DevOps with Kubernetes and VSTS. Part 1: Local History
Last time, I often talk about containers, Docker and Kubernetes. Against this background, colleagues increasingly began to ask about, where are the Microsoft technologists here? To explain, I found several materials, including this set of a couple of articles from Colin Dembovsky. They have everything: Docker, Kubernetes and our technology. I think that for readers of Habra this should also be interesting. So, meet, translation of the first part.

If you read my blog, you know that I am a fan of containers in general and Docker in particular. When was the last time you put software on bare metal? Maybe only on a laptop, but even then the odds are slim. Virtualization has fundamentally changed our attitude to data center resources, significantly increasing their density and efficiency of use. The next step to increase the density of steel containers, only VMs are located on physical servers, and containers - in the VMs themselves. Very soon, most of us will not work not only at the server level, but even at the VM level, all workloads will move into containers. But this is in perspective.
1. Containers for rapid deployment .
2. DevOps with Kubernetes and VSTS. Part 1: Local history.
3. DevOps with Kubernetes and VSTS. Part 2: Cloud history.
4. A node with infinite capacity for Kubernetes.
')
Despite all the advantages of containers in terms of packaging applications, many still do not understand how to run containers in a production environment. Installing one container will be an interesting and inspiring experience for any developer, but how about scaling containers or combining them into a cluster? How will you watch your containers? How to detect and fix failures? Here we smoothly turn to the problem of container orchestration.
In this article, we will look at local development approaches using Kubernetes and minikube. Part 2 focuses on creating CI / CD pipelines for the Kubernetes cluster in Azure.
There are three popular container orchestration systems - Mesos , Kubernetes and Docker Swarm Mode . I will not encourage you to stand under someone's flag (at least for now), conceptually they are all alike. They all use the concept of “configuration as code” to deploy multiple containers to multiple nodes. Kubernetes offers a number of features that, in my opinion, will be a real breakthrough in the field of DevOps: configuration maps (ConfigMaps) , secrets (Secrets) and namespaces (namespaces) .
Without going into details, I would say that namespaces allow you to create different logical environments in a single cluster. As an example, I’ll give you the DEV namespace, where you can run small copies of your PROD environment for testing purposes. Namespaces are also used to implement multi-tenancy or different security contexts. Configuration maps (ConfigMaps) and secrets (Secrets) allow you to store configuration outside of containers, that is, you can run one image in different contexts without embedding specific code for a specific environment into the images themselves.
In this article, I will demonstrate a Kubernetes development approach. In the first part, we will look at the development workflow, and in the second, the DevOps pipeline. Fortunately, thanks to the MiniKube ( Kubernetes single node cluster running on VM) we can work with a full cluster on a laptop! This means that you have the benefits of cluster technology (like ConfigMaps) without connecting to a production cluster.
So, consider the workflow of the developer. It will be something like:
As practice shows, thanks to Visual Studio 2017 (and (or) VS Code), Docker and MiniKube will not meet pitfalls on this path.
Then you go to the DevOps pipeline, starting at its inception. Based on your source files and Dockerfile files, images are created that are registered in the private container registry. Next, you need to transfer the configuration to the Kubernetes cluster in order to launch / deploy new images. Thanks to Azure and VSTS, we will create a DevOps pipeline in just a couple of clicks! But this is the topic of the second part of our article, now we are studying the workflow of the developer.
For the demonstration, I will use Windows, but in Mac or Linux, the settings are similar. To deploy a local development environment, you need to install:
You can use the links and perform the installation. In the process, I ran into a small problem when launching MiniKube on Hyper-V — by default, the MiniKube start command, which creates a VM for MiniKube, connects to the first Hyper-V virtual network found. I had several networks, and the MiniKube connected to the internal one, which led to a crash. I created a new virtual network called minikube in the Hyper-V console and made sure that it is an external network. To create the MiniKube VM, I used the following command:
I had to execute the cd command in order to go to the root directory of c: \, without this, MiniKube could not create a VM.
The external network is connected to my Wi-Fi access point. This means that when I connect to a new network, the VM minikube gets a new IP address. Instead of updating kubeconfig every time, I simply added the host string to my hosts file (on Windows, this is c: \ windows \ system32 \ drivers \ etc \ hosts): kubernetes, where IP is the IP address of the VM minikube obtained using commands minikube ip. To update kubeconfig use the following command:
where <user> is your username; thus, cert points to the ca.crt file created in your .minikube directory.
Now, when you connect to a new network, you simply update the IP address in the hosts file, and the kubectl command will still work. A certificate is generated for a node named kubernetes, so use this name.
If everything works fine, you will get a concise answer to the kubectl get nodes command:
To launch the Kubernetes UI, simply enter the minikube dashboard command. The following window will open in the browser:

Finally, to “reuse” the minikube docker context, run the following command:
This ensures that the minikube docker socket is shared. By running the docker ps command, you will receive information about several working containers, these are the basic Kubernetes system containers. This also means that you can create images here that can be launched by a minikube cluster.
You now have a single node cluster. You can start developing!
Not so long ago, I posted a blog article Developing an Aurelia Project using Azure and VSTS . And since I already had a couple of ready-made .NET Core sites, I decided to try running them in the Kubernetes cluster. Clone this repository and check the docker branch. I added a few files to the repository to provide the ability to create Docker images and specify the Kubernetes configuration. Let's see what it looks like.
The docker-compose.yml file defines a composite application of two images: api and frontend:
The Dockerfile file for each service is as simple as possible: launching from an ASP.NET Core 1.1 image, copying application files to a container, opening port 80 and launching dotnet app.dll (frontend.dll and api.dll for each site) as an entry point for each container:
To prepare for the creation of images, run the dotnet restore, build and publish commands, the projects will be built and published. Now you can proceed to creating images. If there are ready-made images, we can configure the Kubernetes service to launch them in our minikube cluster.
The easiest way to create images is to use Visual Studio. Set up the docker-compose project as your start-up and run it. Images will be created. If you are not working with Visual Studio, create images by executing the following commands from the repository root directory:
Now, after running the docker images command, you will see the minikube containers, as well as the images for the frontend and api:
Now we can specify which services to run in the cluster. In my opinion, one of the advantages of Kubernetes is that you have to declare your environment instead of running the script. Such a declarative model is much better imperative, and now it is spreading more and more thanks to Chef, Puppet and PowerShell DSC. Kubernetes allows us to specify the services to be started, as well as define the methods for their deployment. Various Kubernetes objects can be defined using a simple yaml file. We announce two services: api and frontend. Server services (backend) are usually not available outside the cluster, but in this case our demo code is a one-page application, so the api service must be accessible from the outside.
The list of services will change very rarely, these are services available in the cluster. However, the base containers (in Kubernetes they are called hearths), of which the service consists, will change. They change when upgrading, as well as when scaling. To manage the containers that make up the service, use the Deployment construction. Since the service and the deployment are quite closely related, I put them in one file. That is, we have a file for the frontend service / deployment (k8s / app-demo-frontend-minikube.yml) and a file for the api service / deployment (k8s / app-demo-backend-minikube.yml). If you see fit, you can put service and deployment definitions in separate files. Examine the contents of the app-demo-backend.yml file:
Notes:
The definition of customer service (frontend service) is almost the same, except that it will take a little tinkering to configure. Let's see what it looks like.
Notes:
Now we have several container images and we can run them in the minikube. But before you begin, let's discuss the configuration. If you have heard my speeches or read my blog, then you know that I am one of the main advocates of the “create once, deploy many times” concept. This is the basic principle of proper DevOps. In the case of Kubernetes and containers, the situation is similar.
However, for this you will need to place the configuration outside of your compiled code, that is, you need mechanisms such as configuration files. If you are deploying to IIS or Azure App, you can simply use the web.config file (for DotNet Core this will be appsettings.json) and specify different values for different environments. But how to deal with containers? All application code is in a container, so you cannot use different versions of the configuration file, otherwise you will need different versions of the container itself, that is, the principle of a one-time creation will be violated.
Fortunately, we can use pluggable volumes (container concept) in combination with secrets and / or configMaps (Kubernetes concept). We can specify configMaps (essentially, key-value pairs) or secrets (masked or hidden key-value pairs) in Kubernetes, and then simply mount them by connecting volumes in containers. This is really a powerful tool, since the definition of the hearth remains the same, but if we have another configMap, we get a different configuration! We will see how this works when we deploy to a cloud cluster and use namespaces to isolate the development environment and production environment.
configMaps can also be specified using the "Configuration as Code" method. Here is the configuration of our configMap:
Notes:
I really ran into one problem when mounting the configuration file using configMaps: inside the container, the path /app/www/config/config.json ends with a symbolic link. I saw the idea of using configMap in a container in an excellent article by Anthony Chu, where he describes how to include the application.json file for use in the Startup.cs file.
Obviously, he did not encounter the problem of a symbolic link in the Startup file. However, for my demo client application, I create a configuration file that is used by the SPA application, and since it is on the client side, the configuration file must be provided from the DotNet Core application, simply in the form of html or js. No problems. We already have a call to UseStaticFiles in Startup, so it should just provide the file, right? Unfortunately, this is not the case. Most likely, it will send only the first few bytes from this file.
I spent a couple of days to figure it out. There is a special topic on Github, you can read if you're interested. In short, the length of a symbolic link is not the length of the file itself, but the length of the path to the file. StaticFiles middleware reads FileInfo.Length bytes when a file is requested, but since this length is not equal to the full length of the file, only the first few bytes are returned. I created a FileProvider tool to work around this issue.
To run the newly created services in the minikube, we can simply use kubectl to apply the configurations. Here is a list of commands (highlighted lines):
Now we have a service! You can open the dashboard with the minikube dashboard command and make sure that the status of the services is green:
To connect to customer service, enter http: // kubernetes: 30080 :
The list (value1 and value2) are the values returned by the API service, that is, the client was able to successfully connect to the minikube server service!
After updating your code, you will have to recreate the container (s). After updating the configuration, run the kubectl apply command again to update the configMap. Then, since we do not need high availability in the development environment, we can simply delete the running subnets and let the replication service restart them, but this time with the updated configuration and / or code. Of course, in a production environment such liberties are not allowed, and in the second part I will show you how to perform sequential updates when we work with CI / CD in the Kubernetes cluster.
But in the development environment, I get a list of pods, delete them all, and then watch as Kubernetes magically restarts containers (with new identifiers). As a result, I get updated containers.
Please note that the bog IDs change, as the scoops themselves are already different. If we switch to the client side, we will see the updated code.
I’m really impressed with Kubernetes’s capabilities and how this platform is promoting the concept of “infrastructure as a code”. You can simply deploy a cluster locally on your laptop using minikube and start developing in an environment as close as possible to production, and this is always a good idea. You can use secrets and maps configMaps, similar to those used in production containers. In general, this is an excellent approach to development, allowing you to adhere to best practices from the very beginning.
Ps. We thank Konstantin Kichinsky ( Quantum Quintum ) for the illustration of this article.
If you read my blog, you know that I am a fan of containers in general and Docker in particular. When was the last time you put software on bare metal? Maybe only on a laptop, but even then the odds are slim. Virtualization has fundamentally changed our attitude to data center resources, significantly increasing their density and efficiency of use. The next step to increase the density of steel containers, only VMs are located on physical servers, and containers - in the VMs themselves. Very soon, most of us will not work not only at the server level, but even at the VM level, all workloads will move into containers. But this is in perspective.
A series of articles "We are talking about containers":
1. Containers for rapid deployment .
2. DevOps with Kubernetes and VSTS. Part 1: Local history.
3. DevOps with Kubernetes and VSTS. Part 2: Cloud history.
4. A node with infinite capacity for Kubernetes.
')
Despite all the advantages of containers in terms of packaging applications, many still do not understand how to run containers in a production environment. Installing one container will be an interesting and inspiring experience for any developer, but how about scaling containers or combining them into a cluster? How will you watch your containers? How to detect and fix failures? Here we smoothly turn to the problem of container orchestration.
In this article, we will look at local development approaches using Kubernetes and minikube. Part 2 focuses on creating CI / CD pipelines for the Kubernetes cluster in Azure.
Battlefield - orchestration
There are three popular container orchestration systems - Mesos , Kubernetes and Docker Swarm Mode . I will not encourage you to stand under someone's flag (at least for now), conceptually they are all alike. They all use the concept of “configuration as code” to deploy multiple containers to multiple nodes. Kubernetes offers a number of features that, in my opinion, will be a real breakthrough in the field of DevOps: configuration maps (ConfigMaps) , secrets (Secrets) and namespaces (namespaces) .
Without going into details, I would say that namespaces allow you to create different logical environments in a single cluster. As an example, I’ll give you the DEV namespace, where you can run small copies of your PROD environment for testing purposes. Namespaces are also used to implement multi-tenancy or different security contexts. Configuration maps (ConfigMaps) and secrets (Secrets) allow you to store configuration outside of containers, that is, you can run one image in different contexts without embedding specific code for a specific environment into the images themselves.
Kubernetes Workflow (Workflow) and Pipeline (Pipeline)
In this article, I will demonstrate a Kubernetes development approach. In the first part, we will look at the development workflow, and in the second, the DevOps pipeline. Fortunately, thanks to the MiniKube ( Kubernetes single node cluster running on VM) we can work with a full cluster on a laptop! This means that you have the benefits of cluster technology (like ConfigMaps) without connecting to a production cluster.
So, consider the workflow of the developer. It will be something like:
- Develop the code.
- Create an image based on a Dockerfile file or a batch of files generated using the docker-compose command.
- Start the service in the MiniKube (run the containers from your images).
As practice shows, thanks to Visual Studio 2017 (and (or) VS Code), Docker and MiniKube will not meet pitfalls on this path.
Then you go to the DevOps pipeline, starting at its inception. Based on your source files and Dockerfile files, images are created that are registered in the private container registry. Next, you need to transfer the configuration to the Kubernetes cluster in order to launch / deploy new images. Thanks to Azure and VSTS, we will create a DevOps pipeline in just a couple of clicks! But this is the topic of the second part of our article, now we are studying the workflow of the developer.
Preparing the development environment
For the demonstration, I will use Windows, but in Mac or Linux, the settings are similar. To deploy a local development environment, you need to install:
You can use the links and perform the installation. In the process, I ran into a small problem when launching MiniKube on Hyper-V — by default, the MiniKube start command, which creates a VM for MiniKube, connects to the first Hyper-V virtual network found. I had several networks, and the MiniKube connected to the internal one, which led to a crash. I created a new virtual network called minikube in the Hyper-V console and made sure that it is an external network. To create the MiniKube VM, I used the following command:
c: cd \ minikube start --vm-driver hyperv --hyperv-virtual-switch minikube I had to execute the cd command in order to go to the root directory of c: \, without this, MiniKube could not create a VM.
The external network is connected to my Wi-Fi access point. This means that when I connect to a new network, the VM minikube gets a new IP address. Instead of updating kubeconfig every time, I simply added the host string to my hosts file (on Windows, this is c: \ windows \ system32 \ drivers \ etc \ hosts): kubernetes, where IP is the IP address of the VM minikube obtained using commands minikube ip. To update kubeconfig use the following command:
kubectl config set-cluster minikube --server=https://kubernetes:8443 --certificate-authority=c:/users/<user>/.minikube/ca.crt where <user> is your username; thus, cert points to the ca.crt file created in your .minikube directory.
Now, when you connect to a new network, you simply update the IP address in the hosts file, and the kubectl command will still work. A certificate is generated for a node named kubernetes, so use this name.
If everything works fine, you will get a concise answer to the kubectl get nodes command:
PS:\> kubectl get nodes NAME STATUS AGE VERSION minikube Ready 11m v1.6.4 To launch the Kubernetes UI, simply enter the minikube dashboard command. The following window will open in the browser:
Finally, to “reuse” the minikube docker context, run the following command:
minikube docker-env | Invoke-Expression This ensures that the minikube docker socket is shared. By running the docker ps command, you will receive information about several working containers, these are the basic Kubernetes system containers. This also means that you can create images here that can be launched by a minikube cluster.
You now have a single node cluster. You can start developing!
Go to the code
Not so long ago, I posted a blog article Developing an Aurelia Project using Azure and VSTS . And since I already had a couple of ready-made .NET Core sites, I decided to try running them in the Kubernetes cluster. Clone this repository and check the docker branch. I added a few files to the repository to provide the ability to create Docker images and specify the Kubernetes configuration. Let's see what it looks like.
The docker-compose.yml file defines a composite application of two images: api and frontend:
version: '2' services: api: image: api build: context: ./API dockerfile: Dockerfile frontend: image: frontend build: context: ./frontend dockerfile: Dockerfile The Dockerfile file for each service is as simple as possible: launching from an ASP.NET Core 1.1 image, copying application files to a container, opening port 80 and launching dotnet app.dll (frontend.dll and api.dll for each site) as an entry point for each container:
FROM microsoft/aspnetcore:1.1 ARG source WORKDIR /app EXPOSE 80 COPY ${source:-obj/Docker/publish} . ENTRYPOINT ["dotnet", "API.dll"] To prepare for the creation of images, run the dotnet restore, build and publish commands, the projects will be built and published. Now you can proceed to creating images. If there are ready-made images, we can configure the Kubernetes service to launch them in our minikube cluster.
Creating images
The easiest way to create images is to use Visual Studio. Set up the docker-compose project as your start-up and run it. Images will be created. If you are not working with Visual Studio, create images by executing the following commands from the repository root directory:
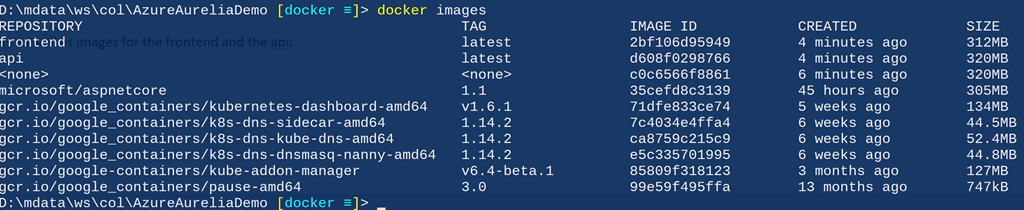
cd API dotnet restore dotnet build dotnet publish -o obj/Docker/publish cd ../frontend dotnet restore dotnet build dotnet publish -o obj/Docker/publish cd .. docker-compose -f docker-compose.yml build Now, after running the docker images command, you will see the minikube containers, as well as the images for the frontend and api:
Service declaration - configuration as code
Now we can specify which services to run in the cluster. In my opinion, one of the advantages of Kubernetes is that you have to declare your environment instead of running the script. Such a declarative model is much better imperative, and now it is spreading more and more thanks to Chef, Puppet and PowerShell DSC. Kubernetes allows us to specify the services to be started, as well as define the methods for their deployment. Various Kubernetes objects can be defined using a simple yaml file. We announce two services: api and frontend. Server services (backend) are usually not available outside the cluster, but in this case our demo code is a one-page application, so the api service must be accessible from the outside.
The list of services will change very rarely, these are services available in the cluster. However, the base containers (in Kubernetes they are called hearths), of which the service consists, will change. They change when upgrading, as well as when scaling. To manage the containers that make up the service, use the Deployment construction. Since the service and the deployment are quite closely related, I put them in one file. That is, we have a file for the frontend service / deployment (k8s / app-demo-frontend-minikube.yml) and a file for the api service / deployment (k8s / app-demo-backend-minikube.yml). If you see fit, you can put service and deployment definitions in separate files. Examine the contents of the app-demo-backend.yml file:
apiVersion: v1 kind: Service metadata: name: demo-backend-service labels: app: demo spec: selector: app: demo tier: backend ports: - protocol: TCP port: 80 nodePort: 30081 type: NodePort --- apiVersion: apps/v1beta1 kind: Deployment metadata: name: demo-backend-deployment spec: replicas: 2 template: metadata: labels: app: demo tier: backend spec: containers: - name: backend image: api ports: - containerPort: 80 imagePullPolicy: Never Notes:
- Lines 1–15 announce the service.
- Line 4 indicates the name of the service.
- Lines 8–10 describe the selector for this service. Any one with app = demo and tier = frontend tags will be used to load balance this service. The service will know how to redirect traffic to its base modules associated with requests for this service that fall into the cluster. This makes it easier to add, delete, and update containers, since all we need to do is change the selector. The service will receive a static IP address, and its base modules will be dynamic addresses, which will change at different stages of the module life cycle. Nevertheless, this process is completely transparent to us, because we will simply send requests to the service, and everything should work.
- Line 14 - we want this service to be available through port 30081 (associated with port 80 on the sub, as indicated in line 13).
- Line 15 - NodePort indicates that we want Kubernetes to provide the service with a port on the same IP address that the cluster uses. For “real” clusters (on cloud service provider resources, such as Azure), we would change this setting to get an IP address from a cloud host.
- In lines 17–34, the Deployment construction is declared, which will ensure the availability of containers (pods) for this service. If it fails, Deployment automatically starts a new one. This design ensures the normal operation of the service.
- Line 22 indicates that we constantly need two instances of the container for this service.
- Lines 26 and 27 are important; they must match the selector labels from the service.
- Line 30 shows the name of the container in the pod (in our case there is only one container in this pod, as we planned).
- Line 31 shows the name of the image being launched - this is the name we specified in the docker-compose file for the backend image.
- In line 33 we open port 80 on this container for the cluster.
- Line 34 indicates that we do not want Kubernetes to retrieve the image, since we are going to create images in the context of minikube docker. In the production cluster, we plan to specify other policies so that the cluster can receive updated images from the container registry (we will see this in the second part).
The definition of customer service (frontend service) is almost the same, except that it will take a little tinkering to configure. Let's see what it looks like.
spec: containers: - name: frontend image: frontend ports: - containerPort: 80 env: - name: "ASPNETCORE_ENVIRONMENT" value: "Production" volumeMounts: - name: config-volume mountPath: /app/wwwroot/config/ imagePullPolicy: Never volumes: - name: config-volume configMap: name: demo-app-frontend-config Notes:
- Line 30: the name of the container in the pod.
- Line 31: Specify the image name for this container, it must match the name in the docker-compose file.
- Lines 34–36: An example of specifying environment variables for a service.
- Lines 37–39: link to mount the volume (shown below) to connect the configuration file, from which Kubernetes finds out where the file should be mounted on the container’s file system. In this case, Kubernetes will mount the volume named config-volume in the following path in the container: / app / wwwroot / config.
- Lines 41–44: they indicate the volume, in our case, the configMap volume for configuration (more on this later). Here we ask Kubernetes to create a volume named config-volume (referenced by the volumeMount container) and use the data from the configMap named demo-app-frontend-config for the volume.
Configuration management
Now we have several container images and we can run them in the minikube. But before you begin, let's discuss the configuration. If you have heard my speeches or read my blog, then you know that I am one of the main advocates of the “create once, deploy many times” concept. This is the basic principle of proper DevOps. In the case of Kubernetes and containers, the situation is similar.
However, for this you will need to place the configuration outside of your compiled code, that is, you need mechanisms such as configuration files. If you are deploying to IIS or Azure App, you can simply use the web.config file (for DotNet Core this will be appsettings.json) and specify different values for different environments. But how to deal with containers? All application code is in a container, so you cannot use different versions of the configuration file, otherwise you will need different versions of the container itself, that is, the principle of a one-time creation will be violated.
Fortunately, we can use pluggable volumes (container concept) in combination with secrets and / or configMaps (Kubernetes concept). We can specify configMaps (essentially, key-value pairs) or secrets (masked or hidden key-value pairs) in Kubernetes, and then simply mount them by connecting volumes in containers. This is really a powerful tool, since the definition of the hearth remains the same, but if we have another configMap, we get a different configuration! We will see how this works when we deploy to a cloud cluster and use namespaces to isolate the development environment and production environment.
configMaps can also be specified using the "Configuration as Code" method. Here is the configuration of our configMap:
apiVersion: v1 kind: ConfigMap metadata: name: demo-app-frontend-config labels: app: demo tier: frontend data: config.json: | { "api": { "baseUri": "http://kubernetes:30081/api" } } Notes:
- Line 2: we specify that the definition is configMap.
- Line 4: the name of this card.
- Line 9: we indicate that this map uses the format file format, and set the file name - config.json.
- Lines 10-14: the contents of the configuration file.
Retreat: the problem of symbolic links to static files
I really ran into one problem when mounting the configuration file using configMaps: inside the container, the path /app/www/config/config.json ends with a symbolic link. I saw the idea of using configMap in a container in an excellent article by Anthony Chu, where he describes how to include the application.json file for use in the Startup.cs file.
Obviously, he did not encounter the problem of a symbolic link in the Startup file. However, for my demo client application, I create a configuration file that is used by the SPA application, and since it is on the client side, the configuration file must be provided from the DotNet Core application, simply in the form of html or js. No problems. We already have a call to UseStaticFiles in Startup, so it should just provide the file, right? Unfortunately, this is not the case. Most likely, it will send only the first few bytes from this file.
I spent a couple of days to figure it out. There is a special topic on Github, you can read if you're interested. In short, the length of a symbolic link is not the length of the file itself, but the length of the path to the file. StaticFiles middleware reads FileInfo.Length bytes when a file is requested, but since this length is not equal to the full length of the file, only the first few bytes are returned. I created a FileProvider tool to work around this issue.
Running Images in Kubernetes
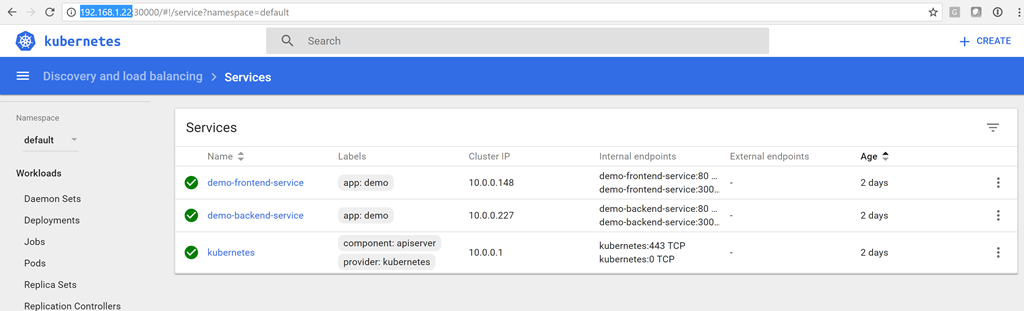
To run the newly created services in the minikube, we can simply use kubectl to apply the configurations. Here is a list of commands (highlighted lines):
PS:\> cd k8s PS:\> kubectl apply -f .\app-demo-frontend-config.yml configmap "demo-app-frontend-config" created PS:\> kubectl apply -f .\app-demo-backend-minikube.yml service "demo-backend-service" created deployment "demo-backend-deployment" created PS:\> kubectl apply -f .\app-demo-frontend-minikube.yml service "demo-frontend-service" created deployment "demo-frontend-deployment" created Now we have a service! You can open the dashboard with the minikube dashboard command and make sure that the status of the services is green:
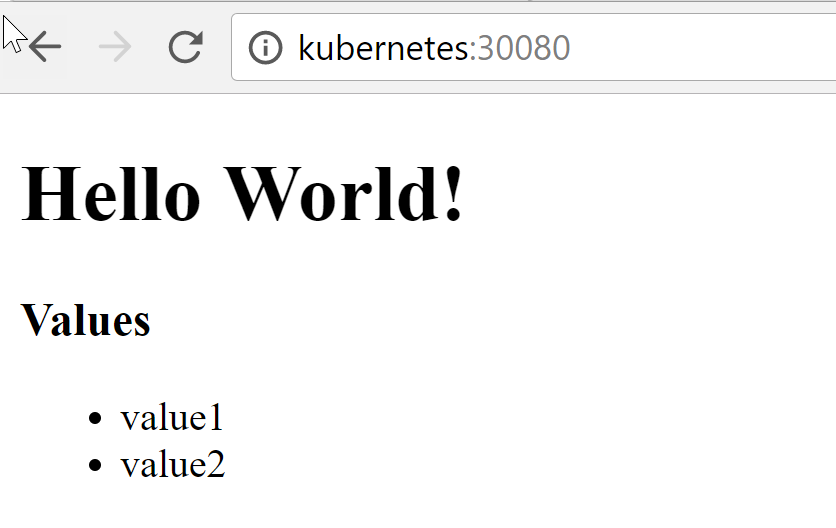
To connect to customer service, enter http: // kubernetes: 30080 :
The list (value1 and value2) are the values returned by the API service, that is, the client was able to successfully connect to the minikube server service!
Container Update
After updating your code, you will have to recreate the container (s). After updating the configuration, run the kubectl apply command again to update the configMap. Then, since we do not need high availability in the development environment, we can simply delete the running subnets and let the replication service restart them, but this time with the updated configuration and / or code. Of course, in a production environment such liberties are not allowed, and in the second part I will show you how to perform sequential updates when we work with CI / CD in the Kubernetes cluster.
But in the development environment, I get a list of pods, delete them all, and then watch as Kubernetes magically restarts containers (with new identifiers). As a result, I get updated containers.
PS:> kubectl get pods NAME READY STATUS RESTARTS AGE demo-backend-deployment-951716883-fhf90 1/1 Running 0 28m demo-backend-deployment-951716883-pw1r2 1/1 Running 0 28m demo-frontend-deployment-477968527-bfzhv 1/1 Running 0 14s demo-frontend-deployment-477968527-q4f9l 1/1 Running 0 24s PS:> kubectl delete pods demo-backend-deployment-951716883-fhf90 demo -backend-deployment-951716883-pw1r2 demo-frontend-deployment-477968527-bfzhv demo-frontend-deployment-477968527-q4f9l pod "demo-backend-deployment-951716883-fhf90" deleted pod "demo-backend-deployment-951716883-pw1r2" deleted pod "demo-frontend-deployment-477968527-bfzhv" deleted pod "demo-frontend-deployment-477968527-q4f9l" deleted PS:> kubectl get pods NAME READY STATUS RESTARTS AGE demo-backend-deployment-951716883-4dsl4 1/1 Running 0 3m demo-backend-deployment-951716883-n6z4f 1/1 Running 0 3m demo-frontend-deployment-477968527-j2scj 1/1 Running 0 3m demo-frontend-deployment-477968527-wh8x0 1/1 Running 0 3m Please note that the bog IDs change, as the scoops themselves are already different. If we switch to the client side, we will see the updated code.
Conclusion
I’m really impressed with Kubernetes’s capabilities and how this platform is promoting the concept of “infrastructure as a code”. You can simply deploy a cluster locally on your laptop using minikube and start developing in an environment as close as possible to production, and this is always a good idea. You can use secrets and maps configMaps, similar to those used in production containers. In general, this is an excellent approach to development, allowing you to adhere to best practices from the very beginning.
Ps. We thank Konstantin Kichinsky ( Quantum Quintum ) for the illustration of this article.
Source: https://habr.com/ru/post/337626/
All Articles