SAMBA File Server Based on Linux CentOS 7

Hi Habr!
After the activity of the Petya encryption company on 06/27/2017, I turned off SMB1 aka CIFS, and received production equipment and network MFPs that do not know how to work on “new” versions of the SMB protocol.
How then to receive data from "old" devices? As practice has shown, a separate “machine” with Windows is not an option; during the attack, in addition to domain “machines”, those not included in the domain also suffered, therefore, and for licensing reasons, I decided to use Linux.
')
Under the cut there is a step-by-step instruction on installing and configuring the SAMBA file server based on CentOS 7:
- Anonymous access
- Authentication and authorization
- Active Directory integration
CentOS 7 installation
The servers are running VMware ESXi, and therefore I installed CentOS 7 1611 on the VM, allocating 1 CPU, 1GB RAM and 3GB HDD.
I do not use LVM, I do not create a SWAP partition, allocate 500MB to the boot partition, and give everything else to the root of the file system. I use ext4 as a file system.
I will not describe the installation process, even if you have never done this, it is not difficult, you will succeed. I assume that you have already installed everything, then you can proceed.
If you are new to Linux, make copies of the original files with configs, use the cp command.
cp /etc/somefile.conf /etc/somefile.conf.bak Getting ip address by DHCP
If for some reason there is no DHCP server on the network, you should raise it. Working with a large number of VMs without DHCP is not convenient.
To force update or get ip address, run the command
dhclient Show ip address
ifconfig nmcli device show Yum
CentOS 7 uses the YUM package manager. Cheat sheet on yum is here .
If the Internet access is organized through a proxy server, add the proxy address to the configuration file /etc/yum.conf , use the vi editor or the following command
echo proxy=http://your.proxy:8888 >> /etc/yum.conf If you use the login and password to access the proxy server, add the following parameters:
proxy_username = yum-user
proxy_password = qwerty
Installing agents on the VM to interact with the host server
VMware ESXi requires open-vm-tools to be installed.
yum install open-vm-tools For Hyper-V, hyperv-daemons
yum install hyperv-daemons Install Updates
It is very important to install all available updates.
yum update Midnight commander
Editing files without a normal editor is not very convenient, and I suggest using mc and mcedit
yum install mc Network configuration
You can use the nmtui utility to configure a static ip address and host name .

The command line list of network adapters can be obtained with the command
nmcli device status The static ip and gateway are defined by the following command, where “ens192” is the name of the network adapter
nmcli connection modify “ens192” ipv4.addresses “192.168.1.100/24 192.168.1.1” FQDN setting
Let the full host name be ls01.fqdn.com , execute the command
hostnamectl set-hostname ls01.fqdn.com Rebooting the name service
systemctl restart systemd-hostnamed You can check the result with the following commands.
hostnamectl status hostname hostname -s hostname -f ipv6
If the ipv6 protocol is not used, it is logical to disable it. To do this, add two parameters to the /etc/sysctl.conf file, run the following commands, or use the mcedit editor
echo net.ipv6.conf.all.disable_ipv6 = 1 >> /etc/sysctl.conf echo net.ipv6.conf.default.disable_ipv6 = 1 >> /etc/sysctl.conf Restart network service
service network restart SELINUX
At this stage, the SELINUX service needs to be disabled, you can check the status of the SELINUX service with the command
sestatus Change the SELINUX value in the / etc / selinux / config file to SELINUX = disabled then restart the server.
reboot I'll be back to SELINUX at the end of the article.
Samba
Installation
yum install samba Add service to auto start
chkconfig smb on Service start and status check
service smb start smbstatus firewallD
By default, CentOS 7 uses the firewallD firewall, the status of the service can be found with the command
firewall-cmd --state For a list of rules and services use
firewall-cmd --list-all firewall-cmd --list-services 
Pay attention to the list of services, if you have disabled the ipv6 protocol, it is also logical to do with dhcpv6-client
firewall-cmd -–permanent -–remove-service=dhcpv6-client Create a rule for SAMBA and reboot
firewall-cmd --permanent --add-service=samba firewall-cmd --reload Anonymous shared resource
Create a folder for the resource / samba / guest
mkdir /samba mkdir /samba/guest Change the owner and assign rights
chown nobody:nobody /samba/guest chmod 777 /samba/guest Editing the SAMBA configuration file /etc/samba/smb.conf
mcedit /etc/samba/smb.conf Change the contents of the original file to the following
[global]Just in case, I specified the minimum version of the SMB protocol = NT1 . If you specify SMB2 or SMB3, clients with Windows XP and below will not be able to access resources.
workgroup = WORKGROUP
security = user
map to guest = bad user
min protocol = NT1
[guest]
path = / samba / guest
guest ok = Yes
writable = Yes
Parameter check and service restart
testparm service smb restart smbstatus Congratulations, you have reached the first level of dedication. The shared resource with anonymous access is configured, it will work for a long time and reliably. But you can and need to adjust a few more things.
Bows
By default, the log files are located in the / var / log / samba folder. If you need to get detailed logs, you must add the log level = 2 or 3 parameter to the [global] section. The default value is 1, the value 0 disables logging.
[global]As you may know, providing access to files is only part of the SAMBA functionality. If the server will only have file resources, the print service is logical to disable. In the [global] section, add the following parameters
log level = 2
[global]
load printers = no
show add printer wizard = no
printcap name = / dev / null
disable spoolss = yes
The SAMBA configuration is in the / etc / samba directory, and the logs in the / var / log / samba directory
It is more convenient for me to keep all the tools at hand, so I mount the directories I need in / samba
Create directories into which everything will be mounted
mkdir /samba/smbconf mkdir /samba/smblogs Editing the config file / etc / fstab , I assume that you know what fstab is responsible for.
mcedit /etc/fstab Add the following lines
/ etc / samba / samba / smbconf none bind 0 0
/ var / log / samba / samba / smblogs none bind 0 0
Mount without rebooting
mount -a Disk connection
Keeping a shared resource on a system disk without a quota is not the best choice. I decided not to get quotas, it is easier for me to connect a separate “physical” disk.
You can use the lsblk command to get the list of devices .
lsblk Creating a partition table on the / dev / sdb disk
parted /dev/sdb mklabel msdos or
parted /dev/sdb mklabel gpt Detailed information about gpt can be read here.
Creating a partition for the entire sdb disk, in the best traditions of the genre, I decided to indent 1MiB at the beginning of the disk.
parted /dev/sdb mkpart primary ext4 1MiB 100% Create an ext4 file system
mkfs.ext4 /dev/sdb1 Editing fstab
mcedit /etc/fstab Add another line
/ dev / sdb1 / samba / guest ext4 defaults 0 0
Mounting
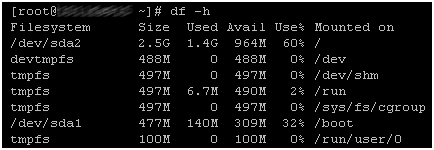
mount –a Check the result
df -h Assignment of rights
chmod 777 /samba/guest Mount Disk Image
If you do not need large amounts, and enough resource size xxx mb, you can mount a disk image from a file.
Create a directory for storing images
mkdir /samba/smbimg Create an image file size of 100 MB
dd if=/dev/zero of=/samba/smbimg/100M.img bs=100 count=1M About the dd command you can read a lot of interesting stuff here.
In the version with the image, I decided not to create a partition table, just create an ext4 file system.
mkfs.ext4 /samba/smbimg/100M.img Editing fstab
mcedit /etc/fstab Config for mounting image
/samba/smbimg/100M.img / samba / guest ext4 defaults 0 0
Mounting
mount -a Check the result
df -h Assignment of rights
chmod 777 /samba/guest RAM disk connection
For temporary resources where a large amount is not needed, I think the RAM disk is the best option, it is very quickly and simply tuned, and the speed of work is amazing.
Editing fstab
mcedit /etc/fstab Config for RAM disk
none / samba / guest tmpfs defaults, size = 100M 0 0
Mounting
mount -a Check the result
df -h Deleting old files
In the case of a file dumper, resources need to be somehow freed up, for this you can use the crontab task scheduler
View assignments
crontab –l Task editing
crontab –e Config example:
SHELL = / bin / bash
PATH = / sbin: / bin: / usr / sbin: / usr / bin
MILTO = ""
HOME = /
# delete files and directories every hour
* 0-23 * * * rm –R / samba / guest / *
# Delete only files older than 1 day, run the command every 10 minutes.
0-59 / 10 * * * * find / samba / guest / * -type f -mtime +1 -exec rm –f {} \;
# delete files older than 50 minutes, run the command every 10 minutes
0-59 / 10 * * * * find / samba / guest / * -type f -mmin +50 -exec rm -f {} \;
Exit vi
<ESC> :wq The crontab service logs are located in the / var / log / cron file
Access restriction to SAMBA by ip addresses
If you need to restrict access to all SAMBA resources, add your access lists in the global section, and if you need to restrict only to a specific resource, in the section of this resource.
Example:
[global]
hosts allow = 192.168.1.100, 192.168.1.101
hosts deny = ALL
[guest]
hosts allow = 192.168.0.0/255.255.0.0
hosts deny = 10. except 10.1.1.1
User authentication and authorization
Restricting access to ip addresses is not always convenient or possible, then you can use logins and passwords.
First you need to create a local user in the system.
adduser user1 If the user will only work with SAMBA resources, there is no need to set a password for the system. The password for the system and for SAMBA are stored in different files and may differ.
Then you need to add the system user to the samba users and set the password for it.
smbpasswd -a user1 By default, the tdb file format located in the / var / lib / samba / private / directory is used to store passwords.
You can change the file location using the global passdb backend parameter.
[global]
passdb backend = tdbsam: /etc/samba/smbpassdb.tdb
tdb files were created to replace the “obsolete” text files, if you want to use text files, for this, use the passdb parameter backend = smbpasswd in the global section
passdb backend = smbpasswd: / etc / samba / smbpasswd
Then specify lists of users and groups for accessing resources.
[guest]
path = / samba / guest
writable = no
read list = user1, @ group2
write list = user2, user3
Active Directory integration
It is also possible to receive information about users from LDAP, but this option is not interesting to me and I immediately turn to AD. Detailed instructions from Microsoft are here .
Time synchronization is very important for AD, so it’s worth starting with.
Install the appropriate service
yum install ntp Add the /etc/ntp.conf file of the server domain controllers to the config
mcedit /etc/ntp.conf Example:
server 192.168.1.10
server 192.168.1.20
server someserver.contoso.com
We add ntp service to automatic start
chkconfig ntpd on We start the service
service ntpd start Checking time synchronization
ntpq –p winbind
To get information about users from AD, you need to install the samba-winbind package
yum install samba-winbind We add service to automatic start
chkconfig winbind on We start the service
service winbind start Adding a host to AD
Let me remind you that at the beginning of this instruction, the host name was set to ls01.fqdn.com . We assume that the full domain name is fqdn.com , and let the short one be fqdn_com
To make all the necessary parameters in the configuration files, you can use the authconfig-tui utility , check the Use Winbind box, then go to the next window
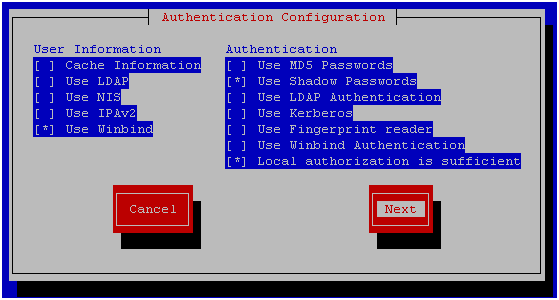
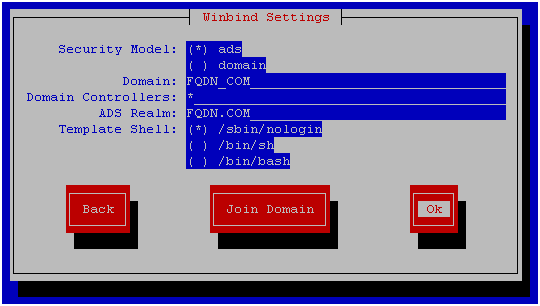
Select the ADS security model and enter your domain names. In the domain controller field, enter “*”, this is necessary to automatically search for an available domain controller. Then click OK and close the utility.
To add a host to AD, use the command net ads join –U% username% , the user must have the rights to create a PC account in the domain
net ads join –U youruser 
If the machine is not added to the domain, add the FQDN of the host name to the / etc / hosts file .
I checked everything several times, and I made changes to the hosts file when I didn’t set the full hostname at the network setup stage.
To remove a host from a domain, use the command net ads leave –U% username%
What does the authconfig-tui utility do?
The utility adds parameters for connecting to AD in the following files, there are not many parameters and, if desired, you can score everything with your hands.
/etc/krb5.conf
[libdefaults]
Default_realm = FQDN.COM
[realms]
FQDN.COM = {
kdc = *
}
/etc/nsswitch.conf
passwd: files sss winbind
shadow: files sss winbind
group: files sss winbind
/etc/samba/smb.conf
[global]
workgroup = FQDN_COM
password server = *
realm = FQDN.COM
security = ads
idmap config *: range = 16777216-33554431
template shell = / sbin / nologin
kerberos method = secrets only
winbind use default domain = false
winbind pffline logon = false
You may have noticed that this utility introduces noticeably fewer parameters than is written in instructions from Microsoft or other instructions, but if it works this way, then why not?
From the Microsoft manual I add the following parameters to the config
[global]
domain master = no
local master = no
preferred master = no
os level = 0
domain logons = no
Setting permissions on a resource
As an example and for clarity, I recommend setting up resources with different rights to the same folder.
[domain users read only]
path = / samba / guest
read list = "@fqdn_com \ domain users"
force create mode = 777
directory mask = 777
[domain users writable]
path = / samba / guest
read list = "@fqdn_com \ domain users"
write list = "@fqdn_com \ domain users"
force create mode = 777
directory mask = 777
Restart samba service
service smb restart Check
smbstatus The screenshot shows a domain user who is in one of the public folders.

THE END
List of useful links:
Fighting viruses and infrastructure, or disabling SMB v1
SambaCry critical vulnerability: how to protect
How to Fix SambaCry Vulnerability (CVE-2017-7494) in Linux Systems
Yum, cheat sheet
Dd command and everything related to it
Using Samba, 2nd Edition
Inclusion of the Ubuntu-based Samba server in the AD domain
Setting Up Samba and Configure Firewalls for Allow File Sharing on Linux / Windows Clients
SELinux - description and features of working with the system. Part 1
SELinux - description and features of working with the system. Part 2
PS
Back to SELINUX, so that the SAMBA server can provide access to any directories, the following commands should be executed.
setsebool -P samba_export_all_ro=1 setsebool -P samba_export_all_rw=1 Unfortunately, I still could not configure winbind when SELINUX is enabled, if you tell me how, I will be grateful.
Source: https://habr.com/ru/post/337556/
All Articles