Learn OpenGL. Part 2.4. - Texture Cards

Earlier we discussed the possibility of each object to have a unique material in order to respond differently to light. This is great for giving each object a unique look relative to other objects in the scene. But this still does not give us much flexibility in customizing the appearance of the object.
- Opengl
- Creating a window
- Hello window
- Hello triangle
- Shaders
- Textures
- Transformations
- Coordinate systems
- Camera
Part 2. Basic lighting
')
Part 3. Loading 3D Models
Part 4. OpenGL advanced features
Texture Cards
In the previous lesson, we defined material for a whole object, but in the real world, objects usually consist of not one, but several materials. Imagine a car: its external case is brilliant; windows partially reflect the environment; the car also has frosted tires, and there are sparkling rims (sparkling if you wash your car well). So, each object has different material properties for each part.
So, our system of materials from the previous lesson is not suitable for more or less complex objects, so we need to expand it by introducing diffuse and specular maps. This will give us the opportunity to influence the diffuse (and, indirectly, the background, as it is almost always the same) and the specular component of the object with greater accuracy.
Diffuse cards
All we need is a way to set a diffuse color for each object fragment. What can affect the color value based on the position of the fragment?
Do you remember? These are textures that we discussed extensively in a previous lesson. Lighting maps are just another name for the same principle: using an image applied to the surface of an object, we can make color samples for each fragment. In scenes with lighting, this is usually referred to as a diffuse map (usually 3D artists call it that way), since the texture image represents all the diffuse colors of an object.
To show diffuse maps, we will use an image of a wooden container with an iron frame:

Using diffuse maps in shaders is very similar to using textures in one of the previous lessons. However, now we will replace the previously defined vec3 vector of the diffuse color with the diffuse sampler2D map .
Keep in mind that
sampler2Dis the so-called opaque data type . This means that we cannot create an instance of this type; we can only define it as uniform . If we try to use this type not as uniform (for example, as a function parameter), then GLSL will produce strange errors. This rule also applies to any structure that contains an opaque type .
We also deleted the ambient vector, since in most cases it coincides with the diffuse color, so we don’t need to keep it separate:
struct Material { sampler2D diffuse; vec3 specular; float shininess; }; ... in vec2 TexCoords; If you are so stubborn and still want to set the background color to be non-diffuse, you can leave the
ambientvector. But the background color will be the same for the entire object. To get different background color values for each object fragment, you need to use a separate texture for the background color values.
Note that we need texture coordinates in the fragment shader again, so we declare an additional input variable. Then we simply sample the texture to extract the diffuse color value of the fragment:
vec3 diffuse = light.diffuse * diff * vec3(texture(material.diffuse, TexCoords)); Also, do not forget to set the background color of the material to be the same as the diffuse one:
vec3 ambient = light.ambient * vec3(texture(material.diffuse, TexCoords)); This is all we need to use a diffuse map. As you can see, this is nothing new, but it gives an impressive increase in visual quality. For this to work, we need to add texture coordinates to the vertex data and transfer them as a vertex attribute to the fragment shader, load the texture and link it to the corresponding texture block.
Updated vertex data can be found here . Now they include vertex positions, normal vectors, and texture coordinates for each vertex of the cube. Let's update the vertex shader so that it can take texture coordinates as a vertex attribute and pass them to the fragment shader:
#version 330 core layout (location = 0) in vec3 aPos; layout (location = 1) in vec3 aNormal; layout (location = 2) in vec2 aTexCoords; ... out vec2 TexCoords; void main() { ... TexCoords = aTexCoords; } Make sure to update the vertex attributes of both VAO ( note the translator: meaning VAO textured cube and VAO cube-lamp ) so that they coincide with the new vertex data, and load the image of the container into the texture. Before drawing the container, we need to assign the preferred texture unit to the material.diffuse variable and associate the texture of the container with it:
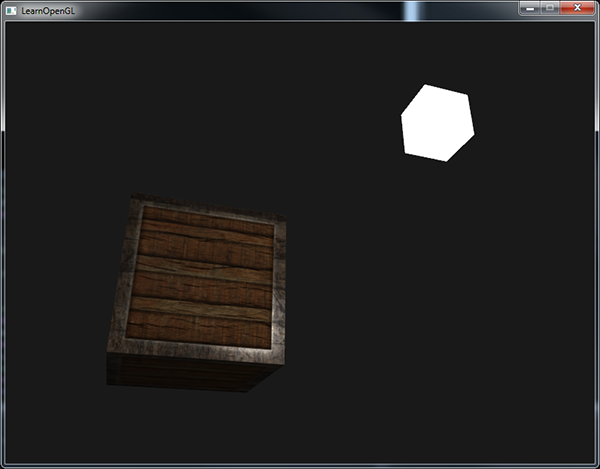
lightingShader.setInt("material.diffuse", 0); ... glActiveTexture(GL_TEXTURE0); glBindTexture(GL_TEXTURE_2D, diffuseMap); Using a diffuse map, we again got a huge increase in detail and now, with added lighting, our container really began to shine (literally). It probably now looks like this:

You can find the full source code of the application here .
Glare cards
You probably noticed that the flare looks a bit strange, because our object is a container, which mostly consists of wood. And, as we know, the tree does not give such a mirror shine. We can fix this by setting the specular vector in the Material structure to be vec3(0.0) , but this means that the iron frame of the container will also stop giving glare, and we know that the metal should , at least shine a little. And again we would like to control which parts of the object should shine and with what force. This problem is very similar to the discussion of diffuse maps. Coincidence? I do not think.
We can again use the texture map, only now for mirror highlights. This means that we need to create a black and white (or color, if you want) texture that determines the brilliance of each part of the object. Here is an example of a glare map :
The intensity of the brightness is determined by the brightness of each pixel of the image. Each pixel of such a card can be represented as a color vector, where black is vec3(0.0) and gray is vec3(0.5) , for example. Then, in the fragment shader, we select the corresponding color value and multiply it by the intensity of the highlight color. Accordingly, the "whiter" the pixel, the greater the result of the multiplication, and, consequently, the brightness of the glare on the object fragment.
Since the container is mostly made of wood, and wood is a material that does not give glare, the entire “wooden” part of the texture is painted black. The black pieces do n't shine at all . The surface of the steel frame of the container has a variable power of specular gloss: the steel itself gives quite intense glares, while cracks and abrasions do not.
Technically, wood also has specular reflections, although with a much lower gloss power (the light is more diffused), but for educational purposes, we pretend that the wood does not react to specular light.
Using tools such as Photoshop or Gimp , it is quite simple to turn a diffuse texture into a glare. Simply cut out some parts, make the image black and white and increase the brightness / contrast.
Sampling of glare maps
The specular reflection map is the most common texture, so its loading code is very similar to the diffuse map loading. Make sure you have loaded the image correctly and generated a texture object. Since we are using a new texture in the same fragment shader, we need to use another texture unit for the highlight map. Let's link this texture with the appropriate texture unit before rendering:
lightingShader.setInt("material.specular", 1); ... glActiveTexture(GL_TEXTURE1); glBindTexture(GL_TEXTURE_2D, specularMap); Then we will update the material properties in the fragment shader so that the reflecting component is taken as sampler2D , not vec3 :
struct Material { sampler2D diffuse; sampler2D specular; float shininess; }; And, finally, we need to sample the glare map in order to get the corresponding flare intensity for each object fragment:
vec3 ambient = light.ambient * vec3(texture(material.diffuse, TexCoords)); vec3 diffuse = light.diffuse * diff * vec3(texture(material.diffuse, TexCoords)); vec3 specular = light.specular * spec * vec3(texture(material.specular, TexCoords)); FragColor = vec4(ambient + diffuse + specular, 1.0); Using the glare map, we can determine with extreme accuracy which parts of the object mirror reflections give and determine their corresponding intensity. Thus, the glare map gives us an additional level of control over the diffuse map.
You can also use colors in the glare map, which determine not only the intensity of the glare, but also its color. However, in reality, the color of the glare largely (and in most cases completely) depends on the light source, therefore the use of color glare maps will not give realistic results (which is why these images are usually black and white - we are only interested in the glare intensity).
If you run the application, you will see that the container material is very similar to a wooden container with an iron frame:
You can find the full source code of the application here .
Using diffuse and specular maps, we can add a huge amount of detail to relatively simple objects. We can add even more details using other texture maps, such as normal / relief maps and / or reflection maps, but we will save them for the next lessons. Show your container to friends and family and remember that one day our container may become even more attractive than it is now!
Exercises
- Try to play with the background, diffuse and glare vectors of the light source and see how they affect the appearance of the object.
- Try to invert the colors of the highlight map in the fragment shader, i.e. the tree should shine, and the iron frame should not (note that the cracks in the frame still mirror, albeit with less intensity): the solution .
- Try to create a glare map from a diffuse map that uses non-black and white colors, and you will see that the result is not very realistic. You can use this color highlight map if you cannot do it yourself. Result .
- You can also try adding an emission map to our cube that stores the luminosity value of each object fragment. Emission values are colors that an object can emit as if it contained a source of light. Thus, the object can be lit regardless of the lighting conditions. Usually glow maps can be seen on those game objects that glow (for example , the robot's eyes or stripes of light on the container ). Add this texture (from creativesam) to our container as a glow card, so that the letters emit light. The decision , the result .
Source: https://habr.com/ru/post/337550/
All Articles