We go to the Internet outside the Russian Federation: (MikroTik <-> Ubuntu) * GRE / IPsec
I will allow myself to publish my experience in using network technologies to the best of my perversity for going online from outside the Russian Federation. Let's not talk about why it is needed. I hope that everything is clear to everyone.
So, we have a static public IP address that comes with an Ethernet cable in the MikroTik RouterBOARD 750G r3 (hEX) . We try to assemble such a construction.
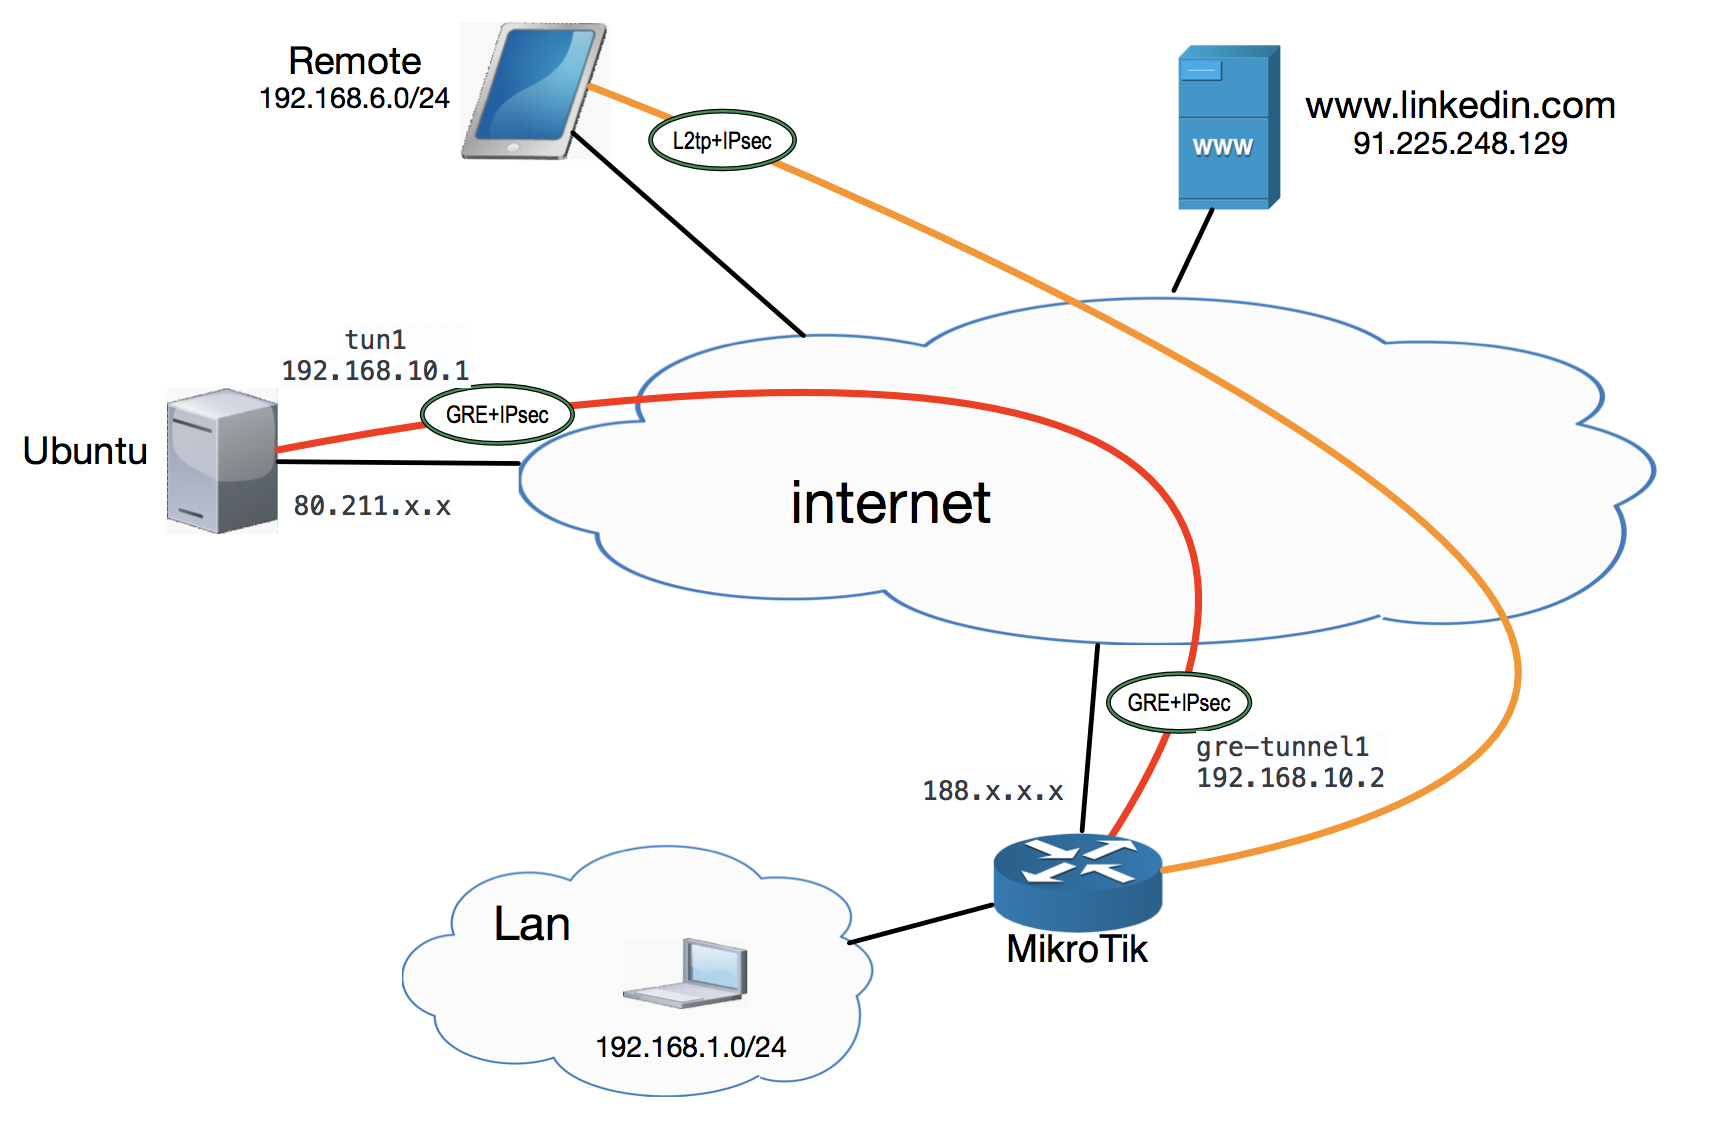
I do not describe the L2tp link setting in this article, but it is drawn on the diagram only because it is mentioned in it.
As you already guessed, we need a system that is included on the Internet outside the Russian Federation. I didn’t want to spend big money on it, and I stopped at Aruba Cloud . Here, for just 1 euro per month, VM is given in the locations Italy, Czech Republic, Germany, France and the United Kingdom. I stopped my choice on the Czech Republic, because ping to our resources was 20ms less than from Italian (50ms vs. 70ms). Ubuntu 16.04 LTS rose very quickly. It was possible to enter it earlier than the “green” status in the “cloud” interface.
')

The server is installed in the minimum configuration. It does not hurt to install traceroute utility.
The choice in favor of the GRE was made for several reasons:
So, on the Ubuntu side, we describe the tun1 interface in / etc / network / interfaces
Everything is simple here:
In the old way I activate this part of the configuration like this:
We have such an interface:
On the MikroTik side, the setup is also simple. I did this from the web interface.

I draw attention to the fact that keepalive is not configured. I never managed to enable the mate on Ubuntu. If there is no traffic, then the interface on MikroTik will “go away” from running and rise only if traffic comes from Ubuntu.
Set the IP address on the tunnel interface on the side of MikroTik 192.168.10.2

At this stage, we must climb the tunnel interfaces on both sides. Check it out is easy. It is enough to run ping c Ubuntu in the direction of MikroTik.
We configure routing in the direction of subscriber networks to the tunnel interface
Private IP addresses of the local network from which Internet access is provided - 192.168.1.0/24. The network 192.168.6.0/24 is a network dedicated to connecting to MikroTik via L2TP from the “outside world”. In order for local network computers and remote devices to work, we add routes to both networks at the end of the / etc / network / interfaces file
Once again we ask the system to update the network settings.
Enable ip_forward
We register SNAT.
For a static external IP, it should work faster than MASQUERADE due to the fact that you do not need to find out the interface IP address each time.
We insist routing on MikroTik
Since I do not have the task to “deploy” all traffic to the Internet through another country, I will only route resources that interest me to the tunnel interface. I chose Linkedin as such a resource.
So, we add routes to MikroTik (via terminalku):
At this point, the coveted resource began to open up at me, and this could be the end, because, despite the fact that GRE traffic is not encrypted and can be clearly seen in Wireshark , not all providers have DPI traffic (and even DPI) Yat, then they don’t exactly look inside the tunnels to track the traffic from the forbidden resources), and the AIC “Revizor” is not interested in what traffic the subscribers actually consume.
For further experiments, I was prompted by the fact that in the GRE settings of the MikroTik interface there is the IPsec Secret option. Is it really that simple?
As a coder on the Ubuntu side, I chose strongSwan . I took the configuration example from the Configure GRE over IPSec secured private channel material, but it did not work right away and I had to make some edits.
Install
We enter this into the main strongSwan configuration file:
Writing a pre-shared-key (PSK) in /etc/ipsec.secrets
Restart strongSwan
This completes the Ubuntu setup. Getting down to setting up MikroTik.
I set up the following default proposal settings

It is time to enter the same PSK in the IPsec Secret field that was specified in /etc/ipsec.secrets on the server (VeryBigSecret).
If everything worked out, then we perform diagnostics at both ends of the tunnel.
MikroTik

If you "fall through" deeper, it should be like this:

Ubuntu
Now GRE (protocol 47) between MikroTik and Ubuntu is encrypted with IPsec (ESP). An analysis of the pcap file taken by tcpdump confirmed this.

It seems that everything works and the coveted resource opens. However, after I sent several more resources to the tunnel, it turned out that not everything is as good as it seemed initially. It was possible to find out that packets of large size ceased to pass (or rather, they ceased to be properly fragmented).
The solution was found quickly. It turned out that it is enough to reduce the MTU to 1435 at both ends of the tunnel.
MikroTik

Ubuntu - add mtu 1435 to the interface description.
Diagnosing an IPsec connection is not trivial. Logs are much easier to read on Ubuntu than on MikroTik. By default, IPsec logging is disabled on MikroTik. It turns on simply, but it is easier to analyze through terminalku.
I managed to achieve a download speed of 25 Mbps and a return of 50 Mbps. In my opinion, this is quite enough for comfortable work with the resource. Why does not accelerate more - this is still a mystery. CPU utilization at both ends of the tunnel is not high. The basic version is the speed limit on the cloud side. Somehow at leisure I chase files between servers without encryption.
UPD 1: iptables settings
Install the netfilter-persistent package
I wrote the rules with commands, and then wrote them down in /etc/iptables/rules.v4 with the command iptables-save> /etc/iptables/rules.v4
In the end, I got this set:
In /etc/rc.local, I added activation of the rules at the start of the machine (I haven’t yet succeeded in doing this in another way).
After rebooting the server, we check that all the rules are in place.
UPD 2: I recommend disabling MikroTik Neighbor discovery on the gre-tunnel1 interface.
If this is not done, then with the above iptables settings, packets on UDP / 5678 will be dropped.
PS: Plans to configure IKEv2 tunnel from my devices (I use Apple technology) directly to the server using certificates. So far I have not managed to do it. Apple devices for some reason do not respond to requests to establish a secure connection from the server. You can, of course, make L2tp, but this is no longer interesting: I already had that experience.
So, we have a static public IP address that comes with an Ethernet cable in the MikroTik RouterBOARD 750G r3 (hEX) . We try to assemble such a construction.
I do not describe the L2tp link setting in this article, but it is drawn on the diagram only because it is mentioned in it.
1. Raise the VPS
As you already guessed, we need a system that is included on the Internet outside the Russian Federation. I didn’t want to spend big money on it, and I stopped at Aruba Cloud . Here, for just 1 euro per month, VM is given in the locations Italy, Czech Republic, Germany, France and the United Kingdom. I stopped my choice on the Czech Republic, because ping to our resources was 20ms less than from Italian (50ms vs. 70ms). Ubuntu 16.04 LTS rose very quickly. It was possible to enter it earlier than the “green” status in the “cloud” interface.
')
The server is installed in the minimum configuration. It does not hurt to install traceroute utility.
$ sudo apt install traceroute 2. Configure GRE between MikroTik and Ubuntu
The choice in favor of the GRE was made for several reasons:
- simple and understandable customizable;
- easy to break;
- routing is nowhere easier;
- elementary draws a graph of the interface load in MikroTik.
So, on the Ubuntu side, we describe the tun1 interface in / etc / network / interfaces
$ sudo cat << EOF >> /etc/network/interfaces iface tun1 inet static address 192.168.10.1 netmask 255.255.255.0 pre-up iptunnel add tun1 mode gre local 80.211.xx remote 188.xxx ttl 255 up ifconfig tun1 multicast pointopoint 192.168.10.2 post-down iptunnel del tun1 EOF Everything is simple here:
- 80.211.xx - VM address with Ubuntu in the Czech Republic;
- 188.xxx - MikroTik external address;
- 192.168.10.1 - address on the tun1 tuni interface on the Ubuntu side;
- 192.168.10.2 - the address of the tunnel interface on MikroTik;
In the old way I activate this part of the configuration like this:
$ sudo service networking restart Received constructive criticism of this method of activating network settings.
We have such an interface:
$ ifconfig tun1 tun1 Link encap:UNSPEC HWaddr 10-D3-29-B2-00-00-B0-8A-00-00-00-00-00-00-00-00 inet addr:192.168.10.1 PtP:192.168.10.2 Mask:255.255.255.255 inet6 addr: fe80::200:5ffa:50d3:c9c2/64 Scope:Link UP POINTOPOINT RUNNING NOARP MULTICAST MTU:1476 Metric:1 RX packets:379 errors:0 dropped:0 overruns:0 frame:0 TX packets:322 errors:4 dropped:7 overruns:0 carrier:0 collisions:0 txqueuelen:1 RX bytes:103387 (103.3 KB) TX bytes:159422 (159.4 KB) On the MikroTik side, the setup is also simple. I did this from the web interface.
I draw attention to the fact that keepalive is not configured. I never managed to enable the mate on Ubuntu. If there is no traffic, then the interface on MikroTik will “go away” from running and rise only if traffic comes from Ubuntu.
Set the IP address on the tunnel interface on the side of MikroTik 192.168.10.2
At this stage, we must climb the tunnel interfaces on both sides. Check it out is easy. It is enough to run ping c Ubuntu in the direction of MikroTik.
$ ping 192.168.10.2 PING 192.168.10.2 (192.168.10.2) 56(84) bytes of data. 64 bytes from 192.168.10.2: icmp_seq=1 ttl=64 time=56.0 ms 64 bytes from 192.168.10.2: icmp_seq=2 ttl=64 time=59.9 ms 64 bytes from 192.168.10.2: icmp_seq=3 ttl=64 time=56.3 ms 64 bytes from 192.168.10.2: icmp_seq=4 ttl=64 time=56.1 ms --- 192.168.10.2 ping statistics --- 4 packets transmitted, 4 received, 0% packet loss, time 3004ms rtt min/avg/max/mdev = 56.091/57.137/59.936/1.618 ms user@vps:~$ We configure routing in the direction of subscriber networks to the tunnel interface
Private IP addresses of the local network from which Internet access is provided - 192.168.1.0/24. The network 192.168.6.0/24 is a network dedicated to connecting to MikroTik via L2TP from the “outside world”. In order for local network computers and remote devices to work, we add routes to both networks at the end of the / etc / network / interfaces file
$ sudo cat << EOF >> /etc/network/interfaces #static route" up ip ro add 192.168.1.0/24 via 192.168.10.2 up ip ro add 192.168.6.0/24 via 192.168.10.2 EOF Once again we ask the system to update the network settings.
$ sudo service networking restart Enable ip_forward
$ sudo echo "net.ipv4.ip_forward = 1" >> /etc/sysctl.conf $ sudo sysctl -p We register SNAT.
For a static external IP, it should work faster than MASQUERADE due to the fact that you do not need to find out the interface IP address each time.
$ sudo iptables -t nat -A POSTROUTING -j SNAT --to-source 80.211.xx -o eth0 We insist routing on MikroTik
Since I do not have the task to “deploy” all traffic to the Internet through another country, I will only route resources that interest me to the tunnel interface. I chose Linkedin as such a resource.
So, we add routes to MikroTik (via terminalku):
/ip route add comment=linkedin distance=1 dst-address=91.225.248.0/22 gateway=gre-tunnel1 add comment=linkedin distance=1 dst-address=108.174.0.0/20 gateway=gre-tunnel1 add comment=linkedin distance=1 dst-address=185.63.144.0/22 gateway=gre-tunnel1 At this point, the coveted resource began to open up at me, and this could be the end, because, despite the fact that GRE traffic is not encrypted and can be clearly seen in Wireshark , not all providers have DPI traffic (and even DPI) Yat, then they don’t exactly look inside the tunnels to track the traffic from the forbidden resources), and the AIC “Revizor” is not interested in what traffic the subscribers actually consume.
For further experiments, I was prompted by the fact that in the GRE settings of the MikroTik interface there is the IPsec Secret option. Is it really that simple?
3. Encrypt the tunnel
As a coder on the Ubuntu side, I chose strongSwan . I took the configuration example from the Configure GRE over IPSec secured private channel material, but it did not work right away and I had to make some edits.
Install
$ apt install strongswan We enter this into the main strongSwan configuration file:
$ cat << EOF > /etc/ipsec.conf # ipsec.conf - strongSwan IPsec configuration file config setup charondebug="ike 2, knl 2, cfg 2, net 2, esp 2, dmn 2, mgr 2" conn %default # keyexchange=ikev2 conn mikrotik # Try connect on daemon start auto=start # Authentication by PSK (see ipsec.secret) authby=secret # Disable compression compress=no # Re-dial setings closeaction=clear dpddelay=30s dpdtimeout=150s dpdaction=restart # ESP Authentication settings (Phase 2) esp=aes128-sha1-modp2048,aes256-sha1-modp2048 # UDP redirects forceencaps=no # IKE Authentication and keyring settings (Phase 1) ike=aes128-sha1-modp2048,aes256-sha1-modp2048 ikelifetime=86400s keyingtries=%forever lifetime=3600s # Internet Key Exchange (IKE) version # Default: Charon - ikev2, Pluto: ikev1 keyexchange=ikev1 # connection type type=transport # Peers left=188.xxx right=80.211.xx # Protocol type. May not work in numeric then need set 'gre' leftprotoport=47 rightprotoport=47 EOF Writing a pre-shared-key (PSK) in /etc/ipsec.secrets
$ echo "80.211.xx 188.xxx : PSK VeryBigSecret" >> /etc/ipsec.secrets Restart strongSwan
$ ipsec restart This completes the Ubuntu setup. Getting down to setting up MikroTik.
I set up the following default proposal settings
It is time to enter the same PSK in the IPsec Secret field that was specified in /etc/ipsec.secrets on the server (VeryBigSecret).
If everything worked out, then we perform diagnostics at both ends of the tunnel.
MikroTik
If you "fall through" deeper, it should be like this:
Ubuntu
$ ipsec status Security Associations (1 up, 0 connecting): mikrotik[2]: ESTABLISHED 60 minutes ago, 80.211.xx[80.211.xx]...188.xxx[188.xxx] mikrotik{2}: INSTALLED, TRANSPORT, reqid 1, ESP SPIs: cc075de3_i 07620dfa_o mikrotik{2}: 80.211.xx/32[gre] === 188.xxx/32[gre] Now GRE (protocol 47) between MikroTik and Ubuntu is encrypted with IPsec (ESP). An analysis of the pcap file taken by tcpdump confirmed this.
It seems that everything works and the coveted resource opens. However, after I sent several more resources to the tunnel, it turned out that not everything is as good as it seemed initially. It was possible to find out that packets of large size ceased to pass (or rather, they ceased to be properly fragmented).
The solution was found quickly. It turned out that it is enough to reduce the MTU to 1435 at both ends of the tunnel.
MikroTik
Ubuntu - add mtu 1435 to the interface description.
auto tun1 iface tun1 inet static address 192.168.10.1 netmask 255.255.255.0 pre-up iptunnel add tun1 mode gre local 80.211.xx remote 188.xxx ttl 255 up ifconfig tun1 multicast pointopoint 192.168.10.2 mtu 1435 post-down iptunnel del tun1 Diagnosing an IPsec connection is not trivial. Logs are much easier to read on Ubuntu than on MikroTik. By default, IPsec logging is disabled on MikroTik. It turns on simply, but it is easier to analyze through terminalku.
I managed to achieve a download speed of 25 Mbps and a return of 50 Mbps. In my opinion, this is quite enough for comfortable work with the resource. Why does not accelerate more - this is still a mystery. CPU utilization at both ends of the tunnel is not high. The basic version is the speed limit on the cloud side. Somehow at leisure I chase files between servers without encryption.
UPD 1: iptables settings
Install the netfilter-persistent package
$ sudo apt install netfilter-persistent I wrote the rules with commands, and then wrote them down in /etc/iptables/rules.v4 with the command iptables-save> /etc/iptables/rules.v4
In the end, I got this set:
$ cat /etc/iptables/rules.v4 # Generated by iptables-save v1.6.0 on Thu Sep 14 20:36:19 2017 *nat :PREROUTING ACCEPT [17:3042] :INPUT ACCEPT [2:92] :OUTPUT ACCEPT [0:0] :POSTROUTING ACCEPT [0:0] -A POSTROUTING -o eth0 -j SNAT --to-source 80.211.xx COMMIT # Completed on Thu Sep 14 20:36:19 2017 # Generated by iptables-save v1.6.0 on Thu Sep 14 20:36:19 2017 *filter :INPUT DROP [29:4527] :FORWARD DROP [0:0] :OUTPUT ACCEPT [0:0] -A INPUT -i lo -j ACCEPT -A INPUT -p icmp -j ACCEPT # TCP/4022 - ssh ( , port-scan-) # !!! ssh , -A INPUT -p tcp -m tcp --dport 4022 -j ACCEPT -A INPUT -p udp -m udp --dport 500 -j ACCEPT -A INPUT -p gre -j ACCEPT -A INPUT -p esp -j ACCEPT # Forwarding -A FORWARD -j ACCEPT COMMIT # Completed on Thu Sep 14 20:36:19 2017 In /etc/rc.local, I added activation of the rules at the start of the machine (I haven’t yet succeeded in doing this in another way).
$ echo "iptables-restore < /etc/iptables/rules.v4" >> /etc/rc.local After rebooting the server, we check that all the rules are in place.
$ iptables -L -n -v Chain INPUT (policy DROP 185 packets, 28847 bytes) pkts bytes target prot opt in out source destination 4 344 ACCEPT all -- lo * 0.0.0.0/0 0.0.0.0/0 32 896 ACCEPT icmp -- * * 0.0.0.0/0 0.0.0.0/0 948 66063 ACCEPT tcp -- * * 0.0.0.0/0 0.0.0.0/0 tcp dpt:3022 172 21504 ACCEPT udp -- * * 0.0.0.0/0 0.0.0.0/0 udp dpt:500 2864 454K ACCEPT 47 -- * * 0.0.0.0/0 0.0.0.0/0 2864 582K ACCEPT esp -- * * 0.0.0.0/0 0.0.0.0/0 Chain FORWARD (policy DROP 0 packets, 0 bytes) pkts bytes target prot opt in out source destination 4572 3303K ACCEPT all -- * * 0.0.0.0/0 0.0.0.0/0 Chain OUTPUT (policy ACCEPT 1820 packets, 2974K bytes) pkts bytes target prot opt in out source destination 4797 6544K ACCEPT all -- * * 0.0.0.0/0 0.0.0.0/0 state RELATED,ESTABLISHED UPD 2: I recommend disabling MikroTik Neighbor discovery on the gre-tunnel1 interface.
If this is not done, then with the above iptables settings, packets on UDP / 5678 will be dropped.
Sep 15 19:25:33 vps kernel: [42049.805599] IN=tun1 OUT= MAC= SRC=192.168.10.2 DST=255.255.255.255 LEN=133 TOS=0x00 PREC=0x00 TTL=64 ID=0 DF PROTO=UDP SPT=36233 DPT=5678 LEN=113 PS: Plans to configure IKEv2 tunnel from my devices (I use Apple technology) directly to the server using certificates. So far I have not managed to do it. Apple devices for some reason do not respond to requests to establish a secure connection from the server. You can, of course, make L2tp, but this is no longer interesting: I already had that experience.
Source: https://habr.com/ru/post/337426/
All Articles