BeagleBone: support for 7 '' BB-View display on the new linux-4.4 core
The new linux-4.4 kernel rewrote the mechanism of working with deviceTree. Now they are no longer compiled with the kernel, but are supplied as a separate repository. Last time when I tried to start a Chinese 4-inch WaveShare display, there were no adequate manuals. The most I could find is the source of the module for the old kernel (linux-3.8.13). Having spent a week, I still collected my core, which I do not part with.
But time is changing, everything has long since been switched to Debian 8.7, but I haven’t found how to connect the BB-VIEW display on the new kernel.
Installing Debian 8.7 on BeagleBone
- Downloading a fresh image from the official site .
- Now, even under Linux, there is a handy utility for uploading a file system image to an SD card. You no longer need to copy to the console via dd , being afraid to make a mistake and wipe the contents of the hard disk. Fill the SD card through Etcher .
- Insert the SD card into the BB and wait for the download
How to find BeagleBone online
There are several standard ways to connect to the console BeagleBone
- SSH over Ethernet
- UART through the debug-connector on the board (you need to buy a converter USB-> UART)
- We stick Biglbon into the USB port, install the drivers and create a second subnet 192.168.7.0 on our computer, in which our BeagleBOne will be.
Personally, it's easier for me to stick Biglbon into the router and communicate with it over the network. Only one problem: how to find out his address?
To do this, there is the nmap utility, which scans all live computers on your local network.
Scan the network:
nmap -p 22 192.168.1.1/24
nmap -p 22 192.168.1.1/24
Do not forget to fix it on your subnet (for example, 192.168.0.1, if you have a zero subnet).
And ... knock on every aipishnik found:
ssh debian@192.168.1.178
One of them is sure to respond with a greeting.
Debian update
Probably it is obvious, but just in case I will write.
sudo apt-get update
sudo apt-get upgrade
It is likely that during this operation you may not have enough free space on the SD card. No problem. Turn off Beaglebon, insert the SD card into the computer, and then use gparted to simply increase the size of the corresponding section (the main thing is not to change the beginning of the section).
Where to get display drivers
The easiest way is to install overlays from the debian repository.
Update the package with overlays:
sudo apt update ; sudo apt install bb-cape-overlays
Update the package with overlays:
If it does not help, then we can compile from source
In general, the overlay repository is now located at .
But! The creators of BeagleBone have already thought of everything for you, and the already cloned repository is located on the SD card of your BeagleBone at: /opt/source/bb.org-overlays
We go there.
Update driver sources to latest version:
git pull origin master
Update the DTC compiler:
./dtc-overlay.sh
We assemble and install * .dtbo drivers:
./install.sh
At this stage, a new initrd image should be assembled, including assembled drivers.
How to enable the required * .dtbo driver
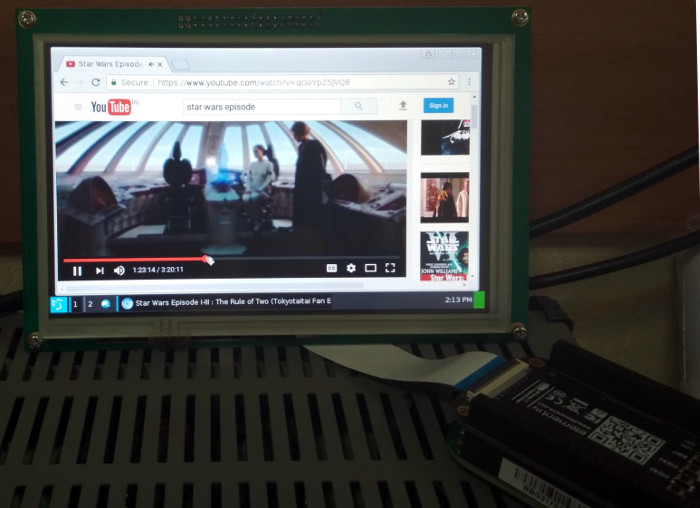
Consider the example of a 7-inch BB-VIEW display.
We edit the file / boot / uEnv.txt (do not forget sudo, because the owner of the root file)
And insert the following lines (near the end):
cape_disable=bone_capemgr.disable_partno=BB-GREEN-HDMI

cape_enable=bone_capemgr.enable_partno=BB-VIEW-LCD7-01
The first line prohibits the download of the HDMI driver. Since BB-VIEW conflicts on the legs with HDMI. The second line loads the corresponding module.
Reboot and check.
Typical problems
After a reboot after some time, all the lights go out and the device turns off
Not enough power. Most likely, the BeagleBone is turned off when the backlight turns on. It is recommended to use USB charging with a current of at least 2A with the display. In addition to charging, the USB cable is also important. A bad cable reduces the current and voltage at the bigleon input. It is best to take short and thick cables.
How to change the screen resolution and wrong colors
A picture of the Debian desktop appears, but flattened and halfway through the screen. How to change the resolution?
We edit the file /etc/X11/xorg.conf. We find there the Section Section "Screen" , and in it the DefaultDepth parameter. We set the value to 24. Save, reboot. Should work!
Conclusion
Everything turned out to be easier than it seemed. I did not even have to rebuild the kernel. Still, life is changing for the better!
Links / Sources
- Latest Debian builds for BeagleBone
- Repository with overlays . There are instructions for use.
- Instructions for connecting the display to the old kernel
')
Source: https://habr.com/ru/post/337226/
All Articles