Getting rid of the RecyclerView.Adapter routine with DataBinding
RecyclerView is the main UI element of almost any application. Writing adapters and ViewHolders is often too routine work and contains enough boilerplate code. In this article I want to show how using DataBinding and the MVVM pattern, you can write an abstract adapter and completely forget about ViewHolders, inflate, manual binding and other routines.
Viewholder
We are all accustomed to writing a separate ViewHolder for each type of cells in the table to store references to individual views and data binding.
We can say that DataBinding generates on the fly the code that you usually write in ViewHolder'ah, so there is no need for them, and we can easily use one implementation that stores the object of the ready binding:
abstract class ViewModelAdapter : RecyclerView.Adapter<ViewModelAdapter.ViewHolder>() { class ViewHolder(view: View) : RecyclerView.ViewHolder(view) { val binding = DataBindingUtil.bind<ViewDataBinding>(view) } } ViewDataBinding is the base abstract class for all generated DataBinding classes, and although we pass it as a template parameter to the bind method, DataBindingUtil itself understands which layout we use and which implementation we end up using.
ViewModelAdapter
Having dealt with the ViewHolder, you need to decide what we want from our basic adapter in the end. All I need from the adapter within the MVVM architecture is to give a list of objects (ViewModels), say what markup I want to use for the data in this list of classes and don’t worry at all about the logic required for this.
DataBinding takes on the logic of data binding, but this is a completely different article, of which there is already enough of it on the Internet.
Let's write the logic for configuring our adapter:
abstract class ViewModelAdapter : RecyclerView.Adapter<ViewModelAdapter.ViewHolder>() { data class CellInfo(val layoutId: Int, val bindingId: Int) protected val items = LinkedList<Any>() private val cellMap = Hashtable<Class<out Any>, CellInfo>() protected fun cell(clazz: Class<out Any>, @LayoutRes layoutId: Int, bindingId: Int) { cellMap[clazz] = CellInfo(layoutId, bindingId) } protected fun getCellInfo(viewModel: Any): CellInfo { cellMap.entries .filter { it.key == viewModel.javaClass } .first { return it.value } throw Exception("Cell info for class ${viewModel.javaClass.name} not found.") } } For each class of table objects we will store a pair of layoutId and bindingId.
- layoutId - as is clear from the name and annotation @LayoutRes is the corresponding cell markup.
- bindingId is the generated variable identifier used in the corresponding markup. We need it in order to bind the table object to the previously written ViewHolder, or rather to the ViewDataBinding.
It only remains to implement the abstract functions of the RecyclerView.Adapter:
abstract class ViewModelAdapter : RecyclerView.Adapter<ViewModelAdapter.ViewHolder>() { override fun getItemCount(): Int = items.size override fun getItemViewType(position: Int): Int { return getCellInfo(items[position]).layoutId } override fun onCreateViewHolder(parent: ViewGroup?, viewType: Int): ViewHolder { val inflater = LayoutInflater.from(parent?.context) val view = inflater.inflate(viewType, parent, false) return ViewHolder(view) } override fun onBindViewHolder(holder: ViewHolder?, position: Int) { if (holder != null) { val cellInfo = getCellInfo(items[position]) if (cellInfo.bindingId != 0) holder.binding.setVariable(cellInfo.bindingId, items[position]) } } } - getItemViewType - since layoutId is unique for different cells, we can easily use it as a viewType.
- onCreateViewHolder - don't forget that viewType is our layoutId.
- onBindViewHolder - all that is required to bind object data to markup - tell the DataBinding that the cell now has a new object, it will take over the rest of the logic.
This is where the entire basic logic of the ViewModelAdapter is described, but one problem remains - the handling of cell clicks. Usually this logic is described in Activity, but I don’t like to translate logic up the hierarchy, if you can’t do without it, so I’ll implement it directly in the adapter, but you can implement it where it suits you.
To implement the processing of clicks, we add to the ViewModelAdapter such a thing as sharedObject, an object that will be bound to all table cells (not necessary if it does not find a variable with this bindingID in the markup, nothing falls).
abstract class ViewModelAdapter : RecyclerView.Adapter<ViewModelAdapter.ViewHolder>() { private val sharedObjects = Hashtable<Int, Any>() protected fun sharedObject(sharedObject: Any, bindingId: Int) { sharedObjects[bindingId] = sharedObject } override fun onCreateViewHolder(parent: ViewGroup?, viewType: Int): ViewHolder { val inflater = LayoutInflater.from(parent?.context) val view = inflater.inflate(viewType, parent, false) val viewHolder = ViewHolder(view) sharedObjects.forEach { viewHolder.binding.setVariable(it.key, it.value) } return viewHolder } } Now consider how it all works in the end:
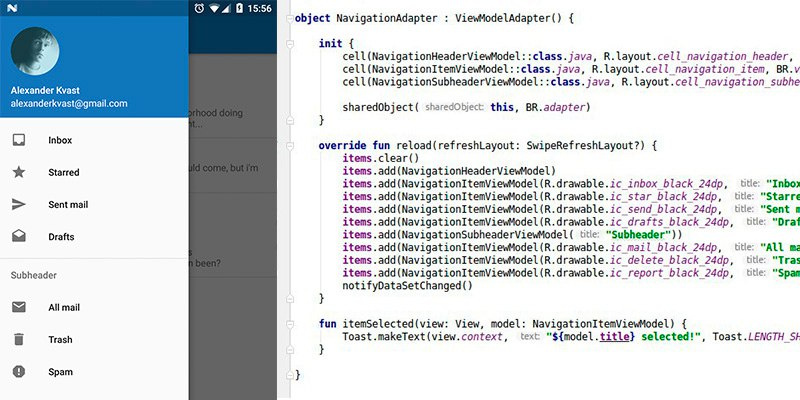
As an example, I implemented an adapter for the side menu (use the NavigationView from the standard library if you do not need to move away from Material Design).
object NavigationAdapter : ViewModelAdapter() { init { cell(NavigationHeaderViewModel::class.java, R.layout.cell_navigation_header, BR.vm) cell(NavigationItemViewModel::class.java, R.layout.cell_navigation_item, BR.vm) cell(NavigationSubheaderViewModel::class.java, R.layout.cell_navigation_subheader, BR.vm) sharedObject(this, BR.adapter) } override fun reload(refreshLayout: SwipeRefreshLayout?) { items.clear() items.add(NavigationHeaderViewModel) items.add(NavigationItemViewModel(R.drawable.ic_inbox_black_24dp, "Inbox")) items.add(NavigationItemViewModel(R.drawable.ic_star_black_24dp, "Starred")) items.add(NavigationItemViewModel(R.drawable.ic_send_black_24dp, "Sent mail")) items.add(NavigationItemViewModel(R.drawable.ic_drafts_black_24dp, "Drafts")) items.add(NavigationSubheaderViewModel("Subheader")) items.add(NavigationItemViewModel(R.drawable.ic_mail_black_24dp, "All mail")) items.add(NavigationItemViewModel(R.drawable.ic_delete_black_24dp, "Trash")) items.add(NavigationItemViewModel(R.drawable.ic_report_black_24dp, "Spam")) notifyDataSetChanged() } fun itemSelected(view: View, model: NavigationItemViewModel) { Toast.makeText(view.context, "${model.title} selected!", Toast.LENGTH_SHORT).show() } } And as an example of layout: cell_navigation_item.xml
<?xml version="1.0" encoding="utf-8"?> <layout xmlns:android="http://schemas.android.com/apk/res/android" xmlns:tools="http://schemas.android.com/tools"> <data> <variable name="vm" type="com.github.akvast.mvvm.ui.vm.NavigationItemViewModel" /> <variable name="adapter" type="com.github.akvast.mvvm.ui.adapter.NavigationAdapter" /> </data> <FrameLayout android:layout_width="match_parent" android:layout_height="wrap_content" android:background="?attr/selectableItemBackground" android:onClick="@{v -> adapter.itemSelected(v, vm)}"> <ImageView android:layout_width="24dp" android:layout_height="24dp" android:layout_gravity="center_vertical" android:layout_marginLeft="16dp" android:src="@{vm.icon}" android:tint="@{@color/grey_600}" /> <TextView style="@style/TextAppearance.AppCompat.Body2" android:layout_width="match_parent" android:layout_height="wrap_content" android:gravity="center_vertical" android:minHeight="48dp" android:paddingBottom="12dp" android:paddingLeft="72dp" android:paddingRight="16dp" android:paddingTop="12dp" android:text="@{vm.title}" tools:text="Item title" /> </FrameLayout> </layout> As you can see everything is quite simple, there is no superfluous logic. We can declare as many types of cells as possible by calling 1 function. We can forget about manual data binding for UI.
This adapter successfully passes combat tests for six months in several large projects.
I am pleased to answer your questions in the comments.
useful links
→ Full code and example project on GitHub
→ ViewModelAdapter written in Java
→ Official DataBinding Documentation
→ Configure the use of DataBinding and other libraries in Kotlin
')
Source: https://habr.com/ru/post/337110/
All Articles