Securing Network Security in the Kubernetes Cluster
 Network Policies is a new Kubernetes functionality that, through the creation of firewalls, allows you to configure network interaction between groups of hoops and other network nodes. In this guide, I will try to explain features not described in the official Kubernetes network policy documentation.
Network policy functionality has stabilized in Kubernetes 1.7. In this article, their work is explained in theory and in practice. If you wish, you can go directly to the repository with examples of kubernetes-networkpolicy-tutorial or to the documentation .
What can you do with network policies
In the Kubernetes cluster, the traffic between the subfields is not limited by default. This means that pods can easily connect to each other, and there are no firewalls inside the cluster that could prevent them.
Network policies allow declaratively determine which pods to whom they can connect. When configuring policies, it is possible to drill them down to namespaces or more precisely, denoting the ports for which the selected policies will operate.
Currently, traffic originating from hearths cannot be controlled in this way. This functionality is planned in Kubernetes 1.8.
At the same time, an open source project called Istio is a good alternative with support for outbound filtering, as well as many other features, including native support for Kubernetes.
What are good network policies
Network Policies has been another name for IT access control lists (ACLs) for more than a decade. With the Kubernetes cluster, access control lists for pods are configured with their help. Like all other resources in the Kubernetes cluster, network policies are configured using declarative manifests. They are part of the application, located in its repository and deployed to Kubernetes along with the application.
Network policies are applied in near real time. If there are open connections between the sub, applying a new policy prohibiting such connections will lead to their immediate rupture. However, for such efficiency you have to pay a small loss of performance. See more details and benchmark results in this article .
Examples of using
Below are some common examples of the use of network policies by Kubernetes. Additional examples and corresponding manifests can be found on GitHub: kubernetes-networkpolicy-tutorial .
Deny all traffic to the application (DENY)
This policy will cause a drop (drop) of all traffic to the application pods selected using the Pod Selector.
Usage scenarios:
- You want to run under, but prevent others from interacting with it.
- You want to temporarily isolate traffic to the service from other platforms.

Example
Run nginx under the tags app=web and env=prod , and also open its 80th port:
kubectl run web --image=nginx --labels app=web,env=prod --expose --port 80 Run a temporary one and run a request to the web service:
$ kubectl run --rm -i -t --image=alpine test-$RANDOM -- sh / # wget -qO- http://web <!DOCTYPE html> <html> <head> ... Works! Now, save the following manifest to the web-deny-all.yaml and apply it to the cluster:
kind: NetworkPolicy apiVersion: networking.k8s.io/v1 metadata: name: web-deny-all spec: podSelector: matchLabels: app: web env: prod $ kubectl apply -f web-deny-all.yaml networkpolicy "access-nginx" created Check
Run the container again and try to make a request to the web service:
$ kubectl run --rm -i -t --image=alpine test-$RANDOM -- sh / # wget -qO- --timeout=2 http://web wget: download timed out Traffic is blocked!
Remarks
In the above manifest to achieve the desired, we assigned to submit special tags app=web,env=prod . However, this file lacks the spec.ingress field. Therefore, all traffic is denied.
If you create another network policy that will allow some users to access the application directly or indirectly, the first network policy will expire.
If there is at least one network policy with rules permitting traffic, this traffic will follow the allowed route, regardless of the existence of prohibitory rules.
Cleaning
kubectl delete deploy web kubectl delete service web kubectl delete networkpolicy web-deny-all Limit traffic to the application (LIMIT)
You can create a network policy that restricts traffic only from certain hearths.
Usage scenarios:
Providing access to the service only to those microservices that need it.
Providing access to the database only to applications using it.

Example
Suppose that in our application there is a REST API server with tags app=bookstore and role=api :
kubectl run apiserver --image=nginx --labels app=bookstore,role=api --expose --port 80 Save the following network policy to the api-allow.yaml . It only allows access to other sites (for example, other microservices) with the app=bookstore tag:
kind: NetworkPolicy apiVersion: networking.k8s.io/v1 metadata: name: api-allow spec: podSelector: matchLabels: app: bookstore role: api ingress: - from: - podSelector: matchLabels: app: bookstore $ kubectl apply -f api-allow.yaml networkpolicy "api-allow" created Check
Let's make sure that we give access without access to the app=bookstore tag:
$ kubectl run test-$RANDOM --rm -i -t --image=alpine -- sh / # wget -qO- --timeout=2 http://apiserver wget: download timed out Traffic is blocked!
And now let's check that traffic is allowed from the pods labeled app=bookstore :
$ kubectl run test-$RANDOM --rm -i -t --image=alpine --labels app=bookstore,role=frontend -- sh / # wget -qO- --timeout=2 http://apiserver <!DOCTYPE html> <html><head> Traffic is allowed.
Cleaning
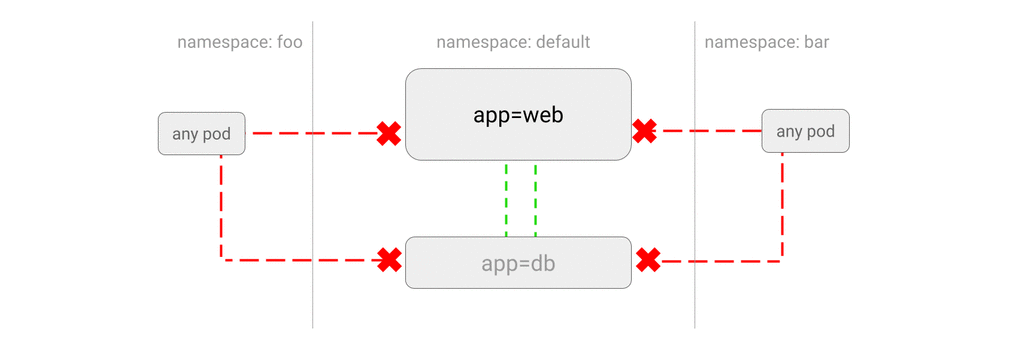
kubectl delete deployment apiserver kubectl delete service apiserver kubectl delete networkpolicy api-allow Prohibition (DENY) of all unlisted traffic in the current namespace
Usage scenario
This is a very important policy that blocks all traffic between the slots, with the exception of being whitelisted using another policy.
kube-system applying the appropriate manifest in all namespaces in which the workload is deployed (but not in the kube-system ).
With this policy, you can configure the "deny all" access type (default "deny all"). Thus, it is possible to clearly determine which components depend on other components, and implement network policies on which to build dependency graphs between components.

Manifesto
kind: NetworkPolicy apiVersion: networking.k8s.io/v1 metadata: name: default-deny-all namespace: default spec: podSelector: matchLabels: A few notes:
namespace— by default, apply this policy in thedefaultnamespace.matchLabels- not filled, it means compliance with all submit. Thus, the policy will be applied to all subsets in the specified namespace.ingressrules are not defined, so traffic going to selected (all) slots will be rejected.
Save this manifest to the default-deny-all.yaml and apply the policy:
$ kubectl apply -f default-deny-all.yaml networkpolicy "default-deny-all" created Cleaning
kubectl delete networkpolicy default-deny-all Ban (DENY) all traffic from other namespaces
(also known as LIMIT - restricting traffic to the current namespace)
You can configure network policies to block all traffic from other namespaces, while allowing local traffic within the namespace in which it is located.
Usage scenarios
- You do not want applications from the
testnamespace to accidentally direct any traffic to services or databases in theprodnamespace. - You have different client applications in different namespaces, and you want to isolate them from each other.
Example
Create a new namespace called secondary and start the web service:
kubectl create namespace secondary kubectl run web --namespace secondary --image=nginx \ --labels=app=web --expose --port 80 Save the following manifest to web-deny-other-namespaces.yaml and apply it to the cluster:
kind: NetworkPolicy apiVersion: networking.k8s.io/v1 metadata: namespace: secondary name: web-deny-other-namespaces spec: podSelector: matchLabels: ingress: - from: - podSelector: {} $ kubectl apply web-deny-other-namespaces.yaml networkpolicy "web-deny-other-namespaces" created" A few notes about the manifest:
namespace: secondarywill cause the manifest to be applied in thesecondarynamespace;- the policy will be applied to all subsets in the
secondarynamespace, sincespec.podSelector.matchLabelsdoes not contain values, thus selecting all subsets; - allowed traffic from all subs in the
secondarynamespace, sincespec.ingress.from.podSelectordoes not contain values, which also means compliance with all subsets.
Check
Request this web service from the default namespace:
$ kubectl run test-$RANDOM --namespace=default --rm -i -t --image=alpine -- sh / # wget -qO- --timeout=2 http://web.secondary wget: download timed out Traffic from the default namespace is blocked!
At the same time, any user from the secondary namespace will get:
$ kubectl run test-$RANDOM --namespace=secondary --rm -i -t --image=alpine -- sh / # wget -qO- --timeout=2 http://web.secondary <!DOCTYPE html> <html> Cleaning
kubectl delete deployment web -n secondary kubectl delete service web -n secondary kubectl delete networkpolicy web-deny-other-namespaces -n secondary kubectl delete namespace secondary Allow (ALLOW) of any traffic from the namespace
This policy is similar to allowing traffic from all namespaces , while it allows you to select a specific namespace.
Usage scenarios:
- Limiting traffic to a production-database in such a way that it is allowed only from namespaces in which production-applications are deployed.
- Deploy monitoring tools that are allowed to collect the metrics of the current namespace in a specially created separate namespace.

Example
Start the web server in the default namespace:
kubectl run web --image=nginx \ --labels=app=web --expose --port 80 Now suppose you have these namespaces:
default- created by Kubernetes, your API is deployed here;prod- other production-services are deployed here; it has the labelpurpose=prod;devis the dev / test environment; it is labeledpurpose=testing.
Create prod and dev namespaces:
kubectl create namespace dev kubectl label namespace/dev purpose=testing kubectl create namespace prod kubectl label namespace/prod purpose=production The following manifest will only allow traffic from pods that are in the namespace with the label purpose=production . Save it to web-allow-prod.yaml and apply to the cluster:
kind: NetworkPolicy apiVersion: networking.k8s.io/v1 metadata: name: web-allow-prod spec: podSelector: matchLabels: app: web ingress: - from: - namespaceSelector: matchLabels: purpose: production $ kubectl apply -f web-allow-prod.yaml networkpolicy "web-allow-prod" created Check
Make a request to the web server from the dev namespace, make sure that traffic is blocked:
$ kubectl run test-$RANDOM --namespace=dev --rm -i -t --image=alpine -- sh If you don't see a command prompt, try pressing enter. / # wget -qO- --timeout=2 http://web.default wget: download timed out ( ) Now make a request from the prod namespace, make sure the request passes:
$ kubectl run test-$RANDOM --namespace=prod --rm -i -t --image=alpine -- sh If you don't see a command prompt, try pressing enter. / # wget -qO- --timeout=2 http://web.default <!DOCTYPE html> <html> <head> ... ( ) Cleaning
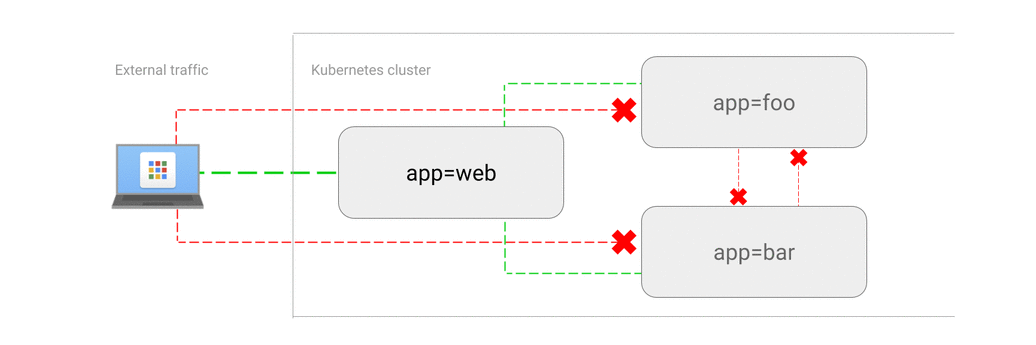
kubectl delete networkpolicy web-allow-prod kubectl delete deployment web kubectl delete service web kubectl delete namespace {prod,dev} Allow (ALLOW) traffic from external clients
This network policy allows external clients to access the store via a load balancer or directly from the Internet.
Usage scenarios:
- You need to configure access to the feeds directly from the Internet, while prohibiting all traffic that is not whitelisted .
Example
Launch and open its 80th port for access from the Internet via a load balancer:
kubectl run web --image=nginx \ --labels=app=web --port 80 kubectl expose deployment/web --type=LoadBalancer Wait for the EXTERNAL-IP to kubectl get service in the output of the kubectl get service . Open http://[EXTERNAL-IP] in the browser and make sure that you have access to the resource.
The following manifest allows traffic from any sources (both within the cluster and from external sources). Save it to the web-allow-external.yaml file and apply to the cluster:
kind: NetworkPolicy apiVersion: networking.k8s.io/v1 metadata: name: web-allow-external spec: podSelector: matchLabels: app: web ingress: - from: [] $ kubectl apply -f web-allow-external.yaml networkpolicy "web-allow-external" created Open http://[EXTERNAL-IP] in the browser again and make sure it still works.
Remarks
This manifest defines one ingress-rule for hearths with the tag app=web . Since specific podSelector or namespaceSelector not specified, traffic from any sources, including external ones, will be transmitted.
To allow access from the outside only to port 80, use the following ingress-rule:
ingress: - ports: - port: 80 from: [] Cleaning
kubectl delete deployment web kubectl delete service web kubectl delete networkpolicy web-allow-external How network policies are applied
Network policies are not basic Kubernetes functionality. And although you can send a NetworkPolicy object to the Kubernetes wizard, the policy will not work if the corresponding functionality is not implemented in the network plugin.
Examples of network plugins that support network policies can be found on this page . Network policies are also supported by Calico and Weave Net plugins.
In Google Container Engine (GKE) network policy support is implemented in the initial stage (alpha) by pre-installing the Calico network plugin.
Network policies are applied to connections, not network packets. Note that connections imply bidirectional transfer of network packets. For example, if under A can connect to hearth B, under B can respond hearth A within the current connection. However, this does not mean that under B can initiate a connection with the hearth A.
Anatomy of NetworkPolicy
NetworkPolicy is one of the Kubernetes API objects. Many such objects can be created in a cluster. NetworkPolicy has two main components:
- Targeted pods are pods whose ingress network connections should be subject to the appropriate policies. These pods are selected by tags.
- Incoming rules determine which plots can connect to target plots. They are also selected by label or by namespace.
Here is a concrete example of the NetworkPolicy manifest:
kind: NetworkPolicy apiVersion: networking.k8s.io/v1 metadata: name: api-allow spec: podSelector: matchLabels: app: bookstore role: api ingress: - from: - podSelector: matchLabels: app: bookstore - from: - podSelector: matchLabels: app: inventory In this policy, with tags app=bookstore or app=inventory , you are allowed to connect to sites with tags app=bookstore or role=api . It can be voiced in the following way: "Provide bookstore applications with access to the bookstore API to microservices."
How network policies work
Despite the fact that project documentation and network policy API help are very difficult to understand, I managed to highlight a few simple rules:
- If selected under NetworkPolicy, the traffic intended for this will be limited.
- If the pod does not have a NetworkPolicy object defined, all pods from all namespaces can connect to this pod. That is, if the network policy is not defined for a specific pod, the default is implicitly implying the behavior of “allow all”.
- If traffic to A is limited and B must connect to it, you need to create a NetworkPolicy object, which is selected under A, and there is an ingress rule in which it is selected under B.
The matter becomes more complicated when it is necessary to configure the network interaction between different namespaces. In a nutshell, it works like this:
- Network policies only affect network connections for those subnets that are in the same namespace with NetworkPolicy.
- In the ingress-rule
podSelectoryou can select only pods from the same namespace in which the NetworkPolicy object is deployed. - If hearth A needs to connect to a hearth B in a different namespace and network connections to hearth B are limited by network policy, under A must be selected in the
namespaceSelectorfield of the network policy under fire B.
How safe are network policies?
Network policies restrict network communication between the sub and are an important part of ensuring traffic and application security in the Kubernetes cluster. However, unlike firewalls, deep packet inspection is not performed within network policies.
In order to ensure the security of traffic between the sub-clusters in the cluster, you should not rely only on network policies. I also recommend looking at such methods as TLS (transport layer security) with mutual authentication, which allows you to encrypt traffic and perform authentication when interacting with microservices.
Take a look at Google Cloud Security Whitepaper (highlighted by me):
Defense in depth describes the many layers of the security system that protects the Google network from outside attacks. Passage is allowed only to authorized services and protocols that meet our security requirements. Everything else is discarded automatically. Industrial-grade firewalls and access control lists (ACLs) are used to separate networks. All traffic is directed through specially configured GFE servers (Google Front End), which allows you to detect and stop malicious requests and DDoS attacks. Also GFE-servers are allowed to interact only with internal servers that are in a special list. Such a “default by default” policy allows preventing access from GFE servers to those resources that they do not need. [...]
When transmitted over the Internet and internal networks, data becomes vulnerable and unauthorized access can be made to them. [...] The Google Front End (GFE) servers support strong encryption protocols such as TLS , which allows you to secure connections between client devices and Google web services.
The projects mentioned earlier by me related to service grids (service mesh), such as Istio and linkerd , promise qualitative improvements in this area. For example, Istio can encrypt traffic between microservices using TLS and apply network policies transparently, without the need to change the application code.
Additional Information
If you want to try network policies in action, the easiest place to start is to create a GKE cluster . You can also read the following:
- Network policy documentation ;
- Network Policy Design document - the purpose of network policy functionality is described here, but their implementation is not reflected in sufficient detail;
- Network Policy API reference ;
- NetworkPolicy benchmark from Romana network plugin.
Thanks to Matthew DeLio and Daniel Nardo for checking drafts of this article.
References:
- Original: Securing Kubernetes Cluster Networking .
')
Source: https://habr.com/ru/post/337088/
All Articles