Color in interface design: instructions for use
How to create a clean interface using just one color? You will learn from this article. Translation " I love FE ".
Being basically a self-taught designer, I was always wondering why so many articles and websites talk about color theory and color palettes. In my experience, the likelihood of making a beautiful design using a “split-complimentary palette” tends to zero.
I have a different opinion on this: the theory of color is useless .
But if color theory is not a solid basis for choosing color in interface design, then what is it?
Here is my answer: color modification . It's all a matter of small color changes, not their choice from the color wheel.
In other words: the basic skill in imparting color to the interface design is the ability to modify one primary color in many different variations .
I know it sounds a little weird. But listen to me, I will give you practical instructions for adapting colors in your design.
You are ready? Then let's go.
This manual will allow you to:
- modify one primary color for almost any purpose in your design (this is a very powerful tool, and we will see how it is used by the same Facebook),
- predict which color changes will look good
- to create less “subjective” palettes (“subjective” usually means “I have not figured out how it works”, and it is this word that designers most often say when they talk about color).
Darker and lighter tones
One thing that I have noticed on many beautiful interfaces is that they often use darker and lighter variations of the same primary color.
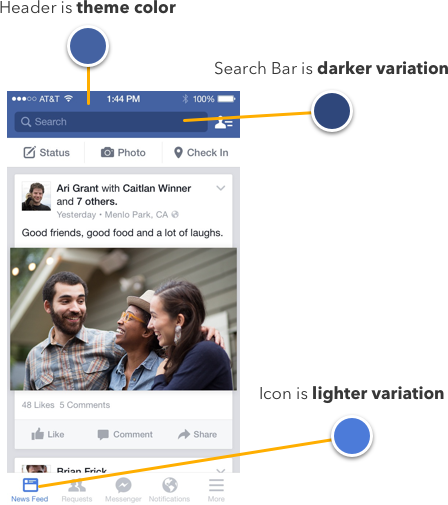
You did not think that the color of the search string is just a translucent black layer? Spoiler: no, it's not him. No transparency or the imposition of black on blue will give you that color. This is a variation of the primary color, which was obtained in some magical way.
Look at the Swell Grid, a beautiful surfer app:
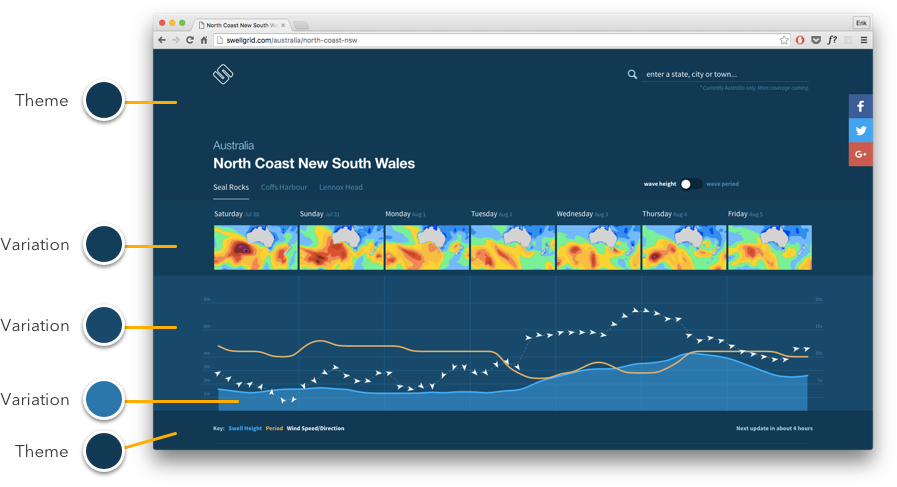
Ta-dam! Here is a whole car of variations! How many? Do it yourself. Almost any color on this page is a variation of the main blue.
Here is another simple example:

Color variations can even be used for different element states. This is not a “palette of three blues”; it is one blue with several variations.
This begs the question: how can you practically modify the color to get good variations ?
We will come to this before, but I want you to understand two basic principles from the very beginning:
- We will look for examples in real life . Despite the fact that our interfaces are not real, we still very often copy real life. Because for decades we have become accustomed to seeing things in the real world, and we have a certain expectation about how light and color should work.
- We will use the HSB color model . Because it is the most intuitive color model with a wide range of applications (for our purposes - in Photoshop and Sketch). If you do not know what color hue, saturation and brightness are, let's stop and meet in 10 minutes.
Variations of color in real life
Look around you. What color variations do you see a couple of dozen times, looking around your room?
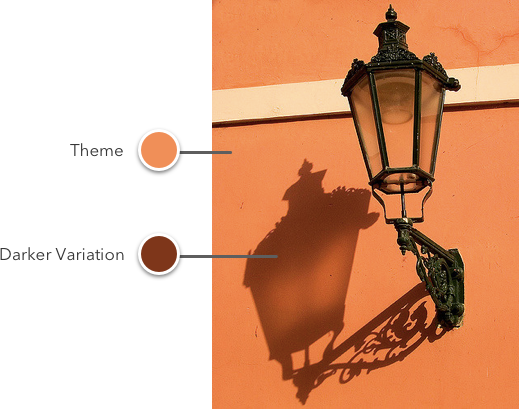
Shadows .
You can look at the shadows as a darker variation of the primary color.
Are you still with me?
Then let's go to Sketch and use the color dropper to find out exactly what happens when a shadow falls on a coral wall.
As I said, we’ll find out using the HSB color model.
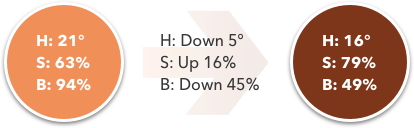
Brightness has become less - well, it was quite obvious. But wait, before we move on to the generalizations, let's look at another example.
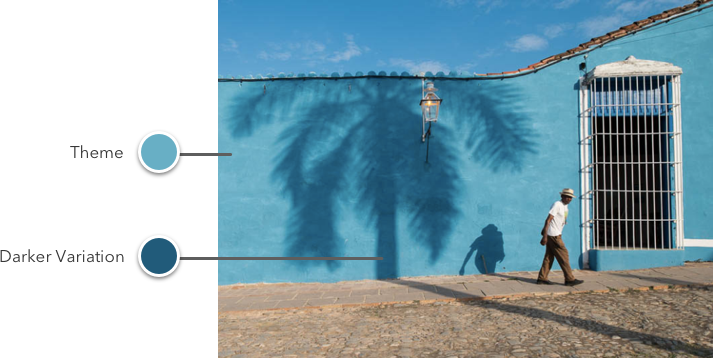
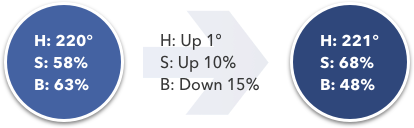
Shadows in Cuba behave the same? We will find out soon.

Great, you can already see the similarities and differences.
When you see a shadow or a darker variation in color, you can expect the brightness to decrease, and the saturation to increase. We looked at only two examples, but as far as I could see in my whole life, this is a firm rule that you can follow .
With color everything is a bit more complicated - it has decreased for the coral wall and increased for the sea green color wall. There is an explanation for this, but it is less important and more esoteric than brightness / saturation, so we will return to it later.
rules
Let's look at these principles in more detail.
Darker variations = saturation above + brightness below
If you go back to our example with the Facebook search string, you’ll see that this is what is happening there.
Saturation increased, while brightness became less. The reason why the color of the search bar could not be obtained by superimposing a translucent black layer on the base blue color is because adding black to the HSB color model is equivalent to dimming . But we needed to reduce the brightness at the same time increasing the saturation . Black does not add any saturation to color.
Why in real life are darker colors associated with greater saturation? I don't have the slightest idea. But I can always think of something, for example, the more intense the light (brightness), the more blurry the color (saturation) becomes, and vice versa .
Perhaps this is complete nonsense, but, as it seems to me, there is something in it, isn't it?
Lighter variations = saturation lower + brightness higher
Now, being able and erudite readers, you probably guessed that the reverse transformation will give us the opposite result.
And you are absolutely right.
Of course, we can go even further. If we reduce saturation and increase brightness until the cows return from pasture, what will happen?
It:
We will get white color.
You can think of lighter variations as adding white . And in Sketch there are two easy ways to add white color:
- Reduce the transparency of the element (if it is on a white background).
- Add a translucent white layer on top of the element.
The Most Important Thing
If you remember only one of this article, remember this:
Darker color variations are obtained by reducing the brightness and increasing the saturation. Lighter variations - by increasing the brightness and reducing saturation.
Knowing this simple idea, you can do amazing things with just one color.
The truth is that the multitude of colors between elements — or different states of the same element — are just variations of the same color.
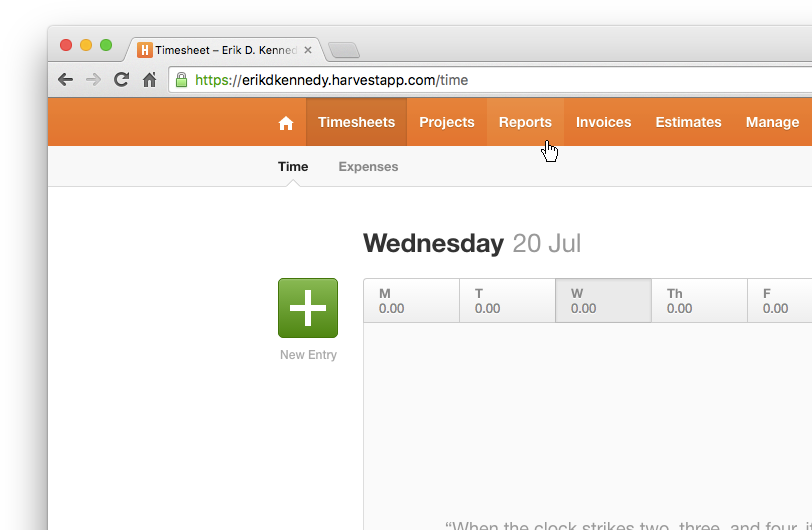
Here, for example, Harvest, a time tracking application that I use and love.
Look at the menu, in the hover state it is lighter, in the selected state it is darker.
Or look at the green button to add a new entry.
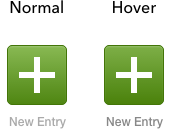
For the hover state, a darker color variation is used - saturation is higher, brightness is lower.
You will use it again and again .
To be honest, this rule is not always 100% used in design. In the previous example from the Harvest menu, the active state is only a reduced brightness (the saturation did not change), and the hover state is only a reduced saturation (the brightness did not change). But we looked at how color works in real life, and we know that the design will look good if it comes close to the principles outlined here.
What about color?
Speaking of approaching principles, we need to deal with color. I have already said, but you can repeat it again: the color plays a secondary role in the bundle brightness-and-saturation-must-move-in-opposite-directions . Therefore you can not pay attention to it at all, creating variations.
However, here is the shortest explanation.
First of all, each color has a “perceived brightness”. Or luminosity .
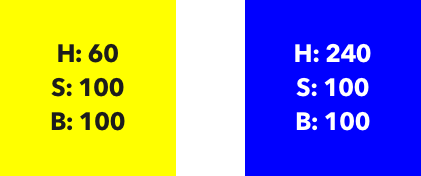
Although this yellow and this blue on HSB have a brightness of 100%, which of these colors looks brighter?
I mean, ask anyone on the street: which one is brighter ?
“Um ... Yellow. Yellow?"
Thanks, buddy. You just learned what color luminosity is.
"I'm right?"
Yes you are right. Even if the brightness and saturation are at the same level, the colors will differ in intensity or luminance, which is measured from 0 to 100.
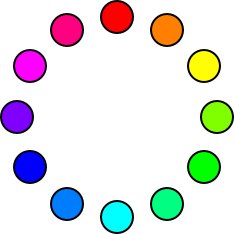
Here are our colors with an interval of 30 ° with brightness and saturation equal to 100%.

And these are the same colors in the Luminosity overlay mode (on a white background, which is very important if you are trying to repeat this in Sketch) with the gray color that was summarized. This makes it possible to measure the luminosity of the original color.
In the Luminosity blend mode, light gray means high luminosity, dark gray means low. If you think for a minute, it is quite logical.
I typed these numbers for you, but the graph is worth a thousand numbers, isn't it?

Look, Sherlock, there's a pattern here.
And this pattern answers the question we asked at the very beginning. Remember how the color of the shadow sometimes went up and sometimes down? Why did he do it?
Well, did you notice that there are three lower points and three upper ones on the chart? The low points are red, green and blue. Tops are cyan, magenta and yellow.
Does it remind you of anything? That's right, RGB and CMY are popular color models, but forget about them now, otherwise it will only confuse you.
The most important thing is that if you do not pay attention to the saturation and brightness, then changing the color to red (0 °), green (120 °) or blue (240 °) will reduce its luminosity. And the change in color to yellow (60 °), magenta (180 °) or blue (300 °), on the contrary, will increase.
The trick is to combine the color change with a movement of saturation and brightness . If you need darker variations, move the color towards red (0 °), green (120 °) or blue (240 °), depending on which one is closer to the original color, and vice versa - towards yellow ( 60 °), magenta (180 °) or cyan (300 °), if you want to get lighter variations. (Naturally it is implied that you simultaneously change the brightness and saturation.)
That is why the color of the shadow on the coral wall went down - closer to the red (0 °), which is the closest lowest point to 21 °.
And that is why the color of the shadow on the sea-green wall went up - closer to the blue (240 °), which is the closest lowest point to 194 °.
I have not made you a brain?
Color properties
So, if you need to pick colors, just ask yourself what do you need, darker or lighter color variations that you already have? (If you want your design to look simple and clean, then most often this will be enough.)
Darker variations :
- brightness decreases,
- saturation increases
- the color moves towards the nearest low point (red, green or blue).
Lighter variations :
- brightness increases
- saturation decreases
- the color moves towards the nearest top point (cyan, magenta, or yellow).
This will allow you to take one color and change it infinitely for any of your interface design needs, using its darker and lighter variations where necessary.
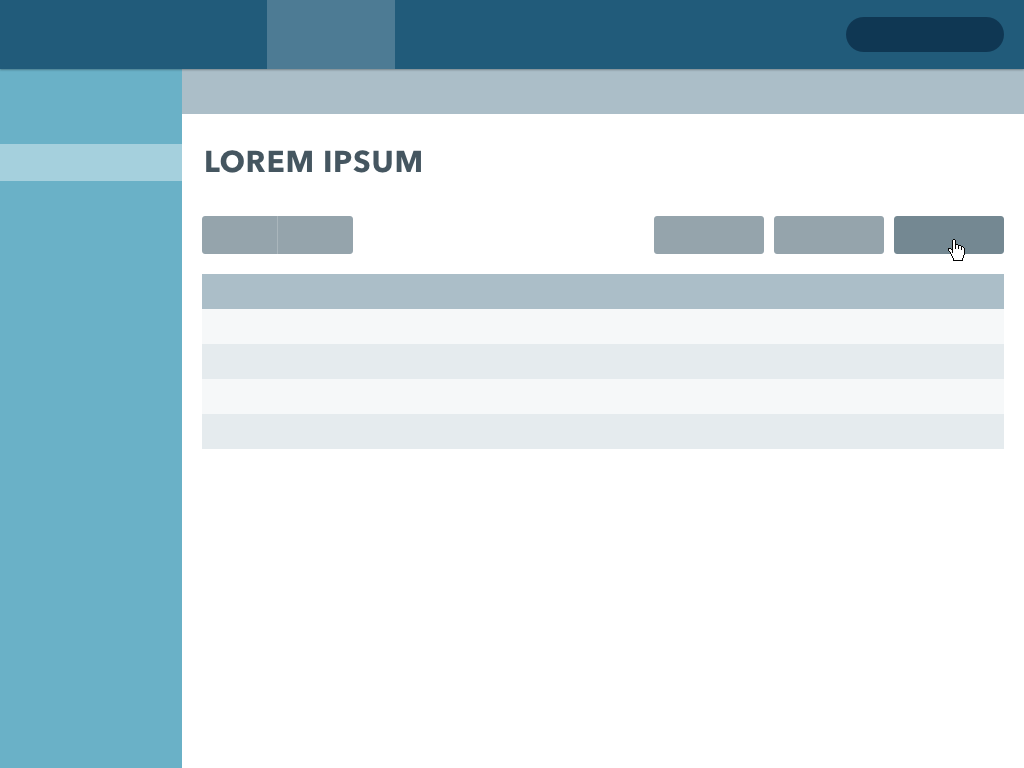
I have sketched a quick example here. The entire interface was built using one single color.
This is not all that can be said about color. We still have a lot of questions, but this is a topic for a separate article.
')
Source: https://habr.com/ru/post/337060/
All Articles