We write GraphQL API server on Yii2 with a client on Polymer + Apollo. Part 3. Mutations
Part 1. Server
Part 2. Client
Part 3. Mutations
Part 4. Validation. findings
Sometimes, when developing an API, it happens that it is necessary not only to receive data, but also to make certain changes. It is for this purpose that there exists what in GraphQL is called the strange word "mutation" .
Server
Having played enough with the client part, let's go back to our server and add a few mutations. For mutations, we need to have a separate entry point from query (MutationType), and the functionality itself is implemented through the parameters of the args and resolve fields.
Question: Can I implement mutations through the fields of the query section? Good question. The fact is that hypothetically this is possible, but architecturally wrong. And the Apollo library loves to do a root query, i.e. having the whole structure, asks for everything that is possible. Why does she do this, I do not know, but presumably, if you put methods like delete () in a query, you can accidentally lose valuable things.
Step 1. Create the necessary types.
/schema/mutations/UserMutationType.php:
<?php namespace app\schema\mutations; use GraphQL\Type\Definition\ObjectType; use GraphQL\Type\Definition\Type; use app\models\User; class UserMutationType extends ObjectType { public function __construct() { $config = [ 'fields' => function() { return [ // // // User 'update' => [ // // 2 - // - / // User. // // , // 'type' => Type::boolean(), 'description' => 'Update user data.', 'args' => [ // , // User. // // , 'firstname' => Type::string(), 'lastname' => Type::string(), 'status' => Type::int(), ], 'resolve' => function(User $user, $args) { // , // .. : // , // , $user->setAttributes($args); return $user->save(); } ], ]; } ]; parent::__construct($config); } } Council Try to make your resolve () functions as low as possible. As you can see, GraphQL allows you to do this to the maximum. Carry as much as possible all the logic in the model. The schema and API is only a link between the client and the server. This principle applies not only to GraphQL, but to any server architecture.
Similar to /schema/mutations/AddressMutationType.php:
<?php namespace app\schema\mutations; use GraphQL\Type\Definition\ObjectType; use GraphQL\Type\Definition\Type; use app\models\Address; use app\schema\Types; class AddressMutationType extends ObjectType { public function __construct() { $config = [ 'fields' => function() { return [ 'update' => [ 'type' => Type::boolean(), 'description' => 'Update address.', 'args' => [ 'street' => Type::string(), 'zip' => Type::string(), 'status' => Type::int(), ], 'resolve' => function(Address $address, $args) { $address->setAttributes($args); return $address->save(); }, ], // // user, // // , 'user' => [ 'type' => Types::userMutation(), 'description' => 'Edit user directly from his address', // relove // , ? 'resolve' => function(Address $address) { // ! // // (, - // , GraphQL, // , // User, , // - ) return $address->user; } ], ]; } ]; parent::__construct($config); } } During the development of your server, be careful not to use the mutation for sampling, or query to change the data, because there is no hard binding, as such.
Well, the root type: /schema/MutationType.php:
<?php namespace app\schema; use GraphQL\Type\Definition\ObjectType; use GraphQL\Type\Definition\Type; use app\models\User; use app\models\Address; class MutationType extends ObjectType { public function __construct() { $config = [ 'fields' => function() { return [ 'user' => [ 'type' => Types::userMutation(), 'args' => [ 'id' => Type::nonNull(Type::int()), ], 'resolve' => function($root, $args) { return User::find()->where($args)->one(); }, ], 'address' => [ 'type' => Types::addressMutation(), 'args' => [ 'id' => Type::nonNull(Type::int()), ], 'resolve' => function($root, $args) { return Address::find()->where($args)->one(); }, ], ]; } ]; parent::__construct($config); } } Step 2. Add the created Types.php types
If you noticed, in the last step we already used custom types from Types, although we have not yet created them. This is what we are doing now.
... // .. // use app\schema\mutations\UserMutationType; use app\schema\mutations\AddressMutationType; ... private static $userMutation; private static $addressMutation; ... public static function mutation() { return self::$mutation ?: (self::$mutation = new MutationType()); } public static function userMutation() { return self::$userMutation ?: (self::$userMutation = new UserMutationType()); } public static function addressMutation() { return self::$addressMutation ?: (self::$addressMutation = new AddressMutationType()); } ... Step 3. Add the root type to the entry point of GraphqlController.php
... $schema = new Schema([ 'query' => Types::query(), 'mutation' => Types::mutation(), ]); ... Step 4. Testing
Let's open our GraphiQL (and in the next tab our newly created client to make sure that the data is changing) and look at the result:
Request:
mutation { user(id:1) { update(firstname:"Stan") } } 

Now we will try to change the address and the user associated with it with one request:
Request:
mutation { address(id:0) { update(zip: "56844") user { update(firstname:"Michael") } } } 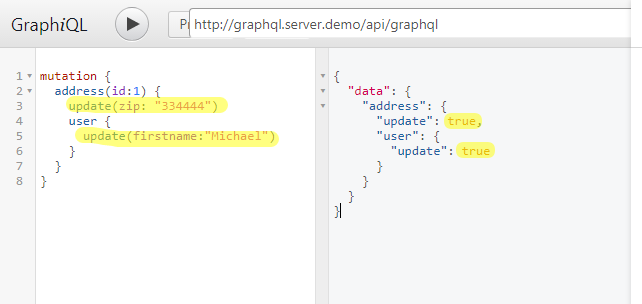
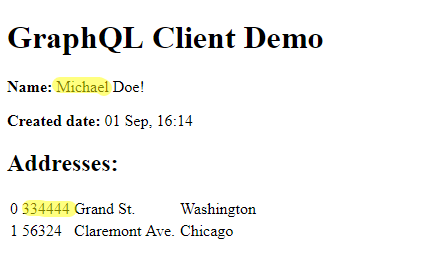
To see the changes in the address, we change our template a bit:
Immediately try to present and compare with how you need to excel in order to crank something like this in a RESTful architecture. In general, such things, as far as I know, rewrite the concepts of REST, and in GraphQL this is originally incorporated architecturally.
Variables
Until we went to the client, we will understand what variables are in GraphQL . You will get acquainted with their practical application when used in mutations in the client, but for now do not bother about it, because initially their benefits are not so noticeable.
Let's change our mutation using variables a bit:
Request:
mutation ($id:Int, $zip: String, $firstname: String) { address(id: $id) { update(zip: $zip) user { update(firstname: $firstname) } } } Variables:
{ "id": 1, "zip": "87444", "firstname": "Steve" } Note. Technically, variables come as a separate POST parameter variables.
Window GraphiQL (the field for entering variables you just need to pull the bottom, yes, you also have it):

It may seem that variables are convenient when the same value is used in several places, but in reality, in practice, this is a rare situation, and no, this is not their main purpose.
More useful is the ability to immediately validate a field. If you try to pass an invalid type to a variable and / or if you don’t pass it at all, in the case where the field is required, the request will not go to the server.
But the main convenience (I would even say the necessity) of use you will feel in the client.
Customer
Step 1. Add a mutation to models / user.js
As you remember, we agreed to store all our GraphQL queries in models (not almost everything, but everything), therefore we will add our new mutation.
models / user.js:
... // // export const updateAddressAndUserMutation = gql` mutation updateAddressAndUser( $id: Int!, $zip: String, $street: String, $firstname: String, $lastname: String ) { address(id: $id) { update(zip: $zip, street: $street) user { update( firstname: $firstname, lastname: $lastname ) } } } `; Step 2. Component
To make it more interesting, we will create a new component, at the same time we will look at how the event mechanism works for communication between components (no relation to GraphQL, therefore without enthusiasm).
Create the / src / update-user-address directory and traditionally add 2 files there: update-user-address.html and update-user-address.js.
Note. If you want to name your component somehow differently, keep in mind that there is an unobvious naming requirement. The fact is that the custom component in the name must contain "-". Like this.
/src/update-user-address/update-user-address.js:
import { PolymerApolloMixin } from 'polymer-apollo'; import { apolloClient } from '../client'; // import { getUserInfoQuery, updateAddressAndUserMutation } from '../models/user'; class UpdateAddressUser extends PolymerApolloMixin({ apolloClient }, Polymer.Element) { static get is() { return 'update-address-user'; } static get properties() { return { user: { type: Object, value: {}, // observer // // // observer: "_updateProperties", }, // // // , .. // , // zip: { type: String, value: "" }, street: { type: String, value: "" }, firstname: { type: String, value: "" }, lastname: { type: String, value: "" }, }; } get apollo() { return { getUserInfo: { query: getUserInfoQuery } }; } _updateProperties() { // // // // . // // // // (user = {...}) if (this.user.firstname != undefined) { // // this.zip = this.user.addresses[0].zip; this.street = this.user.addresses[0].street; this.firstname = this.user.firstname; this.lastname = this.user.lastname; } } // // ( , // polymer-apollo // (https://github.com/aruntk/polymer-apollo#mutations) _sendAddressUserMutation() { this.$apollo.mutate({ mutation: updateAddressAndUserMutation, // , // , variables: { id: 1, zip: this.zip, street: this.street, firstname: this.firstname, lastname: this.lastname, }, }).then((data) => { // // , , // // // document.getElementById('view-block').dispatchEvent(new CustomEvent('refetch')); }) } } window.customElements.define(UpdateAddressUser.is, UpdateAddressUser); /src/update-user-address/update-user-address.html:
<dom-module id="update-address-user"> <template> <!-- ( ) --> ZIP Code: <input value="{{zip::input}}"><br> Street: <input value="{{street::input}}"><br> First Name: <input value="{{firstname::input}}"><br> Last Name: <input value="{{lastname::input}}"><br> <!-- --> <button on-click="_sendAddressUserMutation">Send</button> </template> </dom-module> Step 3. Add event listener to the main component
So that we can immediately update the data in the neighboring component to display it after the change, add an event listener and a method to update the GraphQL query.
src / graphql-client-demo-app / graphql-client-demo-app.js:
... // eventListener // ready() { super.ready(); this.addEventListener('refetch', e => this._refetch(e)); } ... // _refetch() { this.$apollo.refetch('getUserInfo'); } ... Step 4. Connect the newly created component
index.html:
... <link rel="import" href="/src/graphql-client-demo-app/graphql-client-demo-app.html"> <link rel="import" href="/src/update-address-user/update-address-user.html"> <script src="bundle.js"></script> </head> <body> <graphql-client-demo-app id="view-block"></graphql-client-demo-app> <update-address-user></update-address-user> </body> </html> entry.js:
import './src/client.js'; import './src/graphql-client-demo-app/graphql-client-demo-app.js'; import './src/update-address-user/update-address-user.js'; Step 5. Testing
Well, for starters, let's put together a webpack (if you still haven't gotten rid of it):
$> webpack Open the browser and get something like this:
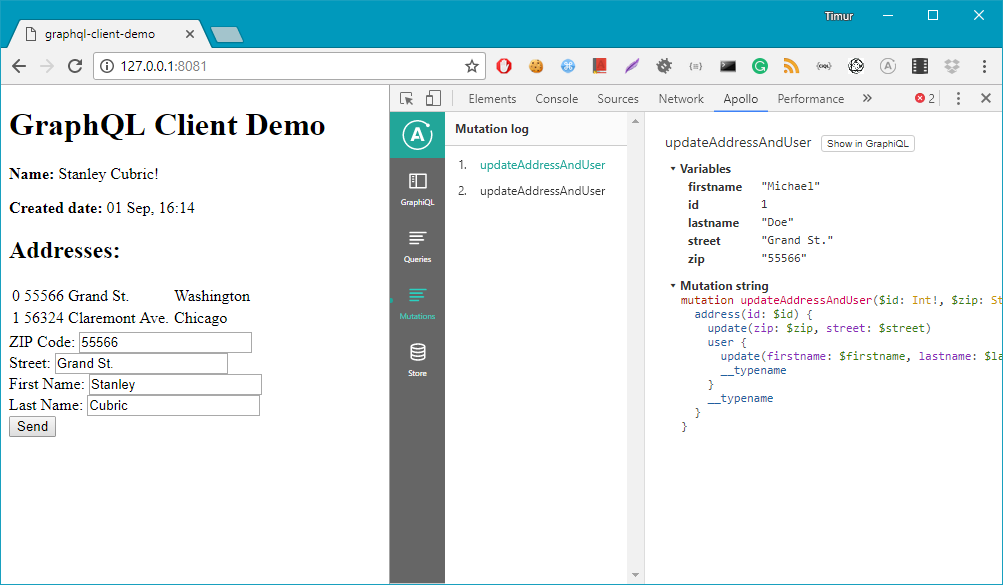
Of course, the picture does not allow to prove that the data in the upper part changes immediately after clicking on the Send button, but you should not try it yourself. By the way, all changes are prudently uploaded to github: client and server .
Frankly speaking, this architecture is not at all optimal, since it is necessary to modify it in such a way that one request is executed and data is pulled to all parts of the interface. But this is not a GraphQL problem.
In the next (final) part of the article we will look at how to implement validation in mutations, and finally draw conclusions on the advantages and disadvantages of switching to GraphQL based on the experience gained.
')
Source: https://habr.com/ru/post/337046/
All Articles