Deploy a .NET Core project to the Azure Web App for Linux
Linux-based Web Apps allows developers to run web applications in Docker containers for Linux. This makes it easy to migrate existing applications hosted and optimized for the Linux platform into the Azure App Service. In addition, developers can deploy applications in various programming languages and platforms using the familiar Docker and Azure App Service toolkits.
Azure Web App for Linux provides many opportunities for developers, regardless of whether they are developing applications for Linux or simply want their applications to be containerized. Azure Web App for Linux is available in Western Australia, Western Europe, and Southeast Asia.
Some of the new features that have been added to the Linux App Service are:
')
Deployment slots were one of the most popular features of the Azure App Service. Implementing the App Service for Linux would not be complete without slots support! You can duplicate an existing application in a “slot” and easily perform switching operations between test slots and slots with a working version of web applications.
You can easily scale the App Service Linux and Container applications on demand or automatically. Auto Scale supports CPU, Disk Queue Length and Memory triggers.
You can use SSH to manage in your application. Enter the address in the browser to find out the SSH connection settings:
If you have not been authenticated, you will need to log in. After that you will see something like this:

NOTE . To activate SSH for Docker custom containers, you need to further configure an SSH server .
Your web application will be automatically deployed when the new version is published in the Docker Hub.
To activate this feature:
Start the terminal, create a directory called hellodotnetcore and go to it. Then enter:
This command creates three files (hellodotnetcore.csproj, Program.cs, and Startup.cs) and one empty directory (wwwroot /) in the current directory. The contents of the .csproj file should look like this:
Since this is a web application, the link to the ASP.NET Core package is automatically added to the hellodotnetcore.csproj file. The version number of the package is set according to the installed SDK. This example refers to ASP.NET Core version 1.1.2, because it uses .NET Core 1.1.
You can build and run a .NET Core application using two commands:
When the application starts, you will see a message saying that incoming requests are listening:
Check that the application works correctly by opening localhost : 5000 / in the browser
If all goes well, you will see the message “Hello World!”.
The first thing you need to do is create a new web application. Log in to the Azure portal and create a WebApp for Linux.
Next, specify the parameters for creating a new application:
Next, after the creation of the application is complete, find the URL of the git repository by going to:
Run the commands to deploy the application to Azure:
You do not need to separately add to the repository files in the bin / or obj / directory, because the web application will be automatically collected in the cloud.
The result should look something like this:
After deployment is complete, restart the web application. To do this, go to the Azure portal, open the "Overview" page of your web application and click the "Restart" button.
After restarting, open the page with the web application. It should look something like this:
What's new in Azure Web App for Linux?
Azure Web App for Linux provides many opportunities for developers, regardless of whether they are developing applications for Linux or simply want their applications to be containerized. Azure Web App for Linux is available in Western Australia, Western Europe, and Southeast Asia.
Some of the new features that have been added to the Linux App Service are:
')
- Slots
- Auto scaling
- SSH support
- Automatic publishing of images from Docker Hub
Slots
Deployment slots were one of the most popular features of the Azure App Service. Implementing the App Service for Linux would not be complete without slots support! You can duplicate an existing application in a “slot” and easily perform switching operations between test slots and slots with a working version of web applications.
Auto scaling
You can easily scale the App Service Linux and Container applications on demand or automatically. Auto Scale supports CPU, Disk Queue Length and Memory triggers.
SSH support
You can use SSH to manage in your application. Enter the address in the browser to find out the SSH connection settings:
https://<mysite>.scm.azurewebsites.net/webssh/host. If you have not been authenticated, you will need to log in. After that you will see something like this:
NOTE . To activate SSH for Docker custom containers, you need to further configure an SSH server .
Automatic publishing of images from Docker Hub
Your web application will be automatically deployed when the new version is published in the Docker Hub.
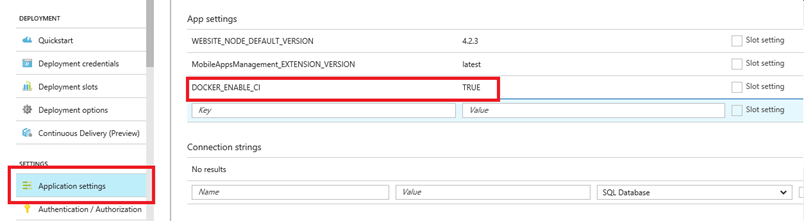
To activate this feature:
- Set up a docker hub hook
https://<publishingusername>:<publishingpwd>@<sitename>.scm.azurewebsites.net/docker/hook - Create a variable for the web application called DOCKER_ENABLE_CI and set its value to TRUE.
Other features
- Support wildcard domains . Now you can assign wildcard names for your web applications. For example, * .constoco.com.
- Production Testing (TiP) : This feature allows you to send x% of traffic to a slot or beta site of your application.
- Always On : With this feature, you can ensure that your web application is running continuously and avoid cold start due to idle timeouts.
- Site Restart : You can reload the container and web application using this option. This option will force the reload of the container from the cached image.
Create and deploy a .NET Core project
Start the terminal, create a directory called hellodotnetcore and go to it. Then enter:
dotnet new web This command creates three files (hellodotnetcore.csproj, Program.cs, and Startup.cs) and one empty directory (wwwroot /) in the current directory. The contents of the .csproj file should look like this:
<!-- Empty lines are omitted. --> <Project Sdk="Microsoft.NET.Sdk.Web"> <PropertyGroup> <TargetFramework>netcoreapp1.1</TargetFramework> </PropertyGroup> <ItemGroup> <Folder Include="wwwroot\" /> </ItemGroup> <ItemGroup> <PackageReference Include="Microsoft.AspNetCore" Version="1.1.2" /> </ItemGroup> </Project> Since this is a web application, the link to the ASP.NET Core package is automatically added to the hellodotnetcore.csproj file. The version number of the package is set according to the installed SDK. This example refers to ASP.NET Core version 1.1.2, because it uses .NET Core 1.1.
You can build and run a .NET Core application using two commands:
dotnet restore dotnet run When the application starts, you will see a message saying that incoming requests are listening:
Hosting environment: Production Content root path: C:\hellodotnetcore Now listening on: http://localhost:5000 Application started. Press Ctrl+C to shut down. Check that the application works correctly by opening localhost : 5000 / in the browser
If all goes well, you will see the message “Hello World!”.
Publish .NET Core applications to Azure
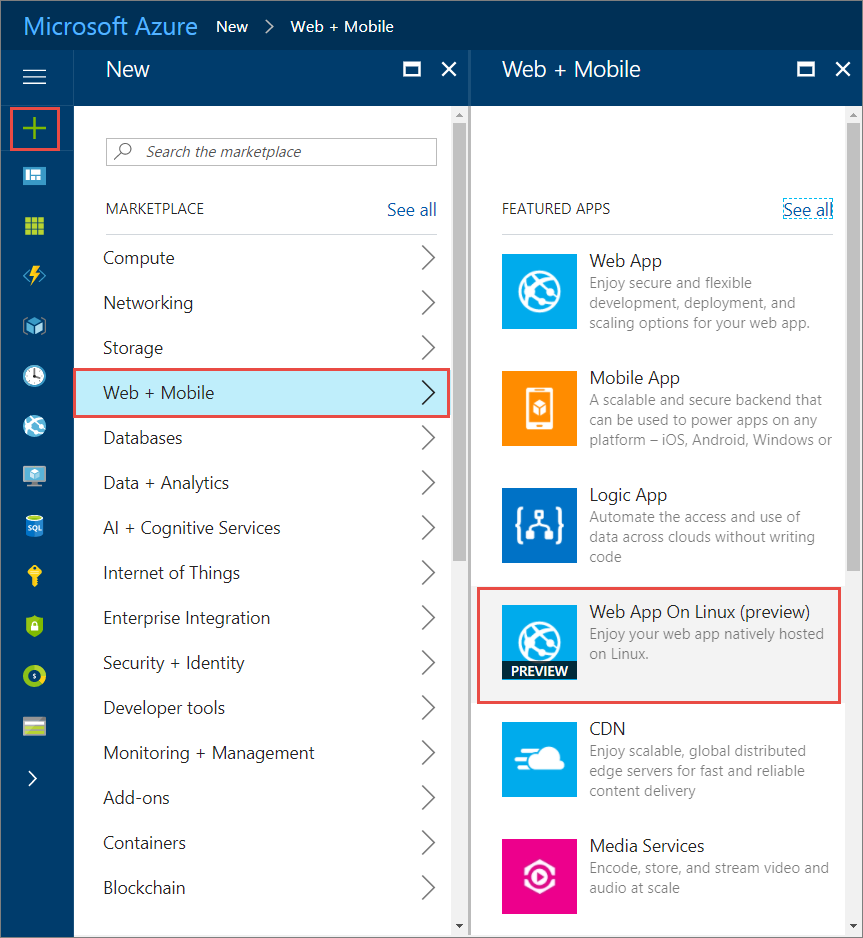
The first thing you need to do is create a new web application. Log in to the Azure portal and create a WebApp for Linux.
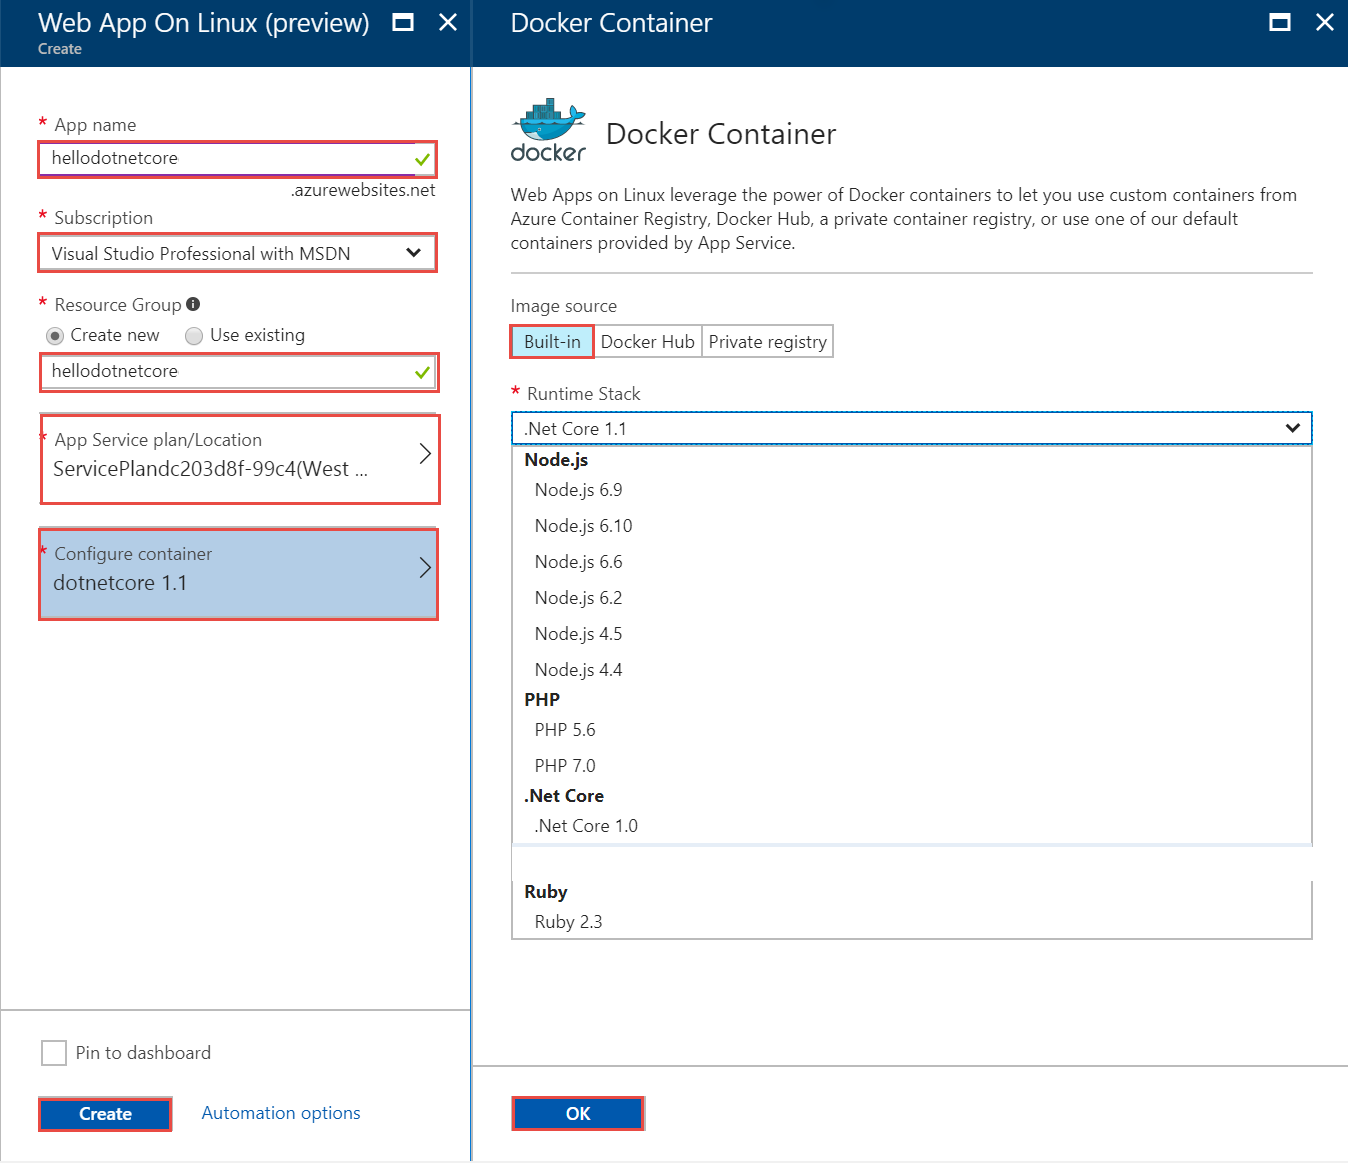
Next, specify the parameters for creating a new application:
| Parameter | Value | Description |
|---|---|---|
| App name | hellodotnetcore | The name of your app. This name must be unique. |
| Subscription | Choose an existing subscription | The Azure subscription. |
| Resource Group | myResourceGroup | The Azure Resource Group to contain the web app. |
| App Service Plan | Existing App Service Plan name | The App Service plan. |
| Configure Container | .NET Core 1.1 | Built-in, Docker, or Private registry. |
| Image source | Built-in | The source of the image. |
| Runtime stack | .NET Core 1.1 | The runtime stack and version. |
Next, after the creation of the application is complete, find the URL of the git repository by going to:
https://{your web app name}.scm.azurewebsites.net/api/scm/info Run the commands to deploy the application to Azure:
git init git remote add azure <Git deployment URL from above> git add *.csproj *.cs git commit -m "Initial deployment commit" git push azure master You do not need to separately add to the repository files in the bin / or obj / directory, because the web application will be automatically collected in the cloud.
The result should look something like this:
/* some output has been removed for brevity */ remote: Copying file: 'System.Net.Websockets.dll' remote: Copying file: 'System.Runtime.CompilerServices.Unsafe.dll' remote: Copying file: 'System.Runtime.Serialization.Primitives.dll' remote: Copying file: 'System.Text.Encodings.Web.dll' remote: Copying file: 'hellodotnetcore.deps.json' remote: Copying file: 'hellodotnetcore.dll' remote: Omitting next output lines... remote: Finished successfully. remote: Running post deployment commands... remote: Deployment successful. To https://hellodotnetcore.scm.azurewebsites.net/ * [new branch] master -> master After deployment is complete, restart the web application. To do this, go to the Azure portal, open the "Overview" page of your web application and click the "Restart" button.
After restarting, open the page with the web application. It should look something like this:
Sources
Source: https://habr.com/ru/post/336948/
All Articles