Create Telegram bot on API.AI
Chat bots are a rather interesting topic that is interested in both geek enthusiasts and companies that want to organize interaction with their clients in the most convenient way for them.
Today I will describe to you a simple example of creating a Telegram bot using a platform for creating conversational API.AI interfaces that will greet the user and answer questions about the weather. For the most part, I followed these instructions , in actual practice, you can not be limited to the weather and implement interfaces
for automated support or sales.
Step One: Preparing the infrastructure.
In this case, we will only use Telegram bot and API.AI, both services are provided for free - we just have to have accounts.
Create a Telegram bot
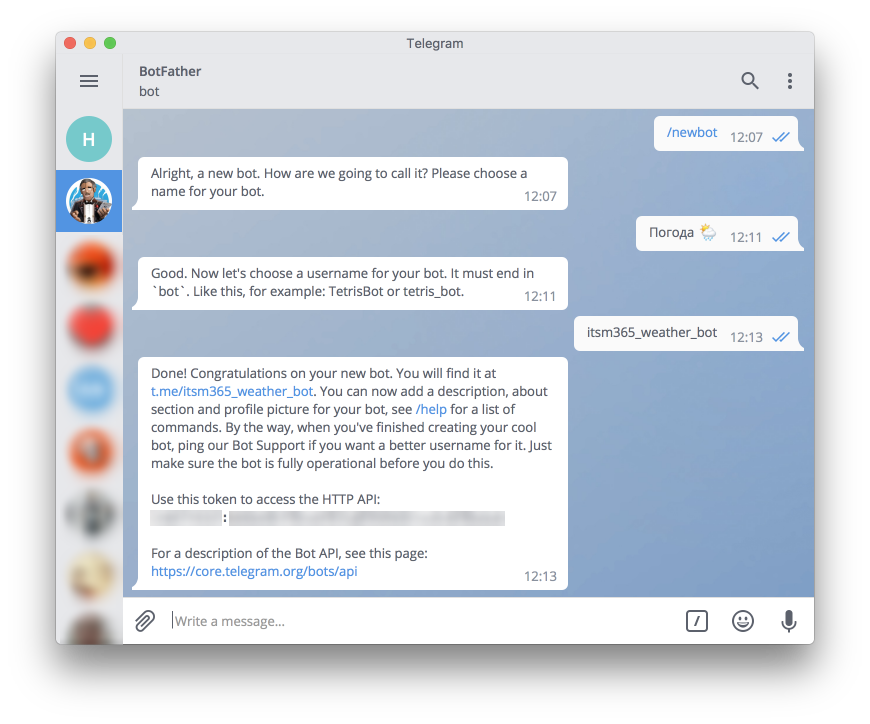
To create a bot - just write @BotFather (this is the kind of bot that other bots can create and configure):
- Send the command / newbot - so we inform @BotFather that we need a new bot
- Now @BotFather will ask us to name the new bot. This name will see our
future users, so the name should be given clear and simple. - The last step is for the bot username, at the end of which it is necessary to
write “bot”. - If the name is not taken, we receive a confirmation message and an access token.
To make it clearer - below is a screenshot with all the actions:
Some theory
It's time to create an API.AI agent, which is essentially a project or a container (as you prefer to call it). The agent contains settings for contexts, entities and responses:
- “Context” (Intent) reflects the connection between what the user said and
what our program should do - “Entities” is a tool for extracting parameter values for
our program from a natural language (what he said or wrote
user) - “Answers ” is the end result of our program, which we
we send to the user on his message
Sometimes there is enough information from the current dialog to respond to the user, in which case you can configure static responses in contexts . In reality, to get a specific answer, we may need an external service or our own business logic, for example, to get weather information for tomorrow, we need to call the external API of the corresponding service. Later I will tell you to receive information from external systems, but first we will prepare the base.
Create a project in API.AI
To register with API.AI, you need a Google account (just go to Gmail). Now go to https://api.ai/ , click on the “SIGN UP FOR FREE” button, and then select the account on behalf of which you want to log in.
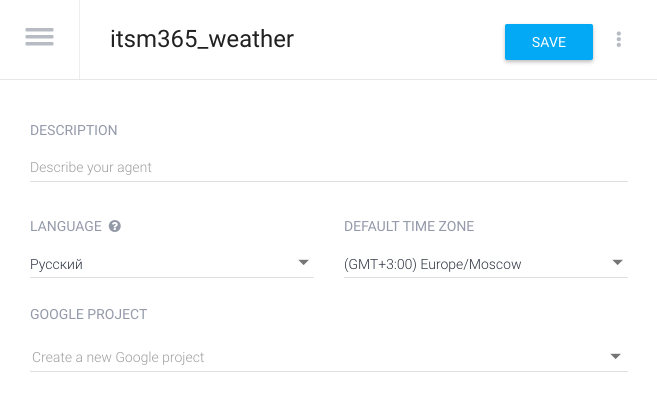
We now turn to the creation of the agent itself. Click on “Create agent” and specify at least Name (Name), Language (Language) and Time Zone (Time Zone).
Step Two: Configure the agent.
The context reflects the connection between what the user says and what our agent should do. In our case, consider the case with the weather forecast:

- Click on the “Context” section (Intents). The agent has already set up “contexts” for greetings and errors, leaving them unchanged for now.
- Specify the name for the “context” - any, the main thing that it was clear to you and your colleagues.
- In the section “User Replicas” (User Says) give examples of questions that your user can. Since we are talking about the weather, a person can ask a question in relation to time and place - we take this into account. The more examples you provide in the settings, the more accurate the agent will work. Some examples I gave in the screenshot:
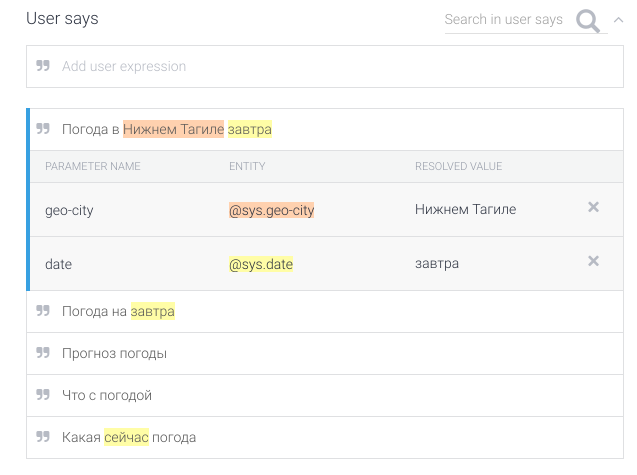
In the last example, the words “tomorrow” and “Nizhny Tagil” are highlighted in different colors - thus the words are associated with entities (in our case, system entities). Using these parameters, the agent will “understand” in which city and for which date it is necessary to know the weather.
Add a couple more of your examples and click “Save” (SAVE).
We are testing!
Let's check the work of the agent on simple questions, for example, “Weather in Perm on Wednesday”:
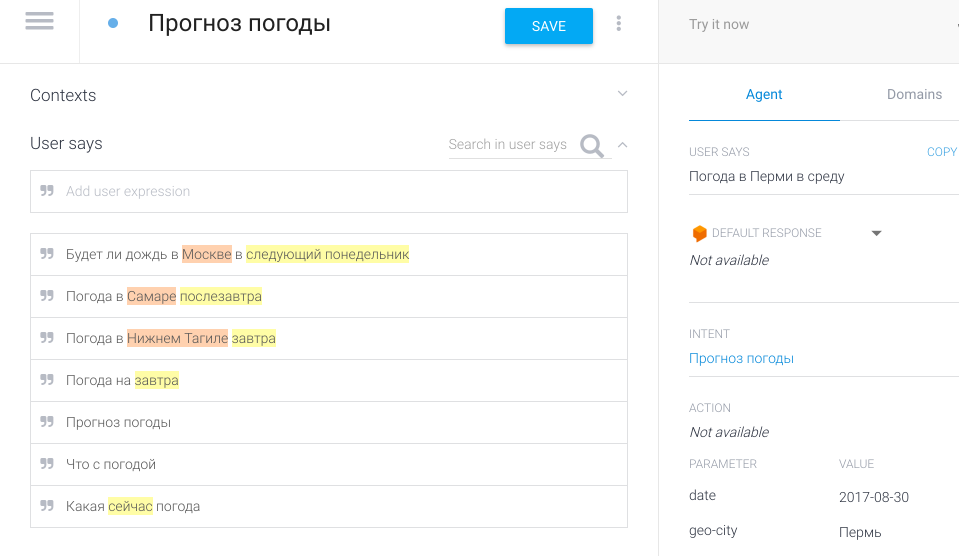
All this time, the inscription “Try it now” loomed in the upper right of the screen - write in this field or say a simple question about the weather and press “Enter”.
We have not yet set up an automatic response, but the agent has already learned how to determine some parameters! In the INTENT section it is reflected that according to the “opinion” of the agent, the user is interested in the weather (the “context” we set up), in PARAMETER, the date and name of the city in the corresponding variables.
Add automatic replies
Let's make our agent talkative! While we have not learned how to obtain weather information from external sources, we will add simple phrases as answers.
Go to the “Response” section and enter simple answers in the same way as you filled in the “User Replicas”:
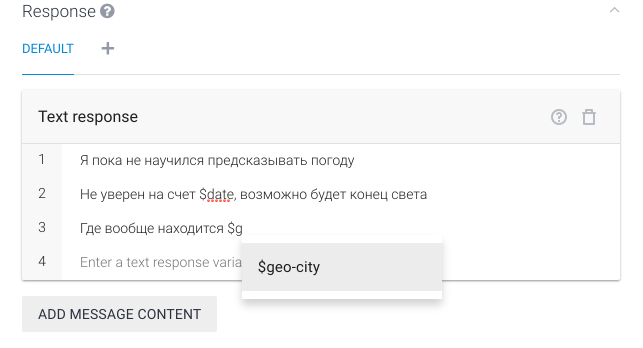
As you can see, in the answers you can use links to the identified entities, start typing $ - and the interface will prompt you to select a specific variable.
When forming the answer, the agent takes into account the number of certain entities and does not use answers for which there is not enough data. For example, the agent uses the answer from the second line to the question without specifying the city.
Save the settings and test again:
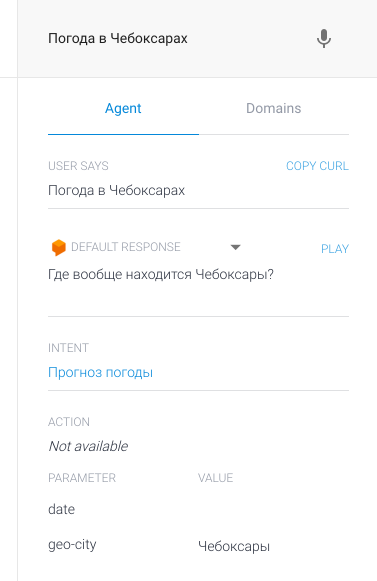
Now we also have the answer!
Step three: Add external service.
Our agent already "understands" in what case the user wants to know the weather, on what date and in what city. It now remains to obtain this data from a suitable service and transfer it to the agent. To do this, you need to write a couple of scripts on JS and place them in the cloud service, in our case - Google Cloud Project.
Create a starting JS file
First, create and navigate to the directory with the name of your project:
Linux or Mac OS X:
mkdir ~ / [PROJECT_NAME]
cd ~ / [PROJECT_NAME]Windows:
mkdir% HOMEPATH% [PROJECT_NAME]
cd% HOMEPATH% [PROJECT_NAME]
Now create an index.js file with the following content:
/* * HTTP Cloud Function. * * @param {Object} req Cloud Function request context. * @param {Object} res Cloud Function response context. */ exports.itsm365Weather = function itsm365Weather (req, res) { response = "This is a sample response from your webhook!" //Default response from the webhook to show it's working res.setHeader('Content-Type', 'application/json'); //Requires application/json MIME type res.send(JSON.stringify({ "speech": response, "displayText": response //"speech" is the spoken version of the response, "displayText" is the visual version })); Set up the Google Cloud Project
- Make settings “Before you
begin ” from 1 to 5 points Deploy the function in the cloud by running in the console:
gcloud beta functions deploy itsm365Weather --stage-bucket [BUCKET_NAME] --trigger-http
where itsm365Weather is the name of the function, and [BUCKET_NAME] is the name of the repository
data for the project.
After the operation is completed, you will see the result from the http URL of the trigger:
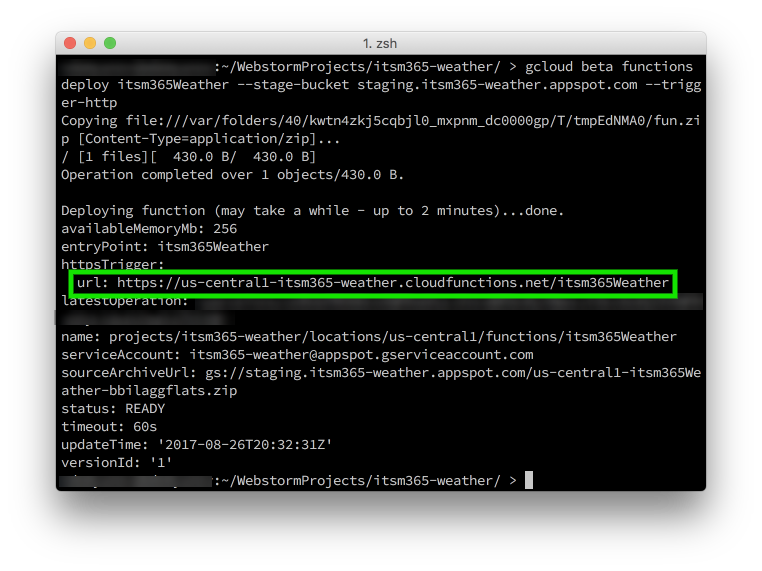
Include Webhook in API.AI
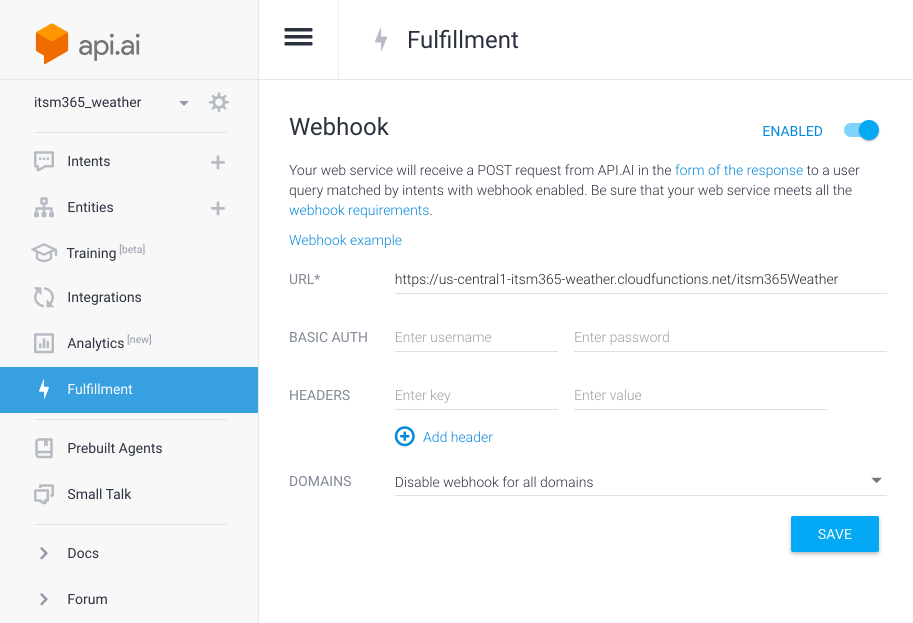
- Make sure you are in the right agent, and then click “ Fulfillment ” in the left-hand pop-up menu.
- Enable the use of Webhook at the top right of the screen.
- Enter the URL obtained in the previous step.
- Save the changes.
Connect the execution of a new function in the context settings
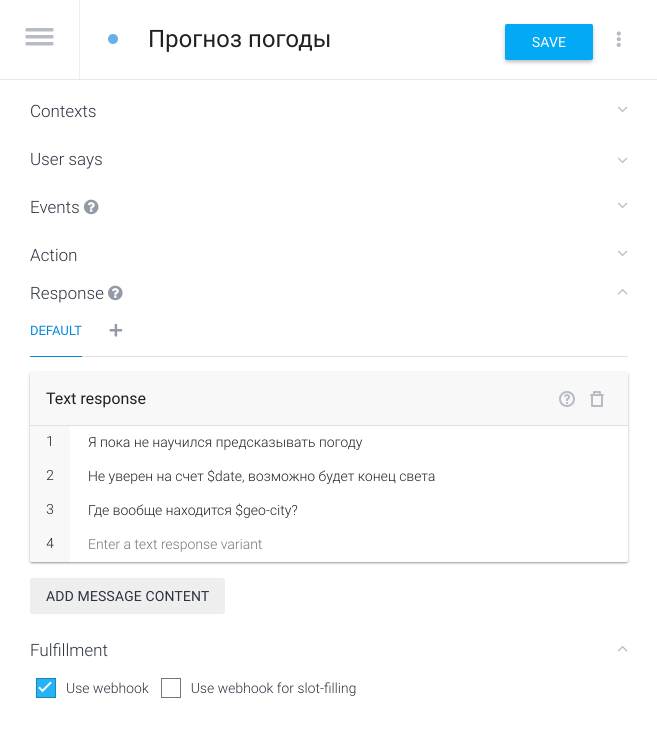
- Go to the weather forecast “context” settings
- Expand the Fulfillment block at the bottom of the page.
- Tick “Use Webhook”
- Save the settings and check the result:
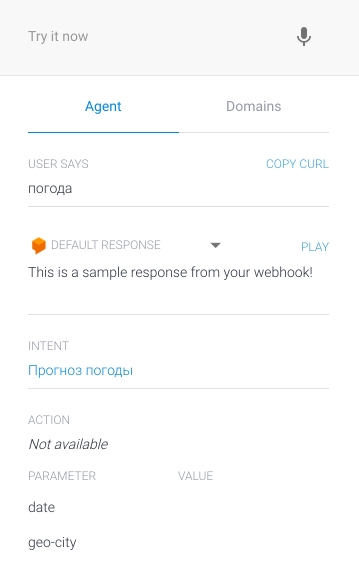
Set up an API to get the weather
For simplicity, let's use the WWO (World Weather Online) service, where you need to get an API key (just register with Facebook or Github).
Update the code of the start-up JS file, do not forget to enter the API key to get information about the weather:
// Copyright 2017, Google, Inc. // Licensed under the Apache License, Version 2.0 (the 'License'); // you may not use this file except in compliance with the License. // You may obtain a copy of the License at // // http://www.apache.org/licenses/LICENSE-2.0 // // Unless required by applicable law or agreed to in writing, software // distributed under the License is distributed on an 'AS IS' BASIS, // WITHOUT WARRANTIES OR CONDITIONS OF ANY KIND, either express or implied. // See the License for the specific language governing permissions and // limitations under the License. 'use strict'; const http = require('http'); const host = 'api.worldweatheronline.com'; const wwoApiKey = '98cfb8e40ecc47c4a2f205209172608'; exports.itsm365Weather = (req, res) => { // Get the city and date from the request let city = req.body.result.parameters['geo-city']; // city is a required param // Get the date for the weather forecast (if present) let date = ''; if (req.body.result.parameters['date']) { date = req.body.result.parameters['date']; console.log('Date: ' + date); } // Call the weather API callWeatherApi(city, date).then((output) => { // Return the results of the weather API to API.AI res.setHeader('Content-Type', 'application/json'); res.send(JSON.stringify({ 'speech': output, 'displayText': output })); }).catch((error) => { // If there is an error let the user know res.setHeader('Content-Type', 'application/json'); res.send(JSON.stringify({ 'speech': error, 'displayText': error })); }); }; function callWeatherApi (city, date) { return new Promise((resolve, reject) => { // Create the path for the HTTP request to get the weather let path = '/premium/v1/weather.ashx?format=json&num_of_days=1' + '&q=' + encodeURIComponent(city) + '&key=' + wwoApiKey + '&date=' + date + '&lang=ru'; console.log('API Request: ' + host + path); // Make the HTTP request to get the weather http.get({host: host, path: path}, (res) => { let body = ''; // var to store the response chunks res.on('data', (d) => { body += d; }); // store each response chunk res.on('end', () => { // After all the data has been received parse the JSON for desired data let response = JSON.parse(body); let forecast = response['data']['weather'][0]; let location = response['data']['request'][0]; let conditions = response['data']['current_condition'][0]; let currentConditions = conditions['lang_ru'][0]['value']; // Create response let output = ` ${forecast['date']} ${location['query']} ${currentConditions}, ${forecast['mintempC']}°C ${forecast['maxtempC']}°C.`; // Resolve the promise with the output text console.log(output); resolve(output); }); res.on('error', (error) => { reject(error); }); }); }); } Redeploy the feature in the cloud project.
Step Four: Set Up Dialog Branches
Interacting with the user, we can not be sure that he will provide us with all the information necessary to prepare a response in the external service immediately in the very first message. In our example, to get a forecast, the service will need a date and city. If the date is not known, we can successfully assume that the user implies “today”, but we can only learn about the city from the user himself.
Make “location” a required parameter.
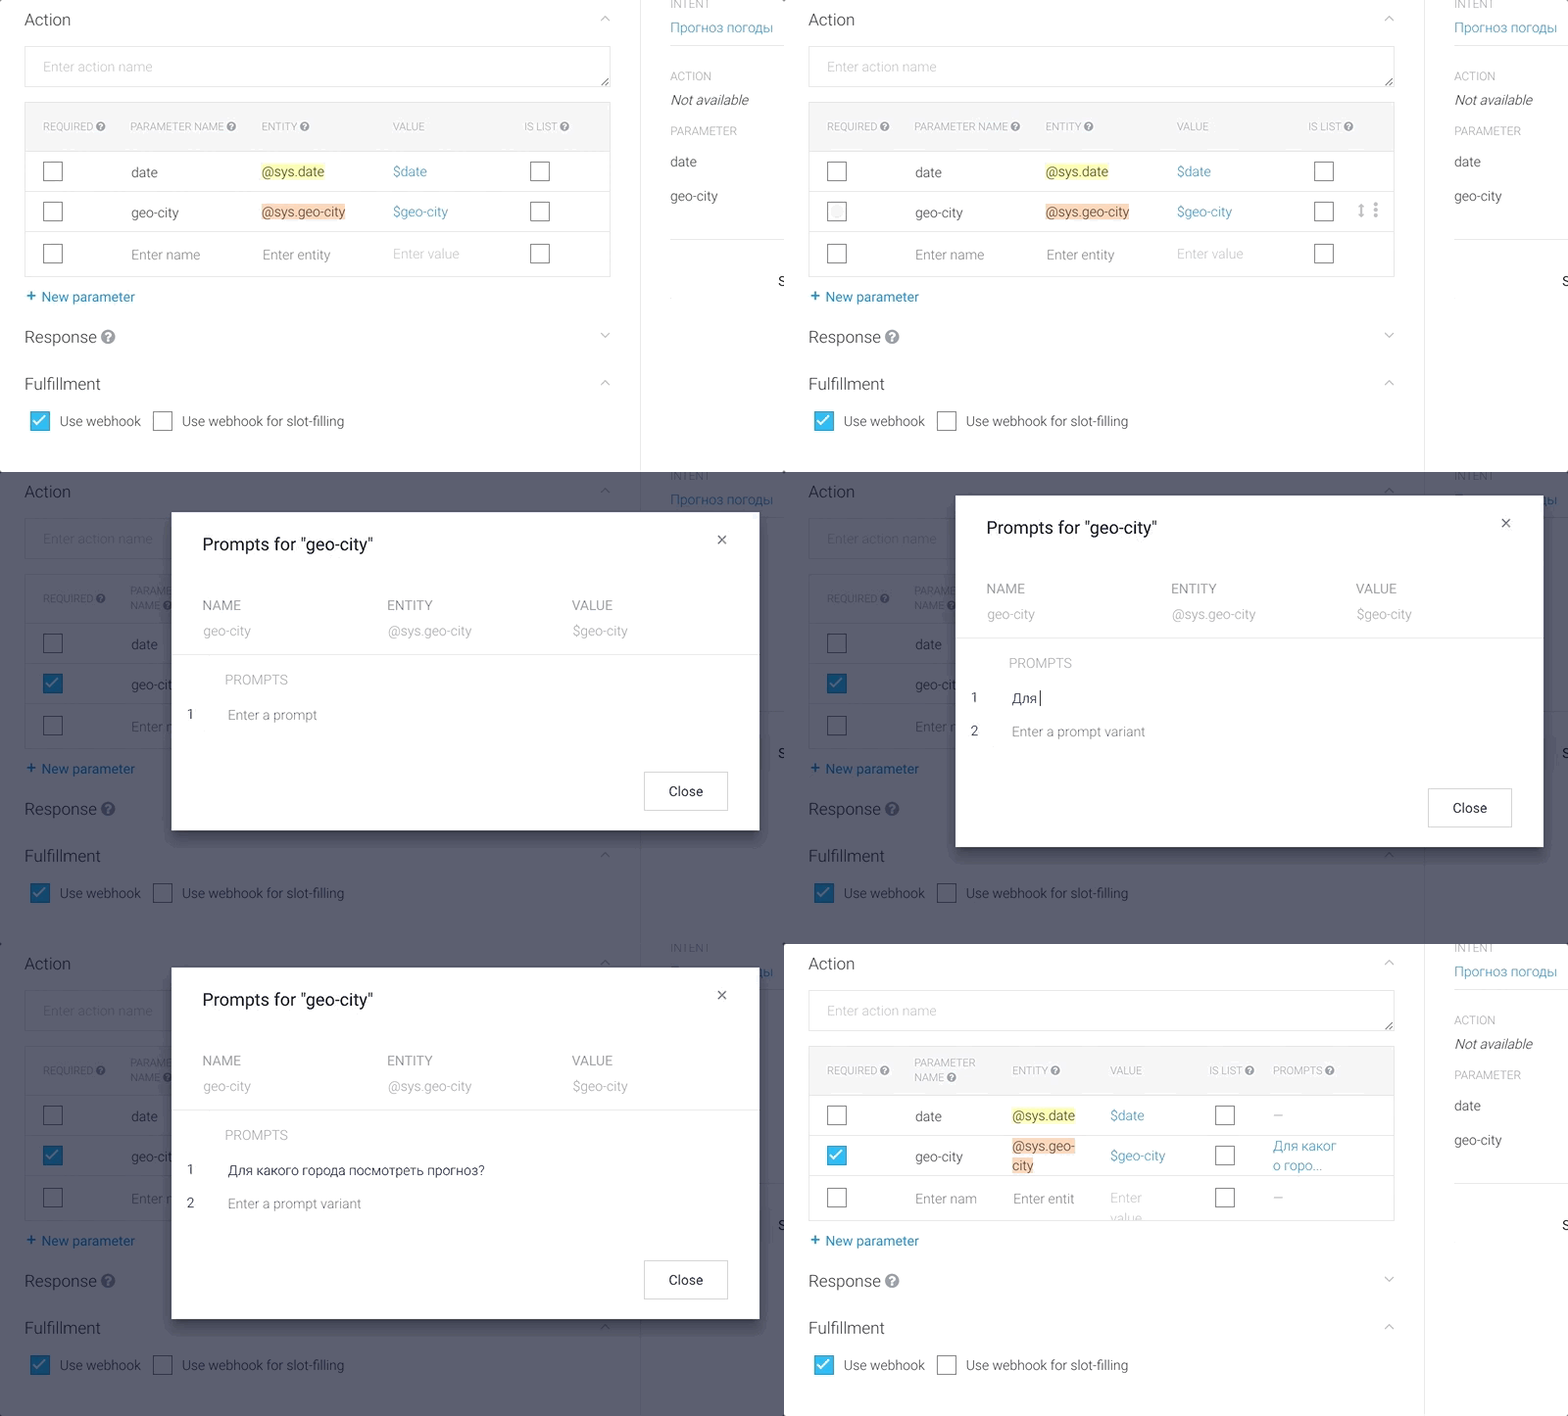
Open the “Weather Forecast” context settings and set the geo-city parameter to be required. Then set up the clarifying question using the link in the “Prompts” column.
Save the settings and check the agent's behavior by asking him a simple question “weather”:
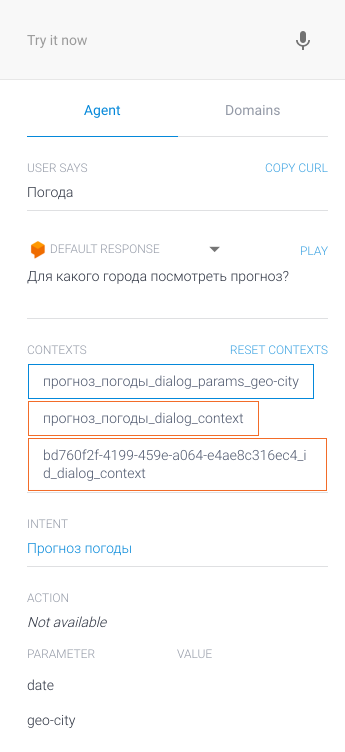
The agent asked us a clarifying question, the current parameters are displayed in the console.
situations.
Create a return refinement for the location.
To use the data obtained at the previous stage of user interaction, you will need to configure the appropriate clarifications.
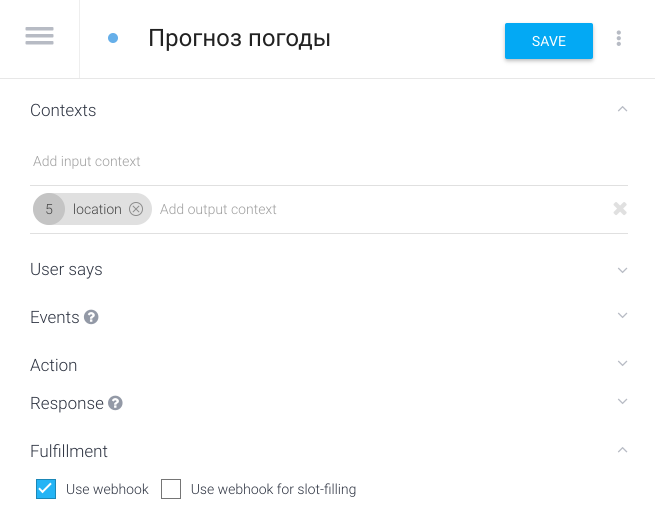
In the “weather forecast” context setting, type in the “Add output context” field the name of the return “location” and save the settings.
Create a new context to clarify.
Conveniently, when at the same location you can ask a few questions, while not asking the user what city he has in mind. You have already configured a return clarification that you can use to handle clarifying questions.
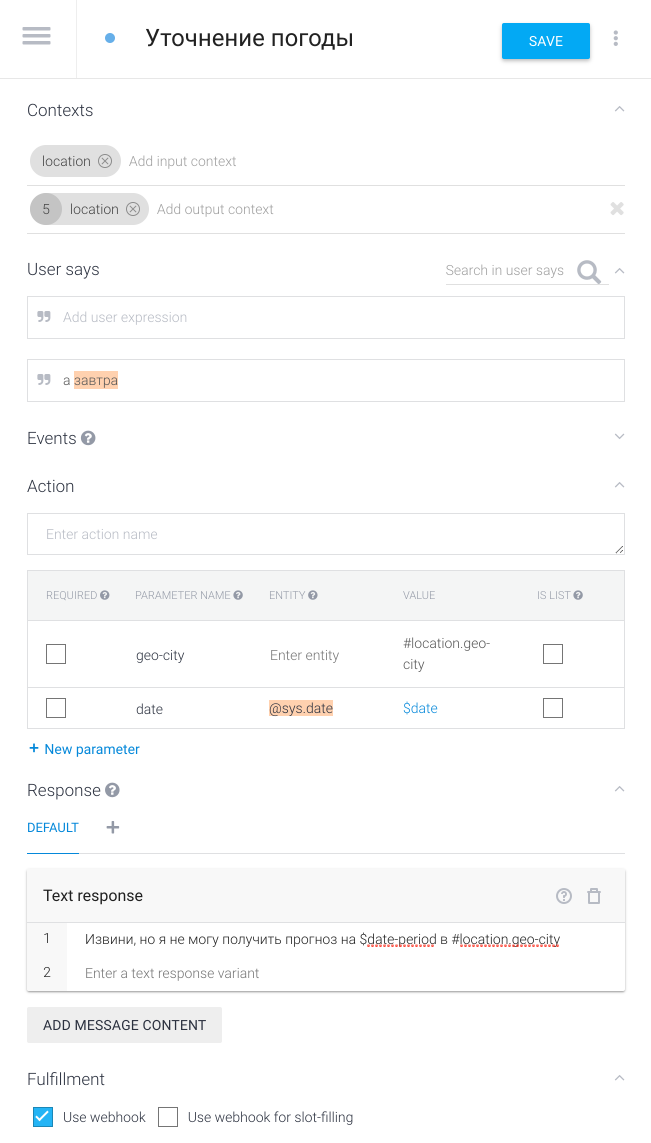
- Create a new context in the Intents section or click the icon in the line.
Intents of the left pull-down menu. - Name the new context “Weather Update” (or any other name that you understand).
- Set incoming and outgoing updates as “location”
- Add replicas of the user, for example, “What about tomorrow”
- Add an entity parameter with the following values:
- Parameter Name:
geo-city
- Value: # location.geo-city - Add a response for the user in the “ Response ” section:
- “Sorry, but I can't get a forecast for $ date-period in # location.geo-city” - Enable the use of the webhook in the Fulfillment menu.
- Save the settings and test in the console:

Step Five: Greeting and handling unforeseen situations
The main agent backbone is ready, now it's nice to make the robot
welcomed the user, and also knew what to answer unexpected questions.
Customize “default” responses for unforeseen situations.
If the user is asked an unforeseen question (in our case, not about the weather), the agent will include the context for handling emergency situations ( Default Fallback Intent ):

Go to setting this context, if necessary, customize your answers.
Set the greeting context
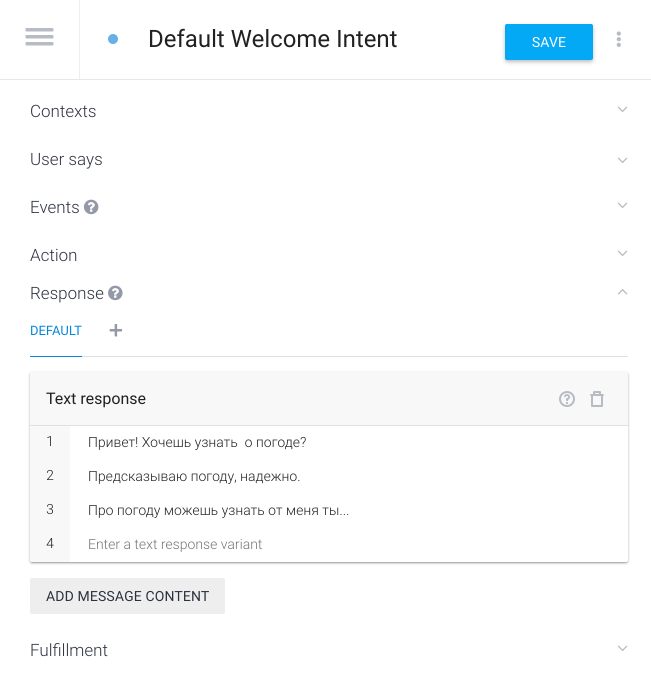
The greeting can be configured in a similar way in the appropriate content -
Default Welcome Intent
Step Six: Run the bot
Connect Telegram bot to agent
Go to the “Integrations” settings and enable the bot in the
“One-click integrations”:
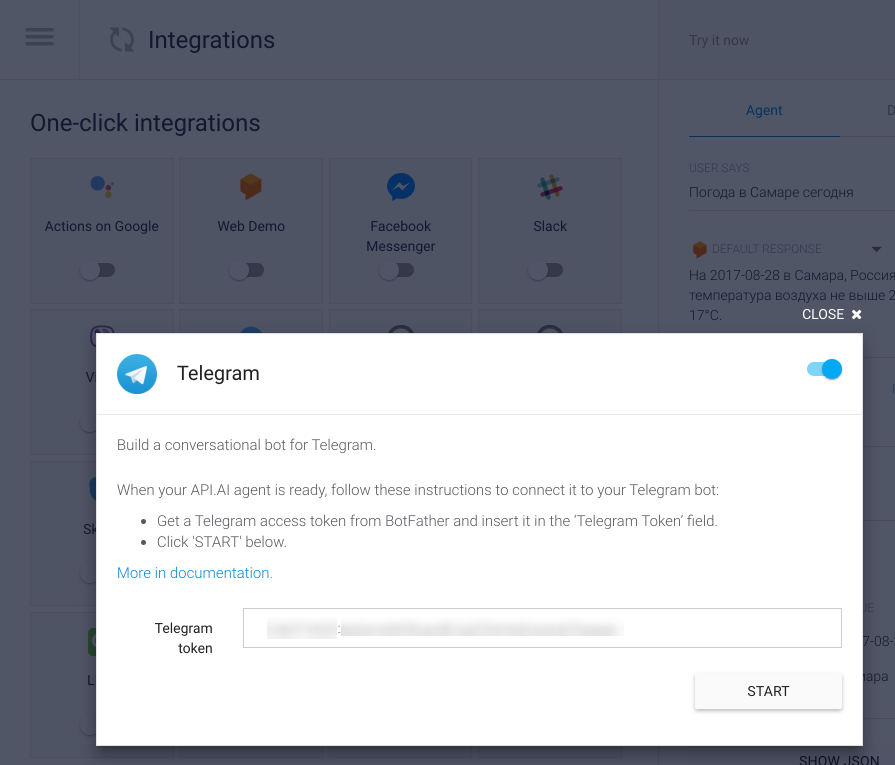
Copy in the “Telegram token” field the token that you received from @botFather and
click on START.
Check the operation of the bot
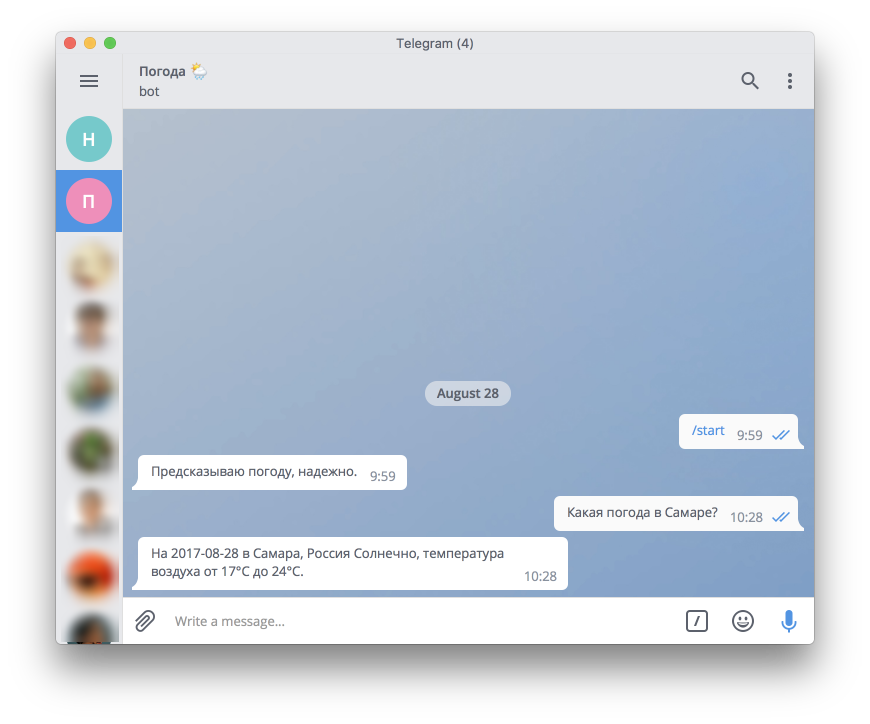
Go to your bot and try to write something to him, in my case it is
@ itsm365_weather_bot (I used free weather accounts, so after 500 requests a day, the bot will turn into a pumpkin).
Conclusion
API.AI is already quite possible to use to build interactive interfaces in instant messengers, support chat with social networks. Given that the tool can be easily integrated with its services, this is a convenient workhorse for automating communication with your users.
PS This is my first post, I will be grateful for the constructive feedback!
')
Source: https://habr.com/ru/post/336668/
All Articles