Puzzle game from scratch on ASP.NET Core 2, let's play?
Modern web frameworks are mainly used for writing corporate applications, but they have long been quite flexible and functional for other areas. Let's try to write a logical casual game on ASP.NET Core 2. Consider the process of creating a game project, as well as innovations of the framework and related tools.
DEMO
Sources
As described above: the game is logical and casual, that is, no super graphics and complex elements. Our game world consists of many rooms, in each of them we are waiting for a special task, after which you can go to the next room. Accordingly, between the rooms there are doors that need to be opened in order to move from one room to another. In general, everything. Each task is a logical puzzle or some kind of interactive element.
The latest version of ASP.NET Core was released quite recently (in mid-August), so if you are interested in following the path of creating a project from scratch, do not forget to update at least .NET Core ( http://dot.net ).
To create a project, you can use it as an IDE (Visual Studio, Visual Studio for Mac, Rider). In the last Visual Studio update, the new web application creation dialog has been slightly reworked:
')

Or you can create a project in a regular console:

and open it in that editor that you like.
From the console, you can now also select a project template and, for example, add authorization:

Let's create a normal empty application without authorization.
And open it in Visual Studio (or your favorite editor). If you look at the structure of the project

then you can see that instead of a heap of standard nuget packages, now only one has been added - Microsoft.AspNetCore.All, which is a kind of container for everything. This is very convenient during development, as there is no need to constantly check whether the package that we need is connected, look for what it is called today, etc.
If you run the project, the result will be the phrase “Hello World!” In the browser.
GitHub Check-point 0
Most ASP.NET projects are written using the ASP.NET MVC library set, as they add considerable development flexibility. To begin with, we add the Controllers folder to the project and try to add a new controller from the context menu.

Unlike previous versions, now when you first add a controller, a dialog appears:
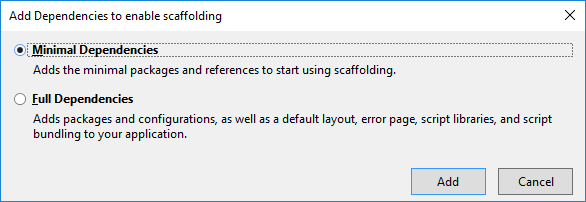
Since we first tried to add an element by pattern (scaffold), Visual Studio suggests that we customize templating. Choose minimal dependencies in order to better control what happens to the code. After automatic configuration of the template, we are told how to add MVC to the project. Use the hint and modify the class Startup.cs
GitHub Check-point 1
When launching the project, we get 404 in response, because the default route looks for the Home controller and the Index method inside it. Add a start page by creating a Home controller and a view in the new Views folder.
GitHub Check-Point 2
As mentioned above: the structural units of our game are rooms. Add a class that will be responsible for providing data about the room. To begin, we limit ourselves to the following data:
To go between rooms we will describe the class door:
In the Door class, we use ForeignKey attributes that suggest dependencies between doors and rooms. In the Room class, InverseProperty attributes are added, which also show to which property of another entity this collection belongs. InverseProperty is needed only in the case of several “similar” relationships (in this case, the room has two types of doors - to enter the room and to exit).
GitHub Check-Point 3
To work with the database, try the Entity Framework Core. To do this, we need to add a data context (the connection between the code and the database).
And also add the settings file with the database connection string and link it with the context in the ConfigureServices method.
GitHub Check-Point 4
The next step is to create the base itself from the classes that we described above. To do this, you need to run 2 commands in the Package Manger Console:
The first command will add code to migrate the database from the previous state (when it did not exist) to the last state (where we have 2 tables - Rooms and Doors). Accordingly, the second team will update the database using migration scripts.
GitHub Check-Point 5
The database is ready.
In order to show the room, it is necessary that the controller draws the details of the room from the base and transfers them to the presentation. Let's start with the controller. Let's create a new class - RoomsController with a method that will retrieve the necessary data and send it to the browser.
GitHub Check-Point 6
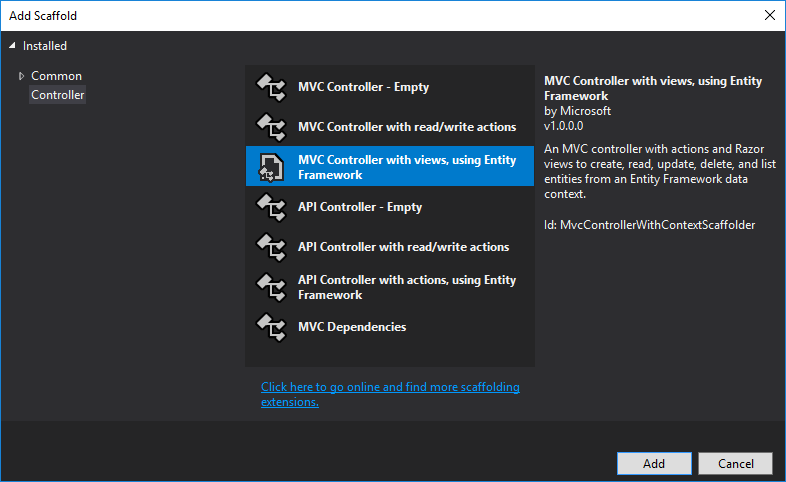
But in order to enter the room, you must first create it. Add controllers to control rooms and doors using a template engine (scaffolding):

GitHub Check-Point 7
Add styles, buttons, labels.
GitHub Check-point 8
We have a prototype ready, now we need to fill it with life.
Each user of our site must be uniquely identified. For example, in order to know who has already passed which rooms and can move on. In order to memorize players, create a Player class and add a unique identifier in the Cookies for each player. To him in addition, add the essence of CompletedRooms, where we will store information about already completed rooms.
In order for these classes to be used, they also need to be added to the data context and add migration to our database.
GitHub Check-point 8
Add logic to validate the user.
GitHub Check-point 9
Well, a few little things to make it all look not really scary. The first version of the game is ready. Unfortunately you can not rob korovanov yet.
As expected, ASP.NET Core 2 did an excellent job with the task. Of course, it is difficult to call a full-fledged game, and I want to check the possibilities of interactivity and real-time interactions. But it seems that modern web frameworks are already very close to the line where the subject matter of the project is not so important. You may notice that with new versions of Visual Studio, during development, more and more dialogs appear that automatically generate code. Already, it is used to create a project, set up a template engine, and automatically create an admin panel. This approach may evolve moreand more with time and it will be possible to code it with a mouse .
DEMO
Sources
DEMO
Sources
Idea
As described above: the game is logical and casual, that is, no super graphics and complex elements. Our game world consists of many rooms, in each of them we are waiting for a special task, after which you can go to the next room. Accordingly, between the rooms there are doors that need to be opened in order to move from one room to another. In general, everything. Each task is a logical puzzle or some kind of interactive element.
Implementation
Create a project
The latest version of ASP.NET Core was released quite recently (in mid-August), so if you are interested in following the path of creating a project from scratch, do not forget to update at least .NET Core ( http://dot.net ).
To create a project, you can use it as an IDE (Visual Studio, Visual Studio for Mac, Rider). In the last Visual Studio update, the new web application creation dialog has been slightly reworked:
')
Or you can create a project in a regular console:
and open it in that editor that you like.
From the console, you can now also select a project template and, for example, add authorization:
Let's create a normal empty application without authorization.
dotnet new webAnd open it in Visual Studio (or your favorite editor). If you look at the structure of the project
then you can see that instead of a heap of standard nuget packages, now only one has been added - Microsoft.AspNetCore.All, which is a kind of container for everything. This is very convenient during development, as there is no need to constantly check whether the package that we need is connected, look for what it is called today, etc.
If you run the project, the result will be the phrase “Hello World!” In the browser.
GitHub Check-point 0
Customize MVC
Most ASP.NET projects are written using the ASP.NET MVC library set, as they add considerable development flexibility. To begin with, we add the Controllers folder to the project and try to add a new controller from the context menu.
Unlike previous versions, now when you first add a controller, a dialog appears:
Since we first tried to add an element by pattern (scaffold), Visual Studio suggests that we customize templating. Choose minimal dependencies in order to better control what happens to the code. After automatic configuration of the template, we are told how to add MVC to the project. Use the hint and modify the class Startup.cs
GitHub Check-point 1
When launching the project, we get 404 in response, because the default route looks for the Home controller and the Index method inside it. Add a start page by creating a Home controller and a view in the new Views folder.
GitHub Check-Point 2
Add a database
As mentioned above: the structural units of our game are rooms. Add a class that will be responsible for providing data about the room. To begin, we limit ourselves to the following data:
namespace TheRooms.Models { public class Room { public int Id { get; set; } public string Name { get; set; } public string Task { get; set; } public string Answer { get; set; } [InverseProperty("RoomTo")] public ICollection<Door> DoorsIn { get; set; } [InverseProperty("RoomFrom")] public ICollection<Door> DoorsOut { get; set; } } } To go between rooms we will describe the class door:
namespace TheRooms.Models { public class Door { public int Id { get; set; } [ForeignKey("RoomFrom")] public int RoomFromId { get; set; } public Room RoomFrom { get; set; } [ForeignKey("RoomTo")] public int RoomToId { get; set; } public Room RoomTo { get; set; } } } In the Door class, we use ForeignKey attributes that suggest dependencies between doors and rooms. In the Room class, InverseProperty attributes are added, which also show to which property of another entity this collection belongs. InverseProperty is needed only in the case of several “similar” relationships (in this case, the room has two types of doors - to enter the room and to exit).
GitHub Check-Point 3
To work with the database, try the Entity Framework Core. To do this, we need to add a data context (the connection between the code and the database).
using Microsoft.EntityFrameworkCore; using TheRooms.Models; namespace TheRooms.Data { public class DataContext : DbContext { public DbSet<Room> Rooms { get; set; } public DbSet<Door> Doors { get; set; } public DataContext(DbContextOptions<DataContext> options) : base(options) { } protected override void OnModelCreating(ModelBuilder builder) { base.OnModelCreating(builder); // disable cascade delete foreach (var relationship in builder.Model.GetEntityTypes().SelectMany(e => e.GetForeignKeys())) { relationship.DeleteBehavior = DeleteBehavior.Restrict; } } } } And also add the settings file with the database connection string and link it with the context in the ConfigureServices method.
services.AddDbContext<DataContext>(options => options.UseSqlServer(Configuration.GetConnectionString("DefaultConnection"))); GitHub Check-Point 4
The next step is to create the base itself from the classes that we described above. To do this, you need to run 2 commands in the Package Manger Console:
Add-Migration Initial
Update-Database
The first command will add code to migrate the database from the previous state (when it did not exist) to the last state (where we have 2 tables - Rooms and Doors). Accordingly, the second team will update the database using migration scripts.
GitHub Check-Point 5
The database is ready.
Show room
In order to show the room, it is necessary that the controller draws the details of the room from the base and transfers them to the presentation. Let's start with the controller. Let's create a new class - RoomsController with a method that will retrieve the necessary data and send it to the browser.
public async Task<IActionResult> Show(int id) { var room = await _context.Rooms.SingleAsync(r => r.Id == id); return View(room); } GitHub Check-Point 6
But in order to enter the room, you must first create it. Add controllers to control rooms and doors using a template engine (scaffolding):
GitHub Check-Point 7
Add styles, buttons, labels.
GitHub Check-point 8
We have a prototype ready, now we need to fill it with life.
Describe the players
Each user of our site must be uniquely identified. For example, in order to know who has already passed which rooms and can move on. In order to memorize players, create a Player class and add a unique identifier in the Cookies for each player. To him in addition, add the essence of CompletedRooms, where we will store information about already completed rooms.
In order for these classes to be used, they also need to be added to the data context and add migration to our database.
GitHub Check-point 8
Add logic to validate the user.
GitHub Check-point 9
Well, a few little things to make it all look not really scary. The first version of the game is ready. Unfortunately you can not rob korovanov yet.
findings
As expected, ASP.NET Core 2 did an excellent job with the task. Of course, it is difficult to call a full-fledged game, and I want to check the possibilities of interactivity and real-time interactions. But it seems that modern web frameworks are already very close to the line where the subject matter of the project is not so important. You may notice that with new versions of Visual Studio, during development, more and more dialogs appear that automatically generate code. Already, it is used to create a project, set up a template engine, and automatically create an admin panel. This approach may evolve more
DEMO
Sources
Source: https://habr.com/ru/post/336590/
All Articles