Learn OpenGL. Part 2.3. - Materials

A couple of days ago I came across the first article in this series of lessons. Unfortunately, only the initial lessons have been translated, and the most interesting (SSAO, PBR, shadows) are only ahead. This course was translated by three people (now four), and I hope that someone from the readers will help with the translation of the remaining parts. Unfortunately, I am not a professional translator; for this, the text may contain errors of a different nature. I would be glad if you report them. Enjoy reading!
- Opengl
- Creating a window
- Hello window
- Hello triangle
- Shaders
- Textures
- Transformations
- Coordinate systems
- Camera
Part 2. Basic lighting
')
Part 3. Loading 3D Models
Part 4. OpenGL advanced features
Materials
In the real world, each object responds differently to light. Iron objects usually sparkle stronger than, for example, a clay vase. A wooden container does not react to light in the same way as a steel one. Each object has a different reflectivity. Some objects reflect light without strong scattering, while others have a fairly large reflection radius. If we want to imitate different types of objects in OpenGL, then we need to define material properties specific to each object.
In the previous lesson, we set the color of the light to determine the appearance of the object, combined with the background and reflective components. Describing objects, we can set the color of the material for all three lighting components: ambient , diffuse and specular . After that we will get detailed control over the resulting color of the object. Now add the power of shine ( shininess ) to our three colors and get all the material properties that we need:
#version 330 core struct Material { vec3 ambient; vec3 diffuse; vec3 specular; float shininess; }; uniform Material material; In the fragment shader, we create a structure that stores the material properties of the object. Of course, we can store out as independent uniform variables , but this is less organized. First we define the structure, and then simply declare a unifrom variable with the type of the newly created structure.
As you can see, we define a color vector for each component of lighting by Phong . The ambient vector determines what color an object reflects under background lighting. This is usually the color of the object itself. The diffuse vector defines the color of the object under ambient lighting. As well as the background, it determines the desired color of the object. The specular vector sets the color of the flare on the object, and the shininess variable shininess radius of this flare.
Using these four components, we can simulate a variety of real materials. The table on the devernay.free.fr website contains properties of some materials that we can see in real life. The following image shows our cube, with different materials:
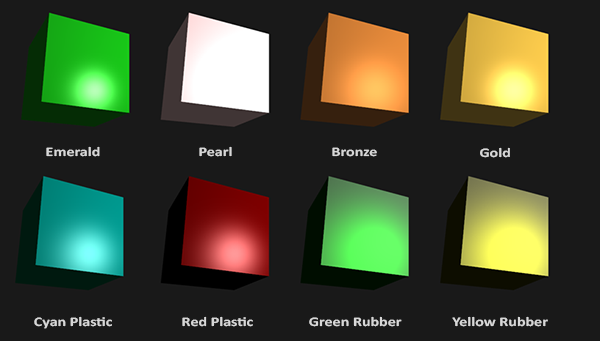
As you can see, the correctly selected material properties completely transform our cube. Of course, it can be seen with the naked eye, but for greater realism, we still need a more interesting figure. In the next section of lessons we will discuss the loading of 3d-models of any complexity.
Picking the right materials for an object is a complex art that requires a lot of experience and experimentation. Therefore, it is not uncommon for the visual quality of an object to be completely lost, if it was chosen that material was not suitable.
Let's try to implement a system of materials in the shaders.
Setting up materials
We created the structure of the material in the fragment shader, for this we need to take this into account in further calculations of the lighting. Since all material variables are stored in the structure, we can access them through a uniform material variable :
void main() { // ambient vec3 ambient = lightColor * material.ambient; // diffuse vec3 norm = normalize(Normal); vec3 lightDir = normalize(lightPos - FragPos); float diff = max(dot(norm, lightDir), 0.0); vec3 diffuse = lightColor * (diff * material.diffuse); // specular vec3 viewDir = normalize(viewPos - FragPos); vec3 reflectDir = reflect(-lightDir, norm); float spec = pow(max(dot(viewDir, reflectDir), 0.0), material.shininess); vec3 specular = lightColor * (spec * material.specular); vec3 result = ambient + diffuse + specular; FragColor = vec4(result, 1.0); } As you can see, now when calculating the lighting, we use the properties of the material structure, so this time, the resulting color depends on the material we defined. Each component of the material of an object is multiplied by its corresponding component of light.
We can customize the material of the object in the application by setting the value of suitable uniform variables . However, there is no particular way in GLSL to assign values to structures. The structure only encapsulates uniform variables . Therefore, if we want to fill it, we must set the value of each uniform variable in the same way as we did before, but this time with the prefix of the structure name:
lightingShader.setVec3("material.ambient", 1.0f, 0.5f, 0.31f); lightingShader.setVec3("material.diffuse", 1.0f, 0.5f, 0.31f); lightingShader.setVec3("material.specular", 0.5f, 0.5f, 0.5f); lightingShader.setFloat("material.shininess", 32.0f); We set the background and diffuse components to the color of the object itself, and the glare was moderately bright. We do not need him to stand out. Also, we left the brilliance force equal to 32. Now we can easily influence the material of an object from the application.
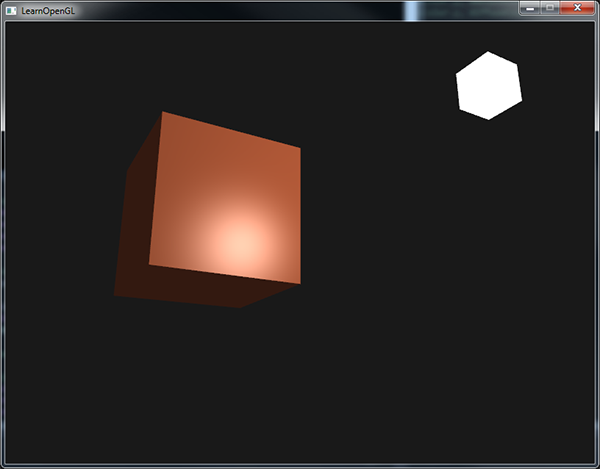
Running the program will produce the following results:

So far, it doesn't look very realistic, right?
Light properties
Now our object is too bright. The reason for this lies in the fact that the background, diffuse and glare colors with full force are reflected from any light source. However, light sources can also have different intensities. In the previous lesson, we solved this problem by replacing the background and diffuse components with constant values. Now we need to do something similar, but now for each component of the light. If we represent lightColor as vec3(1.0) , then the code will be as follows:
vec3 ambient = vec3(1.0) * material.ambient; vec3 diffuse = vec3(1.0) * (diff * material.diffuse); vec3 specular = vec3(1.0) * (spec * material.specular); These values ( vec3(1.0) ) can be changed individually for each light source, and this is exactly what we need. Now the color of the background component affects the color of the cube completely, but the background component should not affect the final color so much, so let's make it a bit smaller:
vec3 ambient = vec3(0.1) * material.ambient; We can influence the diffuse and glare component of light in the same way. This is closely related to what we did in the previous lesson. Now we need to create something similar to the structure of the material, but now for the light:
struct Light { vec3 position; vec3 ambient; vec3 diffuse; vec3 specular; }; uniform Light light; The light source has different intensity for the background , diffuse and glare light. Usually the intensity of the background light is quite low, because we do not want it to dominate too? The color of the diffuse component is the color of the light source itself; often it is bright white. The mirror component is usually left equal to vec3(1.0) . I note that we also added a vector of the position of the light in the structure.
Now we update the lighting calculations in the fragment shader:
vec3 ambient = light.ambient * material.ambient; vec3 diffuse = light.diffuse * (diff * material.diffuse); vec3 specular = light.specular * (spec * material.specular); We also need to set the light intensity in the application itself:
lightingShader.setVec3("light.ambient", 0.2f, 0.2f, 0.2f); lightingShader.setVec3("light.diffuse", 0.5f, 0.5f, 0.5f); // darken the light a bit to fit the scene lightingShader.setVec3("light.specular", 1.0f, 1.0f, 1.0f); Now we have modeled the effect of light on the material of the object and obtained a result similar to the result of the previous lesson. However, now we have complete control over the lighting and material of the object:
Now it is relatively easy to change the appearance of the object.
Different colors of light
Until now, the color of our light source ranged from white to black, so we could not change the color of the object itself (only its intensity). However, from this point on, we have easy access to the properties of light, so we can change it over time to get such cool results:
As you can see, the change in light affects the colors an object can reflect (you probably remember from the color lesson), and this, in turn, significantly affects the result.
We can easily vary the light from time to time, changing the background and diffuse colors through sin and glfwGetTime :
glm::vec3 lightColor; lightColor.x = sin(glfwGetTime() * 2.0f); lightColor.y = sin(glfwGetTime() * 0.7f); lightColor.z = sin(glfwGetTime() * 1.3f); glm::vec3 diffuseColor = lightColor * glm::vec3(0.5f); // decrease the influence glm::vec3 ambientColor = diffuseColor * glm::vec3(0.2f); // low influence lightingShader.setVec3("light.ambient", ambientColor); lightingShader.setVec3("light.diffuse", diffuseColor); Try and experiment with lighting and materials and you will see how they influence the result. You can find the source code of the application here .
Exercises
- Will you be able to simulate some real objects, endowing them with the relevant materials that we saw at the beginning of this lesson? Note that the tabular values of the background light do not coincide with the diffuse - they do not take into account the intensity of light. To get the right results, you need to set the intensity of each component of the light to
vec3(1.0). Solution for blue-green plastic container.
Source: https://habr.com/ru/post/336166/
All Articles