The future of web technologies: creating an intelligent chat bot that can hear and speak
Nowadays, voice interfaces are omnipresent. First, more and more mobile phone users are using voice assistants such as Siri and Cortana. Secondly, devices like Amazon Echo and Google Home are becoming a familiar element of the interior. These systems are based on speech recognition software that allows users to communicate with machines using voice commands . Now the relay, in the guise of Web Speech API, goes to browsers.

During the development of a web application, we can rely on various graphical controls for organizing user interaction. Web Speech API allows you to integrate into a person's natural ways of voice communication with a minimal visual interface. We have at our disposal countless options for applying new technology, enriching the capabilities of programs. In addition, the Web Speech API can make working with web applications more convenient for people with physical or cognitive disabilities or injuries. Thus, the web space of the future may well become more sociable and accessible.
The Web Speech API allows web sites and web applications not only to talk with the user, but also to perceive his speech. Take a look at at least a few excellent examples of how this can be used to expand the possibilities of interaction of programs with a person.
')
Today we will talk about how to create an intelligent browser-based voice chat using the Web Speech API. The program will listen to the user and respond to his replicas with a synthesized voice. Since the Web Speech API is still experimental, the application will only work in browsers that support this API.
The features used in this material, both speech recognition and speech synthesis, are now supported only by Chromium-based browsers, including Chrome 25+ and Opera 27+, while Firefox, Edge and Safari only support speech synthesis.
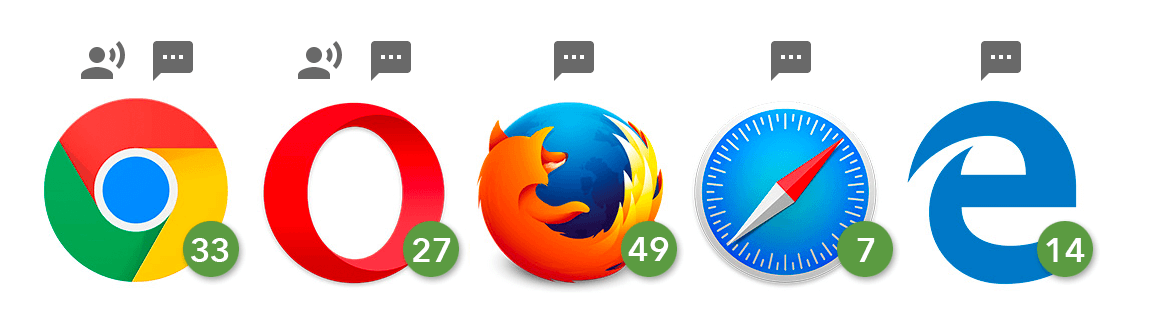
Support for speech synthesis and recognition in various browsers
Here is a video that shows how what we are going to create works in Chrome.
Work on a web application consists of three main steps:

Diagram of application interaction with the user and external services
The full source code for what we will create here can be found on GitHub.
This tutorial is based on Node.js. In order to successfully deal with it, you need to know JavaScript and have a basic understanding of Node.js. Check if you have a Node installed and can get to work.
To begin with we will prepare a framework of Node.js-applications. Create a folder and place the following in it:
Then run this command to initialize the application:
The
Now you need to install the dependencies required to build the program:
Using the
We are going to use Express , a server-side framework for Node.js applications that will run on a local server. In order to organize bidirectional data exchange between the server and the client in real time, apply Socket.IO . In addition, we will install a tool to interact with the API.AI natural language processing service. This will allow us to create an intelligent chat bot capable of maintaining a conversation with a person.
Socket.IO is a library that simplifies the use of WebSockets technology in Node.js. After establishing a connection between the client and the server based on the sockets, the messages between them will be transmitted very quickly. Namely, it will happen, on the client side, at the moment when the Web Speech API converts the user's phrase into a text message, and, on the server side, when the text of the artificial intelligence response comes from API.AI.
Create an
Now let's work on the client part of the system. In the next step, we integrate the Web Speech API into the application interface.
The Web Speech API has a main controller interface called SpeechRecognition . It allows you to convert to text what the user said into the microphone.
The user interface of this application is very simple. Its main element is a button, pressing which starts voice recognition. Configure the
Add a button to the body of an HTML document:
To style a button, use the
In
Here we use the names of objects with and without prefix, since Chrome now supports the API we need only in the version with the prefix
In addition, we use ECMAScript6 syntax. It includes support for the
If desired, speech recognition can be customized by setting various properties of the corresponding object. We apply the following settings:
Then we need a link to the button. We will listen to the click event that is used to start the speech recognition process.
After running recognition, use the
Here we are interested in the
Now we will use Socket.IO to transfer data to the server code.
Socket.IO is a library designed for real-time web applications. It allows you to organize bidirectional data exchange between the client and server parts of the system. We are going to use this library to transfer the textual representation of the recognized speech to the code running on the Node.js server, and then to send the server's response to the browser.
You may be wondering why we do not use simple HTTP or AJAX requests. Data could be sent to the server, for example, using a POST request. However, we use WebSockets via Socket.IO, since this is the most successful solution for organizing bi-directional communication, especially for those cases when events are transmitted from the server to the browser. Thanks to a persistent socket-based connection, we don’t need to reload the data in the browser or send AJAX requests often.
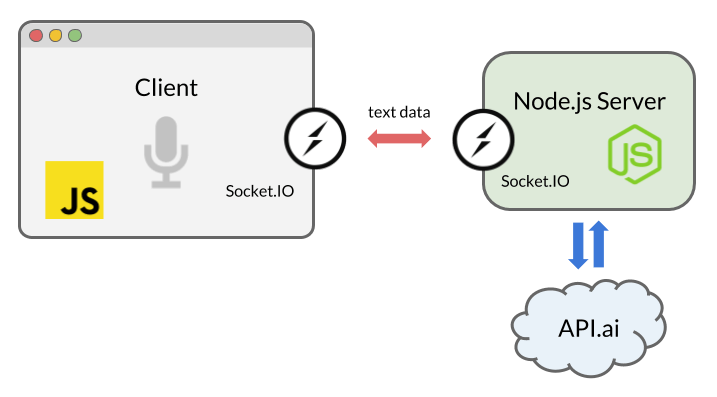
Interaction between client, server, and third-party natural language processing service
On the client, in the
Then we add the following code to where we handle the
We now turn to the server side of the application. It should receive the text transmitted by the client and transfer it to a third-party service that implements the functions of artificial intelligence. After receiving a response from the service, the server must transmit it to the client.
Many platforms and services allow you to integrate an application with an artificial intelligence system using speech-to-text conversion and natural language processing. Among them - IBM Watson , Microsoft LUIS , and Wit.ai. To quickly build a voice interface, we will use API.AI. Here you can get a free developer account and quickly set up the core of a simple chat bot using the web service interface and library for Node.js.
After you have created an account, create an agent. You can read about this at the beginning of the getting started guide . Full customization involves creating entities and setting up links between phrases spoken by the user and actions performed by the system. We will not do this by using the Small Talk preset. This item should be selected in the left menu, and then, using the switch, enable the service.

Configuring Small Talk in API.AI
Immediately, using the API.AI interface, configure the agent. Go to the General Settings page by clicking the gear icon next to the agent name and get the API key. You will need what is called here "client access token" - the service access token. We will use this token in the Node.js SDK.
We connect our Node.js application to API.AI using the appropriate SDK. In the
If you are going to run the code only locally, you can simply enter your API token here. Otherwise, it is better to store it in an environment variable. There are many ways to set environment variables, I usually write the corresponding data to a
So, we, on the server, use Socket.IO to get the result of speech recognition from the browser. As soon as the connection is established and the message is delivered to the server, we will use the API.AI capabilities to get the bot's response to the user's statement:
When API.AI returns the result, we use the
In order to complete the work on the application, let's return to the client file
Create a function for voice synthesis. Here we will use the
The function accepts, as an argument, a string, after which the system utters the text from this string:
In this function, we first create a link to the API
Then, using the constructor, we create a new SpeechSynthesisUtterance () object. Next, set the
And finally, we use the
Now we will get a response from the server, again using Socket.IO. Once the message is received, call the above function:
Now you can chat with our intelligent chat bot!
Please note that the first time you try to communicate with the program, the browser will ask you for permission to use the microphone. As in the case of other APIs (Geolocation, Notification), the browser asks for permission before working with confidential data. As a result, your voice will not be recorded without your knowledge.
If you chat with this bot for a while, you will be bored with chatter, as the AI used here is very simple. However, bots created on the basis of API.AI, can be configured and trained. You can make your bot smarter by reading the API.AI documentation and working on its intelligence.
It should be noted that this guide covers only the main features of the new API, but it is, in fact, very flexible and supports many settings. You can change the language of speech recognition and synthesis, the synthesized voice, including the accent (for example, American and British English), the pitch of the voice, and the speed at which the words are pronounced. Here are some useful links to help you learn more about the Web Speech API:
Here are useful materials on Node.js and on the libraries we used here:
And finally, take a look at the various natural language processing tools and platforms for communicating with computers:
We believe that Google, Facebook, Microsoft, IBM and Amazon are far from being in the list of developers of platforms for processing natural language. Does this mean that the future of the web is uniquely behind voice interfaces? No, it cannot be stated with complete confidence. However, this, as well as the fact that such interfaces are quite popular on mobile platforms, suggests that they also have a place in web applications. Voice technologies and artificial intelligence will complement the usual ways of working with web content, making the Internet more convenient and accessible.
I hope you liked our story about voice web technologies and you created an interesting virtual interlocutor.
Dear readers! What methods of application of speech recognition and speech synthesis in web applications seem to you the most interesting and promising?
During the development of a web application, we can rely on various graphical controls for organizing user interaction. Web Speech API allows you to integrate into a person's natural ways of voice communication with a minimal visual interface. We have at our disposal countless options for applying new technology, enriching the capabilities of programs. In addition, the Web Speech API can make working with web applications more convenient for people with physical or cognitive disabilities or injuries. Thus, the web space of the future may well become more sociable and accessible.
The Web Speech API allows web sites and web applications not only to talk with the user, but also to perceive his speech. Take a look at at least a few excellent examples of how this can be used to expand the possibilities of interaction of programs with a person.
')
Today we will talk about how to create an intelligent browser-based voice chat using the Web Speech API. The program will listen to the user and respond to his replicas with a synthesized voice. Since the Web Speech API is still experimental, the application will only work in browsers that support this API.
The features used in this material, both speech recognition and speech synthesis, are now supported only by Chromium-based browsers, including Chrome 25+ and Opera 27+, while Firefox, Edge and Safari only support speech synthesis.
Support for speech synthesis and recognition in various browsers
Here is a video that shows how what we are going to create works in Chrome.
Work on a web application consists of three main steps:
- Using the
SpeechRecognitioninterface from the Web Speech API to organize the program's perception of the user's voice - Transforming what the user said to text, and sending the request to a commercial natural language processing API, in our case API.AI.
- Getting a response from API.AI and voicing it using the
SpeechSynthesisinterface.
Diagram of application interaction with the user and external services
The full source code for what we will create here can be found on GitHub.
This tutorial is based on Node.js. In order to successfully deal with it, you need to know JavaScript and have a basic understanding of Node.js. Check if you have a Node installed and can get to work.
Preparing Node.js Applications
To begin with we will prepare a framework of Node.js-applications. Create a folder and place the following in it:
. ├── index.js ├── public │ ├── css │ │ └── style.css │ └── js │ └── script.js └── views └── index.html Then run this command to initialize the application:
$ npm init -f The
-f allows you to apply the default settings, but you can configure the application manually without using this switch. During initialization, a package.json file will be created that contains basic information about the application.Now you need to install the dependencies required to build the program:
$ npm install express socket.io apiai --save Using the
--save flag --save automatically update the package.json file. Dependency information will be added to it.We are going to use Express , a server-side framework for Node.js applications that will run on a local server. In order to organize bidirectional data exchange between the server and the client in real time, apply Socket.IO . In addition, we will install a tool to interact with the API.AI natural language processing service. This will allow us to create an intelligent chat bot capable of maintaining a conversation with a person.
Socket.IO is a library that simplifies the use of WebSockets technology in Node.js. After establishing a connection between the client and the server based on the sockets, the messages between them will be transmitted very quickly. Namely, it will happen, on the client side, at the moment when the Web Speech API converts the user's phrase into a text message, and, on the server side, when the text of the artificial intelligence response comes from API.AI.
Create an
index.js file, prepare an instance of Express, and wait for connections. const express = require('express'); const app = express(); app.use(express.static(__dirname + '/views')); // html app.use(express.static(__dirname + '/public')); // js, css, images const server = app.listen(5000); app.get('/', (req, res) => { res.sendFile('index.html'); }); Now let's work on the client part of the system. In the next step, we integrate the Web Speech API into the application interface.
Speech Recognition with SpeechRecognition
The Web Speech API has a main controller interface called SpeechRecognition . It allows you to convert to text what the user said into the microphone.
The user interface of this application is very simple. Its main element is a button, pressing which starts voice recognition. Configure the
index.html file, connect the file with client scripts ( script.js ) and the Socket.IO library, which we will use to exchange data with the server later: <html lang="en"> <head>…</head> <body> … <script src="https://cdnjs.cloudflare.com/ajax/libs/socket.io/2.0.1/socket.io.js"></script> <script src="js/script.js"></script> </body> </html> Add a button to the body of an HTML document:
<button>Talk</button> To style a button, use the
style.css file, which can be found in the example code .Voice Capture Using JavaScript
In
script.js , for voice recognition, let's create an instance of SpeechRecognition voice recognition services controller interface from the Web Speech API: const SpeechRecognition = window.SpeechRecognition || window.webkitSpeechRecognition; const recognition = new SpeechRecognition(); Here we use the names of objects with and without prefix, since Chrome now supports the API we need only in the version with the prefix
webkit .In addition, we use ECMAScript6 syntax. It includes support for the
const keyword and switch functions. All this is available in browsers that support both Speech APIs - SpeechRecognition and SpeechSynthesis .If desired, speech recognition can be customized by setting various properties of the corresponding object. We apply the following settings:
recognition.lang = 'en-US'; recognition.interimResults = false; Then we need a link to the button. We will listen to the click event that is used to start the speech recognition process.
After running recognition, use the
result event to get a textual representation of what the user said: recognition.addEventListener('result', (e) => { let last = e.results.length - 1; let text = e.results[last][0].transcript; console.log('Confidence: ' + e.results[0][0].confidence); // Socket.IO }); Here we are interested in the
SpeechRecognitionResultList object, which contains the result of speech recognition. Text can be extracted from the corresponding array. In addition, as you can see, here we are outputting the confidence indicator for the received text in the console.Now we will use Socket.IO to transfer data to the server code.
Real-time data exchange using Socket.IO
Socket.IO is a library designed for real-time web applications. It allows you to organize bidirectional data exchange between the client and server parts of the system. We are going to use this library to transfer the textual representation of the recognized speech to the code running on the Node.js server, and then to send the server's response to the browser.
You may be wondering why we do not use simple HTTP or AJAX requests. Data could be sent to the server, for example, using a POST request. However, we use WebSockets via Socket.IO, since this is the most successful solution for organizing bi-directional communication, especially for those cases when events are transmitted from the server to the browser. Thanks to a persistent socket-based connection, we don’t need to reload the data in the browser or send AJAX requests often.
Interaction between client, server, and third-party natural language processing service
On the client, in the
script.js file, create an instance of Socket.IO: const socket = io(); Then we add the following code to where we handle the
result event from SpeechRecognition : socket.emit('chat message', text); We now turn to the server side of the application. It should receive the text transmitted by the client and transfer it to a third-party service that implements the functions of artificial intelligence. After receiving a response from the service, the server must transmit it to the client.
Getting a response from an external service
Many platforms and services allow you to integrate an application with an artificial intelligence system using speech-to-text conversion and natural language processing. Among them - IBM Watson , Microsoft LUIS , and Wit.ai. To quickly build a voice interface, we will use API.AI. Here you can get a free developer account and quickly set up the core of a simple chat bot using the web service interface and library for Node.js.
After you have created an account, create an agent. You can read about this at the beginning of the getting started guide . Full customization involves creating entities and setting up links between phrases spoken by the user and actions performed by the system. We will not do this by using the Small Talk preset. This item should be selected in the left menu, and then, using the switch, enable the service.
Configuring Small Talk in API.AI
Immediately, using the API.AI interface, configure the agent. Go to the General Settings page by clicking the gear icon next to the agent name and get the API key. You will need what is called here "client access token" - the service access token. We will use this token in the Node.js SDK.
Using the SDK API.AI for Node.js
We connect our Node.js application to API.AI using the appropriate SDK. In the
index.js file, index.js initialize API.AI using the access token. const apiai = require('apiai')(APIAI_TOKEN); If you are going to run the code only locally, you can simply enter your API token here. Otherwise, it is better to store it in an environment variable. There are many ways to set environment variables, I usually write the corresponding data to a
.env file. In the code that is laid out on GitHub, this file does not exist, since it is included in .gitignore . If you want to know how these files are organized, take a look at the .env-test file .So, we, on the server, use Socket.IO to get the result of speech recognition from the browser. As soon as the connection is established and the message is delivered to the server, we will use the API.AI capabilities to get the bot's response to the user's statement:
io.on('connection', function(socket) { socket.on('chat message', (text) => { // API.AI let apiaiReq = apiai.textRequest(text, { sessionId: APIAI_SESSION_ID }); apiaiReq.on('response', (response) => { let aiText = response.result.fulfillment.speech; socket.emit('bot reply', aiText); // Send the result back to the browser! }); apiaiReq.on('error', (error) => { console.log(error); }); apiaiReq.end(); }); }); When API.AI returns the result, we use the
socket.emit() Socket.IO method to send data to the browser.SpeechSynthesis - voice for bot
In order to complete the work on the application, let's return to the client file
script.js .Create a function for voice synthesis. Here we will use the
SpeechSynthesis controller SpeechSynthesis from the Web Speech API.The function accepts, as an argument, a string, after which the system utters the text from this string:
function synthVoice(text) { const synth = window.speechSynthesis; const utterance = new SpeechSynthesisUtterance(); utterance.text = text; synth.speak(utterance); } In this function, we first create a link to the API
window.speechSynthesis API entry point. You may notice that this time we do not use properties with prefixes. The fact is that support for this API is broader than that of SpeechRecognition , and all browsers that support this API have already removed the prefix for SpeechSynthesis .Then, using the constructor, we create a new SpeechSynthesisUtterance () object. Next, set the
text property of the utterance object. Exactly what we write in this property, and say the machine. You can set other properties here , for example - the voice property to select the type of voice.And finally, we use the
SpeechSynthesis.speak() call, thanks to which the computer utters the phrase.Now we will get a response from the server, again using Socket.IO. Once the message is received, call the above function:
socket.on('bot reply', function(replyText) { synthVoice(replyText); }); Now you can chat with our intelligent chat bot!
Chatting with a chat bot
Please note that the first time you try to communicate with the program, the browser will ask you for permission to use the microphone. As in the case of other APIs (Geolocation, Notification), the browser asks for permission before working with confidential data. As a result, your voice will not be recorded without your knowledge.
If you chat with this bot for a while, you will be bored with chatter, as the AI used here is very simple. However, bots created on the basis of API.AI, can be configured and trained. You can make your bot smarter by reading the API.AI documentation and working on its intelligence.
It should be noted that this guide covers only the main features of the new API, but it is, in fact, very flexible and supports many settings. You can change the language of speech recognition and synthesis, the synthesized voice, including the accent (for example, American and British English), the pitch of the voice, and the speed at which the words are pronounced. Here are some useful links to help you learn more about the Web Speech API:
- Web Speech API (Mozilla Developer Network)
- Web Speech API Specification (W3C)
- Web Speech API: Speech Synthesis (Microsoft)
Here are useful materials on Node.js and on the libraries we used here:
And finally, take a look at the various natural language processing tools and platforms for communicating with computers:
Results: a step into the future of the web
We believe that Google, Facebook, Microsoft, IBM and Amazon are far from being in the list of developers of platforms for processing natural language. Does this mean that the future of the web is uniquely behind voice interfaces? No, it cannot be stated with complete confidence. However, this, as well as the fact that such interfaces are quite popular on mobile platforms, suggests that they also have a place in web applications. Voice technologies and artificial intelligence will complement the usual ways of working with web content, making the Internet more convenient and accessible.
I hope you liked our story about voice web technologies and you created an interesting virtual interlocutor.
Dear readers! What methods of application of speech recognition and speech synthesis in web applications seem to you the most interesting and promising?
Source: https://habr.com/ru/post/336088/
All Articles