Configuring the automatic assembly of the project Unity3d in Gitlab CI
Update 02/17/2019 - This article is out of date. To use it in 2019 is not worth it.
Why do you need to automatically build the project does not need to explain to anyone.
In the case of assembling projects for Unity, this is especially true, since an average project, for example, for WebGL, is assembled on a working machine for 5-7 minutes, completely closing it.
Not so long ago, the Unity version for Linux was released, which made it possible in principle to configure automatic build using Gitlab CI (which is based on docker images).
')
I want to share my experience with this setup.
We will need a docker image that contains Unity.
Below I will attach the finished docker file.
But first, a few comments, from which it should be clear why there is such an exotic thing in a dockerfile as gnome or tightvncserver.
So, the main problem when using the docker image with the “head-on” unit: after installation, manual activation is required. Moreover, activation works only in graphical mode. Fortunately, you only need to do this once.
Therefore, the plan is:
Below is my docker file. He collects the image for unity5.6
I do not change the version of Unity to a newer one, because I myself checked everything with this version.
But you can try to replace
beta.unity3d.com/download/6a86e542cf5c/unity-editor_amd64-5.6.1xf1Linux.deb
to another version.
The current list can be found here :
And here are two scripts that are used by this dokerfile:
We put these three files in one directory.
We collect a docker image (it will contain a non-activated copy of Unity)
I did this:
We start the container from this image:
We need the port to reach the VNC server.
Why do I need privileges, I do not remember, but without them it does not work. We specify bash as the entrypoint to go directly to the running container.
Now inside the container you need to start the vnc server:
It will ask for a password. Ok - we come up with.
As can be seen in the screenshot, the server writes the path to its log file.
You can look at this log to make sure that gnome has started (however, you can not look).
Now we need a VNC client. Any.
For example, this one
Go to your server (you must specify IP + port) for example:
123.123.133.123:5901
The port will be exactly 5901. But the IP is yours.
Run through the gnome Unity menu
Login and activate the license.
We leave
We stop vncserver (of course, inside the container docker - in the same place where it was launched)
It should be made not to litter our future image with the activated Unity every unnecessary junk.
Now we open another terminal on the machine where the docker is running. We need to save the new docker image from the running container.
To do this, without leaving the container, in another terminal we find this container, simply by running docker ps and copying the id of this container.
Next, save the container to a new image:
Now we have a docker image with activated Unity.
You can fill it in the registry.
After this step, you should check the performance of the image outside of gitlab.
You can do it like this:
Let in / root / myProject are the sources of our project, which need to be collected.
We know (or will find out now) that to build from the command line, you need to put a special class configuring the assembly in the project sources.
Put it in the Assets / Editor
Both the class and its method should be named exactly as in my example below (since these names were mentioned in our runUnity.sh script. Remember: “- executeMethod WebGLBuilder.build”?)
Next, launch the container from our image like this:
And make sure the build works.
If the build is working, go to the next item:
Below I will give my .gitlab-ci.yml
But first, a few comments again - why is it sougly non-trivial.
Attempting to build on the basis of the newly assembled image (softaria / unity3d: licenced)
failed - an error occurred "/ usr / bin / sh: / usr / bin / sh: cannot execute binary file gitlab"
I don’t remember the exact reasons for it, but it turned out to be a simple and working solution to use the standard image - docker, and to launch my image inside it.
The second problem was the inability to transfer its source code into the container with Unity using volume. Inside the gitlab, the volumes just didn't work. Perhaps there is some kind of workaround here, but I wastoo lazy to sort it out easier to copy the sources into the container from the unit, and then take the result back.
I do not pretend to the elegance of these decisions, but here you are
That's all. If you have any questions, I will try to answer in the comments.
update from 09/25/2017 - Added ffmpeg to the unit image build. Without it, there is no sound in games.
Why do you need to automatically build the project does not need to explain to anyone.
In the case of assembling projects for Unity, this is especially true, since an average project, for example, for WebGL, is assembled on a working machine for 5-7 minutes, completely closing it.
Not so long ago, the Unity version for Linux was released, which made it possible in principle to configure automatic build using Gitlab CI (which is based on docker images).
')
I want to share my experience with this setup.
Part one - we collect a docker image with Unity
We will need a docker image that contains Unity.
Below I will attach the finished docker file.
But first, a few comments, from which it should be clear why there is such an exotic thing in a dockerfile as gnome or tightvncserver.
So, the main problem when using the docker image with the “head-on” unit: after installation, manual activation is required. Moreover, activation works only in graphical mode. Fortunately, you only need to do this once.
Therefore, the plan is:
- We collect the image with Unity containing the graphic environment and the VNC server
- We start from it the container
- Connect to the VNC server
- Launch Unity manually and activate it.
- Save the container to the new image, which will contain an activated copy of the unity
Below is my docker file. He collects the image for unity5.6
I do not change the version of Unity to a newer one, because I myself checked everything with this version.
But you can try to replace
beta.unity3d.com/download/6a86e542cf5c/unity-editor_amd64-5.6.1xf1Linux.deb
to another version.
The current list can be found here :
Dockerfile
FROM ubuntu:16.04 RUN apt-get update -qq RUN env DEBIAN_FRONTEND=noninteractive apt-get -qq install -y ffmpeg ubuntu-desktop gnome-panel gnome-settings-daemon metacity nautilus gnome-terminal --no-install-recommends curl gconf-service lib32gcc1 lib32stdc++6 libasound2 libc6 libc6-i386 libcairo2 libcap2 libcups2 libdbus-1-3 libexpat1 libfontconfig1 libfreetype6 libgcc1 libgconf-2-4 libgdk-pixbuf2.0-0 libgl1-mesa-glx libglib2.0-0 libglu1-mesa libgtk2.0-0 libnspr4 libnss3 libpango1.0-0 libstdc++6 libx11-6 libxcomposite1 libxcursor1 libxdamage1 libxext6 libxfixes3 libxi6 libxrandr2 libxrender1 libxtst6 zlib1g debconf npm xdg-utils lsb-release libpq5 xvfb git vim xrdp tightvncserver \ && rm -rf /var/lib/apt/lists/* && apt-get purge RUN echo "Downloading Unity3D installer...." \ && mkdir /app \ && curl -o /app/unity_editor.deb "http://beta.unity3d.com/download/6a86e542cf5c/unity-editor_amd64-5.6.1xf1Linux.deb" \ && echo "Unity3D installer downloaded." \ # To make a "min" version of this image build, omit this dpkg line. It saves a lot of space, but you'll need to dpkg it yourself when you use the image. && dpkg -i /app/unity_editor.deb && ln -s /opt/Unity/Editor/Unity /usr/local/bin/unity && rm -rf /app RUN mkdir -p .vnc .cache/unity3d .local/share/unity3d ENV USER root ADD xstartup /root/.vnc/xstartup COPY runUnity.sh /root RUN chmod 755 /root/.vnc/xstartup && chmod 755 /root/runUnity.sh && sed -i -e 's/\r//g' /root/.vnc/xstartup && sed -i -e 's/\r//g' /root/runUnity.sh # VNC EXPOSE 5901 ENTRYPOINT ["bash"] And here are two scripts that are used by this dokerfile:
xstartup
#!/bin/sh export XKL_XMODMAP_DISABLE=1 unset SESSION_MANAGER unset DBUS_SESSION_BUS_ADDRESS [ -x /etc/vnc/xstartup ] && exec /etc/vnc/xstartup [ -r $HOME/.Xresources ] && xrdb $HOME/.Xresources xsetroot -solid grey vncconfig -iconic & gnome-panel & gnome-settings-daemon & metacity & nautilus & gnome-terminal & runUnity.sh
#!/bin/sh xvfb-run --server-args="-screen 0 1024x768x24" /opt/Unity/Editor/Unity -batchmode -logfile -force-opengl -quit -projectPath /project -executeMethod WebGLBuilder.build Step 1
We put these three files in one directory.
Step 2
We collect a docker image (it will contain a non-activated copy of Unity)
I did this:
docker build -t softaria/unity3d . Step 3
We start the container from this image:
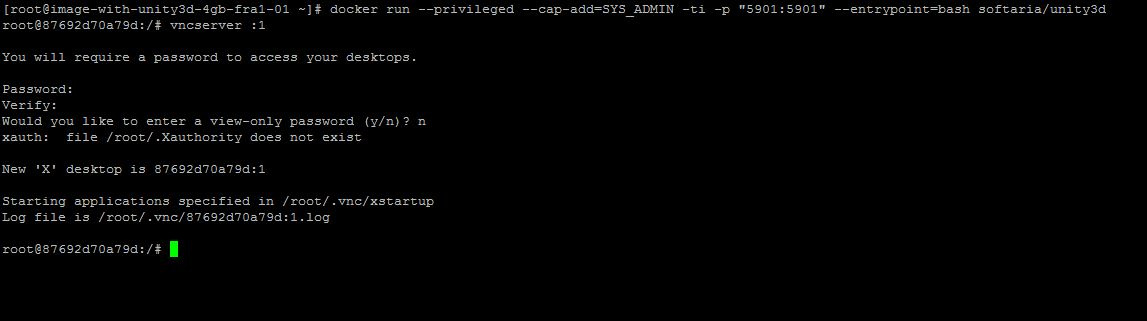
docker run --privileged --cap-add=SYS_ADMIN -ti -p "5901:5901" --entrypoint=bash softaria/unity3d We need the port to reach the VNC server.
Why do I need privileges, I do not remember, but without them it does not work. We specify bash as the entrypoint to go directly to the running container.
Step 4
Now inside the container you need to start the vnc server:
vncserver :1 It will ask for a password. Ok - we come up with.
As can be seen in the screenshot, the server writes the path to its log file.
You can look at this log to make sure that gnome has started (however, you can not look).
Step 5
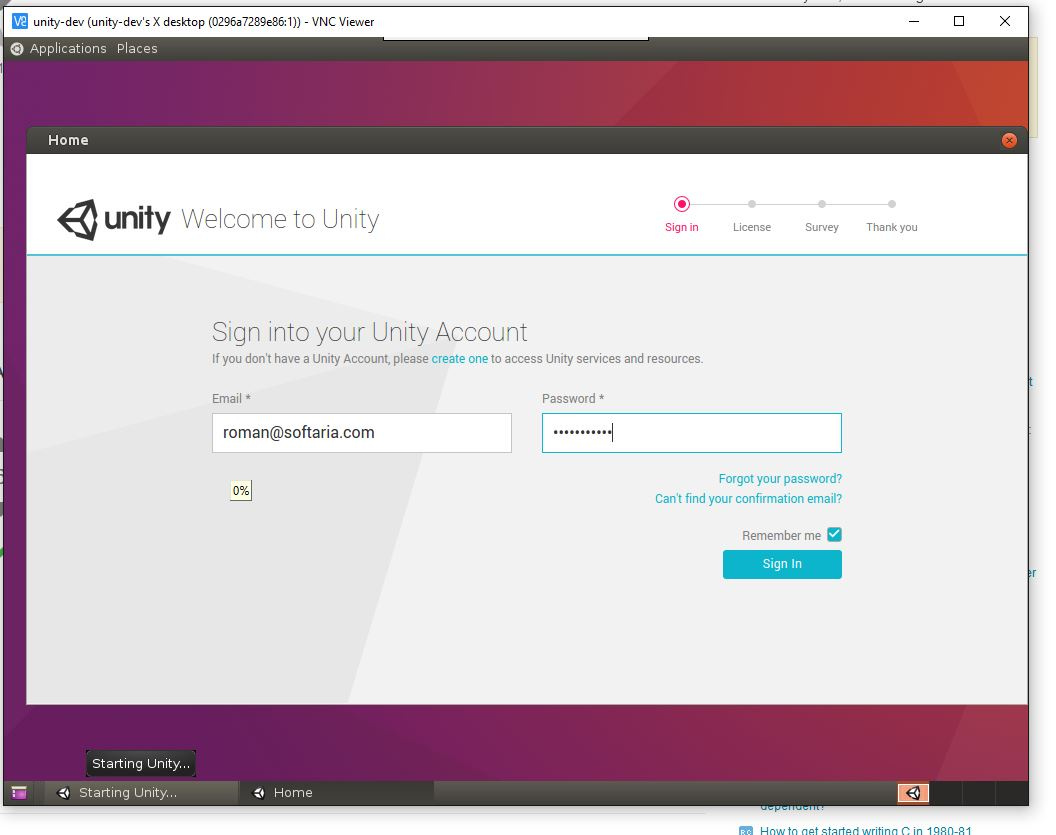
Now we need a VNC client. Any.
For example, this one
Go to your server (you must specify IP + port) for example:
123.123.133.123:5901
The port will be exactly 5901. But the IP is yours.
Step 6
Run through the gnome Unity menu
Login and activate the license.
We leave
Step 7
We stop vncserver (of course, inside the container docker - in the same place where it was launched)
vncserver -kill :1 It should be made not to litter our future image with the activated Unity every unnecessary junk.
Step 8
Now we open another terminal on the machine where the docker is running. We need to save the new docker image from the running container.
To do this, without leaving the container, in another terminal we find this container, simply by running docker ps and copying the id of this container.
Next, save the container to a new image:
docker commit {-} softaria/unity3d:licensed Now we have a docker image with activated Unity.
You can fill it in the registry.
Check the image
After this step, you should check the performance of the image outside of gitlab.
You can do it like this:
Let in / root / myProject are the sources of our project, which need to be collected.
We know (or will find out now) that to build from the command line, you need to put a special class configuring the assembly in the project sources.
Put it in the Assets / Editor
Both the class and its method should be named exactly as in my example below (since these names were mentioned in our runUnity.sh script. Remember: “- executeMethod WebGLBuilder.build”?)
public class WebGLBuilder { static void build() { // string[] scenes = { "Assets/main.unity" }; // — , — ( WebGL, None) BuildPipeline.BuildPlayer(scenes, "WebGL-Dist", BuildTarget.WebGL, BuildOptions.None); } } Next, launch the container from our image like this:
docker run --privileged --cap-add=SYS_ADMIN -v "/root/myProject:/project" softaria/unity3d:licensed /root/runUnity.sh And make sure the build works.
If the build is working, go to the next item:
Part two. Build the project in Gitlab.CI
Below I will give my .gitlab-ci.yml
But first, a few comments again - why is it so
Attempting to build on the basis of the newly assembled image (softaria / unity3d: licenced)
failed - an error occurred "/ usr / bin / sh: / usr / bin / sh: cannot execute binary file gitlab"
I don’t remember the exact reasons for it, but it turned out to be a simple and working solution to use the standard image - docker, and to launch my image inside it.
The second problem was the inability to transfer its source code into the container with Unity using volume. Inside the gitlab, the volumes just didn't work. Perhaps there is some kind of workaround here, but I was
I do not pretend to the elegance of these decisions, but here you are
working build option:
stages: - build build: image: docker stage: build before_script: # - docker login -u $CI_REGISTRY_USER -p $CI_BUILD_TOKEN $CI_REGISTRY script: # - docker pull docker.softaria.com/games/unity:licensed # , - docker create --name ${CI_BUILD_REF}_lines --privileged --cap-add=SYS_ADMIN --entrypoint=bash docker.softaria.com/games/unity:licensed /root/runUnity.sh # - docker cp $(pwd) ${CI_BUILD_REF}_lines:/project # - docker start -a -i ${CI_BUILD_REF}_lines # - rm -rf nginx/client # - docker cp ${CI_BUILD_REF}_lines:/project/WebGL-Dist/ nginx/client/ # — nginx, . ( ) - . - docker build -t $CI_REGISTRY_IMAGE --build-arg build_name=$CI_PIPELINE_ID nginx - docker push $CI_REGISTRY_IMAGE after_script: - docker rm ${CI_BUILD_REF}_lines - docker logout $CI_REGISTRY tags: - docker artifacts: name: "${CI_BUILD_REF_NAME}_${CI_BUILD_REF}" expire_in: 2 weeks paths: - nginx/client only: - master That's all. If you have any questions, I will try to answer in the comments.
update from 09/25/2017 - Added ffmpeg to the unit image build. Without it, there is no sound in games.
Source: https://habr.com/ru/post/335980/
All Articles