New features in Laravel 5.5
The new release of Laravel 5.5 will be a long-term support release (Long Term Support, LTS). This means that he will receive edits of bugs within 2 years, and security updates - within 3 years. The same was the release of Laravel 5.1, but its two-year revision period is coming to an end this year. Let's see without too much fuss what awaits us in the new version.
Create a new project on Laravel 5.5
Since the new release is not yet officially released, we can download the dev release for now with the following command:
laravel new laravel55 --dev cd laravel55 php artisan key:generate If you do not like Laravel installer, you can use the composer command:
composer create-project --prefer-dist --stability=dev laravel/laravel:dev-master cd laravel php artisan key:generate When we go to the home page of the new application, we will have to see the welcome page, similar to the one in previous versions of Laravel.
Render Mailables in the browser
It seems to me that this feature will be very useful. In previous versions of Laravel, we had to send real letters or use an email client like Mailtrap to test the newsletter, and this was not the most fun task. No more suffering, in Laravel 5.5 you can now render a letter template directly in the browser.
Here's a quick way to do this: create a new mailable and a letter template for our project:
php artisan make:mail Welcome --markdown=emails.welcome I prefer to use the markdown format, since we get the template already with some content. Open the web.php file and create a test route to check the letter template:
Route::get('/email', function () { return new App\Mail\Welcome(); }); routes / web.php
If we go to route / email, we can see the letter template:
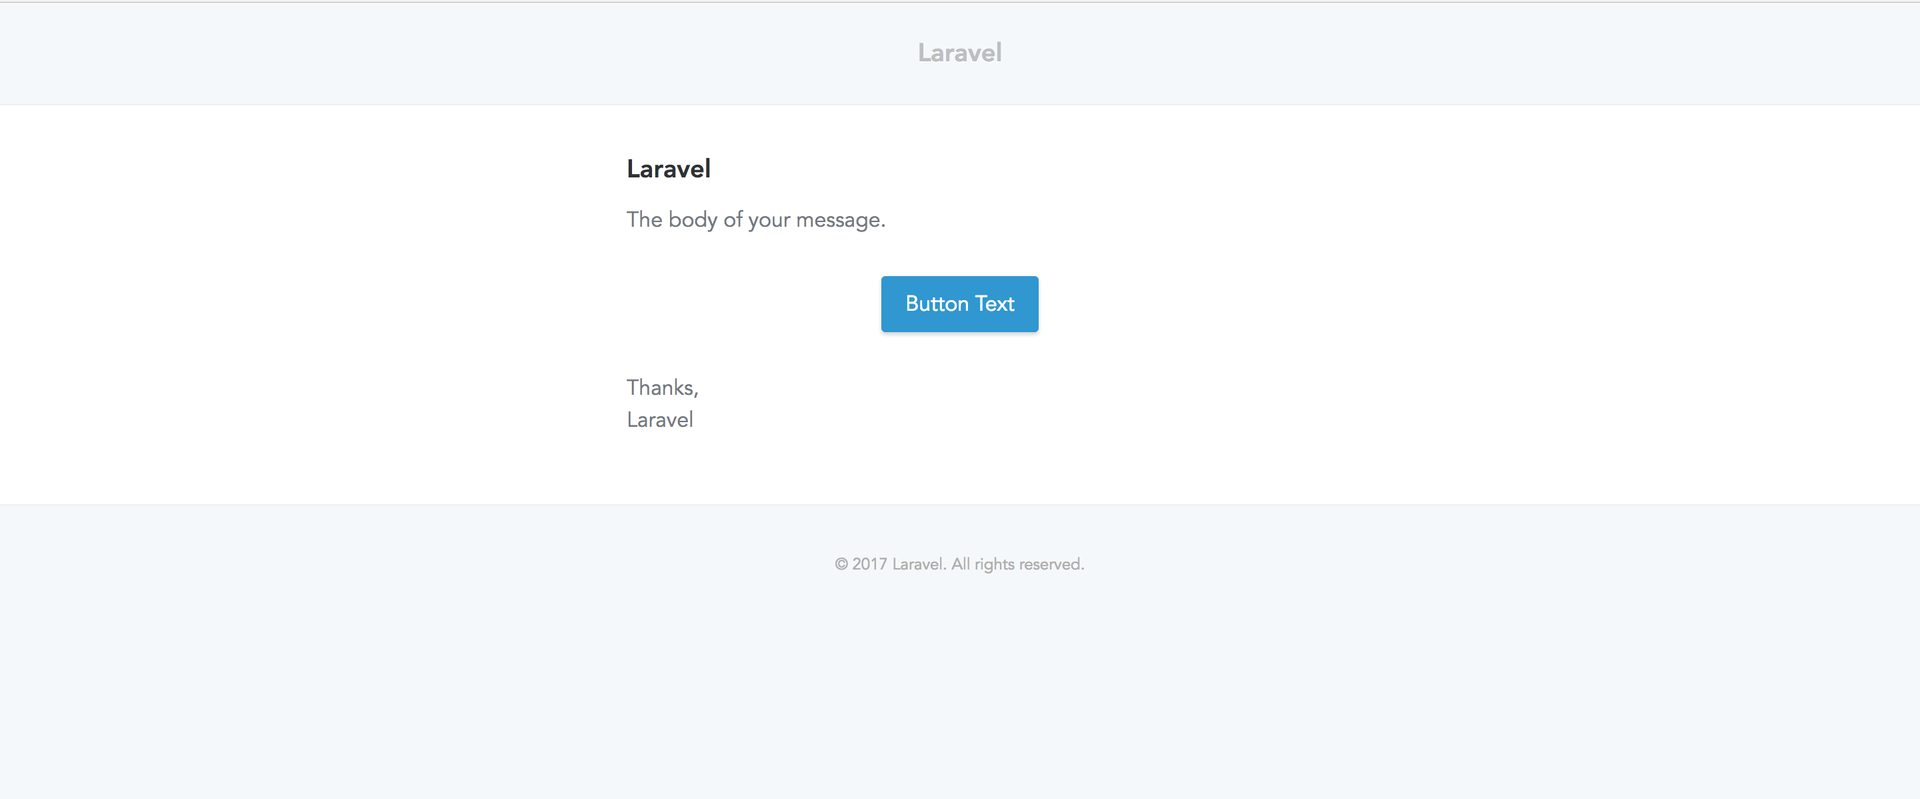
In fact, the following happens. In Laravel 5.5, the 'Mailable' class uses the 'Renderable' contract with the 'render ()' method. Here is the implementation of the render method in 'Illuminate / Mail / Mailable.php':
public function render() { Container::getInstance()->call([$this, 'build']); return Container::getInstance()->make('mailer')->render( $this->buildView(), $this->buildViewData() ); } Illuminate / Mail / Mailable.php
With this method you can get a view. If we tried to return an instance of a class that does not apply a 'Renderable' contract inside our routes, we would get a 'UnexpectedValueException'.
Custom clearance letters
If you use Markdown to design letters, then Laravel will set the default theme. However, someone may need their own styles to promote their brand.
To make a custom design for a particular mailable, first create a custom '.css' file with the styles we need:
touch resources/views/vendor/mail/html/themes/custom.css Then we specify the name of this file as a characteristic of the Mailable class:
class Welcome extends Mailable { protected $theme = 'custom'; [...] } app / Mail / Welcome.php
Thus, the letter template will be based on the styles we specified in the custom.css file. What is especially pleasing is that we can set different styles for different mailables.
Auxiliary function exceptions
Laravel 5.5 includes two auxiliary exception functions that will help us create more expressive code. These are the methods throw_if and throw_unless . Three arguments are included in both, and the third is optional.
Let's see how you can apply these exceptions:
$number = 2; throw_if($number !== 3, new NotThreeException('Number is not three')); // or throw_if($number !== 3, NotThreeException::class, 'Number is not three'); If the auxiliary function 'throw_if' is used, an exception will be thrown provided that the first argument is regarded as true.
If you use throw_unless , then in fact everything will be the same, with the only difference that an exception will be thrown if the first argument is false.
$number = 2; throw_unless($number === 3, new NotThreeException('Number is not three')); // or throw_unless($number === 3, NotThreeException::class, 'Number is not three'); Not the best example, but suitable for the demonstration.
Migrate command: fresh
You probably found yourself in a situation where you had to restore the database. In previous versions of Laravel, this could be done using the php artisan migrate:refresh command. The migrate:refresh command rolls back all migrations, based on what is described in the 'down' method of each migration file, and then starts the migrations again.
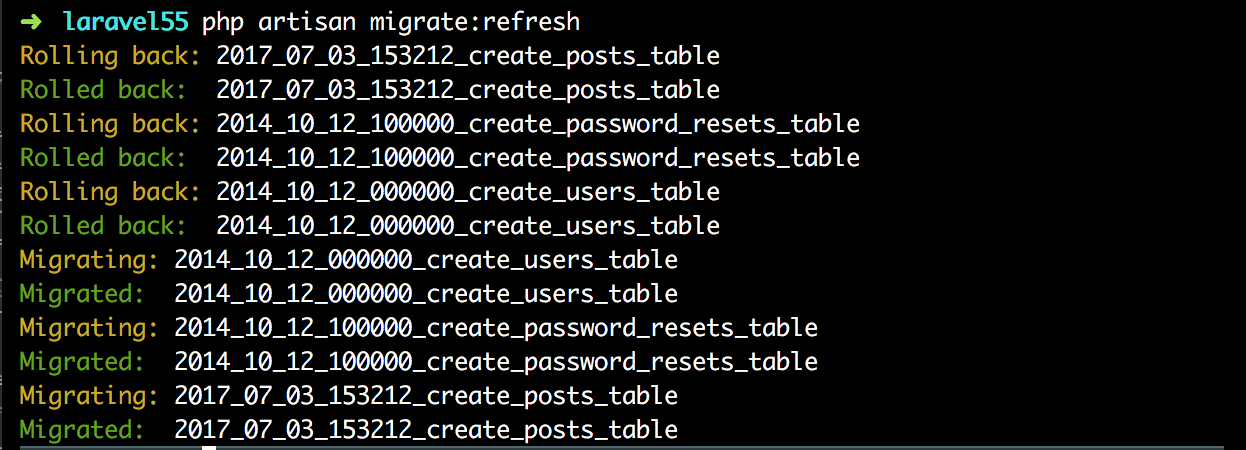
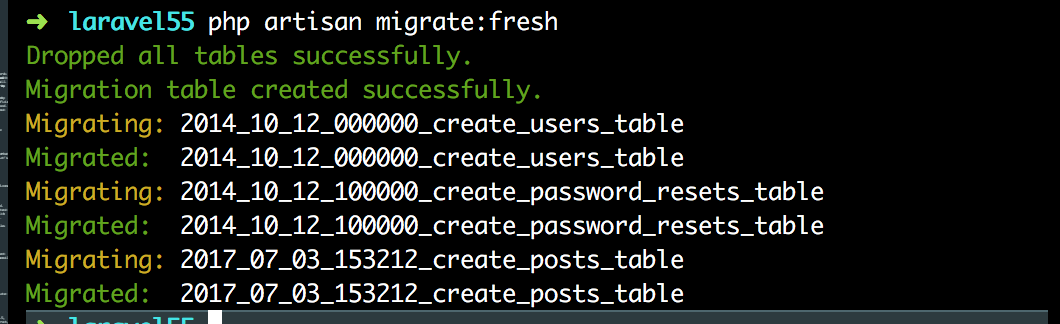
But you may have had problems with this command a couple of times, especially when working with foreign key constraints (foreign key constraints) or when one of the 'down ()' methods in any of your migrations was not sufficiently defined. When this happens, we in most cases manually get rid of the table with which problems arise - (perhaps using the CLI or some GUI). That's exactly when the migrate:fresh command migrate:fresh to the rescue. This command deletes all the tables and then starts the existing migrations again:
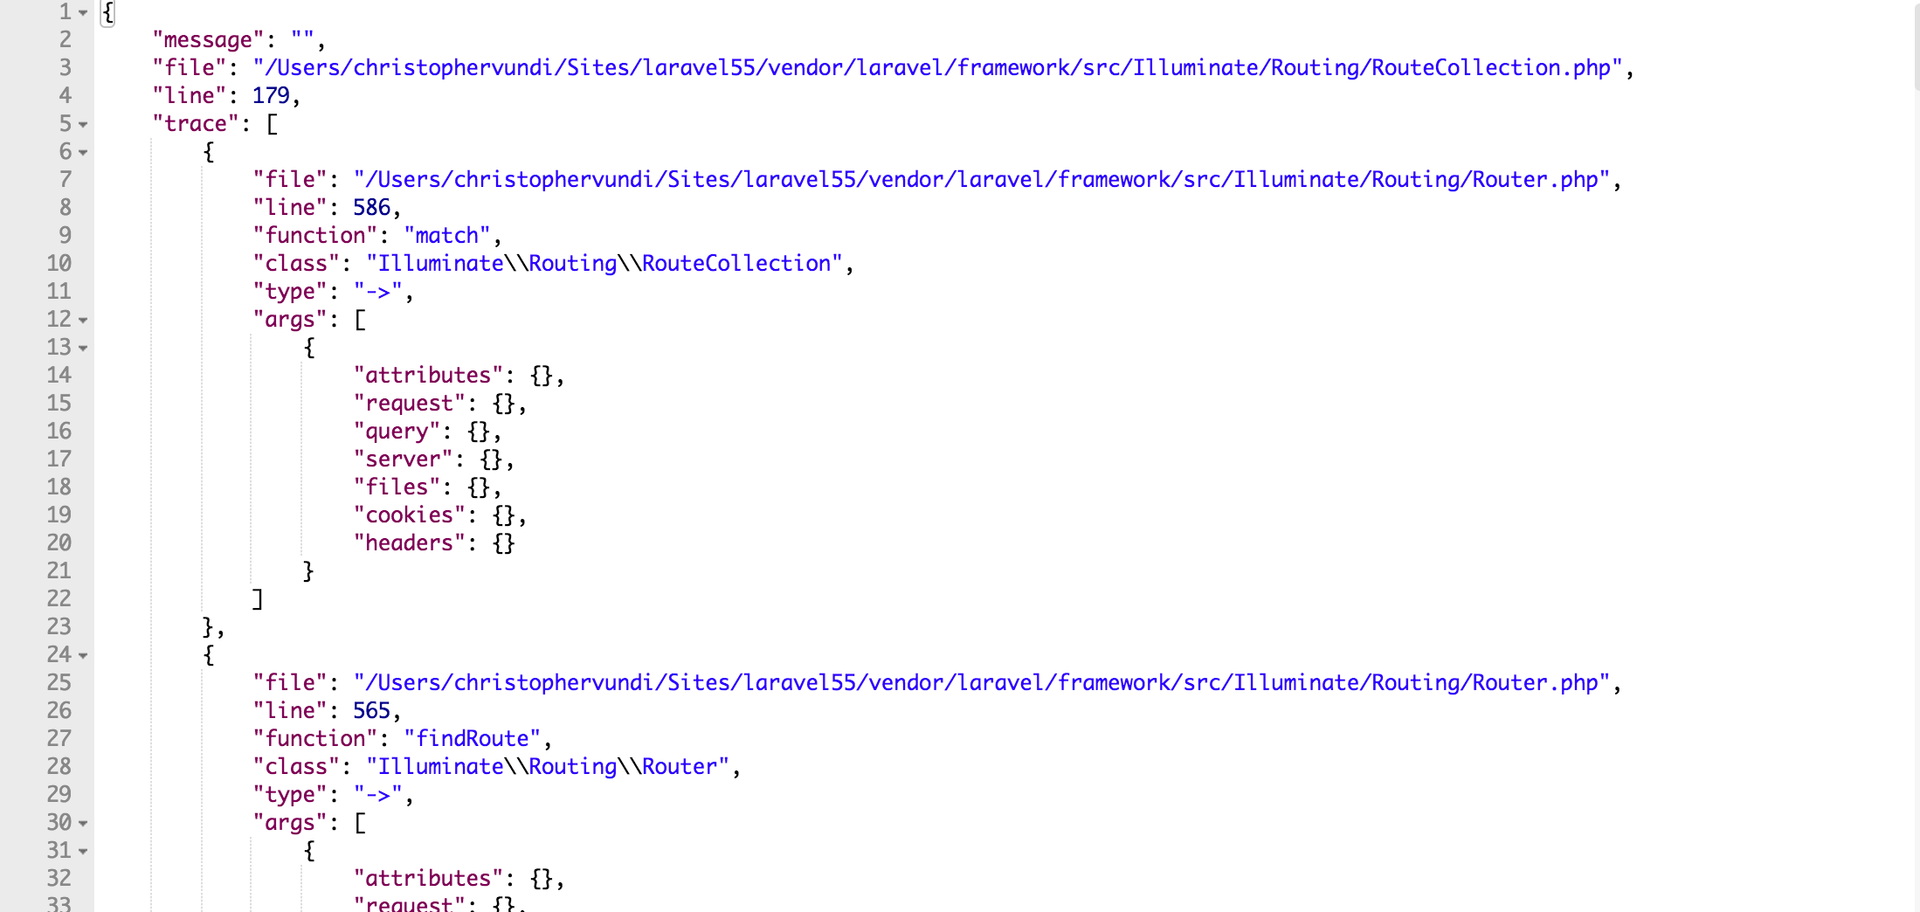
Stack Trace JSON errors
Not the biggest change, but in previous versions of Laravel we saw HTML markup from an API client like Postman every time an error occurred in our APIs. In Laravel 5.5, in case of an error, we get not the HTML markup, but the trace in JSON, which is easier to perceive:
Automatic package installation
To use a third-party package in our Laravel projects, we do the following:
- Install the package.
- We register the service provider of the package.
- Register facades, if any.
As you can see, the procedure can be simplified. Now will be as follows.
With automatic installation of packages, we simply select the desired package and install it on the fly. I note, however, that this is possible only if the supplier of the package has configured it accordingly.
If we look at the Laravel Debugbar package, for which the automatic installation is already configured, we will see that there is an extra section inside the composer.json file:
"extra": { "laravel": { "providers": [ "Foo\\Bar\\ServiceProvider" ], "aliases": { "Bar": "Foo\\Bar\\Facade" } } } Package providers will need to add the extra section to the composer.json file, and then specify the service providers and any aliases for the package.
Another advantage of auto-installation of packages is that if you remove a dependency, nothing will break. Usually, even after the package has been demolished, its service providers and facades still stick in the config/app.php , and in some cases errors may occur due to them.
With auto-installation, if you delete a package through Composer, then everything related to this package is also deleted.
Changes in the vendor: publish command
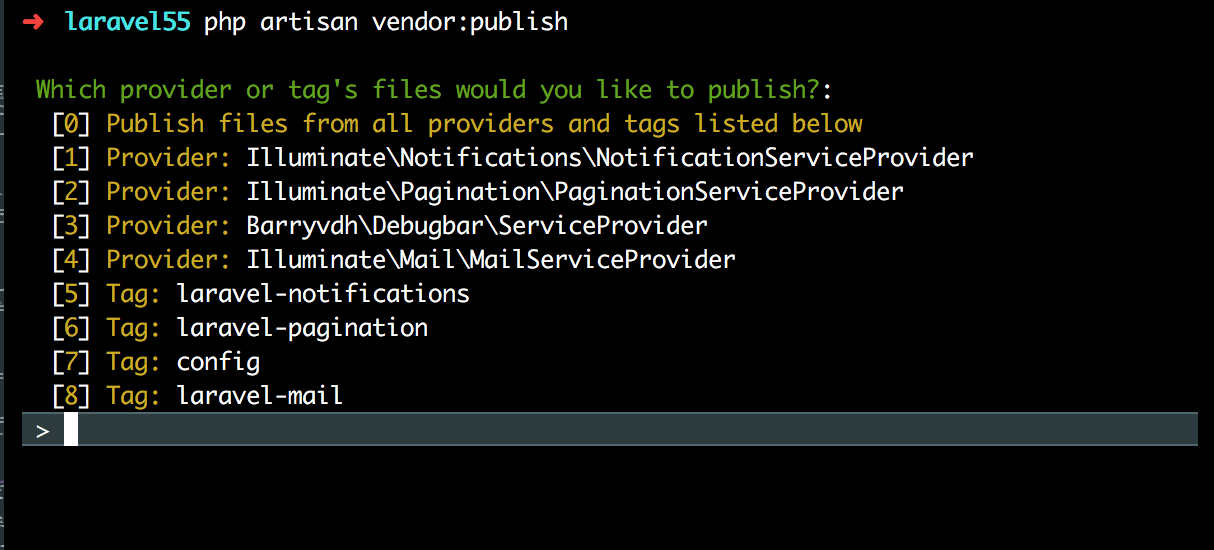
In previous versions of Laravel, the vendor:publish command published the resources of all the packages and the framework itself. Some of these resources include migrations, views, and configs.
In Laravel 5.5, we need to clarify in detail what we want to publish with the help of this command. If we run the php artisan vendor:publish command without any flags, we will be required to choose a provider or a tag so that it is easier to publish only what we want. See screenshot below:
We can bypass this step by --provider --all or --provider when running the publish command:
php artisan vendor:publish --all Variety of front-end presets
In Laravel 5.3 and 5.4, we had some Vue and Bootstrap blanks by default, which simplified front-end development. In the new version, React was added to this set. However, it is not there by default.
The new artisan team helps manage front-end presets. We will only have the one we need for the preset we want to work with. But not everyone is satisfied with the default presets, Vue, Bootstrap and React, someone else may need something else. Perhaps another front-end framework. And Laravel has already taken care of this:
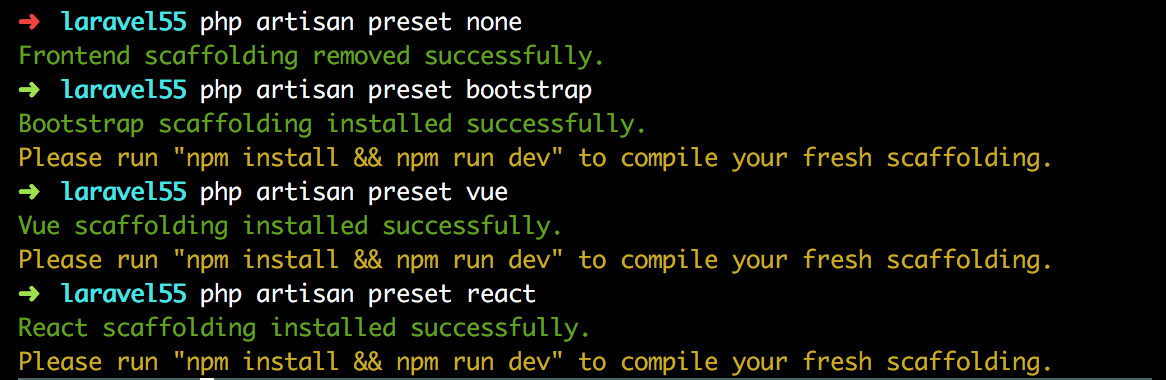
php artisan preset none This command will remove all existing front-end blanks. If we wanted to use React, the following command will help us with the stocking:
php artisan preset react Below is this new team in action:
Whoops is back!
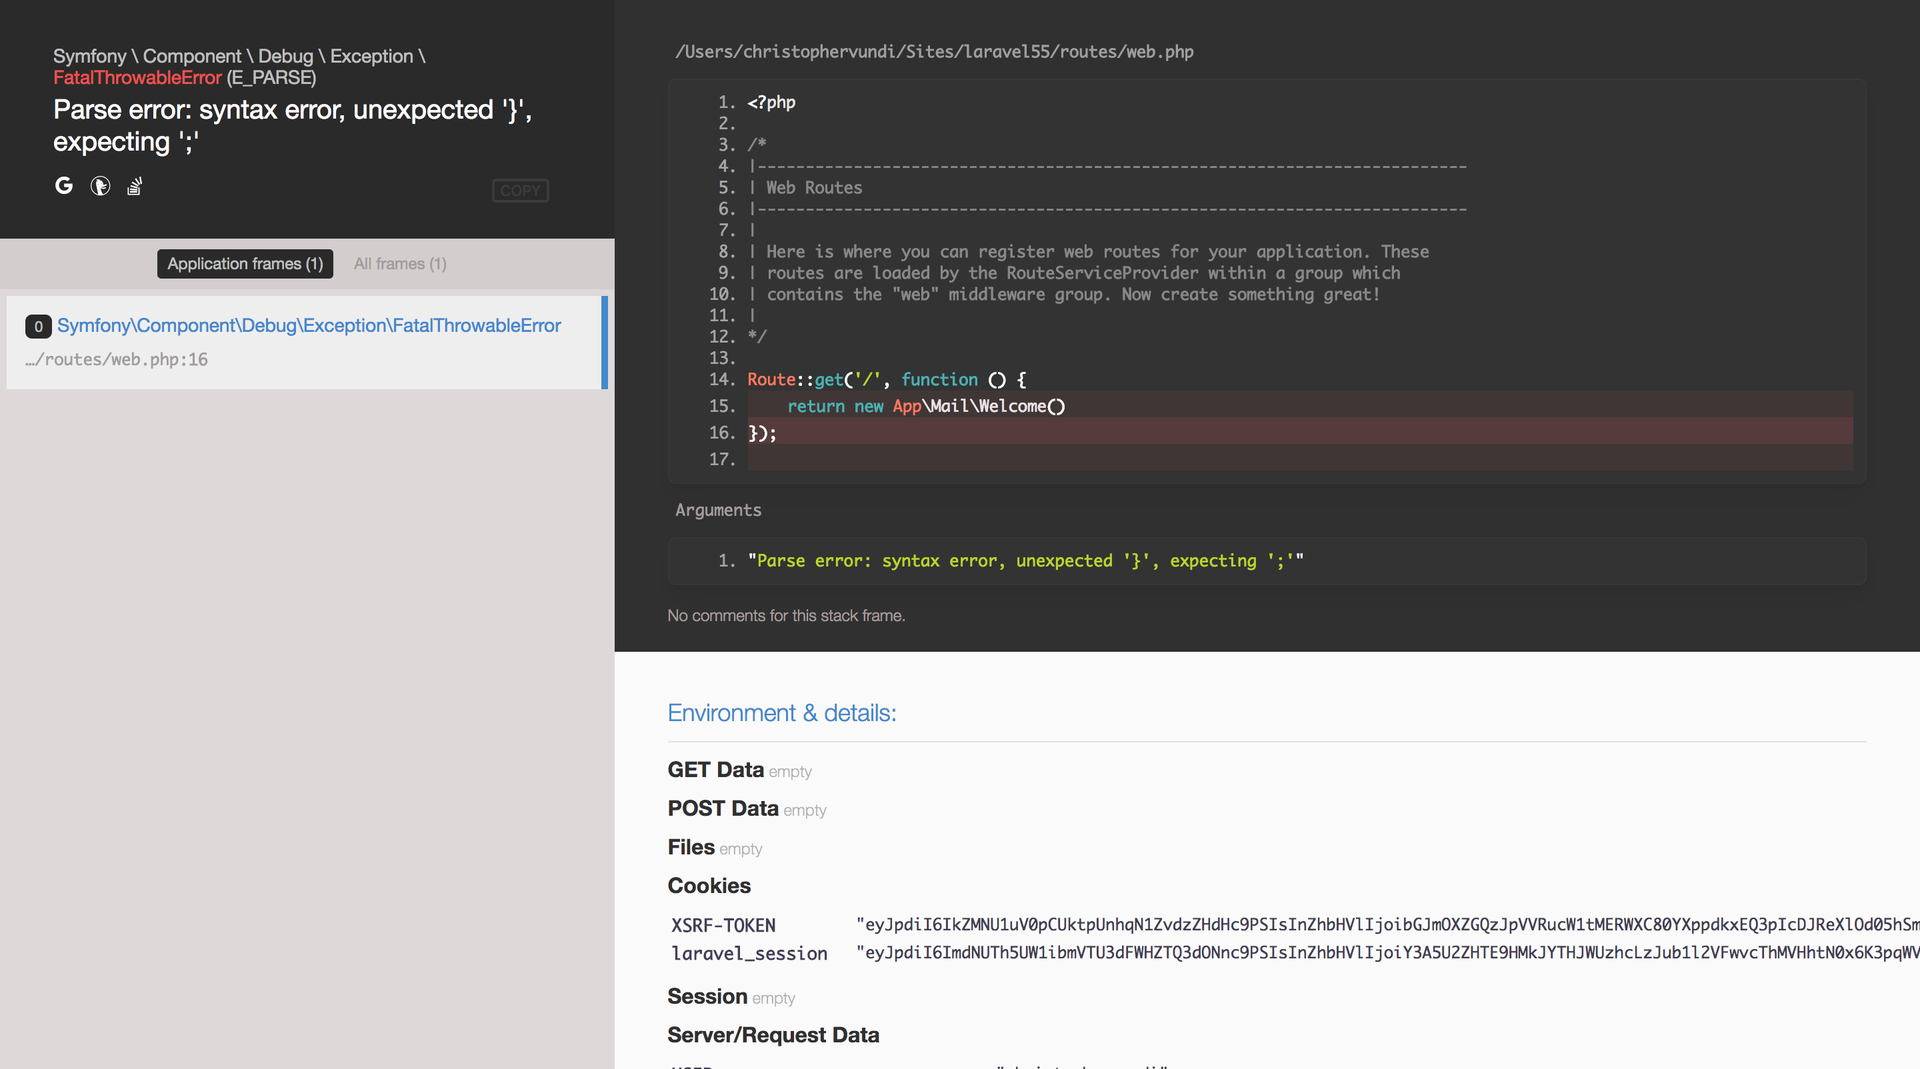
In Laravel 5.5 returned Whoops! with a new way to display errors. Now, if there is an error during development, we will be able to see this line of code as a screenshot along with an error message. In my opinion, the error message now looks better, and the fact that we now get a screenshot with an erroneous line of code makes it even easier to correct errors.
An example of an error with Whoops:
Another cool thing is that Whoops now allows you to open specified files directly in your IDE or editor. This function only works if you have local access to PHP files on the machine on which the editor is installed. To configure it, open app / Exceptions / Handler.php and add this snippet:
[...] use Illuminate\Filesystem\Filesystem; use Illuminate\Support\Arr; use Whoops\Handler\PrettyPageHandler; [...] class Handler extends ExceptionHandler { [...] protected function whoopsHandler() { return tap(new PrettyPageHandler, function ($handler) { $files = new Filesystem; $handler->setEditor('sublime'); $handler->handleUnconditionally(true); $handler->setApplicationPaths( array_flip(Arr::except( array_flip($files->directories(base_path())), [base_path('vendor')] )) ); }); } } app \ Exceptions \ Handler.php
This snippet cancels the main class's whoopsHandler() method with the $handler->setEditor('sublime') , due to which the link is opened in Sublime Text. If you are using another editor, look at the article on the github with a list of all supported editors and instructions on how to add your own. If you have a Mac, be sure to download the sublime URL protocol for this job.
Report method custom exceptions
In previous versions, if we wanted to set up custom exceptions in a special way, we had to place them inside the report method in the Handler.php file. For example:
[...] public function report(Exception $exception) { if ($exception instanceof CustomException) { // Do something } if ($exception instanceof MyOtherException) { // Do something } if ($exception instanceof MyOtherCustomException) { // Do something } return parent::report($exception); } [...] app / Exceptions / Handler.php
If we have, for example, 50 major exceptions, then this file will turn into something terrible. In Laravel 5.5, in order to specify what happens in the case of a custom exception, you can create a report() method inside the exception:
[...] class CustomException extends \Exception { public function report() { // send email } } [...] app / Exceptions / CustomException.php
Model factory generators
Laravel 5.5 has a new team to create a model factory. Model factory is very convenient when we need to generate fake data or a new test object.
To create a factory for a specific class, run the command:
php artisan make:factory Post Now, if we open the database / factories, we will see the PostFactory class:
[...] $factory->define(App\Post::class, function (Faker $faker) { return [ // ]; }); database / factories / PostFactory.php
I think this is a more elegant approach because we share responsibility. In previous versions of Laravel, all the factories were located within the same app/factories/ModelFactory.php .
Return validated data
Now it is possible to get data from the validator and pass it to the create method. In previous versions of Laravel, we created new objects like this:
{ $this->validate(request(), [ 'title' => 'required', 'body' => 'required' ]); // return Post::create(request()->only(['title', 'body'])); or return Post::create(request()->all()); } In Laravel 5.5, you can now create objects directly from validated data:
public function store() { $post = $this->validate(request(), [ 'title' => 'required', 'body' => 'required' ]); return Post::create($post); } You can also call the validate command directly from the request:
public function store() { $post = request()->validate([ 'title' => 'required', 'body' => 'required' ]); return Post::create($post); } Note, however, that care must be taken when you create objects in this way, since any attribute that you leave outside the validation method will not matter. To cope with this problem, we pass all the attributes we want to create inside the validation method for this object, even if their values do not require any validation:
$post = request()->validate([ 'title' => 'required', 'body' => 'required', 'notRequiredField' => '', ]); return Post::create($post); Thus, this field is automatically added to the allowed request data, but it is not limited to any validation rules.
Custom Validation Rules
In previous versions of Laravel, they could be specified using the Validator::extend method. But there was no centralization. We added the rule to the AppServiceProvider file, and then the message to the inside the resources/lang/en/validation.php file. The Laravel documentation describes in detail how this is done in version 5.4.
In Laravel 5.5, we have a new artisan team that defines custom validation. This command creates a new class that implements the Rule contract. Create a new rule to see what is inside it:
php artisan make:rule CustomRule If you look at app/Rules/CustomRule.php , you will see two methods - the passes method and the message method. The passes method takes 2 parameters, i.e. attribute and value , and returns a boolean. If you are confused, $attribute is the field to validate, and $value is the real value that is passed to the attribute.
Suppose, for example, that we do not want to give any specific name to the user. Then our rule will look like this:
{ [...] public function passes($attribute, $value) { return $value !== 'unwantedname'; } public function message() { return 'You cannot use that as your username'; } [...] } app / Rules / CustomRule.php
Then we use the new rule to validate the username attribute:
use App\Rules\CustomRule; request()->validate([ 'username' => [ 'required', new CustomRule() ], 'anotherfield' => 'required|min:5' ]); app / Rules / CustomRule.php
How custom validation is determined in the new version of Laravel is described in detail in the Taylor Otwell article .
DD and Dump added to collections
Now the collection includes both the dump () method and dd (). In previous versions of Laravel, when we debugged collections, we assigned a collection variable, and then dumped it, because the collection changed. In Laravel 5.5, this is no longer necessary, since we can now call the dd() or dump() command directly from the collection, which makes debugging much easier.
Suppose we have a collection of posts that have undergone a number of changes, and we need to inspect the collection at every step. Then do the following:
$posts = Post::all(); $posts ->dump() ->sorBy('title') ->dump() ->pluck('title') ->dump(); At the output we get:
Collection {#284 ▼ #items: array:3 [▼ 0 => Post {#285 } 1 => Post {#286 } 2 => Post {#287 } ] } Collection {#272 ▼ #items: array:3 [▼ 0 => Post {#285 } 2 => Post {#287 } 1 => Post {#286 } ] } Collection {#268 ▼ #items: array:3 [▼ 0 => "Aida Bosco" 1 => "Madge Leuschke" 2 => "Miss Bulah Armstrong Jr." ] } This makes it easier to inspect the contents of the collection at each step. However. I note that there is a difference between the dump() and dd() commands. dump() gives the result at the moment, and then continues, while dd() immediately stops the process and dumps the results (dd means dump and die, reset and die). If we called dd() from the collection at each step, then we would only get the result at the very first point when we called dd() from the collection. Take a look:
366666
$posts = Post::all(); $posts ->dump() ->sorBy('title') ->dd() ->pluck('title') ->dump(); At the output we get another:
Collection {#284 ▼ #items: array:3 [▼ 0 => Post {#285 } 1 => Post {#286 } 2 => Post {#287 } ] } array:3 [▼ 0 => Post {#285 } 2 => Post {#287 } 1 => Post {#286 } ] Castes in the intermediate tables of many-to-many relationships
Usually, you can declare the property casts Model, which determines how the attribute should be saved and read. Suppose we have a Post model, and we want one of the fields to be serialized into JSON when reading and writing. The following code snippet will help us with this:
class Post extends Model { [...] protected $casts = [ 'somefield' => 'array', ]; [...] } It was already possible to cast custom pivots in the many-to-many relationship in version 5.4, but the data could only be read. If we wanted to write to the data, we first had to manually cast the attribute values and then save it. Now you don’t need to do that anymore, since the casts property in the Eloquent\Model and Eloquent\Relations\Pivot classes will behave in the same way, which allows the use of the attach , sync and save methods in pivot models.
Custom Blade :: if () directives
The long duplicate code checks in the patterns of the blade can make them ugly. The good news is that it is now possible to extract duplicate code checks from templates, making them cleaner and more readable. Checks like these:
@if (auth()->check() && auth()->user()->isSubscribed()) <p>Subscribed</p> @else <p>Not Subscribed</p> @endif Can be replaced by:
@subscribed <p>Subscribed</p> @else <p>Not Subscribed</p> @endsubscribed The logic for creating a custom blade directive is added to the boot method of the AppServiceProvider class:
[...] use Illuminate\Support\Facades\Blade; class AppServiceProvider extends ServiceProvider { [...] public function boot() { Blade::if('subscribed', function () { return auth()->check() && auth()->user()->isSubscribed(); }); } [...] } app / Providers / AppServiceProvider.php
For some checks, it may be necessary to pass some method to the argument. In this case, we pass the argument to the closure when it comes to the custom blade directive.
@if (auth()->check() && auth()->user()->isFollowing($user->id)) If you use this condition as an example, you can see that you need to pass $user->id to the isFollowing() method. To create a custom blade directive that takes $user->id as an argument, do the following:
Blade::if('following', function (User $user) { return auth()->check() && auth()->user()->isFollowing($user->id) }); Then, to use this new directive in our templates:
@following($user) <p>Following</p> @else <p>Not Following</p> @endfollowing Autoregistration of new artisan teams in Kernel
We usually create new artisan commands using the php artisan make:command command-name . After that, we assign the key inside the class with the command, go to Kernel and manually register the command.
It is no longer necessary to register new commands in Kernel. We now have a new method inside the app/Console/kernel.php file that tracks the command directory and turns all file paths into namespaced paths:
[...] protected function commands() { $this->load(__DIR__.'Commands'); require base_path('routes/console.php'); } [...] Suppose we called a command that is not yet registered in the kernel. The commands method () automatically connects it.
New route methods
This is not the coolest new feature, but still it is worth mentioning that now we have two additional route methods:
Route::view('/welcome', 'welcome'); Route::redirect('home', 'dashboard'); The first connects the welcome view with the / welcome path, and the second forwards the /home requests to the /dashboard .
Introducing Laravel Horizon
This is a new Laravel package that provides a panel and code-driven configuration system for Laravel Redis queues:
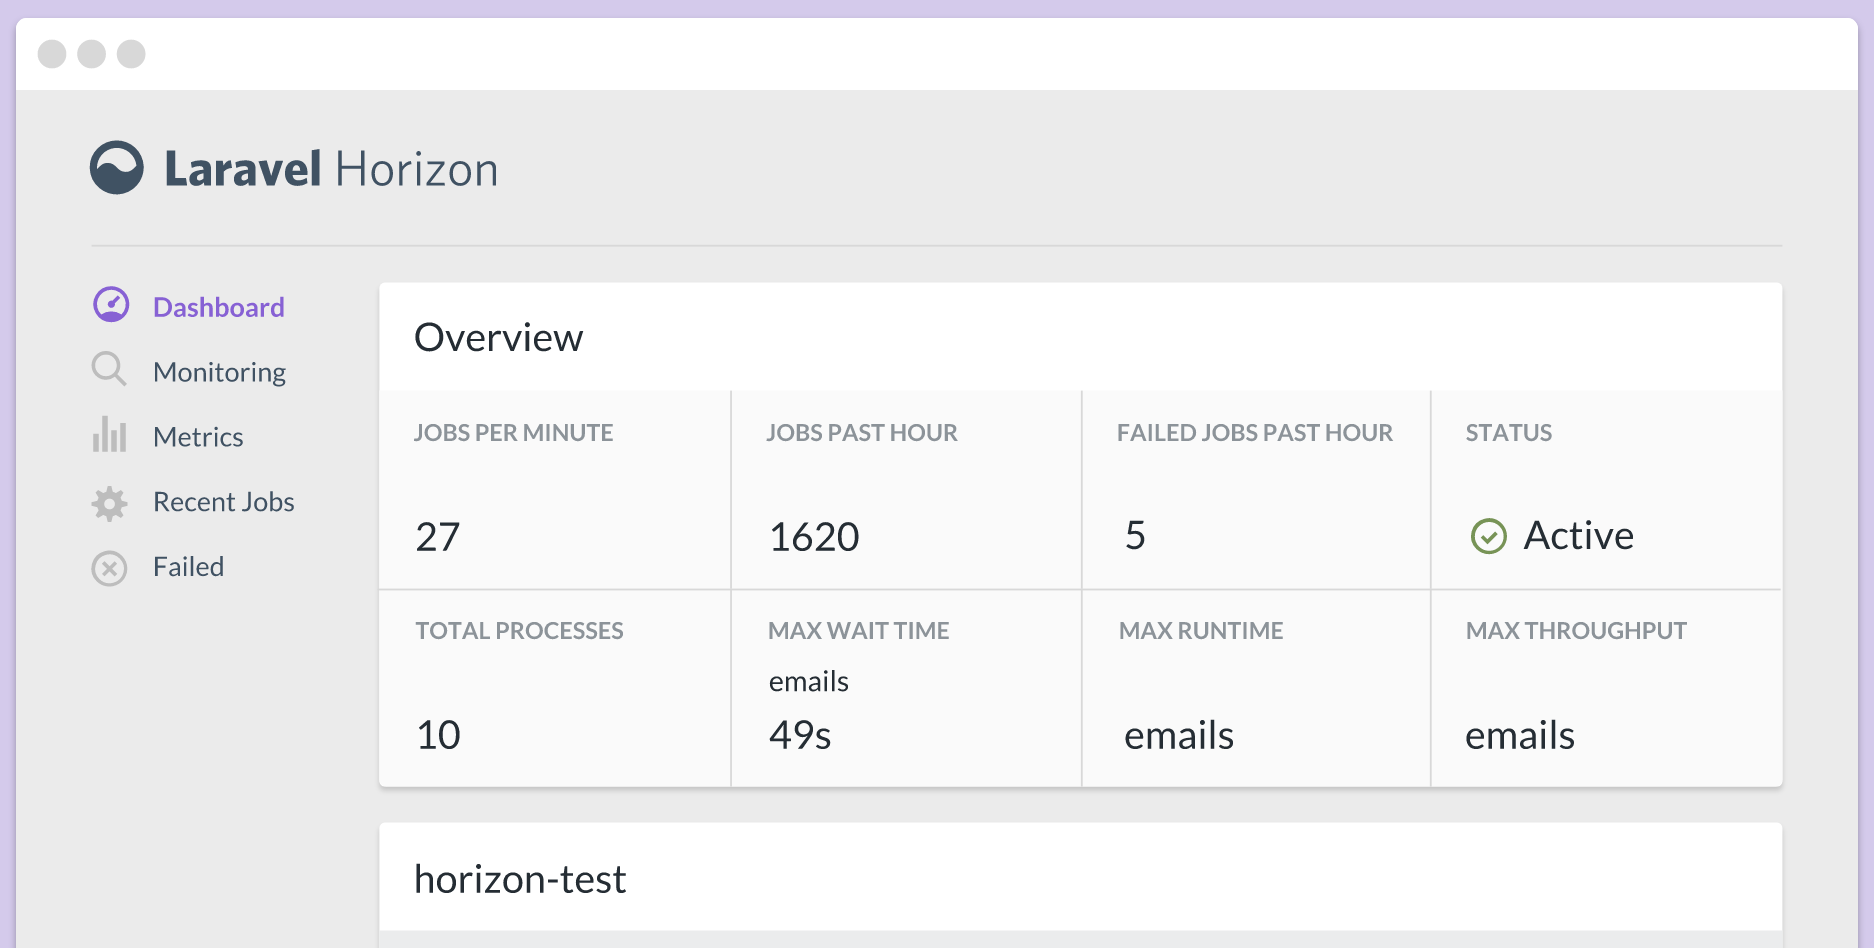
Horizon shows real-time load queues, recent tasks, failed tasks, attempts to restart tasks, throughput and runtime metrics and number of processes.
Horizon features include the following:
- High-level analytics for tasks — indicators such as the number of tasks per minute and tasks in the past hour
- Task-specific and queuing-specific analytics.
- Tags and monitoring - you can add tags to tasks, as well as monitor specific tags.
- Recent tasks - you can get information about the most recent tasks.
- Queue balancing strategies - Horizon can automatically distribute the worker's queue processes to all queues depending on their load.
Taylor Otwell in his article discusses in detail how to set up the Horizon and all the functions that it includes.
New database migration treit
This is a RefreshDatabase RefreshDatabase . Some might wonder why he was needed at all, but the reasons behind him make sense. Initially we had treats of DatabaseMigrations and DatabaseTransactions .
DatabaseMigrations , , DatabaseTransactions , .
RefreshDatabase , .. , . , , , .
Conclusion
, . , , , .
Laravel!
')
Source: https://habr.com/ru/post/335930/
All Articles