Using MVP + TDD in the development of iOS applications
- Glory TDD!
- Unit tests glory!

In this article we will deal with the principles of using MVP + TDD in the development of iOS applications. We will deal with the example of creating a small tutorial for the user, which is shown when you first start.
Business Requirements
So, your customer wants a tutorial added to his application, which will appear to the user once at the first launch. The tutorial consists of several images that must be displayed in a specific sequence. The images should be switched by clicking on the "Continue" button. Also, when displaying the last image - on the button you need to write "Start" (as if hinting to the user that the application will now be launched).
Step 1. We think over the logic.
So we have a certain sequence of images. This means that we must have a queue of these images. From this queue we will extract one image at a time and show it on the screen. And so on until the images in the queue run out.
When the last image remains in the queue - you need to change the label on the button: instead of "Continue" - "Start".
- When the user sees the last image and presses the "Start" button, we need to show the first screen of the application and note that the user has already watched the tutorial (do not show it on subsequent launches).
Step 2. MVP
To begin, create our application (new project in Xcode) and call it OnBoardingTest .

Immediately include in the project and unit tests (TDD after all).
- Add a module for our tutorial to our project. Let's call it OnBoarding .
Refresh MVP knowledge can be re-read my post Via MVP to VIPER. Part one: MVP .
Usually, a module in the MVP architecture consists of two classes (UIViewController and Presenter), which communicate with each other using protocols. But, to be honest, I didn’t have a case where I used different presenters for the same twist. Therefore, in one of the protocols (viewOutput / presenterInput) is simply not necessary.
Our module consists of the following files:

For each screen I use a separate storyboard, you can read more in the article-translation Xcode: probably the best way to work with storyboards
Step 3. V - means View.
Since we are not testing the View layer, we can immediately implement it. View is our storyboard and UIViewController.
The UI on the storyboard is very simple: ImageView full screen and button:

In the view controller, we add the necessary IBOutlets and IBAction. Our class looks like this for now:
class OnBoardingViewController: ViewController { @IBOutlet weak var imageView: UIImageView! @IBOutlet weak var continueButton: UIButton! @IBAction func continueAction(_ sender: UIButton) { } } Also in the view controller you need to add a link to the presenter and module assembly. Add a property:
var presenter: OnBoardingPresenter! The build will be done in awakeFromNib :
override func awakeFromNib() { super.awakeFromNib() self.presenter = OnBoardingPresenter() } Now we need to add methods to our protocol and implement them in the view controller. What our view controller should be able to do: firstly, it must be able to change the image in the UIImageView , secondly: change the label on the button, thirdly: launch the application (when all the images are shown). Add the following methods to the protocol:
func show(image: UIImage) func updateButton(title: String) func startApplication() For the first method, there is an important nuance: we are trying to pass a UIImage parameter, which slightly contradicts the principle of separating the UI layer from the logic layer. If we leave it like this, it turns out that we need to create an object of the UIImage type in the presenter and pass it to the call to the show(image:) method, and the presenter should not work with UIKit . Therefore, we will slightly correct the parameter in the first method:
func showImage(imageName: String) We will transmit the image identifier, and the controller UIImage itself will create a UIImage with this identifier.
Now we implement this protocol in our controller view:
// MARK: - OnBoardingViewProtocol extension OnBoardingViewController: OnBoardingViewProtocol { func showImage(imageName: String) { self.imageView.image = UIImage(named: imageName) } func updateButton(title: String) { self.continueButton.setTitle(title, for: .normal) } func startApplication() { // some logic for application start print("Application is started") } } As you can see, the implementation is very simple: create a UIImage and show it in our self.imageView and put an inscription on the button. We will not implement the logic of launching the application, because this article is not critical. There may be a call to a self.present(...) controller (via self.present(...) ), or more complex logic that needs to be moved to a router. We'll display a message in the console to see that the start of the application is being invoked.
The implementation of our view is ready.
Step 4. M - for Model
In our case, the model will be:
- The queue of image names.
- The service that will record that the tutorial is shown in full, and the next time it is not necessary to show it.
The queue of names is implemented simply. Since these are names ( String ) and they must be ordered, then the queue will be an array of strings: Array<String> .
Add the OnBoardingImageManager service to our module. In it we will have one method getImageQueue() -> [String] :
class OnBoardingImageManager { func getImageQueue() -> [String] { // some logic may be here return ["OnBoarding1", "OnBoarding2", "OnBoarding3", "OnBoarding4", "OnBoarding5"] } } In our case, we will not delve into the logic of image queuing and return an array of hard-coded strings. In fact, here, at a minimum, there should be a logic for obtaining different image names for different screen diagonals (do not show the same image for a 4.0 "screen on a 5.5" screen).
A service that will remember that the user has already watched the tutorial is called OnBoardingLocalManager . In it, we will also have one setFlagOnBoardingCompleted() method:
class OnBoardingLocalManager { func setFlagOnBoardingCompleted() { // some logic for saving onBoardingCompleted flag // maybe use UserDefaults.standard print("OnBoarding completed successfully") } } As you can see his logic, we also will not implement. UserDefaults or CoreData can be used UserDefaults (in special cases), or some other logic (perhaps there is a requirement to transfer information to the server that the user has already watched the tutorial). Therefore, we will simply output a message to the console to see that this method is being invoked.
We are almost done with MVP. It remains to deal with the presenter and move on to TDD.
Step 5. P - Presenter.
At the moment, our presenter goal like a falcon:
class OnBoardingPresenter { } Let's understand what data he can store and what he should do:
- It must keep a queue from the names of the images, and this queue will change (each time the next name will be extracted from it until the queue becomes empty).
- He must retrieve the next name from the queue and pass it on to our view.
- He must determine that the queue is over and let me see a twist about it, and also state that the user has watched the tutorial completely.
Let's add to our presenter a queue of picture titles:
var imageQueue: [String] The compiler will immediately ask to add an initializer, since the imageQueue property imageQueue not optional and must be filled with the value during initialization. Add an initializer:
init(imageQueue: [String] = OnBoardingImageManager().getImageQueue()) { self.imageQueue = imageQueue } As you can see in the initializer, we pass our queue as a parameter. And it has a default value. Why it is impossible to make an initializer without parameters and assign the value self.imageQueue inside init ? Because during the tests we will substitute our queues.
Now we will add the showNextImage(...) method to the presenter:
func showNextImage(view: OnBoardingViewProtocol, localManager: OnBoardingLocalManager = OnBoardingLocalManager()) { } It has no implementation yet, but there are two parameters, let's deal with them.view is our twist, after which the presenter, after the execution of logic, gives the command (commands) to perform certain actions provided by the OnBoardingViewProtocol protocol.localManager is our service that remembers that the user watched the tutor. We added this parameter in order to substitute the IOC in the tests. And they gave it a default value, so as not to specify this object each time in method calls from a view controller.
Let's return for a minute to our OnBoardingViewController ( OnBoardingViewController ) and add to it the presenter:
override func viewWillAppear(_ animated: Bool) { super.viewWillAppear(animated) self.presenter.showNextImage(view: self) } @IBAction func continueAction(_ sender: UIButton) { self.presenter.showNextImage(view: self) } We add a call to viewWillAppear (the learning screen should be shown with the first image from the queue) and to the button click handler.
We came close to TDD.
Step 6. MOK
In order to write tests for our presenter, you need to make MOKs of objects with which he interacts. Namely: for the view , which has the type OnBoardingViewProtocol , and for localManager , the type of which is OnBoardingLocalManager . To create IOCs in Swift, I use the Cuckoo library. How to work with it, I wrote in the article "We urinate" objects using Cuckoo . We add the library to the project through CocoaPods, do pod install in the project folder, and in the script for generating IOCs, we specify the OnBoardingViewProtocol ( "${INPUT_DIR}/OnBoardingViewProtocol.swift" ) and OnBoardingLocalManager ( "${INPUT_DIR}/OnBoardingLocalManager.swift" .
Step 7. TDD. RED
We are ready for TDD. Now we need to write unit tests that describe the necessary logic, but will be "faylitsya".
In OnBoardingTestTests, OnBoardingTestTests delete the extra OnBoardingTestTests.swift file (Xcode has created it by default) and create the OnBoardingPresenterTest file - the heir from XCTestCase :
import XCTest class OnBoardingPresenterTests: XCTestCase { } The unit test structure is as follows:
instanceis a class object that we are testing- IOK ads that are needed for testing
- correct / incorrect input data and expected results
We declare the entities that we need in the tests:
import XCTest import Cuckoo @testable import OnBoardingTest class OnBoardingPresenterTests: XCTestCase { var instance: OnBoardingPresenter! var view: MockOnBoardingViewProtocol! var localManager: MockOnBoardingLocalManager! let correctNexImageName = "correctNextImageName" var fullImageQueue: [String]! let lastImageQueue: [String] = ["something"] let emptyImageQueue: [String] = [] override func setUp() { super.setUp() self.fullImageQueue = [correctNexImageName, "something", "something else"] } } Let's take a look at them:
OnBoardingPresenterwhoseOnBoardingPresentertype is our presenter, which we will test.MockOnBoardingViewProtocoltypeMockOnBoardingViewProtocolandlocalManagertypeMockOnBoardingLocalManagerare our MOKs.- different queue options: a queue of several names, a queue of one name and an empty queue.
Add in the setUp() method initialization of IOCs and stubs for them:
self.view = MockOnBoardingViewProtocol() stub(self.view) { when($0.showImage(imageName: anyString())).thenDoNothing() when($0.updateButton(title: anyString())).thenDoNothing() when($0.startApplication()).thenDoNothing() } self.localManager = MockOnBoardingLocalManager() stub(self.localManager) { when($0.setFlagOnBoardingCompleted()).thenDoNothing() } We are ready to write tests directly.
The first test will test if the image from the queue is retrieved correctly:
func testNextImageExtractsCorrectly() { self.instance = OnBoardingPresenter(imageQueue: self.fullImageQueue) self.instance.showNextImage(view: self.view) verify(self.view).showImage(imageName: self.correctNexImageName) } In this test, we initialize our presenter with the fullImageQueue queue, call the showNextImage(...) presenter method and check that our view invoked an image update method, and with the correct image name.
The second test will check that we retrieved an item from our queue (the number of items in the queue has decreased by one):
func testImageQueueReducesCorrectly() { self.instance = OnBoardingPresenter(imageQueue: self.fullImageQueue) self.instance.showNextImage(view: self.view) XCTAssertEqual(self.instance.imageQueue.count, self.fullImageQueue.count - 1, "image queue should be reduced by one") } In the third test, we check that, in the case when there are several names of pictures in the queue, the correct inscription on the button is set:
func testButtonTitleUpdatesCorrectly() { self.instance = OnBoardingPresenter(imageQueue: self.fullImageQueue) self.instance.showNextImage(view: self.view) verify(self.view).updateButton(title: "") } The fourth test will test the case when only one image name is left in the queue. In this case, the inscription on the button should change to "Start":
func testPrepareForApplicationStartCorrectly() { self.instance = OnBoardingPresenter(imageQueue: self.lastImageQueue) self.instance.showNextImage(view: self.view) verify(self.view).updateButton(title: "") } Of course, the "Continue" and "Start" lines should be put into global constants, but in our educational example we will not waste time on this.
The fifth test will check that the application starts when the queue of names is empty:
func testApplicationStartsCorrectly() { self.instance = OnBoardingPresenter(imageQueue: self.emptyImageQueue) self.instance.showNextImage(view: self.view, localManager: self.localManager) verify(self.view).startApplication() } And the sixth test will verify that our localManager will call the flag saving method about the user successfully passing the tutorial:
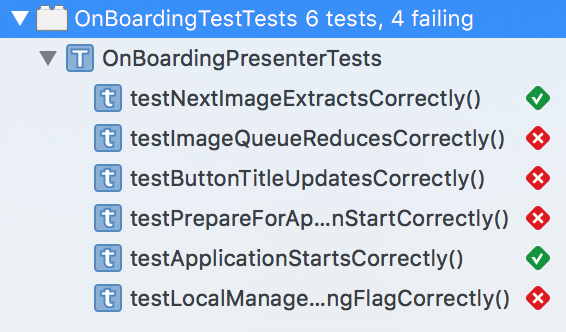
func testLocalManagerSetsOnBoardingFlagCorrectly() { self.instance = OnBoardingPresenter(imageQueue: self.emptyImageQueue) self.instance.showNextImage(view: self.view, localManager: self.localManager) verify(self.localManager).setFlagOnBoardingCompleted() } Run the tests and get a "successful" result for the first stage of TDD:

All tests are red. Go to the next step.
Step 8. TDD. GREEN
Finally, we can do programming the logic of our OnBoardingPresenter . So the first thing we do is retrieve the next item from the queue. We implement this by simply taking the first element from the array and checking it for nil :
if let nextImageName = self.imageQueue.first { } else { } If we got the next item from the queue, we need to tell view so that it shows it: view.showImage(imageName: nextImageName) . If there is no next element, you need to tell view that it’s time to start the application: view.startApplication() . Now the showNextImage(...) method looks like this:
func showNextImage(view: OnBoardingViewProtocol, localManager: OnBoardingLocalManager = OnBoardingLocalManager()) { if let nextImageName = self.imageQueue.first { view.showImage(imageName: nextImageName) } else { view.startApplication() } } To determine whether we have written enough code, we run unit tests and see if they are executed successfully:
We see that two of the six tests already pass successfully, but the code is not written enough.
We continue to code: since we took the name of the image from the queue - we need to remove it from there, we also need to give the command to our localManager that the tutorial is viewed by the user:
func showNextImage(view: OnBoardingViewProtocol, localManager: OnBoardingLocalManager = OnBoardingLocalManager()) { if let nextImageName = self.imageQueue.first { view.showImage(imageName: nextImageName) self.imageQueue = Array(self.imageQueue.dropFirst()) } else { view.startApplication() localManager.setFlagOnBoardingCompleted() } } Once again we run the tests and see the result:

Successfully completed four of the six. It remains only to correctly assign the label to our button:
if self.imageQueue.first != nil { view.updateButton(title: "") } else { view.updateButton(title: "") } Once again, just in case, the "Continue" and "Start" lines should be placed in global constants.
Run the tests again and voila:

All our tests pass successfully. We have written enough code to implement the functionality we need. Fully our presenter looks like this:
class OnBoardingPresenter { var imageQueue: [String] init(imageQueue: [String] = OnBoardingImageManager().getImageQueue()) { self.imageQueue = imageQueue } func showNextImage(view: OnBoardingViewProtocol, localManager: OnBoardingLocalManager = OnBoardingLocalManager()) { if let nextImageName = self.imageQueue.first { view.showImage(imageName: nextImageName) self.imageQueue = Array(self.imageQueue.dropFirst()) if self.imageQueue.first != nil { view.updateButton(title: "") } else { view.updateButton(title: "") } } else { view.startApplication() localManager.setFlagOnBoardingCompleted() } } } Step 9. TDD. Refactor
Successful tests are not enough, you need to look at your code and put it in order: refactor. In this case, I don’t like this piece:
if self.imageQueue.first != nil { view.updateButton(title: "") } else { view.updateButton(title: "") } The call to view.updateButton(...) repeated view.updateButton(...) , the only difference is in the value of the parameter that is passed to this method. You can rewrite it like this:
let buttonTitle: String if self.imageQueue.first != nil { buttonTitle = "" } else { buttonTitle = "" } view.updateButton(title: buttonTitle) Let's run the tests and make sure that we have not violated the logic: the tests are still performed correctly.
Now you need to replace the self.imageQueue.first != nil check with self.imageQueue.count != 0 (you don’t have to try to take the first element in the array, you just have to check the number of elements in the array). We run the tests and see that everything is ok.
But we don’t stop at that either, the self.imageQueue.count != 0 check is also not entirely correct, because the array has an isEmpty property. Therefore, we change self.imageQueue.count != 0 to self.imageQueue.isEmpty and use the ternary operator ( ? : : let buttonTitle = self.imageQueue.isEmpty ? "" : "" let buttonTitle = self.imageQueue.isEmpty ? "" : "" .
Run the unit tests and see the following picture:

Unit tests help us understand that we made a mistake and even where we made it: we mixed up the lines “Continue” and “Start”. let buttonTitle = self.imageQueue.isEmpty ? "" : "" : let buttonTitle = self.imageQueue.isEmpty ? "" : "" let buttonTitle = self.imageQueue.isEmpty ? "" : "" , and run the tests again:

Now everything is in order, and we have completed the third stage of TDD.
Step 10. Final
According to the TDD methodology, we have implemented the necessary and sufficient functionality for our tutorial. Let's see how it looks on the screen.
To do this, we need to add the necessary images to Assets (at the end of the article there will be a link to the repository with this project and all the images will be there), and install our OnBoardingViewController.storyboard as the starting image for the application:

Run our application and see the following:

We pass the tutorial to the end and see the inscription "Start" on the button when the last image is shown:

After clicking on the "Start" button in the console, we see the messages "Application is started" and "OnBoarding completed successfully":

This means that our view received a command to start the application, and localManager fixed that the user successfully viewed the tutorial.
Total
You can download the whole project that we did here: Swift , Objective-C .
Thanks for attention. All good.
')
Source: https://habr.com/ru/post/335908/
All Articles