Bitmap way to display tile cards
Technique automatically select the desired tile from the tile card.
At first this article was an answer to a question on TIGSource , but it seemed to me that it was worth expanding it a bit and publishing it separately.
')
Task: we generated a beautiful platform level and want to be able to automatically place tiles on it, taking into account the neighbors, so that they look correct.
Tiles according to their neighbors
Tiles in Super Mario do not take into account their neighbors: the stone block always looks the same, both as a separate fragment and as part of a wall.
It is quite suitable for many games, but when creating a more harmonious design it may seem unnatural. Tiles that take into account their neighbors solve this problem by matching their appearance with neighboring tiles.
Single bit map
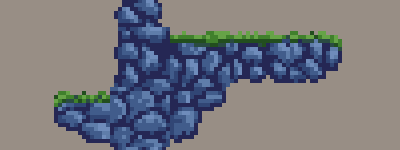
Imagine that with some cunning technicians we created a platform level scheme consisting of only stone blocks and the “air” between them. The level can be represented as a one-bit image, in which the state of each pixel is determined by a single bit (1 is a stone block, 0 is “air”). Here is an enlarged example of a part of this level with grid lines added:

A set of tiles (tileset)
A tileset is a collection of graphic images that can be used to populate a map. Mario Taylset is quite limited, it consists of several types of blocks and “decorations”, but our set will contain many images for each type of tiles:
We estimate neighbors
To determine which tile should be at a specific point in the map, we need to examine the immediate neighbors of this point (for the time being we ignore the neighbors along the diagonal). In order not to write large constructions from if / else-if to handle all possible combinations of neighbors, we use a system that assigns values in each direction.
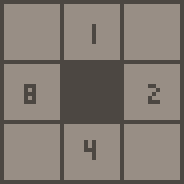
The value for each point is found by examining its neighbors and adding values for those of them that have a stone. For example, if the neighbor in the studied point is above filled with a stone, then it is assigned the value 1. If the neighbors are filled with the stone above and below, then the point is assigned the value 1 + 4, that is, 5.
You can see that the assigned values of the directions are the same as the values in the positions in binary numbers, and this is not surprising: both types of values are ways of representing possible combinations of four positions, each of which can be in “on” or “off” states ( stone or "air").
Here is a map segment with all the tiles filled. You can try to manually calculate the value for a pair of tiles in order to understand how this works.

Adding tiles
The layout of the tileset shown in the image is not accidental: it is arranged so that each tile corresponds to the tile of the map to which a value should be assigned. Assigning values to all points of the map, we simply look for the value in the tileset and place the appropriate tile at this point:

Fine!
Moving on
Part one: get rid of the "air"
The above example works well for platforms hanging in the air, but in fact does not fully handle two types of tiles.
Imagine that instead of a platformer, we are working on a two-dimensional strategy from the top, in which there are two types of tiles - grass and water. In this case, the tile image will be present at each point of the map, there will be no empty places in it, as in the platformer. This means that to determine the appropriate tile, each point on the map must have a value generated from its neighbors.
We can use exactly the same system of assessing neighbors, as before, but we need a way to determine, when studying a point, whether it is grass or water. This is very simple to implement - you just need to add one more value to the point itself, using the same pattern “2 to the power n” from other values:

Let's decide that if there is water, we will add to the value of the point, and if there is grass, we will not. That is, the grass tile, surrounded on all sides by grass, will have a value of 0. The grass tile with water above and to the right is 1 + 8 = 9. The water tile, surrounded on all sides by grass, will have a value of 16. Water tile, surrounded from all sides with water, has the value 1 + 2 + 4 + 8 + 16 = 31
Part Two: Adding Variability
How to ensure the treatment of other types of relief?
Suppose there are three types of relief in the game from the top view: water, grass, and forest. We are already processing the boundaries of water and grass, now we need to learn how to handle the boundaries of water and forest, as well as grass and forest.
Previously, we had two variants of tiles for each adjacent position (grass or water), so we used the binary system of calculation. Now there are already three options, so we need to use a ternary system. It is necessary to change the system of assessment of neighbors to fit the new system of calculus:
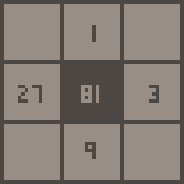
In the binary system, the pattern “2 to the power n” was used, in the new one we will use the pattern “3 to the power n”.
In the ternary system, each position has three possible states: grass, water, forest, or 0, 1, 2. When there is grass at the current point, we ignore the value (multiply it by 0). When water is at a point, we add the set value (multiply it by 1). In the case of a forest, we add a double value (multiply it by 2).
That is, in the case of the forest tile, to the top and to the right of which there is water, the forest below, and the grass to the left: 81 * 3 + 1 * 2 + 3 * 1 + 9 * 3 + 27 * 0 = 275
As you can see, at this stage, to cover all combinations of a map with three types of relief, you need to draw 324 tile images. When working manually, it would take a lot of time. I highly recommend to study at least partially automated ways to create such a multitude of combinations.
Of course, in the same way the system can be expanded to more types of terrain, but the number of tile images will increase significantly. Therefore, I recommend imposing restrictions on which tiles can coexist with each other. For example, if forest and water tiles can never border each other, then in the above example you will need several hundred less tile images.
Source: https://habr.com/ru/post/335662/
All Articles