Hidden features of Windows. How can BitLocker help protect data?
According to experts, it is the laptop theft is one of the main problems in the field of information security (IB).
Unlike other security threats, the nature of the problems of a “stolen laptop” or “stolen flash drive” is rather primitive. And if the cost of the disappeared devices rarely exceeds several thousand American dollars, the value of the information stored on them is often measured in millions.
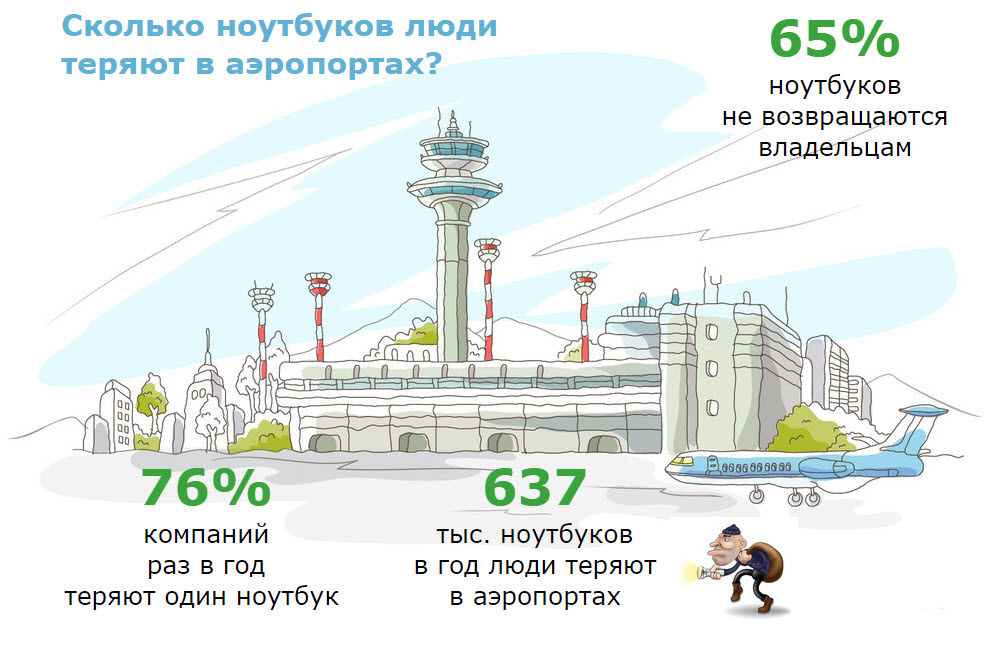
According to Dell and the Ponemon Institute, 637,000 laptops are lost annually in US airports alone. And imagine how many flash drives disappear, because they are much smaller, and dropping a flash drive accidentally is easier than ever.
When a laptop belonging to a top manager of a large company disappears, the damage from one such theft can amount to tens of millions of dollars.
How to protect yourself and your company?
We continue the cycle of articles about the security of the Windows domain. In the first article of the cycle, we talked about setting up secure domain logon, and in the second about setting up secure data transfer in the mail client:
- How to use a token to make a Windows domain safer? Part 1 .
- How to use a token to make a Windows domain safer? Part 2 .
In this article we will talk about setting up encryption of information stored on your hard disk. You will understand how to make so that no one except you could read the information stored on your computer.
Few people know that Windows has built-in tools that help keep information secure. Consider one of them.
Surely, one of you heard the word "BitLocker". Let's see what it is.
What is BitLocker?
BitLocker (the exact name of BitLocker Drive Encryption) is a computer-based disk encryption technology developed by Microsoft. She first appeared in Windows Vista.
Using BitLocker, you could encrypt hard disk volumes, but later, already in Windows 7, similar BitLocker To Go technology appeared, which is designed to encrypt removable drives and flash drives.
BitLocker is a standard component of Windows Professional and server versions of Windows, which means that in most cases of corporate use it is already available. Otherwise, you will need to upgrade your Windows license to Professional.
How does BitLocker work?
This technology is based on full volume encryption using the Advanced Encryption Standard (AES) algorithm. Encryption keys must be stored securely and BitLocker has several mechanisms for this.
The easiest, but at the same time the most insecure method is the password. The key is obtained from the password each time in the same way, and accordingly, if someone finds out your password, then the encryption key will be known.
In order not to store the key in the clear, it can be encrypted either in the TPM (Trusted Platform Module), or on a cryptographic token or smart card that supports the RSA 2048 algorithm.
TPM - a chip designed to implement the basic functions related to security, mainly using encryption keys.
The TPM module, as a rule, is installed on the computer motherboard, however, it is very difficult to purchase a computer with an integrated TPM module in Russia, since the import of devices without notification of the FSB to our country is prohibited.
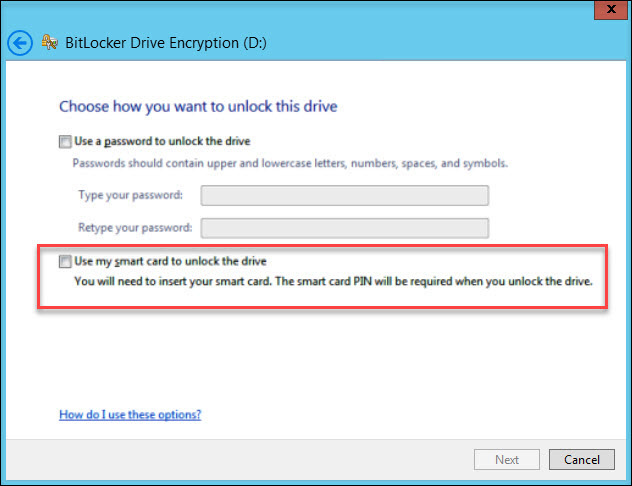
Using a smart card or token to unlock a disk is one of the safest ways to control who performed the process and when. To unlock, in this case, both the smart card itself and the PIN code are required.
BitLocker operation scheme:
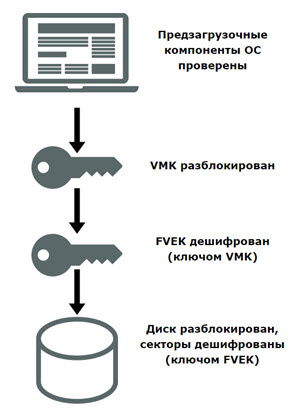
- When BitLocker is activated using a pseudo-random number generator, a main bit sequence is created. This is the volume encryption key - FVEK (full volume encryption key). They encrypt the contents of each sector. The FVEK key is kept in the strictest secrecy.
- FVEK is encrypted using the VMK (volume master key). The FVEK key (encrypted with the VMK key) is stored on disk among the metadata of the volume. At the same time, it should never fall on the disk in decrypted form.
- VMK itself is also encrypted. The way it is encrypted is chosen by the user.
- The VMK key is encrypted by default using the SRK (storage root key), which is stored on a cryptographic smart card or token. Similarly, this happens with TPM.
By the way, the encryption key of the system drive in BitLocker can not be protected using a smart card or token. This is due to the fact that libraries from the vendor are used to access smart cards and tokens, and, of course, they are not available prior to booting the OS.
If there is no TPM, then BitLocker offers to save the key of the system partition on a USB flash drive, and this, of course, is not the best idea. If your system does not have TPM, then we do not recommend encrypting system disks.
In general, encrypting the system disk is a bad idea. When properly configured, all important data is stored separately from the system. It is at least more convenient in terms of their backup. Plus, encryption of system files reduces system performance as a whole, and the work of an unencrypted system disk with encrypted files occurs without loss of speed. - The encryption keys of other non-system and removable disks can be protected using a smart card or token, as well as TPM.
If there is neither a TPM module nor a smart card, then instead of SRK, the key generated on the basis of the password you entered is used to encrypt the VMK key.
When launched from an encrypted boot disk, the system polls all possible keystores - checks for TPM, checks USB ports, or if necessary, prompts the user (what is called recovery). Key storage discovery allows Windows to decrypt the VMK key, which decrypts the FVEK key, which already decrypts the data on the disk.
Each sector of the volume is encrypted separately, and part of the encryption key is determined by the number of this sector. As a result, two sectors containing the same unencrypted data will look different in encrypted form, which makes it very difficult to determine the encryption keys by recording and decrypting previously known data.
In addition to FVEK, VMK and SRK, BitLocker uses another type of key, created “just in case”. These are recovery keys.
For emergency cases (the user lost the token, forgot his PIN, etc.) BitLocker at the last step offers to create a recovery key. Refusal to create it in the system is not provided.
How to enable encryption of data on the hard disk?
Before you begin the process of encrypting volumes on your hard disk, it is important to note that this procedure will take some time. Its duration will depend on the amount of information on the hard disk.
If the computer shuts down or goes into hibernation mode during the encryption or decryption process, these processes will resume from the point of shutdown the next time Windows starts.
Even in the process of encryption, the Windows system can be used, but it is unlikely to be able to please you with its performance. As a result, after encryption, disk performance decreases by about 10%.
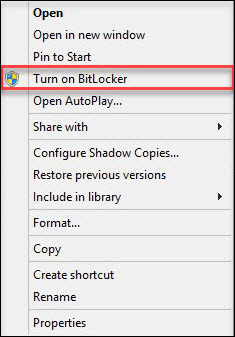
If BitLocker is available on your system, then when you right-click on the name of the disk you want to encrypt, the Turn on BitLocker item will appear in the menu that opens.
On server versions of Windows, you must add the BitLocker Drive Encryption role.
Let's start setting up encryption for a non-system volume and protect the encryption key using a cryptographic token.
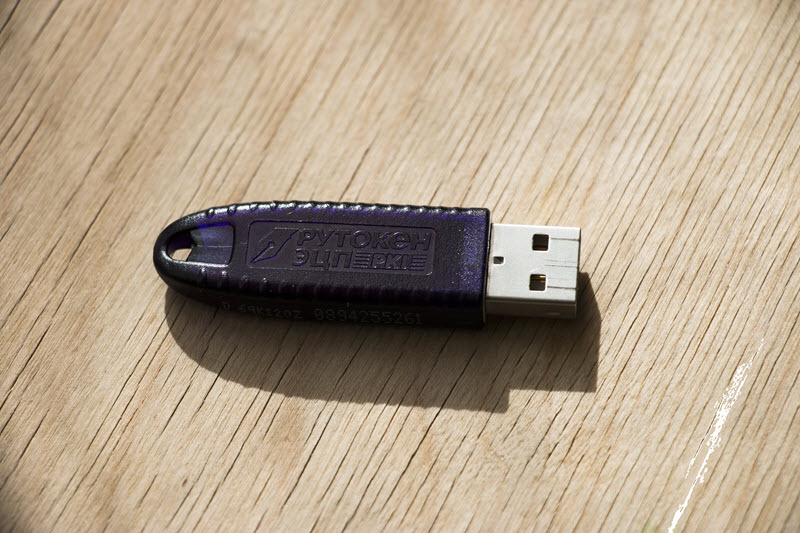
We will use the token produced by the company "Aktiv". In particular, the token Rutoken e-signature PKI .
I. Prepare Rutoken EDS PKI for work.
In most normally configured Windows systems, after the first connection of Rutoken EDS, the PKI automatically loads and installs a special library for working with tokens produced by Aktiv company - Aktiv Rutoken minidriver.
The process of installing such a library is as follows.

The availability of the Aktiv Rutoken minidriver library can be checked through the Device Manager .
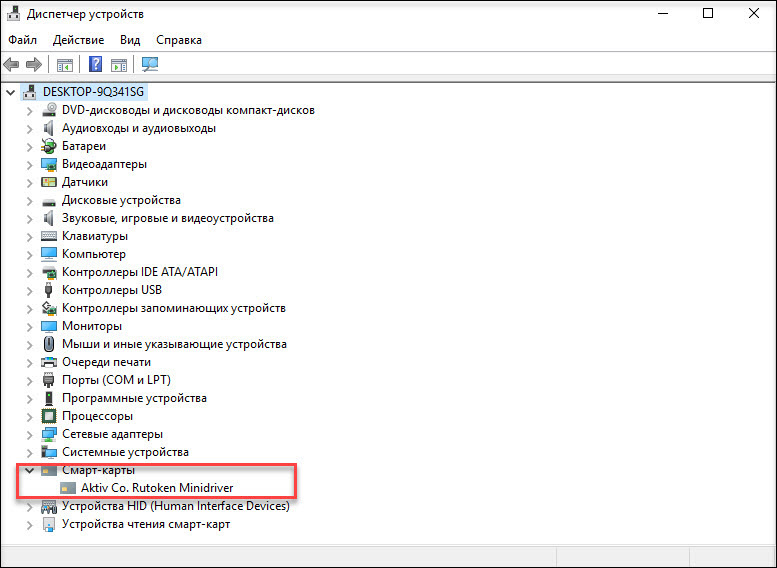
If for some reason the download and installation of the library did not happen, then the Rutoken Drivers for Windows package should be installed.
Ii. Encrypt data to disk using BitLocker.
Click on the drive name and select Turn on BitLocker .
As we said earlier, we will use a token to protect the disk encryption key.
It is important to understand that to use a token or smart card in BitLocker, they must have RSA 2048 keys and a certificate.
If you use Certificate Authority in a Windows domain, then the certificate template should contain the field of application of the “Disk Encryption” certificate (for more details on how to configure the Certificate Authority in the first part of our series of articles on Windows domain security).
If you do not have a domain or you can not change the certificate issuance policy, you can use the backup by using a self-signed certificate, details on how to write yourself a self-signed certificate described here .
Now set the appropriate checkbox.
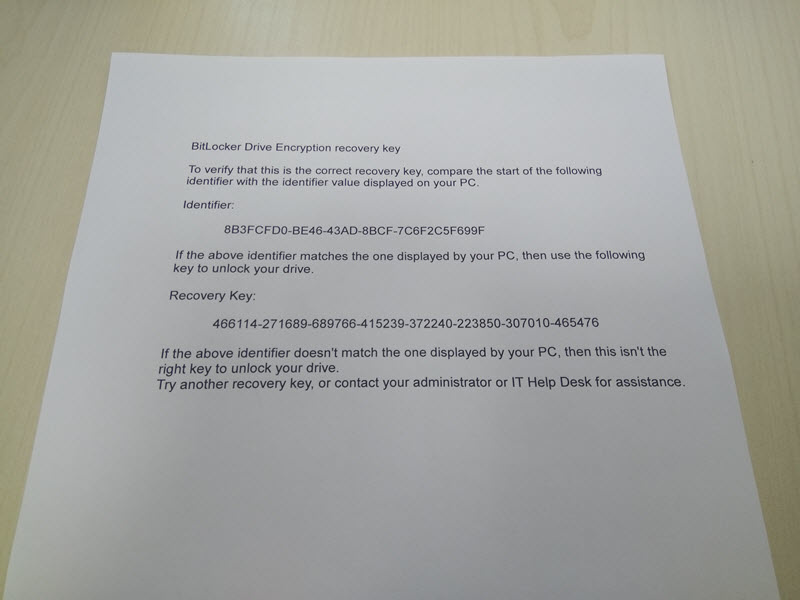
In the next step, select the method for saving the recovery key (we recommend choosing Print the recovery key ).

Paper with a printed recovery key must be stored in a safe place, preferably in a safe.
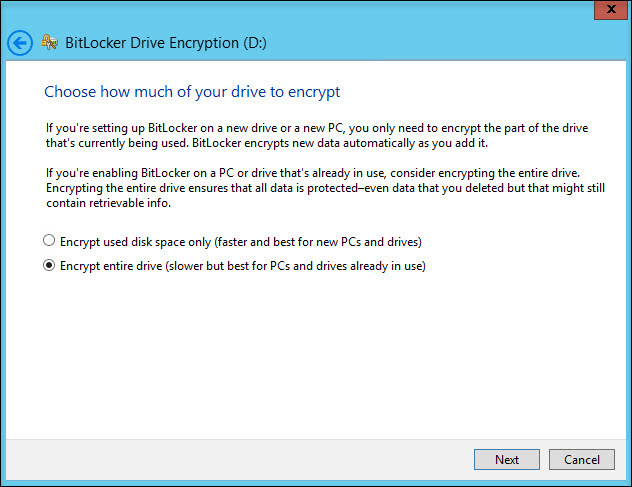
Next, choose which encryption mode will be used for disks that already contain some valuable data (it is recommended to choose the second option).
In the next step, we start the disk encryption process. After this process is complete, it may be necessary to reboot the system.
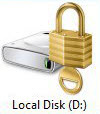
When encryption is enabled, the encrypted disk icon will change.
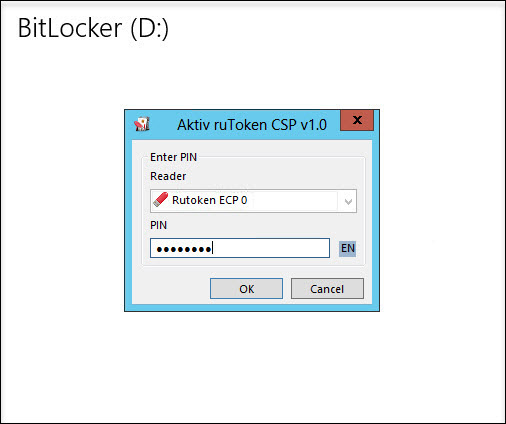
And now, when we try to open this disk, the system will ask you to insert the token and enter its PIN code.
Deploying and configuring BitLocker and TPM can be automated using WMI or Windows PowerShell scripts. The way in which the scenarios are implemented will depend on the environment. The commands for BitLocker in Windows PowerShell are described in the article .
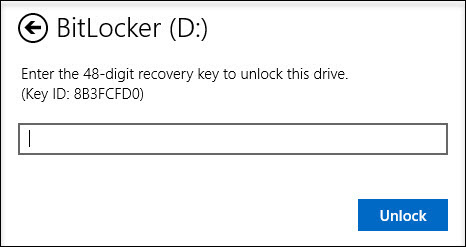
How to recover data encrypted by BitLocker if the token is lost?
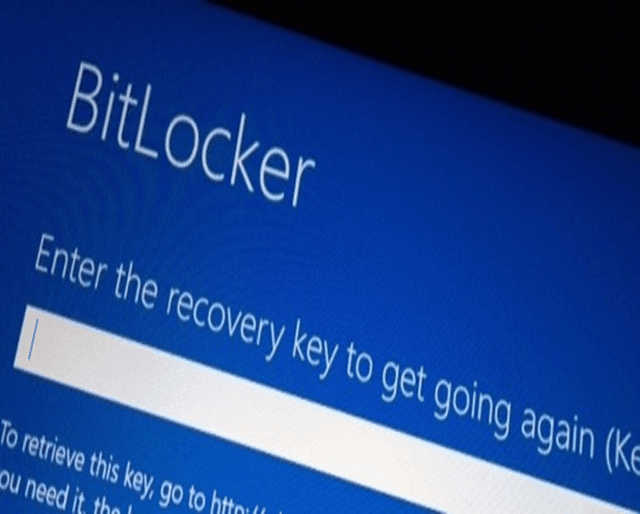
If you want to open encrypted data in Windows
To do this, you will need a recovery key, which we printed out earlier. Just enter it in the appropriate field and the encrypted section will open.
If you want to open encrypted data on GNU / Linux and Mac OS X systems
This requires the DisLocker utility and the recovery key.
The DisLocker utility works in two modes:
- FILE - the entire BitLocker encrypted partition is decrypted into a file.
- FUSE - only the block to which the system refers is decrypted.
For example, we will use the Linux operating system and the FUSE utility mode.
In the latest versions of common Linux distributions, the dislocker package is already included in the distribution, for example, in Ubuntu, starting with version 16.10.
If for some reason the dislocker package was not found, then you need to download the DisLocker utility and compile it:
tar -xvjf dislocker.tar.gz Open the INSTALL.TXT file and check which packages we need to install.
In our case, we need to install the libfuse-dev package:
sudo apt-get install libfuse-dev Let's start building the package. Go to the src folder and use the make and make install commands:
cd src/ make make install When everything compiled (or you installed the package) proceed to the configuration.
Go to the mnt folder and create two folders in it:
- Encrypted-partition — for an encrypted partition;
- Decrypted-partition - for decrypted partition.
cd /mnt mkdir Encrypted-partition mkdir Decrypted-partition Find the encrypted partition. Decrypt it using the utility and move it to the Encrypted-partition folder:
dislocker -r -V /dev/sda5 -p recovery_key /mnt/Encrypted-partition</b>( recovery_key ) Display the list of files in the Encrypted-partition folder:
ls Encrypted-partition/ Enter the command to mount the partition:
mount -o loop Driveq/dislocker-file Decrypted-partition/ To view the decrypted partition, go to the Encrypted-partition folder.
We summarize
Enabling volume encryption with BitLocker is easy. All this is done effortlessly and for free (subject to the availability of a professional or server version of Windows, of course).
To protect the encryption key that encrypts the disk, you can use a cryptographic token or a smart card, which significantly increases the level of security.
')
Source: https://habr.com/ru/post/335532/
All Articles