Getting root access to LG smart TVs on webOS
Probably, many have heard about getting root access to devices on Android. Thanks to him, you can significantly expand the capabilities of mobile devices on this OS. But about rut access to LG TVs, few have heard. So, the other day enthusiasts laid out instructions on how to get root access to LG TVs on the webOS operating system versions 1.0-3.0. The instruction itself is under the cut, but first I want to remind you that the mobile OS webOS was developed by Palm (if anyone remembers this :) for their smartphones and tablets and is based on the Linux kernel with a “samopisny” graphical shell.
Cautions
I want to warn you that in case of problems with the TV, in the service center you may be denied warranty service. You can harm the device or make it inoperable. If you are not an advanced user and do not really know why you need Root rights, it is strongly recommended not to receive them, since There is always a chance to get a "brick", or to change the settings that cause problems in the work.
To get the root you will need to download a special script on the TV. Audit of the script and instructions can be read here .
')
If you dealt with Linux-systems, there is nothing difficult in the procedure of getting root in webOS. To obtain it you will need: a TV with webOS connected to the network, a computer (connected to the same network), a developer account on the LG server.
- First, create a developer account (if absent) on the developer.lge.com server ( instructions / eng /).
- Install the Developer Mode application into the TV from the LG Store application directory. Start it, enter the login / password from the previous item, turn on the Dev Mode Status and Key Server switches. The TV will reboot and will be ready for further manipulations ( instruction / eng /).
- Install on the webOS SDK computer (SDK-CLI component only) from here http://webostv.developer.lge.com/sdk/download/download-sdk/ , the easiest way is to use the Internet installer (Your_OS_Installer file).
Run the webOS TV CLI .
In the window that opens, type ares-setup-device and press "enter". Select add.ares-setup-device name deviceinfo connection profile -------- ------------------------ ---------- ------- emulator developer@127.0.0.1:6622 ssh tv ** You can modify the device info in the above list, or add new device. ? Select: (Use arrow keys) > add modify remove
Enter information about the TV according to the following sample (10.123.45.67 - enter the IP address of your TV):** You can modify the device info in the above list, or add new device. ? Select: add ? Enter Device Name: tv2 ? Enter Device IP address: 10.123.45.67 ? Enter Device Port: 9922 ? Enter ssh user: prisoner ? Enter description: new device ? Select authentification: password ? Enter password: ? Save ? Yes name deviceinfo connection profile -------- -------------------------- ---------- ------- tv2 prisoner@10.123.45.67:9922 ssh tv emulator developer@127.0.0.1:6622 ssh tv
After adding the TV, check the result by running the following command:ares-setup-device -list
Get the key file from the TV with the following command:ares-novacom --device tv2 --getkey
When requesting a Passphrase, you need to enter a 6-character password (case sensitive!), Which is displayed in the Developer Mode application on the TV.input passphrase [default: webos]:
Check the PC connection to the TV with the following command:ares-install --device tv2 --list - Download the file zalil.su/6937580 , rename it to root.
- Use puttygen.exe to import the key previously obtained from the TV key, then save the private key. Install WinSCP from here winscp.net/eng/download.php , run and enter the IP address of your TV, port 9922, then enter the key here "More -> SSH -> Authentication -> Private Key File". Further "Connection -> Open terminal (Ctrl + T)". The contents of the TV will open in the right window, copy the root file there from the left window. That's it, WinSCP is no longer needed, you can close it.
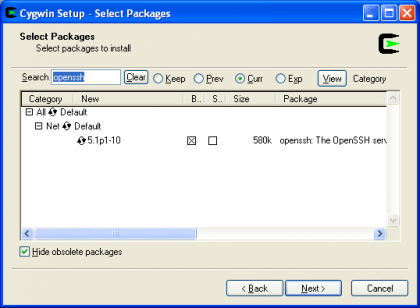
- Now to connect to the TV, we need a Linux application ssh. If not PC is installed on the PC, but Windows XP, 7.8 - download and install Cygwin (UNIX-like environment and command line interface for Microsoft Windows), not forgetting the openssh component.
If the PC is Win10, then the easiest way to use the Linux subsystem in Windows 10 - Run Cygwin64 Terminal and run the following command:
ssh -i tv_webos_key prisoner@192.168.xx -p 9922
where tv_webos_key is the key file name, 192.168.xx is the IP address of the TV - Run the commands:
chmod +x root ./root
The script will begin to perform its actions, wait until the message appears:try install any app from market - Take the remote and try to install any application from the application store on TV - will give an error. And the script in turn should write
third stage ok. try get root - input password 1111 Password: - Enter the password 1111.
Everything, the root is received! - You can check by typing id - will give:
uid=0(root) gid=0(root)........
Such a root is temporary until reboot. To obtain a permanent root, follow this instruction . - To get to the main rootfs we type -
busybox chroot /proc/1/root
And you can read the following post:
webos-forums.ru/post54464.html#p54464
Useful tips:- vim is better not to use ssh. There are problems with the bit-rate transmission of some keys, at least on Windows and on webOS 1.4.
- It is best to transfer the necessary files for editing in / tmp /
cp somefile /tmp/somefile - If you get an error when downloading via WinSCP, then change the file permissions.
chmod 607 /tmp/somefile - Next, locally edit on your PC, put the file back in / tmp / and overwrite the old one
cp /tmp/somefile somefile - At the end of the command
ssh -i tv_webos_key prisoner@192.168.xx -p 9922"/bin/sh -i" - Everything that is put in / tmp / is deleted after turning off the TV.
All beaver!
Actually, the original instructions from the author.
Using these Root-rights, you can, for example, automatically launch the application you need when you turn on the TV.
Source: https://habr.com/ru/post/335504/
All Articles