Learn App Shortcuts on Android Nougat 7.1
Hi Habr! I offer you a free translation of the article “ Exploring Android Nougat 7.1 App Shortcuts ” by Andrei Catinean .
Google released Android Nougat with version 7.1 (API 25). There were some interesting features under the hood. One of these additional features is app shortcuts. This article will tell you what they are, how they work, and how you can implement them.
The end result looks like this:
What is the App Shortcuts and why are they needed?
Application shortcuts are a means of displaying common actions or tasks of your application on the user's home screen. Your users can open shortcuts with a long press of the program launch. From a technical point of view, application shortcuts are a quick and easy way to use intents.
They are of two types:
- Static: these are shortcuts that are statically defined in the resource file. They cannot be changed unless you change the file and deploy the application.
- Dynamic: These are shortcuts that are published at runtime. They can be updated without having to redeploy the application.
By providing your common tasks, you can make it easier for users to quickly return to certain parts of your application without additional navigation and without having to go through activities.
Add shortcuts
Adding shortcuts to your application is quite simple. Start by creating a simple static shortcut.
STATIC SHORTCUTS
This example assumes that you have already created a project in Android Studio.
Go to AndroidManifest.xml and add the following metadata tag to your main activity:
<?xml version="1.0" encoding="utf-8"?> <manifest xmlns:android="http://schemas.android.com/apk/res/android" package="com.catinean.appshortcutsdemo"> <application android:allowBackup="true" android:icon="@mipmap/ic_launcher" android:label="@string/app_name" android:supportsRtl="true" android:theme="@style/AppTheme"> <activity android:name=".MainActivity"> <intent-filter> <action android:name="android.intent.action.MAIN" /> <category android:name="android.intent.category.LAUNCHER" /> <category android:name="android.intent.category.DEFAULT" /> </intent-filter> <meta-data android:name="android.app.shortcuts" android:resource="@xml/shortcuts" /> </activity> </application> </manifest> In the meta-data tag, the android: resource key corresponds to the resource defined in the res / xml / shortcuts.xml file. Here you need to define all your static shortcuts. Let's add one that will open a certain activity from your application.
In the example below, I created a dummy StaticShortcutActivity :
<?xml version="1.0" encoding="utf-8"?> <shortcuts xmlns:android="http://schemas.android.com/apk/res/android"> <shortcut android:enabled="true" android:icon="@drawable/ic_static_shortcut" android:shortcutDisabledMessage="@string/static_shortcut_disabled_message" android:shortcutId="static" android:shortcutLongLabel="@string/static_shortcut_long_label" android:shortcutShortLabel="@string/static_shortcut_short_label"> <intent android:action="android.intent.action.VIEW" android:targetClass="com.catinean.appshortcutsdemo.StaticShortcutActivity" android:targetPackage="com.catinean.appshortcutsdemo" /> </shortcut> </shortcuts> You can see that the root tag of this file is <shortcuts> , which can contain several <shortcut> blocks. Each of them, as you might have guessed, is a static label. Here you can set the following properties for a single shortcut:
- enabled : As indicated in the title, whether the label is enabled or not. If you decide to disable the static shortcut, you can either set the value to false or simply remove it from the
<shortcuts>. - icon : The icon that will be displayed on the left side of the shortcut.
- shortcutDisabledMessage : this is the string that will be shown to the user if he tries to start the disabled shortcut. Note translator: This can happen when the shortcut is not removed from the main screen of the device.
- shortcutLongLabel : This is a longer version of the label description, which is displayed when there is enough space.
- shortcutShortLabel : a short label description. This field is required. This is the text of the label that the user sees on his main screen.
- intent : here you define your intention (or several intentions), which your shortcut will open when clicked.
Here is how this shortcut will be displayed to the user of your application:

Simple and understandable, but if you implement this, then you may notice that when you click on the "back" button, the user returns to the home screen.
How about going into the app instead? To do this, we can add several intent tags in the labels we created earlier:
<?xml version="1.0" encoding="utf-8"?> <shortcuts xmlns:android="http://schemas.android.com/apk/res/android"> <shortcut ...> <intent android:action="android.intent.action.MAIN" android:targetClass="com.catinean.appshortcutsdemo.MainActivity" android:targetPackage="com.catinean.appshortcutsdemo" /> <intent android:action="android.intent.action.VIEW" android:targetClass="com.catinean.appshortcutsdemo.StaticShortcutActivity" android:targetPackage="com.catinean.appshortcutsdemo" /> </shortcut> </shortcuts> Notice how we added an additional <intent> to what we had, pointing to MainActivity . This will create a back stack of intentions, the last of which will be opened with a shortcut. In our case, back stack looks like MainActivity → Static ShortcutActivity , so when you click back, the user goes into MainActivity:

Adding static shortcuts is pretty simple. Let's move to dynamic.
DYNAMIC SHORTCUTS
As their name suggests, dynamic shortcuts can be changed at runtime without the need to re-open your application. As you might guess, they are not defined through a static resource ( shortcuts.xml ), as static, but created in code.
Let's add our first dynamic label! To do this, you will need to use the ShortcutManager and ShortcutInfo.Builder . I will create the first dynamic shortcut in my MainActivity. # OnCreate () :
@Override protected void onCreate(Bundle savedInstanceState) { ... ShortcutManager shortcutManager = getSystemService(ShortcutManager.class); ShortcutInfo webShortcut = new ShortcutInfo.Builder(this, "shortcut_web") .setShortLabel("novoda.com") .setLongLabel("Open novoda.com web site") .setIcon(Icon.createWithResource(this, R.drawable.ic_dynamic_shortcut)) .setIntent(new Intent(Intent.ACTION_VIEW, Uri.parse("https://novoda.com"))) .build(); shortcutManager.setDynamicShortcuts(Collections.singletonList(webShortcut)); } In the example above, we use shortcutManager and create a ShortcutInfo . Using ShortcutInfo.Builder , we can set various properties for the shortcut we want to create. All the methods we use above are the same as for the static label. However, one property that is slightly obscure is the label identifier, which is defined in the StaticInfo.Builder constructor as the second parameter, shortcut_web . In the example above, I determined the intent that will open my site. Finally, I set the dynamic shortcut in the ShortcutManager . Now let's see how our labels look like:

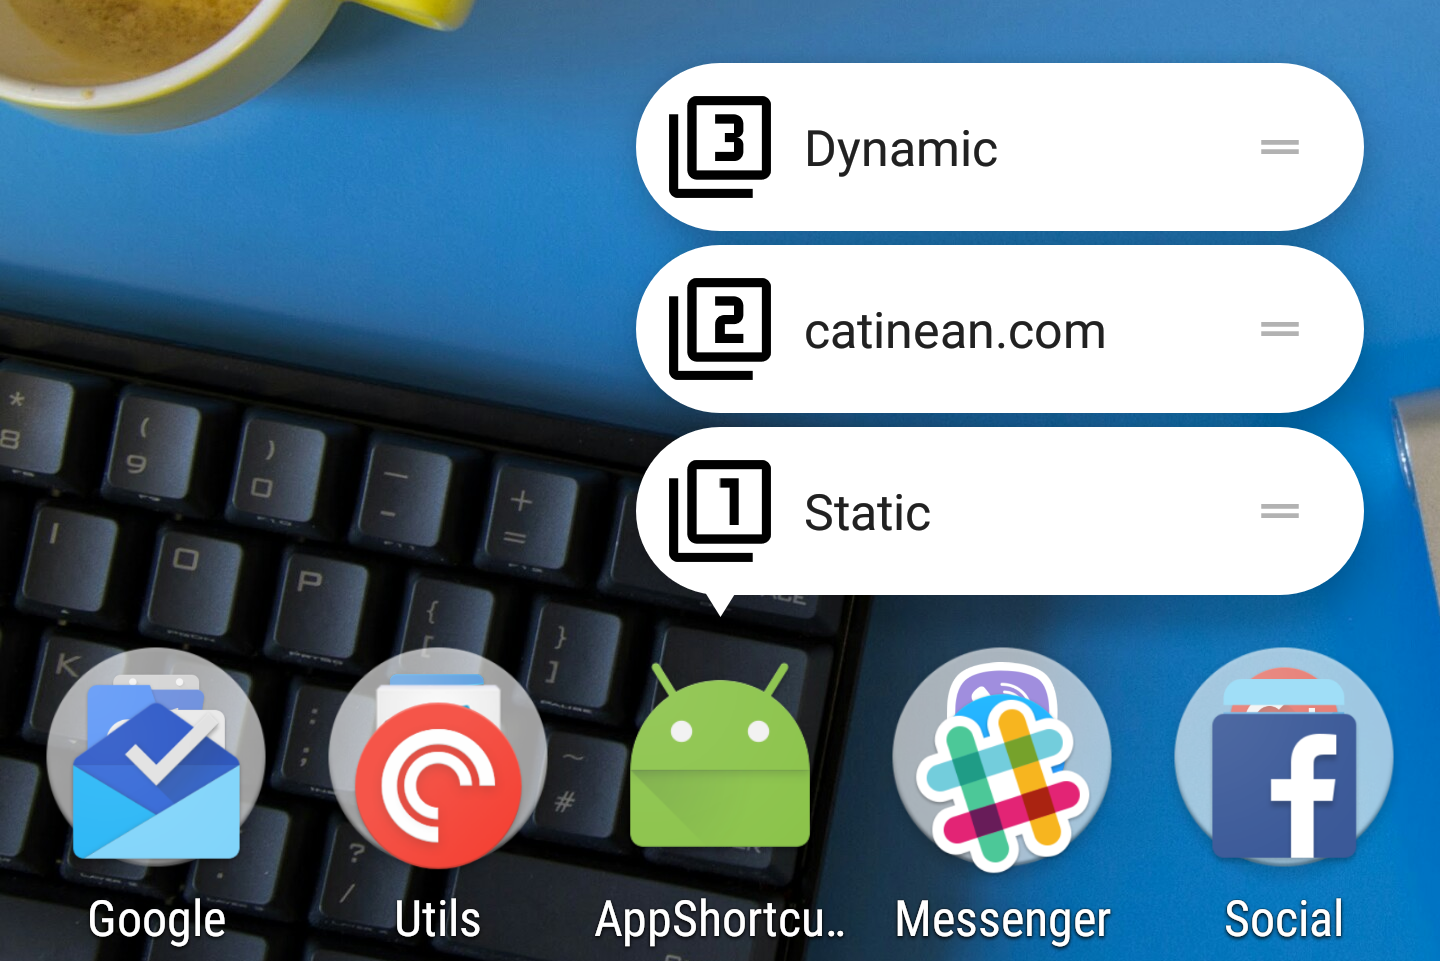
Cool! Now we have 2 quick shortcuts in our application - one static and one dynamic .
Let's add another one that will indicate activity inside the application and see how we can create back stack for it:
@Override protected void onCreate(Bundle savedInstanceState) { ... ShortcutInfo dynamicShortcut = new ShortcutInfo.Builder(this, "shortcut_dynamic") .setShortLabel("Dynamic") .setLongLabel("Open dynamic shortcut") .setIcon(Icon.createWithResource(this, R.drawable.ic_dynamic_shortcut_2)) .setIntents( new Intent[]{ new Intent(Intent.ACTION_MAIN, Uri.EMPTY, this, MainActivity.class).setFlags(Intent.FLAG_ACTIVITY_CLEAR_TASK), new Intent(DynamicShortcutActivity.ACTION) }) .build(); shortcutManager.setDynamicShortcuts(Arrays.asList(webShortcut, dynamicShortcut)); } You can see that now we create setIntents () in the builder to build the back stack:
The first intention corresponds to the MainActivity . We define the FLAG_ACTIVITY_CLEAR_TASK flag to clear all existing tasks associated with the application and make the MainActivity the current root action.
- The second corresponds to DynamicShortcutActivity (an empty activity that I created). To do this, we need to provide an Intent with a specific action, which is defined as a static String in DynamicShortcutActivity and corresponds to the action name intent-filter defined in AndroidManifest.xml for the same activity:
<activity android:name=".DynamicShortcutActivity" android:label="Dynamic shortcut activity"> <intent-filter> <action android:name="com.catinean.appshortcutsdemo.OPEN_DYNAMIC_SHORTCUT" /> <category android:name="android.intent.category.DEFAULT" /> </intent-filter> </activity> By declaring an array of intentions in this order, we guarantee that when the user returns after opening DynamicShortcutActivity , the MainActivity will be opened.
What it looks like:
SHORTCUT ORDERING
Now that we have 1 static label and 2 dynamic ones, how can we give them an order? If we take a closer look at the methods of ShortcutInfo.Builder , in particular: setRank (int) . By setting a custom rank to a dynamic label, we can control the order in which they appear: the higher the rank, the higher the label.
As an example, let's say we want label # 2 (novoda.com) to be on top. We can dynamically change the rows of already added dynamic shortcuts. Let's do this by clicking the button in MainActivity :
findViewById(R.id.main_rank_button).setOnClickListener(new View.OnClickListener() { @Override public void onClick(View view) { ShortcutInfo webShortcut = new ShortcutInfo.Builder(MainActivity.this, "shortcut_web") .setRank(1) .build(); ShortcutInfo dynamicShortcut = new ShortcutInfo.Builder(MainActivity.this, "shortcut_dynamic") .setRank(0) .build(); shortcutManager.updateShortcuts(Arrays.asList(webShortcut, dynamicShortcut)); } }); In the button listener, we create a new ShortcutInfo for each label that we previously added with the same identifiers, but now we set a higher rank to shortcut_web , and a lower rank for shortcut_dynamic . Finally, we use the updateShortcuts (List <ShortcutInfo> ) method to update the shortcuts:

You can see from the above gif that the static label is at the bottom of the list. Important note: you cannot change the rank of a static label. They will be shown in the order in which they are defined in the shortcuts.xml file. Since we only have one static label, it has a default rank of 0, which cannot be changed.
EXTRA BITS
If we take a closer look at the setShortLabel (CharSequence) method, we will see that it takes a CharSequence as a parameter. What does it mean? Well, it means that we can play a little with him :-)
Suppose we want to change the color to red by clicking on the button created above. We can create a SpannableStringBuilder and set the foreground color for it to ForegroundColorSpan , then pass the spannableStringBuilder as shortLabel (because SpannableStringBuilder implements CharSequence ):
findViewById(R.id.main_rank_button).setOnClickListener(new View.OnClickListener() { @Override public void onClick(View view) { ForegroundColorSpan colorSpan = new ForegroundColorSpan(getResources().getColor(android.R.color.holo_red_dark, getTheme())); String label = "novoda.com"; SpannableStringBuilder colouredLabel = new SpannableStringBuilder(label); colouredLabel.setSpan(colorSpan, 0, label.length(), Spanned.SPAN_INCLUSIVE_INCLUSIVE); ShortcutInfo webShortcut = new ShortcutInfo.Builder(MainActivity.this, "shortcut_web") .setShortLabel(colouredLabel) .setRank(1) .build(); ... } });
Total
- Application shortcuts are great for viewing your application's activities and engaging users.
- They can be static or dynamic.
- Static shortcuts are installed and you can update them only when you redeploy the application.
- Dynamic shortcuts can be changed on the fly.
- You can create back stack activities for each shortcut.
- Labels can be reordered, but only in the appropriate type.
- Static shortcuts will always be at the bottom, as they are added first.
- Label descriptions accept CharSequence , so you can manipulate them.
Sources of application from the article
')
Source: https://habr.com/ru/post/335480/
All Articles