What is common between finite automata, animation, and Xamarin.Forms

Animations in Xamarin.Forms
If you are already using Xamarin.Forms in real projects, then you are probably faced with the built-in animation mechanism. If not, then we recommend starting the acquaintance with the articles “Creating Animations with Xamarin.Forms” and “Compound Animations” .
Most often you want to animate the following properties:
- Scale, the scale of the element;
- Opacity, transparency;
- Translation, an additional offset in x, y, relative to that obtained when composing the position;
- Rotation, rotation around the x, y, z axes.
In Xamarin.Forms, low-level OS mechanisms are used to set the indicated properties, which has a great effect on performance - there is no problem to animate a whole bunch of objects at once. In our example, we will focus on these properties, but if you wish, you can independently expand the mechanisms described below.
State machines
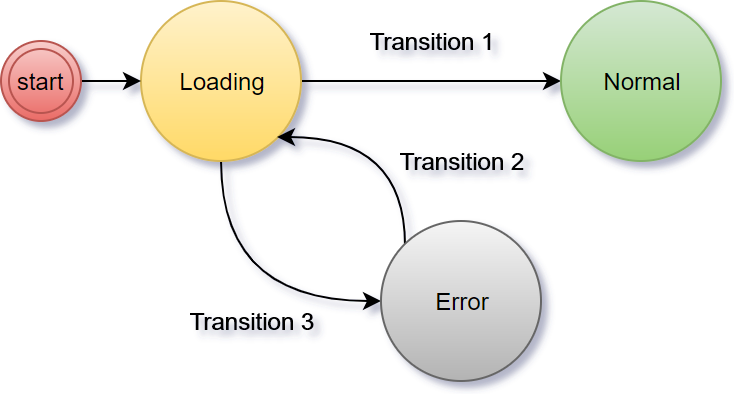
If we describe a finite automaton in human language, then this is an object that may be in different stable states (for example, “loading” or “error”). Their state machine changes under the influence of external events. The number of states of course. Examples of such machines are elevators and traffic lights.
')
If for some reason you did not study at the institute on a technical specialty or did not study theory, then we recommend starting your acquaintance with this article .
What does all this have to do with animations and especially with Xamarin.Forms? Let's get a look.
One screen, many states, there are transition animations
In the article “Working with screen states in Xamarin.Forms”, we have already described the StateContainer component, which simplifies the development of complex interfaces and is suitable for most screens in business applications. This component works well when we have all the states independently of each other and a rather simple transition “one disappeared - the second appeared” between them.

But what if you need to implement a complex and animated transition from one state to another? To go, rotate and jump.
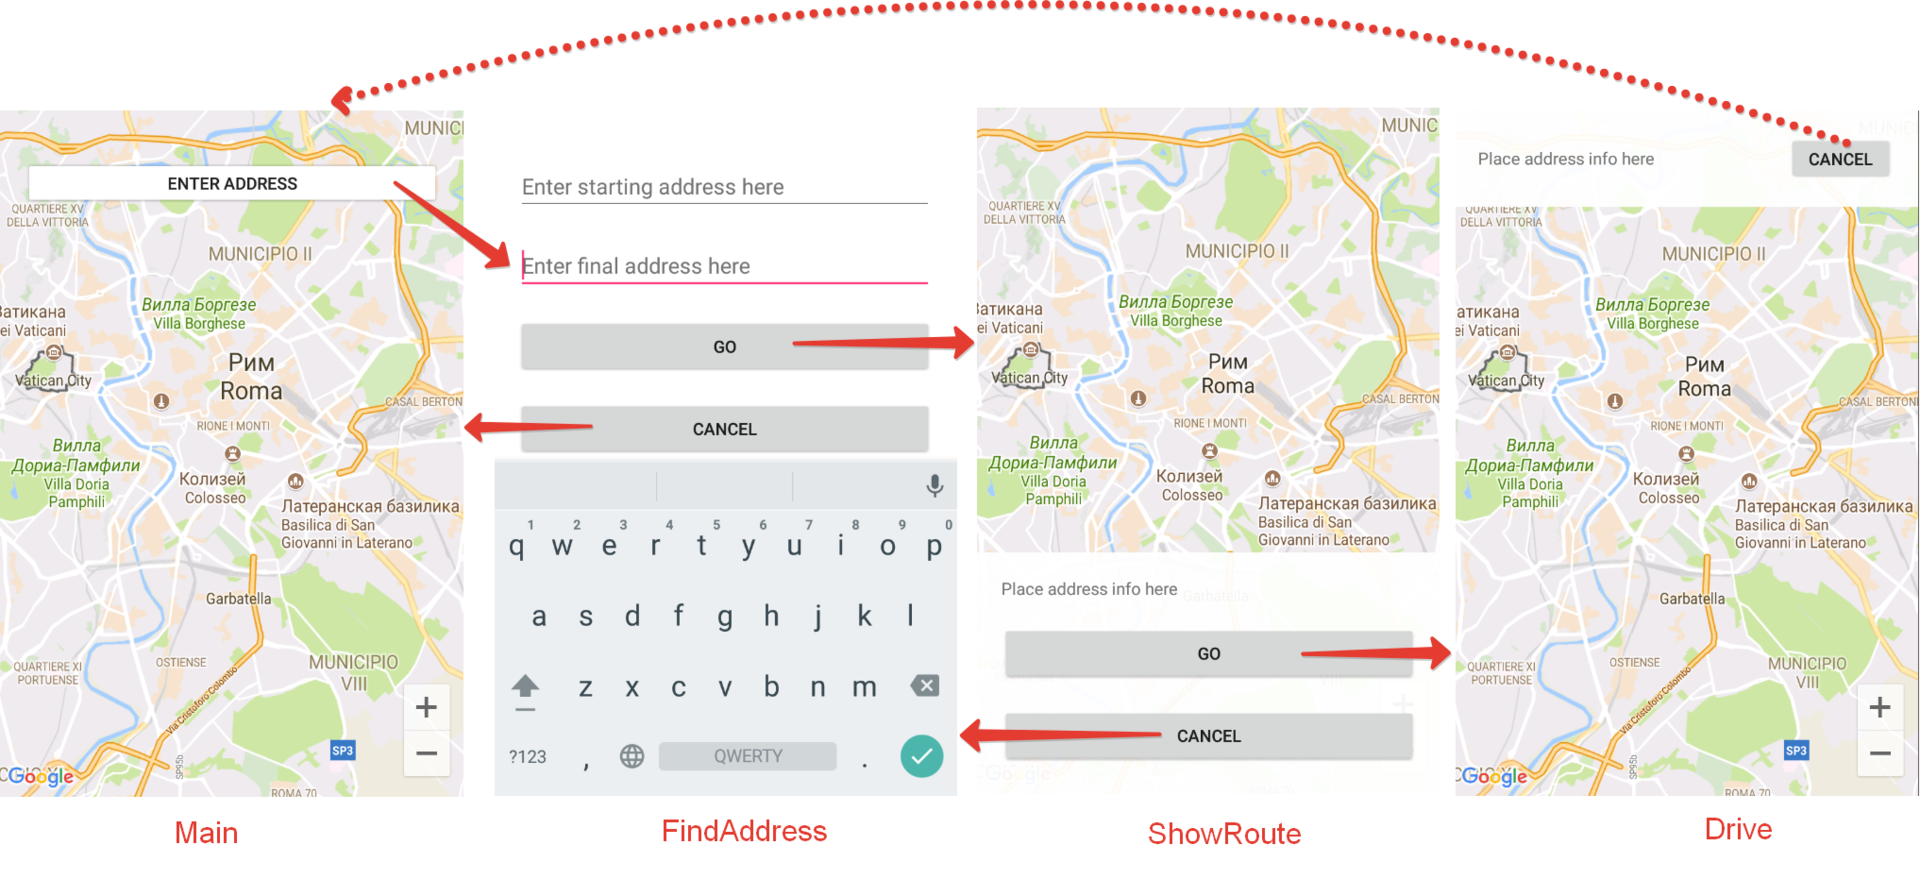
As an example, let's look at the screen for entering an address and working with a map, as it is implemented in most navigators.
Imagine that we have animated transitions between the following states of a SINGLE screen:
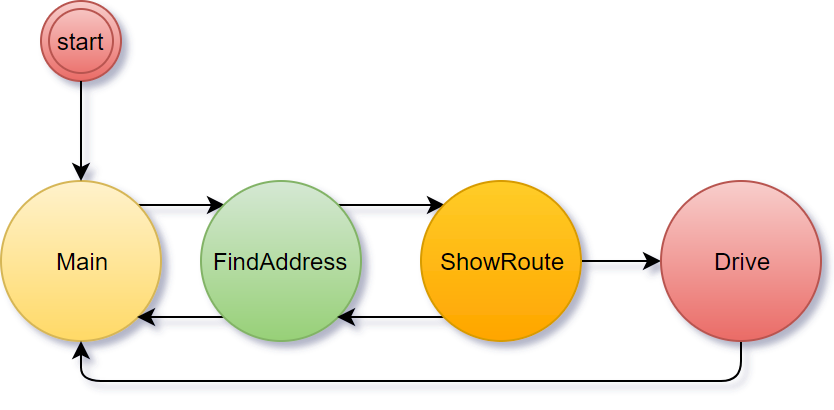
As you can see, we have such a state machine:
You need to implement the following animations when transitioning from state to state:
- When entering FindAddress, you need to hide the old content with animation and smoothly show the new one. Plus for piquancy we will animate the buttons during the appearance;
- When you go to ShowRoute, you need to hide the old state, and a sign with information about the route should come out from the bottom of the screen;
- When you go to Drive, you must hide the old state and the plate with the information about the route should go up;
- When switching to Main (except for the first launch), you need to hide the current state and smoothly display the button, add a small zoom animation to it as well.
We write your machine
We will take the simplest implementation:
- An automaton has a fixed set of states that are set during initialization;
- Each of the states is described by a set of necessary animations (final properties) for UI elements;
- When entering a new state, all animations from the array added during automaton initialization are launched in parallel.
We will not keep any history of transitions, neither does it matter for which user event the machine has moved from one state to another. There is only a transition to a new state, which is accompanied by animations.
So, the simplest machine gun, which we call the Storyboard, will look like this:
public enum AnimationType { Scale, Opacity, TranslationX, TranslationY, Rotation } public class Storyboard { readonly Dictionary<string, ViewTransition[]> _stateTransitions = new Dictionary<string, ViewTransition[]>(); public void Add(object state, ViewTransition[] viewTransitions) { var stateStr = state?.ToString().ToUpperInvariant(); _stateTransitions.Add(stateStr, viewTransitions); } public void Go(object newState, bool withAnimation = true) { var newStateStr = newState?.ToString().ToUpperInvariant(); // Get all ViewTransitions var viewTransitions = _stateTransitions[newStateStr]; // Get transition tasks var tasks = viewTransitions.Select(viewTransition => viewTransition.GetTransition(withAnimation)); // Run all transition tasks Task.WhenAll(tasks); } } public class ViewTransition { // Skipped. See complete sample in repository below public async Task GetTransition(bool withAnimation) { VisualElement targetElement; if( !_targetElementReference.TryGetTarget(out targetElement) ) throw new ObjectDisposedException("Target VisualElement was disposed"); if( _delay > 0 ) await Task.Delay(_delay); withAnimation &= _length > 0; switch ( _animationType ) { case AnimationType.Scale: if( withAnimation ) await targetElement.ScaleTo(_endValue, _length, _easing); else targetElement.Scale = _endValue; break; // See complete sample in repository below default: throw new ArgumentOutOfRangeException(); } } } In the example above, input checks are omitted, the full version can be found in the repository (link at the end of the article).
As we see, in the transition to a new state, smooth changes in the required properties just occur in parallel. It is also possible to go to a new state without animation.
We use the state machine
So, we have an automaton and we can connect it to set the necessary state of the elements. An example of adding a new state:
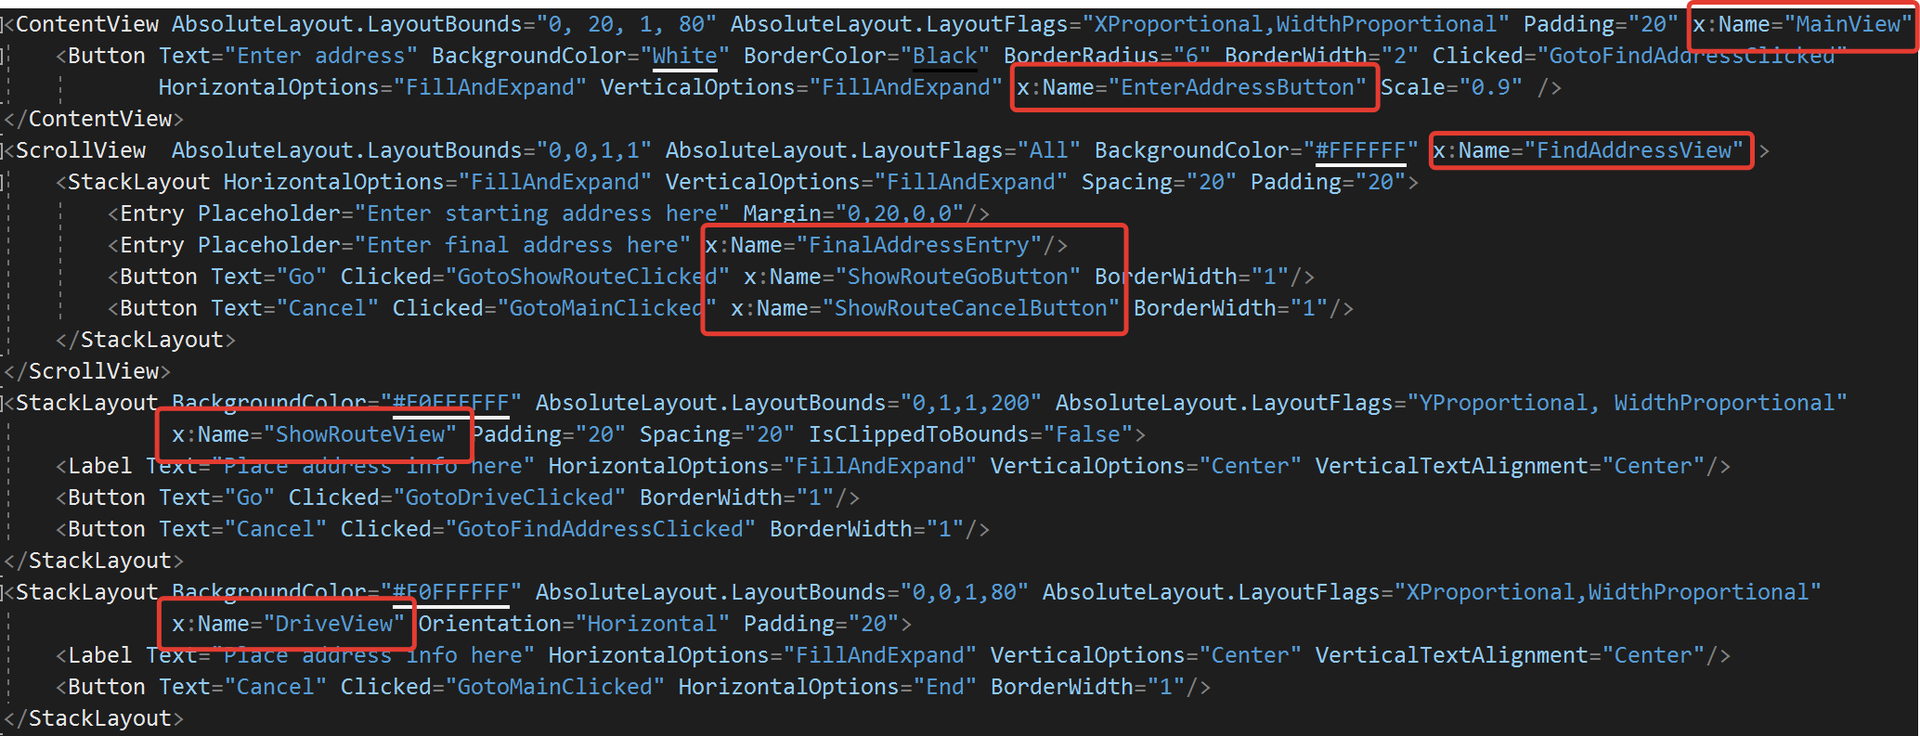
_storyboard.Add(States.Drive, new[] { new ViewTransition(ShowRouteView, AnimationType.TranslationY, 200), new ViewTransition(ShowRouteView, AnimationType.Opacity, 0, 0, delay: 250), new ViewTransition(DriveView, AnimationType.TranslationY, 0, 300, delay: 250), // Active and visible new ViewTransition(DriveView, AnimationType.Opacity, 1, 0) // Active and visible }); As you can see, for the Drive state, we set an array of individual animations. ShowRouteView and DriveView are the normal views defined in XAML, as shown below.
But to switch to a new state, simply call the Go () method:
_storyboard.Go(States.ShowRoute); The code turns out to be relatively small and group animations are created in fact simply by a set of numbers. Our finite state machine can work not only with pages, but also with individual View, which expands its application options. It is better to use Storyboard inside the page code (Page), without mixing it with business logic.
We also give an example of XAML, which describes all the elements of the user interface.
If you decide to add the ability to change the color of elements using animations, we recommend that you familiarize yourself with the implementation described in the article “Building Custom Animations in Xamarin.Forms” .
The full project code from the article can be found in our repository:
https://bitbucket.org/binwell/statemachine .
And as always, ask your questions in the comments. Before communication!
about the author
 Vyacheslav Chernikov - head of development at Binwell , Microsoft MVP and Xamarin Certified Developer. In the past, he was one of the Nokia Champion and Qt Certified Specialists, currently he is the Xamarin and Azure platform specialist. He came to the sphere of mobile in 2005, since 2008 he has been developing mobile applications: he started with Symbian, Maemo, Meego, Windows Mobile, then switched to iOS, Android and Windows Phone. Articles Vyacheslav you can also read the blog on Medium .
Other articles by the author:
- What is common between finite automata, animation, and Xamarin.Forms
- 7 best device farm for mobile app testing
- Automate non-automated, or about Xamarin in real projects
- OAuth Authorization for Xamarin Applications
- Deploy mobile software with Microsoft devops pipeline
- DevOps in the service of man
- Convenient REST for Xamarin Applications
- Quickly create MVP (minimum viable product) based on Microsoft Azure and Xamarin.Forms
- Preparing Xamarin.Forms: Setting Up the Environment and First Steps
- Increase work efficiency in Xamarin.Forms
- Working with screen states in Xamarin.Forms
- Connecting Facebook SDK for Xamarin.Forms
- We connect VKontakte SDK for Xamarin.Forms
Source: https://habr.com/ru/post/335418/
All Articles