Expand Emercoin testnet and get a lot of free coins

Suppose you decide to create a project actively using blockchain. For storage of data on goods and their manufacturers, for accounting of vehicles, etc. It will be reasonable to check the operation of all nodes at all stages and not once. There is a problem: the entries in the blockchain are not free, and if there are many tests, this can cost you a lot of money.
Especially for such cases, there is a “test mode” mode, where coins can be mined by the central processor of any low-power PC, but they also have all the non-monetary properties of “large” EMC coins. Test coins can be sent to test addresses, create as many blockchain-NVS records, and merge wallets in this mode into testnet.
')
This is very easy to do:
First you need to download and install the last Emercoin wallet. Then open emercoin.conf * and register:
testnet = 1
Run the wallet and wait a bit. The client will find the test server-sid and synchronize the blockchain within minutes. If the client cannot find Sid for a long time, go to the console and specify the seed manually:
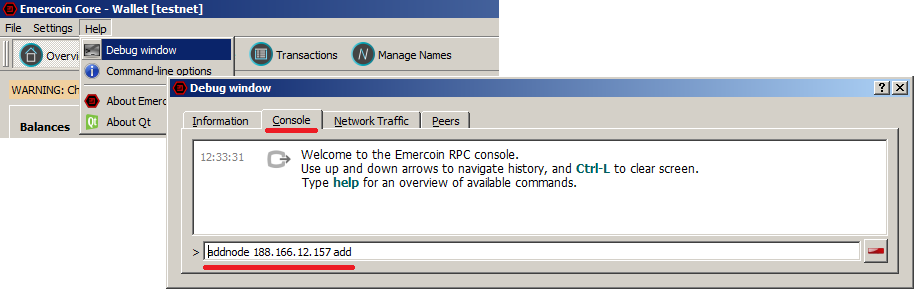
addnode 188.166.12.157 add
Well, now the sweetest, we extract coins, as in the good old 2009 - the processor!
Again we go into the console and enter:
setgenerate true X (where X is the number of processor cores allocated for mining. If you do not specify anything, all available cores will be involved)
PoW network complexity is so low that after a few minutes, the wallet closes the unit and receives test coins. Their number will be enough for most experiments. If you want more, you can leave the wallet in mining mode for a night or longer, until you get a pleasing amount.
You can turn off the generation mode with the command:
setgenerate false
It also turns off if you close the wallet client. By the way, after 1 day, the received PoW-mined coins will themselves generate new coins using the PoS mechanism.
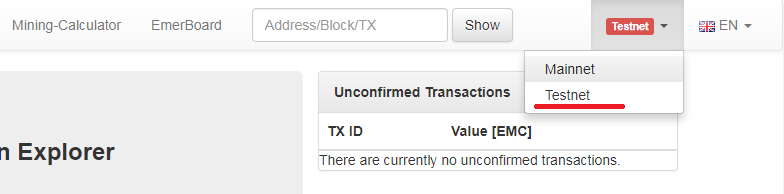
For the convenience of tracking records, we also deployed a blockchain explorer for a public testnet - testnet.emercoin.mintr.org it has the same functionality as for the “big Emer”, you can conveniently switch between them.
If for some reason you are not satisfied with a public testnet. You can create your own - private.
How to do it?
To begin, you must create a local area network isolated from the Internet in which you will perform experiments. Isolation is needed so that your testnet does not join the public one.
Further, in this test network, install at least two purses with the activated option testnet = 1, as indicated above.
After that, on each node of your local testnet, in the console, run the “addnode” commands, as indicated in the example above. As IP addresses, specify the IP addresses of other computers where the nodes of your local testnet are running.
For example, suppose you installed testnet wallets on your local machines 192.168.1.10 and 192.168.1.11. Then in the wallet console on the machine 192.168.1.10 enter “ addnode 192.168.1.11 add ”, and accordingly in the wallet console on the machine 192.168.1.11 enter “ addnode 192.168.1.10 add ”.
You can add these settings to the emercoin.conf file. Thus, let's say on the 192.168.1.10 machine it will look like this:
setgenerate = true 1
addnode = 192.168.1.11
testnet = 1
* The emercoin.conf file is located in the directory where the blockchain is located:
Linux / FreeBSD: $ HOME / .emercoin
Windows: C: \ Users \% User% \ AppData \ Roaming \ EmerCoin
If the file does not exist, create it. When creating a new file in Windows, be careful - disable “hiding extensions” in file explorer, so as not to create the file emercoin.conf.txt instead of emercoin.conf (Windows likes it).
Source: https://habr.com/ru/post/335338/
All Articles