Two-factor authentication with Check Point Security Gateway
In this post we will talk about how to configure two-factor authentication in Check Point Security Gateway using electronic keys using the example of JaCarta PKI, a Russian developer of information security solutions.
The fact that remote access to the resources of the organization is beneficial, but also creates a number of problems for the IT department, it is said everywhere very much. We also consider this an important topic. Therefore, we decided to dedicate this to the next post.
The ability to correctly identify users requesting access to the information system is achieved through the use of integrated access control solutions.
Implementing solutions for remote access without strong user authentication is equivalent to storing important data in a safe cell, the key of which is stored on the nearest coffee table.
')
Good user authentication solutions mean guaranteed access to company resources only by authorized users.
PKI is an effective authentication method for strong authentication systems in terms of functionality, security, and dependency.
JaCarta Client - software that allows you to build infrastructure with public keys using key media JaCarta PKI . This software allows you to use secure transmission of information based on public key infrastructure.
Electronic keys can be supplied in various form factors, including USB tokens, smart cards, including with wide customization possibilities (logo application, use of corporate style, etc.). All form factors are managed by a single interface, the JaCarta Client software. JaCarta Client has unified work methods, such as PKCS # 11, CAPI, which provide support for many out-of-box applications that support these interfaces. Scenarios such as secure web login, secure login, data encryption, mail encryption are supported. PKI keys and certificates can be created, placed and used in the most secure way using hardware or software tokens.
In combination with keys, the JaCarta Management System is most often used, which provides the organization with a comprehensive key lifecycle management platform. JMS associates identifiers with users, allowing you to control the certificates they use. JMS allows you to scale the system without the threat of disruption.
Check Point Security GateWay protects internal and external networks, public and private clouds from internal and external security threats by protecting virtual machines and applications with the full range of Check Point Software Blades protection tools.
In this post, we will describe in detail the steps to configure support for logging into a remote network using a user's certificate using a smart card or a JaCarta PKI hardware token. This implies that the Check Point Security GateWay environment is already configured with static user passwords for authentication.
The information in the post applies to:
The software versions that were used to prepare the configuration instructions.
In fact, the instruction that will be discussed later will be of interest to system administrators who are familiar with the Check Point Security Gateway family and are interested in using the capabilities of multi-factor authentication using smart cards and JaCarta USB tokens.
Authentication with certificates using the JaCarta PKI Client.

The diagram below shows the certificate authentication script.
The user connects to the Check Point Security Gateway Appliance using the Check Point Security Gateway client application. The user inserts the JaCarta PKI token, on which his certificate is located, enters the token's PIN.
After successful authentication, the user gets access to internal network resources.
It describes the prerequisites that must be met before setting up two-factor certificate authentication for Check Point Security Gateway using JaCarta PKI.
To use certificate authentication, you must install and configure the Microsoft Certificate Authority. Any CA can be used as a Certification Authority, but this document considers Microsoft CA only.
Users must have JaCarta PKI tokens with the appropriate certificates issued for them.
JaCarta PKI Client version 6.30 and higher must be installed on users' computers.
USB tokens:
Smart Cards:
Smart cards require an ASEDriveIII USB reader.
Check Point SmartDashboard can be used to configure CheckPoint SSL VPN or IPSec VPN.
Configuring Check Point Security Gateway requires a series of actions.
A user is created with a specific authentication scheme to log on to the Check Point Security VPN Client. The administrator then initiates the process of issuing the certificate to the Security Management Server and receives the registration key.
User groups - a set of users with common tasks or responsibilities. User groups, like individual users, can be processed in security policies.
Creating groups allows you to assign tasks to specific users. The gateway does not allow you to define rules for specific users, but you can assign specific rules to groups of users.
Security gateways have at least one hardware platform that is used as an entry point into the corporate network.
Gateway rules define permissions and denial policies for the gateway. Gateway rules are based on the concept of objects. For example, network objects can be used as the source and destination of rules.
New policy created.

The client establishes a secure connection with the Check Point internal certificate authority, requests certificates using the registration key. When requesting a user certificate for the first time, provide the registration key and install the certificate on the token.

Open the Check Point Endpoint Security application.
Similar and other interesting projects in “Aladdin RD” are led by the department for working with technology partners.
We are currently expanding the staff of specialists, and we have a vacancy in this department - Partner Engineer / Presale Engineer .
If you are interested in working at Aladdin RD, please send your resume indicating the desired position to job@aladdin-rd.ru .
We welcome your feedback!
The fact that remote access to the resources of the organization is beneficial, but also creates a number of problems for the IT department, it is said everywhere very much. We also consider this an important topic. Therefore, we decided to dedicate this to the next post.
The ability to correctly identify users requesting access to the information system is achieved through the use of integrated access control solutions.
Implementing solutions for remote access without strong user authentication is equivalent to storing important data in a safe cell, the key of which is stored on the nearest coffee table.
')
Good user authentication solutions mean guaranteed access to company resources only by authorized users.
PKI is an effective authentication method for strong authentication systems in terms of functionality, security, and dependency.
Jacarta client
JaCarta Client - software that allows you to build infrastructure with public keys using key media JaCarta PKI . This software allows you to use secure transmission of information based on public key infrastructure.
Electronic keys can be supplied in various form factors, including USB tokens, smart cards, including with wide customization possibilities (logo application, use of corporate style, etc.). All form factors are managed by a single interface, the JaCarta Client software. JaCarta Client has unified work methods, such as PKCS # 11, CAPI, which provide support for many out-of-box applications that support these interfaces. Scenarios such as secure web login, secure login, data encryption, mail encryption are supported. PKI keys and certificates can be created, placed and used in the most secure way using hardware or software tokens.
In combination with keys, the JaCarta Management System is most often used, which provides the organization with a comprehensive key lifecycle management platform. JMS associates identifiers with users, allowing you to control the certificates they use. JMS allows you to scale the system without the threat of disruption.
Check Point Security GateWay protects internal and external networks, public and private clouds from internal and external security threats by protecting virtual machines and applications with the full range of Check Point Software Blades protection tools.
In this post, we will describe in detail the steps to configure support for logging into a remote network using a user's certificate using a smart card or a JaCarta PKI hardware token. This implies that the Check Point Security GateWay environment is already configured with static user passwords for authentication.
Software Requirements
The information in the post applies to:
- JaCarta Client - software that manages tokens JaCarta developed by “Aladdin RD” ;
- Check Point Security GateWay.
Environment
The software versions that were used to prepare the configuration instructions.
- JaCarta PKI Client
- CheckPoint GAIA
- CheckPoint Endpoint Security Client
Who will be interested in what we will discuss next
In fact, the instruction that will be discussed later will be of interest to system administrators who are familiar with the Check Point Security Gateway family and are interested in using the capabilities of multi-factor authentication using smart cards and JaCarta USB tokens.
Authentication with certificates using the JaCarta PKI Client.
The diagram below shows the certificate authentication script.
The user connects to the Check Point Security Gateway Appliance using the Check Point Security Gateway client application. The user inserts the JaCarta PKI token, on which his certificate is located, enters the token's PIN.
After successful authentication, the user gets access to internal network resources.
Prerequisites
It describes the prerequisites that must be met before setting up two-factor certificate authentication for Check Point Security Gateway using JaCarta PKI.
To use certificate authentication, you must install and configure the Microsoft Certificate Authority. Any CA can be used as a Certification Authority, but this document considers Microsoft CA only.
Users must have JaCarta PKI tokens with the appropriate certificates issued for them.
JaCarta PKI Client version 6.30 and higher must be installed on users' computers.
Supported Tokens and Smart Cards
USB tokens:
- JaCarta PKI;
- JaCarta PKI / Flash;
- JaCarta PKI / GOST;
- JaCarta PKI / GOST / Flash.
Smart Cards:
- JaCarta PKI;
- JaCarta PKI / GOST.
Smart cards require an ASEDriveIII USB reader.
Configuring Check Point Security Gateway
Check Point SmartDashboard can be used to configure CheckPoint SSL VPN or IPSec VPN.
Configuring Check Point Security Gateway requires a series of actions.
- Create a user account and issue a registration key.
- Creating a user group.
- Allow authentication for VPN clients.
- Install policy.
- Install certificate.
- Permission to control the removal of a smart card.
Creating a user and issuing a registration key
A user is created with a specific authentication scheme to log on to the Check Point Security VPN Client. The administrator then initiates the process of issuing the certificate to the Security Management Server and receives the registration key.
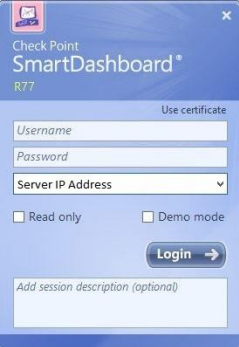
- Open Check Point SmartDashboard R77.
- On the login screen, fill in the following fields and click “Login”.
- Username - enter your username.
- Password - enter the password for the user.
- Servername or Server IP Adress - select the name or IP address of the server where Check Point Security Gateway is located.
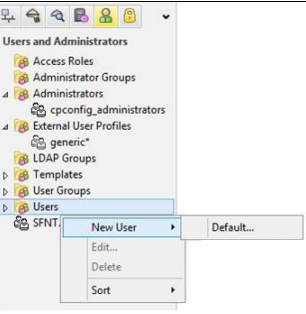
- In the main Check Point SmartDashboard window, under Check Point SmartDashboard, click on Users and then click on New User> Default.
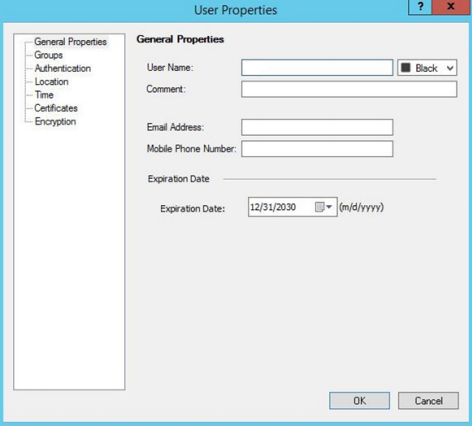
- In the user settings window, in the user name field, enter the user name.
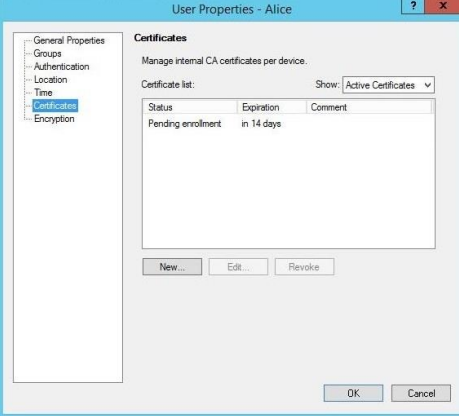
- Click on Certificates.

- Click on New, then choose Registration Key for certificate enrollment.
- The Registration Key is displayed in the Registration Key for Certificate Enrollment window.
- Copy this registration key, save it - you will need it for further registration.

- In the user settings window, in the list of certificates, a pending installation certificate is added. Click OK.
Create user group
User groups - a set of users with common tasks or responsibilities. User groups, like individual users, can be processed in security policies.
Creating groups allows you to assign tasks to specific users. The gateway does not allow you to define rules for specific users, but you can assign specific rules to groups of users.
- In the main Check Point SmartDashboard window, under Users and Administrators, right-click on User Groups, and then New Group.

- In the Group Properties window, complete the following fields, and then click OK.
- Name — Enter the name of the group, for example, VPN_Group.
- Available Members / Selected Members - in the list of available members, select members to add to the group, then click Add. Selected members will be moved to the Selected Members list.

Allow authentication for VPN clients
- In the main Check Point SmartDashboard window, under Network Objects, open Check Point, right-click on your device, for example, Checkpoint-ssl, then click on Edit.
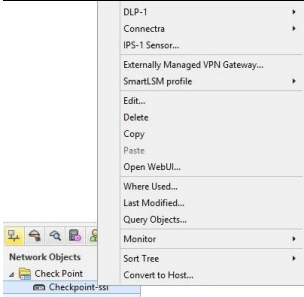
- In the Check Point Gateway - Checkpoint-ssl window, open VPN Clients, then click Authentication.

- In the Authentication Method, select Defined on user record (Legacy Authentication) and then click OK.
Configure Filtering Rules for VPN Clients
Security gateways have at least one hardware platform that is used as an entry point into the corporate network.
Gateway rules define permissions and denial policies for the gateway. Gateway rules are based on the concept of objects. For example, network objects can be used as the source and destination of rules.
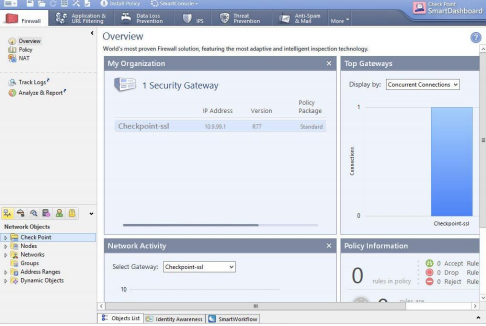
- In the main Check Point SmartDashboard window, click on the Firewall.
- Click on Policy, then on the Add rule at bottom icon. A line is added under the Policy menu.
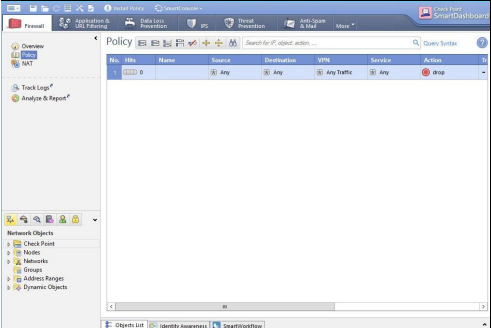
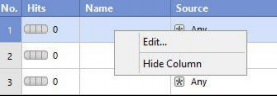
- In the Name column - right click on the new line and then Edit.
- In the Rule Name window, in the Rule Name field, add a name for the rule, then click OK.

- In the Destination column - right click on the new line, then click on the Network Object.
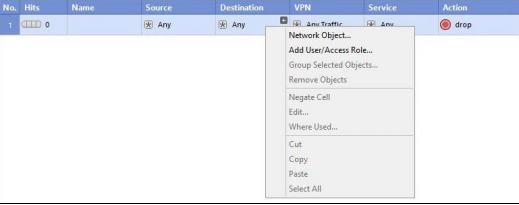
- In the Add Object window, select Internal_network. Internal_network is a synonym for the corporate network of an enterprise.

- In the VPN column - right click on the new line, then Edit Cell.
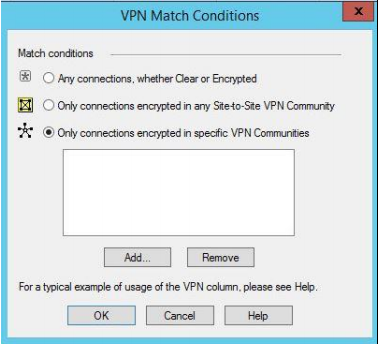
- In the VPN Match Conditions window, perform the following steps and click OK.
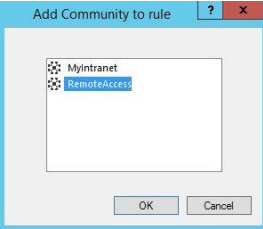
- Select Only connections encrypted in specific VPN communities, click ADD.
- In the Add Community to rule window, select RemoteAccess and click OK.
New policy created.
Policy setting
- The policy installation process is shown below.
- Conduct a heuristic verification of the rules in order to verify the compatibility and non-redundancy of the rules.
- Confirm that each Security Gateway to which the rule will apply ensures that at least one rule is observed.
- Convert the Security Policy into a control script and compile this script into an inspection code.
- Deliver the inspection code to all selected items for delivery.
- In the main Check Point SmartDashboard window - click on Install Policy above (in the menu).

- In the Install Policy window, in the Network Security column, select the options for the required device and click OK.

- When the policy is established, click Close.

Certificate installation
The client establishes a secure connection with the Check Point internal certificate authority, requests certificates using the registration key. When requesting a user certificate for the first time, provide the registration key and install the certificate on the token.
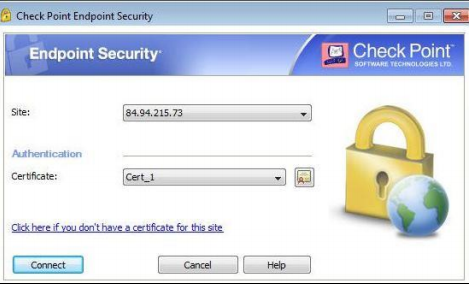
- Insert the JaCarta PKI into the USB slot, then open the Check Point Endpoint Security application.
- The IP address in the Site field is the same as the one entered during installation. Also during the installation, certificates were selected as the authentication option. Click on the link Click here if you don't have a certificate for this site.
- In the Provider field, select the Athena Smart Card CSP.
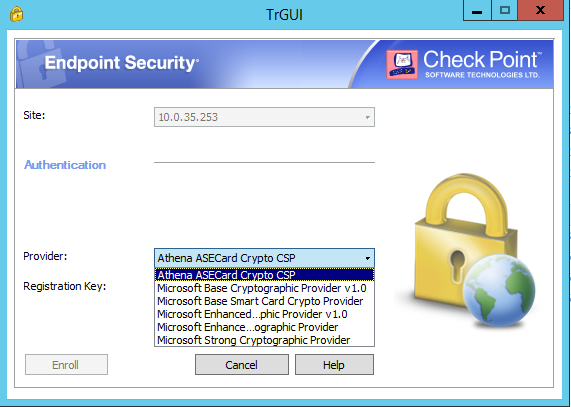
- In the Registration Key field, enter the registration key previously saved, click Enroll.
- In the Token Logon window, in the Token Password field, enter the user PIN from your JaCarta PKI, then click OK.
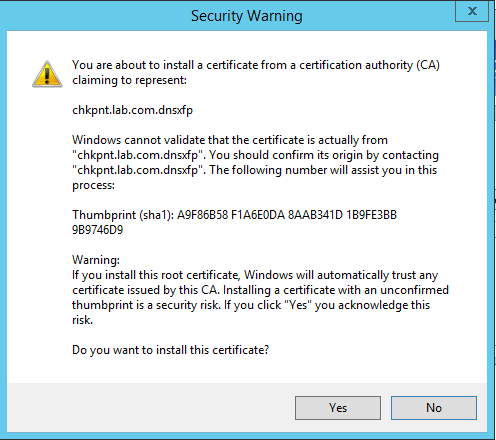
- A security message prompts you to install a new root certificate, press YES. This certificate belongs to the Check Point Internal Certification Authority.
- When the installation is complete, click OK.
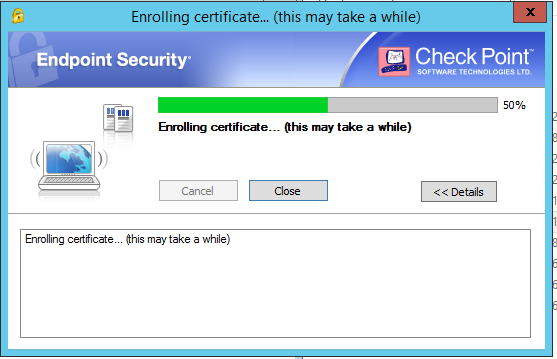
- Open the JaCarta PKI Client and verify that the certificate was successfully issued.

Smart Card Removal Control
- On the Check Point Gateway, you need to edit the file.
$ FWDIR / conf / trac_client_1.ttm, using the editor VI or any other. - Next, you need to find the line disconnect_on_smartcard_removal.
*:disconnect_on_smartcard_removal ( gateway ( :default (true) ) )* - Modify default parameters as required:
- true - enable detection of smart card extraction for the current gateway;
- false - disable detection of smart card extraction for the current gateway;
- client_deside — allow the user to independently set the smart card extraction detection parameter for the current gateway.
- true - enable detection of smart card extraction for the current gateway;
- Next, you need to save the file and exit edit mode.
- Install a policy using Smart DashBoard.
- On the client computer, open the Check Point Endpoint Security settings window and check the box next to Enable always-connect.
Gateway Login
Open the Check Point Endpoint Security application.
- Insert the JaCarta PKI. Certificates on the token will be displayed in the Certificate field. Click Connect.
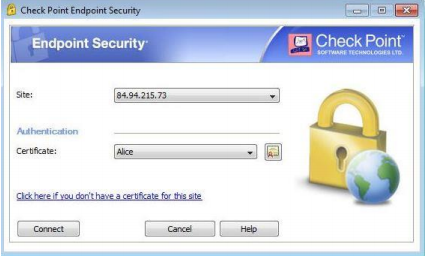
- In the Token Logon window, in the Password field, enter the PIN from the token and click OK.
- In the taskbar, click the VPN icon to view the connection status. When authentication is successful, the connection status becomes Connected.

Similar and other interesting projects in “Aladdin RD” are led by the department for working with technology partners.
We are currently expanding the staff of specialists, and we have a vacancy in this department - Partner Engineer / Presale Engineer .
If you are interested in working at Aladdin RD, please send your resume indicating the desired position to job@aladdin-rd.ru .
We welcome your feedback!
Source: https://habr.com/ru/post/335250/
All Articles