Intelligent Automatic Pet Feeder Based on Arduino - STEP 1
In this series of articles, I will talk about my experience in assembling a “smart” automatic system for feeding a pet, in my case - a cat.
I want to immediately note that in the first step only the “automatic” feeder will be discussed, and it will become “smart” in the next stages (if you are lucky, everything goes according to plan).
Let's start with the concept and goals:
- Make a system that will free me from the obligation to feed the cat with dry food (step 1)
- Equip the system with a weight sensor under the bowl and carry out the feeding in accordance with the indications of the scales: if the bowl is empty, pour, otherwise wait until the bowl becomes empty (step 2)
- Add a Wi-Fi module and a video camera to the system to transfer photos with your favorite cat, and also provide control of the feed remotely. In addition, collect data on how much the cat ate and build analytics (step 3)
In the first step, a large number of sensors and manipulators are not required, one servomotor is enough (for example, Micro Servo Towerpro SG90 9 g), so all control comes from the ArdruinoUno board, which is ideally suited for tasks of this kind.
Feeding systems somehow contain a container in which the dry food lies, and a rotating mechanism that dispenses its quantity. Having studied the experience of other "inventors", I would single out three main mechanisms:
- The container and the system itself is used from under the dispenser of muesli (probably seen in hotels). A rod with blades is installed in the bottom of the container neck. The axis of the rod lies along the plane of the neck. A motor is attached to it, which scrolls the blade one division at a time in a specified period of time.

Such a mechanism looks pretty neat, it is easy to assemble (actually, almost nothing is needed to be collected), but, alas, it is very expensive. But here the taste and color. - Another option - on the contrary, the design is made with your own hands from acrylic, and the rotating dispenser from CDs. Pretty clear about how to make such a feeder described in this video https://www.youtube.com/watch?v=C_ezRywtVg4&t=20s . If there is an acrylic at hand, a cutter for it, well, in principle, there is some experience in assembling these kinds of things, then this is
pretty budget option. But not for people like me - to design everything yourself, to cut and evenly connect, requires a different level of accuracy.
') - For the third option, you will need: a regular bank that will play the role of a container, something from which you can cut a small sector (for example, a lid on some plastic Ikeev box), and a couple of magnets for the fastener design. We will analyze this option in more detail, it does not require engineering education and a large number of investments, in general, just what you need.
All materials that I needed to assemble the feeders in the first stage:
- Glass jar
- ArduinoUno
- MicroServo (I have an allowed rotation angle of 180, but this is not critical)
- a piece of plastic
- magnets
- pins for connecting the board to the servo drive
- Usb charging at 5V
The logic of the mechanism is simple: a sector-type hole is made in the can lid (the center of the lid is not cut), the same sector is cut out of plastic. A servomotor is attached to the inside of the cover, for example, with scotch tape. At first, the cover is mounted on the engine axis, and the cut sector is on the outside. So, when turning the axis of the servomotor, the cut sector shifts relative to the hole in the can lid.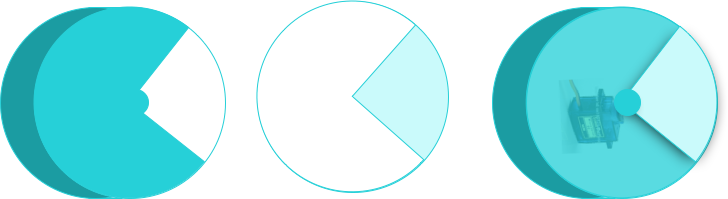
You also need to remember to make a hole for the output of the servomotor wire outside to connect to the board. In step 1, the feeding takes place on a timer, the cat is not a glutton, so the opening of the sector happens once a day for a short time, below is the code for the Arduino:
#include <Servo.h> #define servoPin 9 Servo myservo; void setup() // setup { myservo.attach(servoPin); // 9 } void loop() { myservo.write(0); // 0 delay(300); // 0.3 myservo.write(160); // 160 delay(86400000); // 24 } For fastening the cans to the wall, I used these magnets, each for 4 kg (it seems to me better to use more powerful ones). Magnets are attached to the bank simply with glue, to the wall - with screws.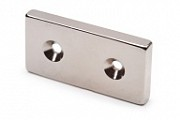
The board is attached to the bank with the help of such velcro, it is convenient to remove and fasten it back. Velcro such sold in any economic, is used to fasten paintings.
Since my only external module is a servomotor, there is no need for additional power, just power the board, it can be connected directly to the network via usb charging at 5V.
Here is how it looks in the assembled state: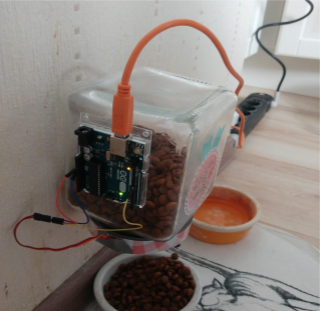
Below I have outlined a few ideas for the further development of the feeder, there are many of them and it is not yet clear what exactly will be done next, this part is for discussion.
- installation of motion sensors, photographing a cat at the moment when it appears in sight. The integration of the weight sensor and the motion sensor allows you to determine when the cat is just walking past the feeder, and when he came to eat. Accordingly, it is possible to fasten analytics when a cat prefers to eat and how much.
- You can add a weight sensor to the container itself with the feed so that the feeder detects the moment when it becomes empty and sends a warning to the owner that, they say, is empty, you need to replenish it. Then, as an option, fasten the possibility of auto-order feed from your favorite site with delivery.
- You can add the ability to trough work on two cats:
- Or it will be two different feeders, each of which is able to scare away the “alien” cat.
- Either this is one, but somehow modified
- We need to think about how to implement the drinker and integrate it with the feeder, add a filtering system.
I hope someone will be useful.
Source: https://habr.com/ru/post/335136/
All Articles