Distributed learning neural networks with MXNet. Part 1
Today we will answer the simple question: "How does distributed learning work (in the context of MXNet )?"
All code samples tested on MXNet v0.10.0 and may not work (or work differently) in other versions, but I believe that the general concepts will be unchanged for a long time.
Well, the last thing before we get to the main part, I want to express my gratitude for the help in writing the article to my colleagues, without which this article would not have been possible:
- Madan Jampani;
- Suneel Marthi;
I would also like to recommend raising the typewriter with DLAMI and doing all the examples from the article myself, especially since they are quite simple. To execute the code it is quite suitable for a free machine on AWS.
With the preamble over, we climb under the cat ...
Distributed learning how MXNet sees it
In MXNet, all participants in the learning process are divided into 3 logical groups:
- scheduler;
- server;
- worker (worker);
This is a purely logical distribution, so that all participants can work on the same machine.
To begin with, let's look at a superficial explanation of what each of the participants represents:
Scheduler
The scheduler is the central node of the cluster, it is responsible for the initial configuration of the cluster, providing the necessary information for each participant in the learning process and ... nothing more. We will see how he falls into hibernation as soon as the cluster is ready to start learning. And even when the cluster finishes its training, its task will only be to turn itself off.
I think everyone already guessed that there can be only one scheduler in a cluster.
Server
The server acts as a repository of learning model parameters. That is, if a model is taught in the style: Y = AX + B, the server stores the A and B vectors. He is also responsible for correct updating them. Servers can be more than one, and accordingly there is a rule according to which the model is distributed to several servers. But this is a topic for a separate article.
Working
These are actually those cluster participants who directly perform the model training. Each worker receives his part of the data, which needs to be trained, considers the gradient step and sends it to the servers for updating the model.
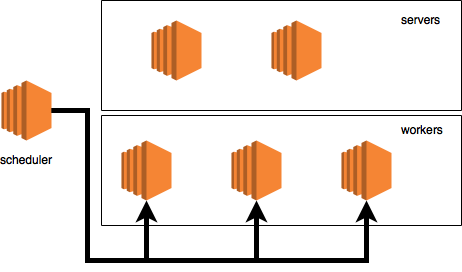
Cluster example
Let's take the sham cluster example with:
- scheduler on a separate machine;
- two servers;
- three cars with workers;
The cluster itself will look like this:
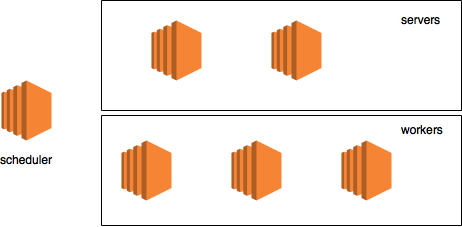
This picture, like the described configuration, will be used only to visualize the data flow.
Cluster initialization
In practice, we will not create such a large cluster as described above, but we will manage with a much smaller cluster with 3 nodes on one physical machine. There are several reasons for this:
- easier and cheaper;
- all logs will be in one place, which will simplify the explanation;
Before continuing, you need to clarify one detail. For MXNet, distributed learning essentially means using KVStore. The name is an acronym for "Key Value Storage". And in essence, it is a distributed storage that runs on servers and has some additional functionality (for example, it knows exactly how to update the model, having received a gradient step from the worker).
Also, KVStore support is available only in one of two options:
- MXNet was compiled manually, with the USE_DIST_KVSTORE = 1 flag turned on or
- DLAMI was used (since the framework was built manually with the USE_DIST_KVSTORE flag = 1 enabled)
In this article, I assume that MXNet will be used from the Jun / Jul DLAMI release (MXNet 0.10.0).
There is also a non-zero probability that at the time of reading, the official MXNet pip package will have support for KVStore.
It is time to start creating logical cluster members. To create a member, you just need to create some environment variables and then import the mxnet module.
Scheduler
First of all, let's run the scheduler:
ubuntu:~$ python >>> import subprocess >>> import os >>> scheduler_env = os.environ.copy() >>> scheduler_env.update({ … "DMLC_ROLE": "scheduler", … "DMLC_PS_ROOT_PORT": "9000", … "DMLC_PS_ROOT_URI": "127.0.0.1", … "DMLC_NUM_SERVER": "1", … "DMLC_NUM_WORKER": "1", … "PS_VERBOSE": "2" … }) >>> subprocess.Popen("python -c 'import mxnet'", shell=True, env=scheduler_env) <subprocess.Popen object at 0x7facb0622850> Let's stop here for a second to get an idea of what's going on. The first 4 lines of code should not cause many questions for Python programmers: just import dependencies and create an OS environment. What is interesting here is exactly what updates to environmental variables will be made:
We start by looking at DMLC_ROLE. Let's see exactly where it is used, namely in the ps-lite package. In accordance with the official README (loosely translated):
Easy and efficient server implementation for storing parameters.
Well, the exact place where the environment variable is read here (by the way, all references to specific commits).
val = CHECK_NOTNULL(Environment::Get()->find("DMLC_ROLE")); // here std::string role(val); is_worker_ = role == "worker"; is_server_ = role == "server"; is_scheduler_ = role == "scheduler"; // and later here verbose_ = GetEnv("PS_VERBOSE", 0); I think it is not necessary to be a C ++ guru to understand what is happening here. The logical role of the node is determined by the string in this variable "DMLC_ROLE". Funny, but it seems there is no check that this variable contains one of the allowed values. This, potentially, can lead to interesting problems.
The second thing that interests us is not only where the variable is read, but also where it is used. To tell about this, you need to refer to the file van.cc, which we will meet more than once, here is a specific line where the variable is used and the variable "is_scheduler" is created:
scheduler_.hostname = std::string(CHECK_NOTNULL(Environment::Get()->find("DMLC_PS_ROOT_URI"))); scheduler_.port = atoi(CHECK_NOTNULL(Environment::Get()->find("DMLC_PS_ROOT_PORT"))); scheduler_.role = Node::SCHEDULER; scheduler_.id = kScheduler; is_scheduler_ = Postoffice::Get()->is_scheduler(); // here If you quickly run further through the code to see what is happening there, you can see the following interesting place:
// get my node info if (is_scheduler_) { my_node_ = scheduler_; } else { auto role = is_scheduler_ ? Node::SCHEDULER : (Postoffice::Get()->is_worker() ? Node::WORKER : Node::SERVER); In this particular example, the role variable will never be equal to Node :: SCHEDULER. So you have a chance to create a pull-request to fix it (if nobody has done it yet).
Just looking at this place you understand that there is not so much work for a planner. This is because, unlike the worker and the server, the scheduler uses the IP address and port that were transferred to it, rather than looking for a free port in the system.
Go further parameter: DMLC_PS_ROOT_PORT. With this we quickly understand with regard to the already existing knowledge. Here is the code that you have already seen:
scheduler_.hostname = std::string(CHECK_NOTNULL(Environment::Get()->find("DMLC_PS_ROOT_URI"))); scheduler_.port = atoi(CHECK_NOTNULL(Environment::Get()->find("DMLC_PS_ROOT_PORT"))); // here scheduler_.role = Node::SCHEDULER; scheduler_.id = kScheduler; is_scheduler_ = Postoffice::Get()->is_scheduler(); Again, this is from van.cc. As it is not difficult to guess, this is the port on which the scheduler should listen to messages.
I hope at this stage it is clear that DMLC_PS_ROOT_URI is just the ip address of the scheduler. So let's jump right away to discussing DMLC_NUM_SERVER and DMLC_NUM_WORKER.
It so happened that every MXNet logical node in a cluster should know about all the other nodes. So, for each node, before it starts, the environment variables write how many workers and servers are in the cluster (the number of schedulers is unnecessary, because it is always 1). By the way, this information is stored in the Postoffice class (along with other information about the cluster).
Well, the last parameter, but perhaps one of the most important archives is PS_VERBOSE. This will force our newly created process to display debug information, which is vital for us now.
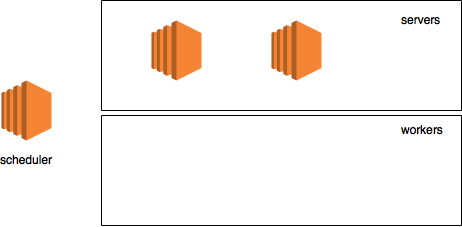
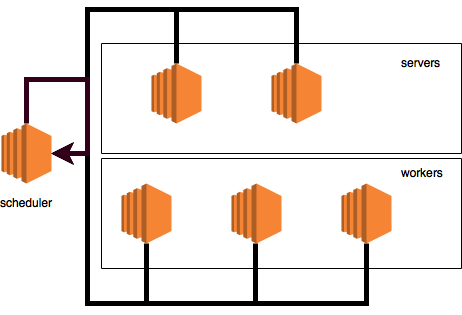
From the point of view of our sham chart, our cluster now looks something like this:
We start the server
Now that we have a scheduler, let's raise the server. Since we are raising all the logical nodes on the same machine, we will have to create a copy of the environment parameters and re-make the necessary changes there in order to start the server:
>>> server_env = os.environ.copy() >>> server_env.update({ … "DMLC_ROLE": "server", … "DMLC_PS_ROOT_URI": "127.0.0.1", … "DMLC_PS_ROOT_PORT": "9000", … "DMLC_NUM_SERVER": "1", … "DMLC_NUM_WORKER": "1", … "PS_VERBOSE": "2" … }) >>> subprocess.Popen(“python -c 'import mxnet'”, shell=True, env=server_env) <subprocess.Popen object at 0x7facb06228d0> I hope now what is happening in the code raises no questions, but just in case:
- we say that the new process is the server (DMLC_ROLE);
- we say what IP is in the scheduler (DMLC_PS_ROOT_URI);
- we speak on which port the scheduler listens for incoming connections (DMLC_PS_ROOT_PORT);
- we tell the server how many workers are in the cluster (DMLC_NUM_WORKER)
- we tell the server how many servers are in a cluster (DMLC_NUM_SERVER)
- well, and set the output to debug mode (2)
Then someone might ask: hey, I thought that DMLC_PS_ROOT_PORT and DMLC_PS_ROOT_URI to specify the IP and port of the logical node that we run? The answer will be - no, this is the address and port of the scheduler, but everyone else must figure out what their address is and find an available port in the system. They need information about the scheduler to knock on him and ask him to add them to the cluster.
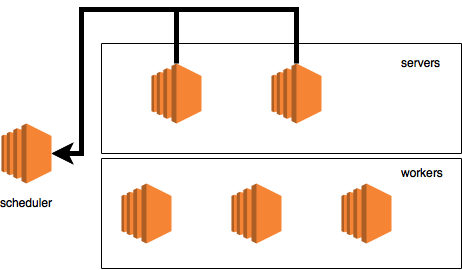
After starting the servers, our chart looks like this:
We start the worker
It is time to launch the actual worker itself and create the KVStore:
>>> os.environ.update({ … "DMLC_ROLE": "worker", … "DMLC_PS_ROOT_URI": "127.0.0.1", … "DMLC_PS_ROOT_PORT": "9000", … "DMLC_NUM_SERVER": "1", … "DMLC_NUM_WORKER": "1", … "PS_VERBOSE": "2" … }) >>> worker_env = os.environ.copy() >>> import mxnet >>> kv_store = mxnet.kv.create('dist_async') By the way, KVStore can work in two modes:
- dist_sync
- dist_async
I will leave to the inquisitive reader the question of how these modes differ, you can read about it here .
After running the workers, our chart will look like this:
The life cycle of the node (Van)
Before you rush to discuss what is happening at the moment of KVStore creation, you need to tell that each node has a life cycle, which has the following events:
Also, the very same class ( Van ) that is responsible for handling these events has several other equally important methods. We will talk about some of them in detail later in other articles, and now we will simply list:
- Send - sends the message
- PackMeta - convert model to proto message
- UnpackMeta - unpacks the proto message and creates a model
- HeartBeat - sends a message that he is still alive
Here is what each node performs at the moment when the Start signal arrives:
- loads into memory all the data about the scheduler
- loads into memory information about what role is assigned to the node (worker, scheduler, server)
- for non-schedulers - find a free port and collect all the data about yourself that will need to be sent to the scheduler (if necessary, the port can be set via the environment variable)
- tie yourself to the found port
- start a stream that listens to incoming messages
- for non-schedulers - send a message to the scheduler with a request to add yourself to the cluster (discussed later)
- Run the stream that is responsible for sending the signal that the node is alive
Cluster initialization
As soon as all the commands above are executed, a lot of debugging information should appear on the screen, which comes from three previously running processes at the same time. Now we will go through each line to discuss in detail what is happening and how our diagram will look like at each stage.
[00:33:12] src / van.cc: 75: Bind to role = worker, ip = 1.1.1.1, port = 37350, is_recovery = 0
This starts the worker process. In this case, it is the Start method, which tells us that its address is 1.1.1.1, the role of "worker" and the port that it found 37350. Now it will instantly try to notify the scheduler that it is ready to be added to the cluster, specifying its address and port :
[00:33:12] src / van.cc: 136 :? => 1. Meta: request = 0, timestamp = 3, control = {cmd = ADD_NODE, node = {role = worker, ip = 1.1.1.1, port = 37350, is_recovery = 0}}
This particular message is generated in the Send method, right here. It is necessary to pay attention to several things:
- is_recovery = 0 - reports that it is not in recovery mode, this part is beyond the scope of this article
- cmd = ADD_NODE - the team scheduler to add a worker to the cluster
- ? => 1 - each node has its own rank. Rank assigned by the planner. The scheduler itself has rank 1. In our case, a node without a rank sends a message to a node with rank 1 (scheduler).
In our diagram, this messaging looks like this:

Go ahead
[00:33:13] src / van.cc: 75: Bind to role = server, ip = 2.2.2.2, port = 54160, is_recovery = 0
This is our server awake. I found a port (54160) and immediately the scheduler tries to notify about it:
[00:33:13] src / van.cc: 136 :? => 1. Meta: request = 0, timestamp = 0, control = {cmd = ADD_NODE, node = {role = server, ip = 2.2.2.2, port = 54160, is_recovery = 0}}
On the diagram, it looks like this:
Just as in the case of a worker, our server sends the command "ADD_NODE" to be registered in the cluster. So, as the server is not yet registered in the cluster and does not have a rank, then we see: "? => 1".
[00:33:13] src / van.cc: 75: Bind to role = scheduler, id = 1, ip = 127.0.0.1, port = 9000, is_recovery = 0
Finally, the scheduler is running. It uses the local IP and port 9000 (all nodes in the cluster should already know about its address and port). Since the scheduler is up, it is logical to expect that at this moment he will receive all incoming messages that were sent to him and ... voila:
[00:33:13] src / van.cc: 161 :? => 1. Meta: request = 0, timestamp = 0, control = {cmd = ADD_NODE, node = {role = server, ip = 2.2.2.2, port = 54160, is_recovery = 0}}
Message from the server. This part of the logs generated by the method of the Receive , to be even more accurate here . The scheduler immediately receives a second message, this time from the worker:
[00:33:13] src / van.cc: 161 :? => 1. Meta: request = 0, timestamp = 3, control = {cmd = ADD_NODE, node = {role = worker, ip = 1.1.1.1, port = 37350, is_recovery = 0}}
First of all, the scheduler is taken to assign ranks, first working (9):
[00:33:13] src / van.cc: 235: assign rank = 9 to node role = worker, ip = 1.1.1.1, port = 37350, is_recovery = 0
Now to server (8):
[00:33:13] src / van.cc: 235: assign rank = 8 to node role = server, ip = 2.2.2.2, port = 54160, is_recovery = 0
After comes the rather important part:
[00:33:13] src / van.cc: 136 :? => 9. Meta: request = 0, timestamp = 0, control = {cmd = ADD_NODE, node = {role = worker, id = 9, ip = 1.1.1.1, port = 37350, is_recovery = 0 role = server, id = 8, ip = 2.2.2.2, port = 54160, is_recovery = 0 role = scheduler, id = 1, ip = 127.0.0.1, port = 9000, is_recovery = 0}}
Messages like these indicate that the scheduler received the "ADD_NODE" commands from all the nodes of the cluster (in our case from the 1st worker and the 1st server) and now began to notify all the nodes back about their ranks and information about all the other nodes in the cluster. That is, the scheduler sends ALL information about EACH cluster node to EACH cluster node.
In this particular message, we see all the data about the cluster and this message is sent to the node with a rank of 9 (this is an employee). Cluster information is vital because it is needed by the worker, for example, to understand which server to send the model update to.
On the diagram, this process looks like this:
The following output:
[00:33:13] src / van.cc: 136 :? => 8. Meta: request = 0, timestamp = 1, control = {cmd = ADD_NODE, node = {role = worker, id = 9, ip = 1.1.1.1, port = 37350, is_recovery = 0 role = server, id = 8, ip = 2.2.2.2, port = 54160, is_recovery = 0 role = scheduler, id = 1, ip = 127.0.0.1, port = 9000, is_recovery = 0}}
The scheduler sends the same confirmation to the node with a rank of 8 (server). The diagram looks like this:

[00:33:13] src / van.cc: 251: the scheduler is connected to 1 workers and 1 servers
Scheduler happily reported that he is connected to one worker and one server (to all the nodes of the cluster).
Reminder - when running on a real cluster, all these logs are on different machines, so now it may seem that there is more information than necessary.
[00:33:13] src / van.cc: 161: 1 => 2147483647. Meta: request = 0, timestamp = 0, control = {cmd = ADD_NODE, node = {role = worker, id = 9, ip = 1.1.1.1, port = 37350, is_recovery = 0 role = server, id = 8, ip = 2.2.2.2, port = 54160, is_recovery = 0 role = scheduler, id = 1, ip = 127.0.0.1, port = 9000, is_recovery = 0}}
[00:33:13] src / van.cc: 281: W [9] is connected to others
This worker received messages from the scheduler and reports that he is connected to the cluster. You can ask what is "2147483647". Answer - I have no idea =) most likely a bug, I would expect to see: "1 => 9". So, as a worker correctly sees his rank: "W [9]", the bug is most likely somewhere in the logging process, so you can fix it and become a project contributor.
[00:33:13] src / van.cc: 161: 1 => 2147483647. Meta: request = 0, timestamp = 1, control = {cmd = ADD_NODE, node = {role = worker, id = 9, ip = 1.1.1.1, port = 37350, is_recovery = 0 role = server, id = 8, ip = 2.2.2.2, port = 54160, is_recovery = 0 role = scheduler, id = 1, ip = 127.0.0.1, port = 9000, is_recovery = 0}}
[00:33:13] src / van.cc: 281: S [8] is connected to others
Same for the server: he received a message and was pleased to tell about this world.
[00:33:13] src / van.cc: 136 :? => 1. Meta: request = 1, timestamp = 4, control = {cmd = BARRIER, barrier_group = 7}
[00:33:13] src / van.cc: 136 :? => 1. Meta: request = 1, timestamp = 2, control = {cmd = BARRIER, barrier_group = 7}
[00:33:13] src / van.cc: 136 :? => 1. Meta: request = 1, timestamp = 1, control = {cmd = BARRIER, barrier_group = 7}
Another important part. So far, we have only seen one "ADD_NODE" command. Here we are seeing a new one: "BARRIER". In short, this concept of barriers, which I hope the reader is familiar with in multithreaded programming, means: "stop until everyone reaches this barrier." The scheduler is responsible for letting you know exactly when everyone has reached the barrier and can continue execution. The first barrier is located immediately after the cluster has started, but before the start of training. All three nodes (including the scheduler itself) sent messages, which essentially means: "I reached the barrier, let me know when you can move on."
Also, as can be seen from the message, there is a concept of a barrier group (barrier_group). Barrier group is a group of nodes that participate in this or that barrier. These groups are:
1 - scheduler
2 - servers
4 - workers
As it is not difficult to guess, this is a power of two, so our group of 7 is: 4 + 2 + 1. In essence, this barrier applies to everyone.
Well, by itself, since in our logs, we saw three sending messages, it is logical to expect three lines about the receipt of these messages by the scheduler:
[00:33:13] src / van.cc: 161: 1 => 1. Meta: request = 1, timestamp = 2, control = {cmd = BARRIER, barrier_group = 7}
[00:33:13] src / van.cc: 291: Barrier count for 7: 1
[00:33:13] src / van.cc: 161: 9 => 1. Meta: request = 1, timestamp = 4, control = {cmd = BARRIER, barrier_group = 7}
[00:33:13] src / van.cc: 291: Barrier count for 7: 2
[00:33:13] src / van.cc: 161: 8 => 1. Meta: request = 1, timestamp = 1, control = {cmd = BARRIER, barrier_group = 7}
[00:33:13] src / van.cc: 291: Barrier count for 7: 3
What happens in our diagram looks like this:
Now it's time to discuss what the planner is doing when it receives a new message that the node has reached a barrier in a particular group:
- it increases the count of the number of nodes that sent the BARRIER command in a particular group ( here )
- when the counter is equal to the number of nodes in the group, it sends confirmation to all that it is possible to continue normal work
In the logs above you can see how the counter increased as each new message was received. Well, at the moment when it reached the expected size (3), the scheduler began to send confirmations:
[00:33:13] src / van.cc: 136 :? => 9. Meta: request = 0, timestamp = 3, control = {cmd = BARRIER, barrier_group = 0}
[00:33:13] src / van.cc: 136 :? => 8. Meta: request = 0, timestamp = 4, control = {cmd = BARRIER, barrier_group = 0}
[00:33:13] src / van.cc: 136 :? => 1. Meta: request = 0, timestamp = 5, control = {cmd = BARRIER, barrier_group = 0}
In our diagram, it looks like this:

As you can see, the scheduler even sends confirmation to itself. Well, of course, since the message was sent from the scheduler (as many as 3), then we should see logs that these messages were received :
[00:33:13] src / van.cc: 161: 1 => 9. Meta: request = 0, timestamp = 3, control = {cmd = BARRIER, barrier_group = 0}
[00:33:13] src / van.cc: 161: 1 => 8. Meta: request = 0, timestamp = 4, control = {cmd = BARRIER, barrier_group = 0}
[00:33:13] src / van.cc: 161: 1 => 1. Meta: request = 0, timestamp = 5, control = {cmd = BARRIER, barrier_group = 0}
Well, the last touch. At the moment, the planner has reached the second barrier, which will be reached by all the nodes after graduation, however, since the planner does not take part in the training, he has already reached this barrier. So he sends the barrier_group = 7 to the group that he has reached the barrier, with instant acknowledgment of receipt of the message and the installation of the 7-by-1 barrier group counter.
[00:33:13] src / van.cc: 136 :? => 1. Meta: request = 1, timestamp = 6, control = {cmd = BARRIER, barrier_group = 7}
[00:33:13] src / van.cc: 161: 1 => 1. Meta: request = 1, timestamp = 6, control = {cmd = BARRIER, barrier_group = 7}
[00:33:13] src / van.cc: 291: Barrier count for 7: 1
At this stage, the cluster is initialized, you can start learning ...
Training
Having executed all the code, we have an initialized KVstore. What now? Let's use it for direct learning. I will use a very simple example of a linear regressor taken from here . Just ask, before continuing, follow the example to understand what is happening. In order to do the training in the described example distributed, you need to change only 1 line in the code. Instead:
model.fit(train_iter, eval_iter, optimizer_params={ 'learning_rate':0.005, 'momentum': 0.9}, num_epoch=50, eval_metric='mse', batch_end_callback = mx.callback.Speedometer(batch_size, 2)) You need to write:
model.fit(train_iter, eval_iter, optimizer_params={ 'learning_rate':0.005, 'momentum': 0.9}, num_epoch=50, eval_metric='mse', batch_end_callback = mx.callback.Speedometer(batch_size, 2), kvstore=kv_store) # updated line So simple? in short, yes.
Small conclusion
I hope the reader now has a more detailed understanding of what is happening with the MXNet cluster at the time of its launch. Also, I hope this article will help with debugging the cluster in case of any problems. Well, plus, with this knowledge, you can draw some conclusions about the characteristics of the network for the cluster, namely:
- it’s not critical for the scheduler to quickly connect to the rest
- servers are not critical to have a fast connection between them
- every worker should have a fast connection with every server
- workers are not critical to have a quick connection with each other
I would be very grateful for the recommendations of the original article on Medium . Also, if all of a sudden you are building AWS-based distributed machine learning systems using MXNet and you have any questions, I’m glad to help and answer (viacheslav@kovalevskyi.com).
References:
- full version of the code from the article
- Draw.IO , a drawing service for diagrams
- MXNet ps-lite repository
')
Source: https://habr.com/ru/post/334968/
All Articles