How we optimized the Ragdoll death animation in Unity
Or how easy it is to turn a Ragdoll into an AnimationClip.

Hello everyone, we are a small indie studio Drunken Monday. A few days ago they released a game where you need to run around the arena and twist around you with a hefty ax, trying to hit other players. Well hit - killed.
')
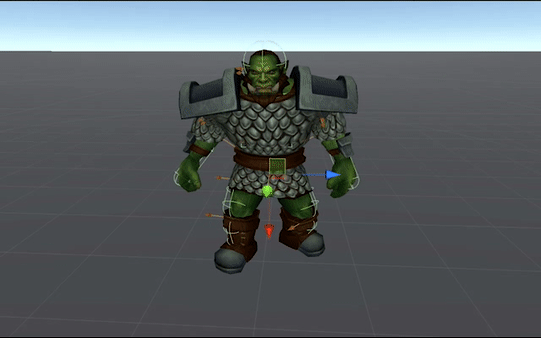
To make the death from the ax spectacular, we used the usual ragdoll animation, built on physics. And everything was fine. At first.
And then, with an increase in the number of characters and calculations, the game began to slow down on old phones. They turned off all the physics - they got 50-60 frames a second and the absolute smoothness of the process.
But to abandon the beautiful deaths of the characters did not want to.
It was possible to puzzle the animators. We even almost gave this task to work, as the thought came: why not record a few ragdoll deaths directly in Unity, and then just show the desired animation?
Deaths will turn out to be diverse, there is no need to connect animators, and most importantly, everything will be quick and beautiful.
The animation clip in Unity is represented by the AnimationClip class, which contains a number of AnimationCurve defining a curve of changes to one specific property of a particular object, for example, the localPosition.x property. Changes to property values relative to time are described by multiple Keyframe structures.
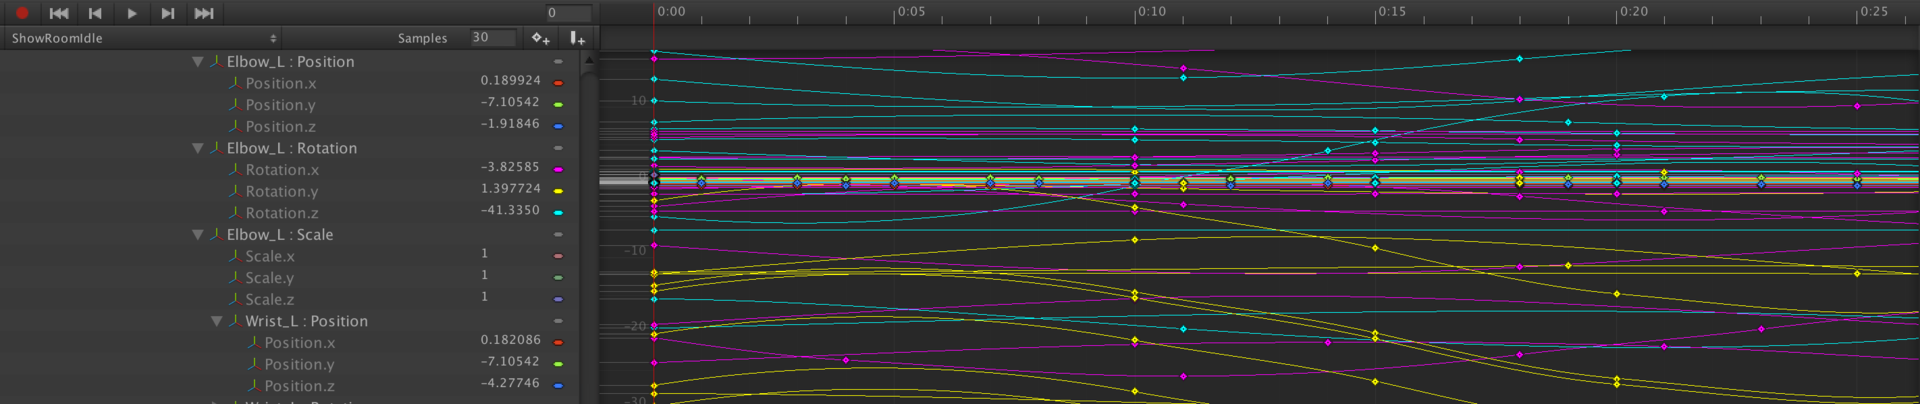
The idea is simple, for each property of each character object to create an AnimationCurve animation curve, and each frame to keep the values of this property on a curve. At the end, export the generated AnimationClip via AssetDatabase.CreateAsset.
To track each character object, create an AnimationRecorderItem class, all the property curves of the monitored object will be described via the dictionary where the key is the name of the property, and the values are the animation curve.
Each frame for all properties will be set to the current values:
But if you set the values each frame for each property of each object, then the output animation file will be too large. We introduce conditions for limiting the minimum changes compared with the previous frame. If the object has moved, increased, and turned around quite a bit, then we will not record these changes.
Ready class AnimationRecorderItem.cs
Also create an AnimationRecorder control class.
At the beginning of work, this script should run through all the children of the object being animated and create an instance of AnimationRecorder for each of them, as well as immediately form and remember the relative Path under which it will be recorded in the AnimationClip .
According to the documentation relativePath is formed as follows:
The code will look like this:
Next, each frame reads the current animation time and records the current property values:
But the Update function is called quite often and the animation is recorded every frame is rather redundant, so we limit the recording.
30 fps should be enough for everyone.
Recording will begin by pressing the Spacebar.
We realize the export of animation. Create an AnimationClip object and fill it with the collected values.
Ready class AnimationRecorder.cs
Finally, create an Assistance class AnimationRecorderRagdollHelper , the function of which is to stop the animation on the object being animated, turn on all collisions, accelerate the object and start recording animation. The end of the animation will complete yourself. The script will start working when the scene starts, but with a specified delay so that there are no artifacts due to initialization of various objects.
Ready class AnimationRecorderRagdollHelper.cs
That's all, we hang AnimationRecorderRagdollHelper on our character, set the impact force, and the object that we have to hit, launch the scene - and watch the character fly merrily around the scene.
As soon as the cold corpse hardens on the ground - press Space.
The script exports our animation to the root of the project.

We write down thus on 4-5 animations for each character and we include them randomly at death.
PS Or not quite random.
The game is multiplayer, the physics is spinning on the server and from there comes the blow vector. We select the animation, the vector of which is closest to that, we turn the character in the right direction ... we fly!
GitHub project
YouTube video with a selection of deaths
For those who are interested in the game, you can find it on Steam, Google Play, AppStore, Facebook and VKontakte.
Hello everyone, we are a small indie studio Drunken Monday. A few days ago they released a game where you need to run around the arena and twist around you with a hefty ax, trying to hit other players. Well hit - killed.
')
To make the death from the ax spectacular, we used the usual ragdoll animation, built on physics. And everything was fine. At first.
And then, with an increase in the number of characters and calculations, the game began to slow down on old phones. They turned off all the physics - they got 50-60 frames a second and the absolute smoothness of the process.
But to abandon the beautiful deaths of the characters did not want to.
It was possible to puzzle the animators. We even almost gave this task to work, as the thought came: why not record a few ragdoll deaths directly in Unity, and then just show the desired animation?
Deaths will turn out to be diverse, there is no need to connect animators, and most importantly, everything will be quick and beautiful.
What happened.gif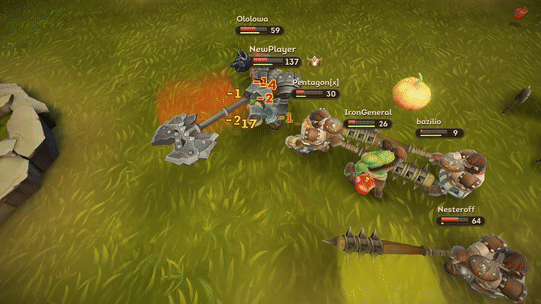
Implementation
The animation clip in Unity is represented by the AnimationClip class, which contains a number of AnimationCurve defining a curve of changes to one specific property of a particular object, for example, the localPosition.x property. Changes to property values relative to time are described by multiple Keyframe structures.
The idea is simple, for each property of each character object to create an AnimationCurve animation curve, and each frame to keep the values of this property on a curve. At the end, export the generated AnimationClip via AssetDatabase.CreateAsset.
To track each character object, create an AnimationRecorderItem class, all the property curves of the monitored object will be described via the dictionary where the key is the name of the property, and the values are the animation curve.
Properties = new Dictionary<string, AnimationCurve> (); Properties.Add ( "localPosition.x", new AnimationCurve () ); Properties.Add ( "localPosition.y", new AnimationCurve () ); Properties.Add ( "localPosition.z", new AnimationCurve () ); Properties.Add ( "localRotation.x", new AnimationCurve () ); Properties.Add ( "localRotation.y", new AnimationCurve () ); Properties.Add ( "localRotation.z", new AnimationCurve () ); Properties.Add ( "localRotation.w", new AnimationCurve () ); Properties.Add ( "localScale.x", new AnimationCurve () ); Properties.Add ( "localScale.y", new AnimationCurve () ); Properties.Add ( "localScale.z", new AnimationCurve () ); Each frame for all properties will be set to the current values:
Properties["localPosition.x"].AddKey (new Keyframe (time, _animObj.localPosition.x, 0.0f, 0.0f)); Properties["localPosition.y"].AddKey (new Keyframe (time, _animObj.localPosition.y, 0.0f, 0.0f)); Properties["localPosition.z"].AddKey (new Keyframe (time, _animObj.localPosition.z, 0.0f, 0.0f)); Properties["localRotation.x"].AddKey (new Keyframe (time, _animObj.localRotation.x, 0.0f, 0.0f)); Properties["localRotation.y"].AddKey (new Keyframe (time, _animObj.localRotation.y, 0.0f, 0.0f)); Properties["localRotation.z"].AddKey (new Keyframe (time, _animObj.localRotation.z, 0.0f, 0.0f)); Properties["localRotation.w"].AddKey (new Keyframe (time, _animObj.localRotation.w, 0.0f, 0.0f)); Properties["localScale.x"].AddKey (new Keyframe (time, _animObj.localScale.x, 0.0f, 0.0f)); Properties["localScale.y"].AddKey (new Keyframe (time, _animObj.localScale.y, 0.0f, 0.0f)); Properties["localScale.z"].AddKey (new Keyframe (time, _animObj.localScale.z, 0.0f, 0.0f)); But if you set the values each frame for each property of each object, then the output animation file will be too large. We introduce conditions for limiting the minimum changes compared with the previous frame. If the object has moved, increased, and turned around quite a bit, then we will not record these changes.
Ready class AnimationRecorderItem.cs
Also create an AnimationRecorder control class.
At the beginning of work, this script should run through all the children of the object being animated and create an instance of AnimationRecorder for each of them, as well as immediately form and remember the relative Path under which it will be recorded in the AnimationClip .
According to the documentation relativePath is formed as follows:
Apply this curve to the game. The relativePath is a formatted, eg, root / spine / leftArm. If it is a relative, it is a clip.
The code will look like this:
private List<AnimationRecorderItem> _recorders; void Start () { Configurate (); } void Configurate () { _recorders = new List<AnimationRecorderItem> (); var allTransforms = gameObject.GetComponentsInChildren< Transform > (); for ( int i = 0; i < allTransforms.Length; ++i ) { string path = CreateRelativePathForObject ( transform, allTransforms [ i ] ); _recorders.Add( new AnimationRecorderItem ( path, allTransforms [ i ] ) ); } } private string CreateRelativePathForObject ( Transform root, Transform target ) { if ( target == root ) { return string.Empty; } string name = target.name; Transform bufferTransform = target; while ( bufferTransform.parent != root ) { name = string.Format ( "{0}/{1}", bufferTransform.parent.name, name ); bufferTransform = bufferTransform.parent; } return name; } Next, each frame reads the current animation time and records the current property values:
private float _recordingTimer; private bool _recording = false; void Update () { if ( _recording ) { for ( int i = 0; i < _recorders.Count; ++i ) { _recorders [ i ].AddFrame ( _recordingTimer ); } _recordingTimer += Time.deltaTime; } } But the Update function is called quite often and the animation is recorded every frame is rather redundant, so we limit the recording.
30 fps should be enough for everyone.
Recording will begin by pressing the Spacebar.
private const float CAPTURING_INTERVAL = 1.0f / 30.0f; private float _lastCapturedTime; private float _recordingTimer; private bool _recording = false; void Update () { if ( Input.GetKeyDown ( KeyCode.Space ) && !_recording ) { StartRecording (); return; } if ( _recording ) { if (_recordingTimer==0.0f||_recordingTimer-_lastCapturedTime>=CAPTURING_INTERVAL) { for ( int i = 0; i < _recorders.Count; ++i ) { _recorders [ i ].AddFrame ( _recordingTimer ); } _lastCapturedTime = _recordingTimer; } _recordingTimer += Time.deltaTime; } } public void StartRecording () { Debug.Log ( "AnimationRecorder recording started" ); _recording = true; } We realize the export of animation. Create an AnimationClip object and fill it with the collected values.
private void ExportAnimationClip () { AnimationClip clip = new AnimationClip (); for ( int i = 0; i < _recorders.Count; ++i ) { Dictionary<string,AnimationCurve> propertiles = _recorders [ i ].Properties; for ( int j = 0; j < propertiles.Count; ++j ) { string name = _recorders [ i ].PropertyName; string propery = propertiles.ElementAt ( j ).Key; var curve = propertiles.ElementAt ( j ).Value; clip.SetCurve ( name, typeof(Transform), propery, curve ); } } clip.EnsureQuaternionContinuity (); string path = "Assets/" + gameObject.name + ".anim"; AssetDatabase.CreateAsset ( clip, path ); Debug.Log ( "AnimationRecorder saved to = " + path ); } Ready class AnimationRecorder.cs
Finally, create an Assistance class AnimationRecorderRagdollHelper , the function of which is to stop the animation on the object being animated, turn on all collisions, accelerate the object and start recording animation. The end of the animation will complete yourself. The script will start working when the scene starts, but with a specified delay so that there are no artifacts due to initialization of various objects.
Ready class AnimationRecorderRagdollHelper.cs
That's all, we hang AnimationRecorderRagdollHelper on our character, set the impact force, and the object that we have to hit, launch the scene - and watch the character fly merrily around the scene.
As soon as the cold corpse hardens on the ground - press Space.
The script exports our animation to the root of the project.
We write down thus on 4-5 animations for each character and we include them randomly at death.
PS Or not quite random.
The game is multiplayer, the physics is spinning on the server and from there comes the blow vector. We select the animation, the vector of which is closest to that, we turn the character in the right direction ... we fly!
Links
GitHub project
YouTube video with a selection of deaths
For those who are interested in the game, you can find it on Steam, Google Play, AppStore, Facebook and VKontakte.
Source: https://habr.com/ru/post/334922/
All Articles