Configuring Cisco AnyConnect VPN with 2FA (ActiveDirectory and Certificate) via ASDM
I just want to note right away - I am not going to make a holivar about what is better - ASDM or console: all markers are different in taste and color ... I prefer ASDM and I make settings for such a plan through it. Therefore, the article will be saturated with pictures (screens).
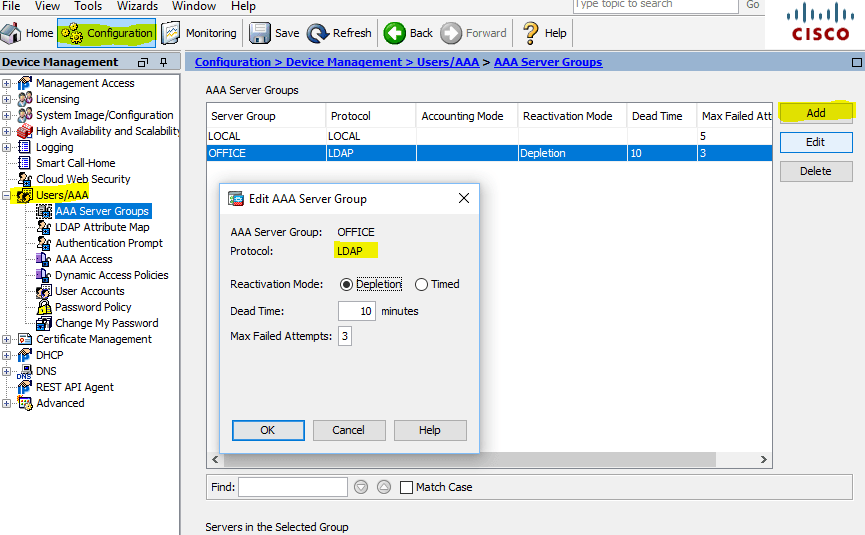
So let's get started. Let's start with setting up the LDAP server (in our case, this is DC ActiveDirectory), for this we go to Configuration> DeviceManagement> Users / AAA> AAA Server Groups and create a group, let's call it OFFICE , specify the LDAP
Cisco ASA AAA Server Groups Configuration
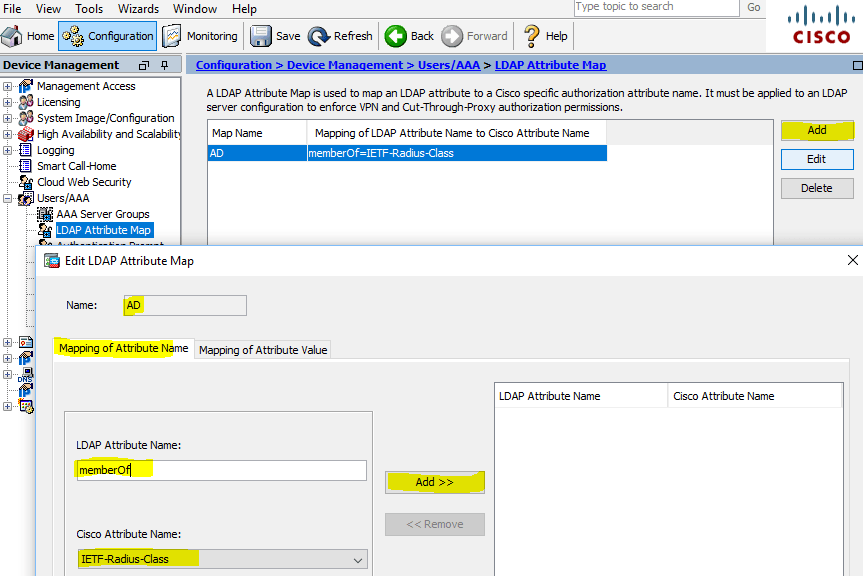
In order to add a server to the created group, we need to first create an LDAP Atribute Map . To do this, go to the appropriate section: Configuration> DeviceManagement> Users / AAA> LDAP Attribute Map and create a new map: in our case, this is Map Name: AD , Mapping of Attribute Name> LDAP Attribute Name: memberOf , Cisco Attribute Name: IETF-Radius -Class
')
LDAP Attribute Map
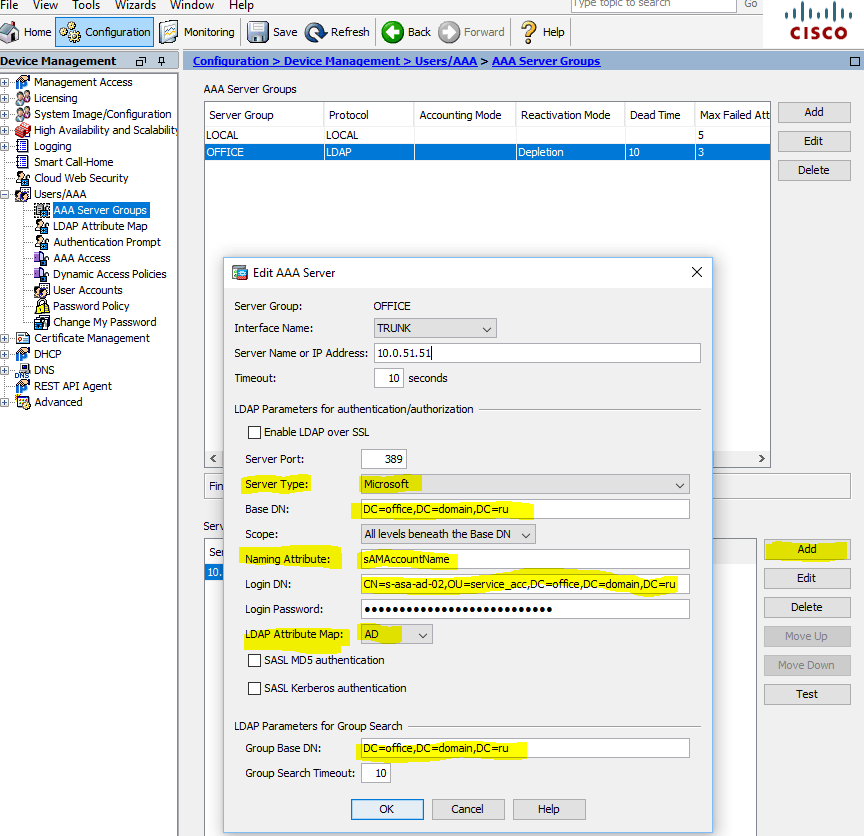
Now you can add a server (set up a connection to the domain controller), specify the interface through which we will connect, the IP address of the DC, Server Type: Microsoft, Base DN, Naming Attribute: sAMAccountName, Login DN, Login Password, the newly created LDAP Attribute Map : AD, Group Base DN:
AAA Server - Microsoft DC
Add AAA Server
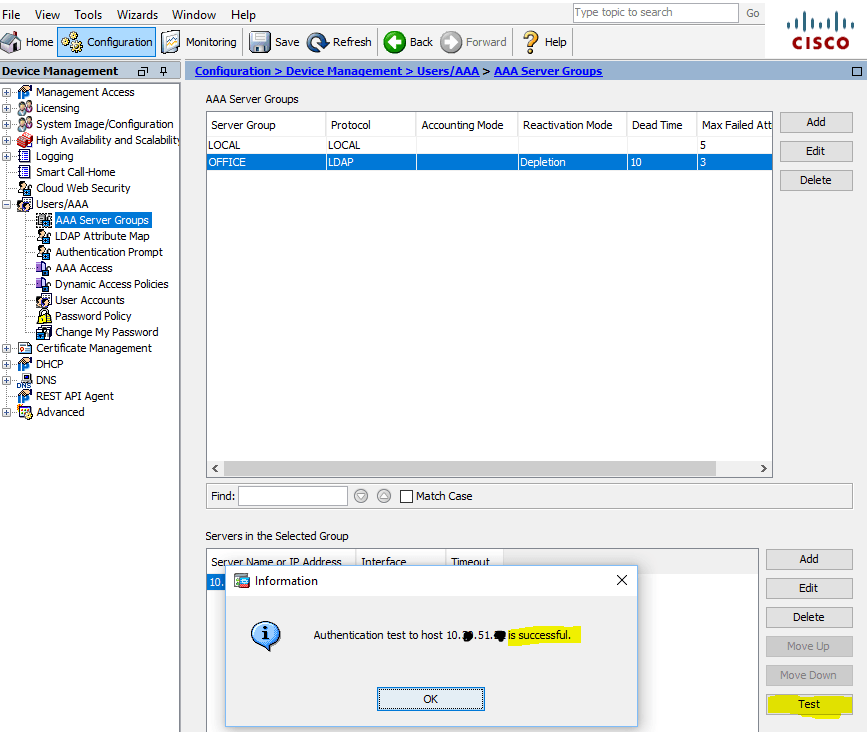
After adding the server, we do the verification, we authenticate with the AD account:
Test AAA Server - Authentication
Now you can add a certificate from a certification authority (used by Microsoft CA, I’m not going to talk about its configuration, the only thing you need to remember is: Cisco ASA doesn’t accept certificates with Signature algorithm RSASSA-PSS , which Microsoft proposes to use by default. We changed to sha512RSA ):

Identity Certificates Signature algorithm RSASSA-PSS - sha512
Go to Configuration> DeviceManagement> Certificate Management> Identity Certificates and import in PKCS12 format (* .pfx certificate + private key):

Identity Certificates Signature algorithm sha512RSA (ECDSA 521 bits)
With the preparations completed, you can proceed to setting up profiles for AnyConnect VPN. For example, we will use 2 profiles, which will have different IP Address Pools and acc. ACL, Dynamic Access Policies, Group Policies and, accordingly, 2 ActiveDirectory groups. When connecting users via VPN, we use the “Tunneling only specified networks” policy, the so-called Split Tunneling , in order not to drive all user traffic through VPN. But this is “an amateur”, maybe someone, on the contrary, will need this - lately it is very important;)
Let's start with IP Address Pools , for this go to Configuration> Remote Access VPN> Network (Client) Access> Address Assignment> Address Pools
Create an address pool (segment) for administrators (let's call, for example, VPN_Admins):
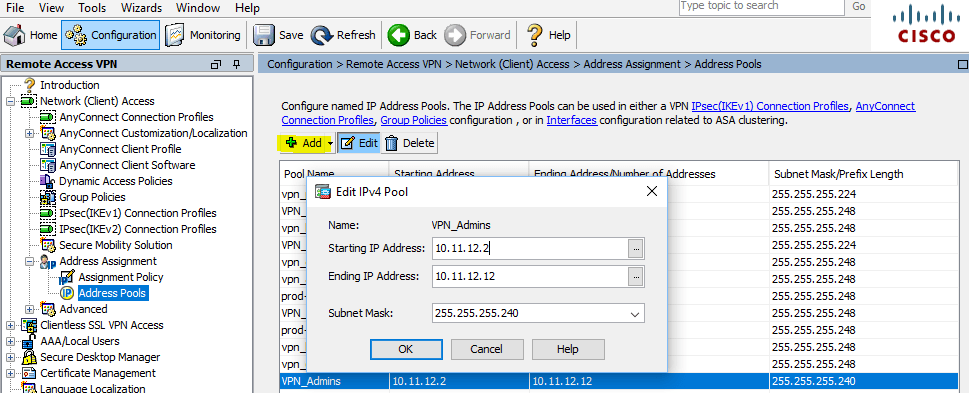
Address Assignment - Address Pools
Next, create a policy (this is the main part of the profile settings in which you can set: protocols to be used for tunnels, access time, number of simultaneous logins, close access to certain VLANs, set timeouts, set DNS servers, configure Split Tunneling , client firewall and td and tp) - in general, this setting should be given special attention! Let's start: Configuration> Remote Access VPN> Network (Client) Access> Group Policies, Add Internal Group Policy
All the parameters set are purely individual - in our case, a little paranoid. The protocols that are allowed to create a tunnel (Tunneling Protocols), the time period for access by VPN (Access Hours), the number of simultaneous connections with one account (Simultaneous Logins), the maximum time for session, etc .:
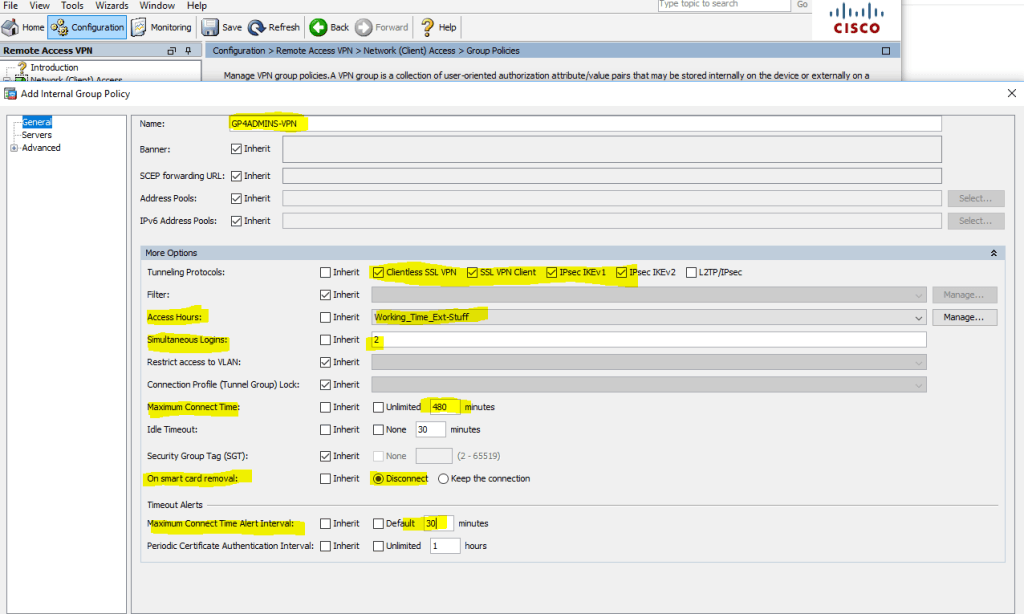
Configuration> Remote Access VPN> Network (Client) Access> Group Policies> Add Internal Group Policy
The next useful setting is the Servers tab, in which we can specify internal. DNS servers, for users of AnyConnect VPN, so that they can access internal resources by name:
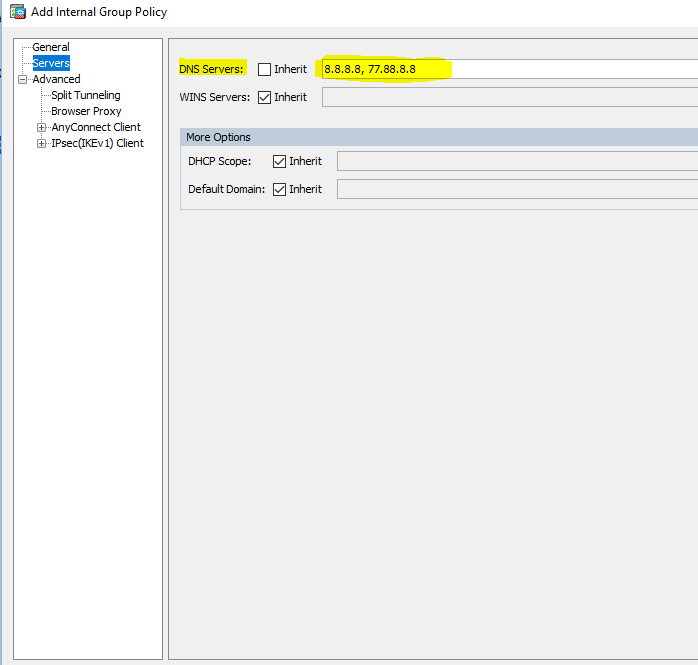
Configuration> Remote Access VPN> Network (Client) Access> Group Policies> Edit Group Policy - Servers
Now let's move on to another interesting option - setting up Split Tunneling . As I wrote earlier, we will use the policy of “tunneling only specified networks” (we do not wrap all traffic of users into the tunnel and allow access to local resources - the option “ Local Lan Access ” will be further considered separately):
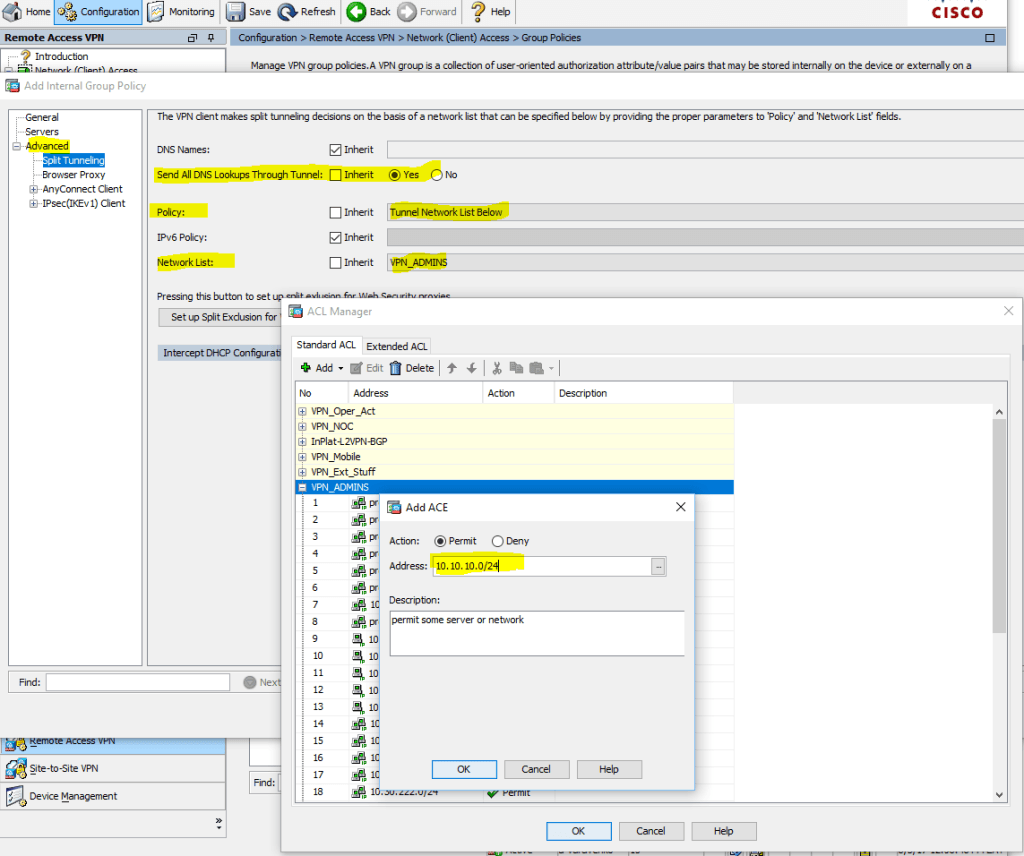
Configuration> Remote Access VPN> Network (Client) Access> Group Policies> Edit Group> Advanced> Split Tunneling
Earlier, we specified which networks \ hosts we allowed access to, and now we will restrict access to them by protocols \ ports (one more ACL ):

Configuration> Remote Access VPN> Network (Client) Access> Group Policies> Edit Group> Advanced> AnyConnect Client> Client Firewall> Private Network Rule
As a result, after connecting to the AnyConnect vpn client, you can see the routes in the direction of the tunnel and the firewall rules:

AnyConnect Client> Route Details
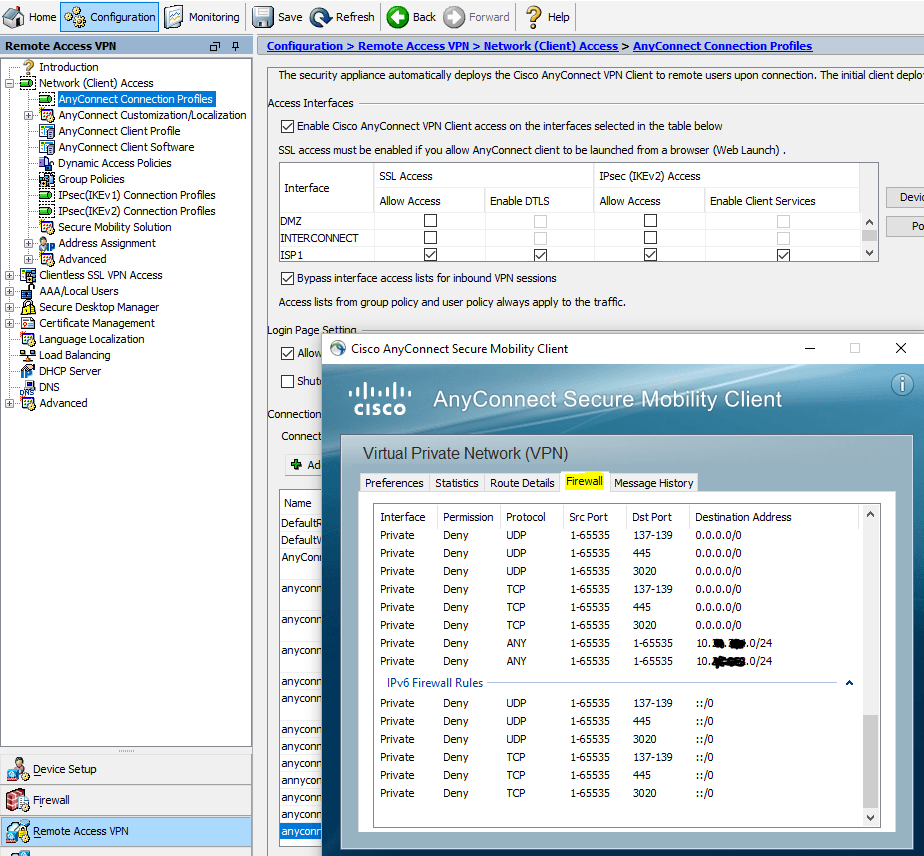
AnyConnect Client> Firewall
Now you can go directly to the creation of the AnyConnect profile, go to Configuration> Remote Access VPN> Network (Client) Access> AnyConnect Connection Profiles>, Add AnyConnect Connection Profile
and specify: Name , Aliases , then Authentication Method (AAA and certificate) , AAA Server Group , Client Address Pools , Group Policy - everything created before!

Configuration> Remote Access VPN> Network (Client) Access> AnyConnect Connection Profiles> Add AnyConnect Connection Profile> Basic
And now a small “life hack” - we will pull out the E-mail value from the user certificate and using the regular program
(the E-mail value should be

Configuration> Remote Access VPN> Network (Client) Access> AnyConnect Connection Profiles> Add AnyConnect Connection Profile> Advanced> Authentication> Username Mapping from Certificate
When the profiles are configured, we can already connect, because the default DfltAccessPolicy policy will work for all authenticated users (it has the highest priority). We want for different ActiveDirectory groups to use their profile and work out their own group policy / access policy. Therefore, go to: Configuration> Remote Access VPN> Network (Client) Access> Dynamic Access Policies and prohibit DfltAccessPolicy (in fact, do not prohibit, but do Terminate with a user notification - a good diagnosis that the user is not included in the required ActiveDirectory group):
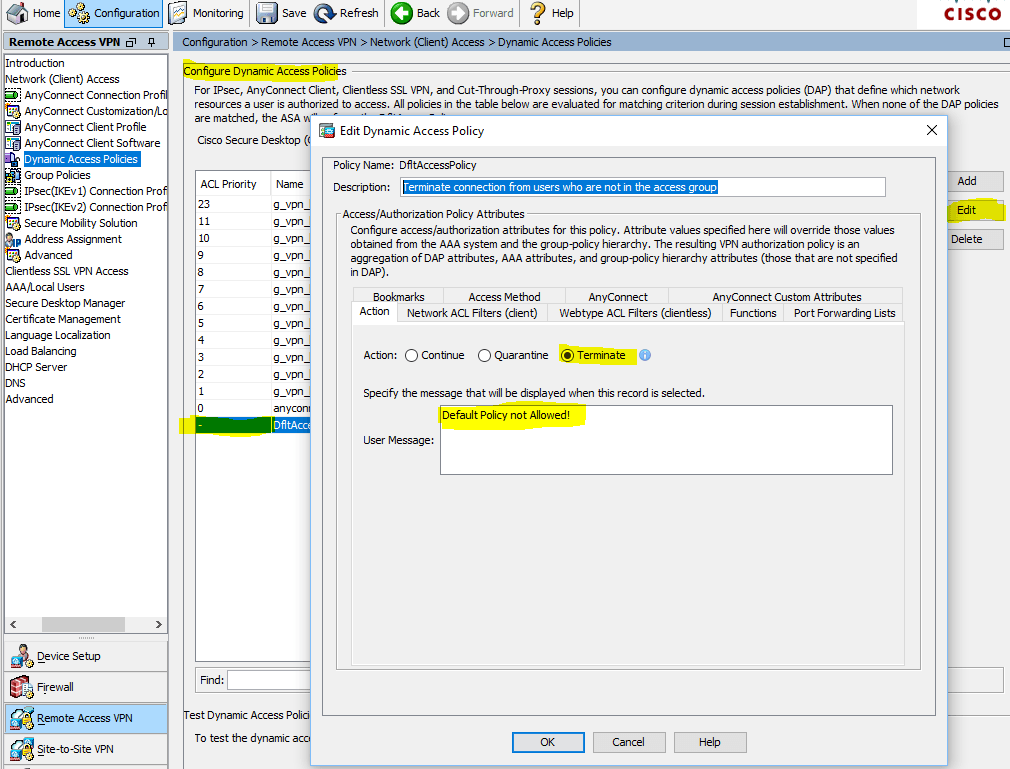
Configuration> Remote Access VPN> Network (Client) Access> Dynamic Access Policies
Terminate connection from users who are not in the access group
After the policy has been banned by default, we will create a new one:
Configuration> Remote Access VPN> Network (Client) Access> Dynamic Access Policies> Add Dynamic Access Policy

Configuration> Remote Access VPN> Network (Client) Access> Dynamic Access Policies> Add Dynamic Access Policy with AAA Attributes
where g_vpn_level_01 is the security group created in ActiveDirectory, where we include the necessary admin accounts for connecting via AnyConnect VPN connection with the VPN-ADMINS profile :

Configuration> Remote Access VPN> Network (Client) Access> Dynamic Access Policies> Add Dynamic Access Policy with AAA Attributes> Get AD Groups
Well, the final “touch” - I recommend saving the created profile to a file (useful, for example, to synchronize profiles for the StandBy unit with a failover configuration):
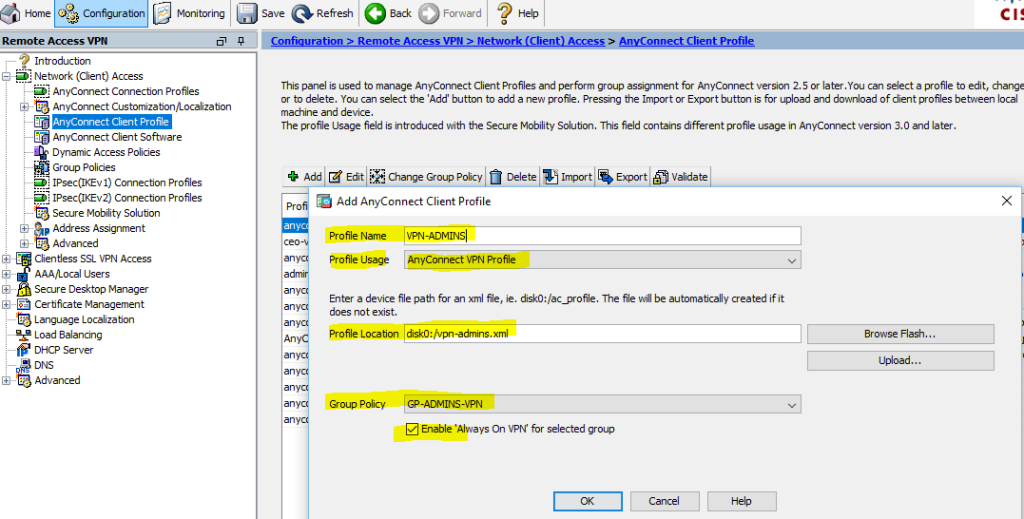
Configuration> Remote Access VPN> Network (Client) Access> AnyConnect Client Profile
After the profile is saved - it can be a little “tuned”: remember, I was talking about the option “ Local Lan Access ”? It is just configured here. And here you can also configure the selection of the certificate store; auto update of AnyConnect client; Allow \ deny the ability to connect to the computer via the RDP, with the Vpn connected; specify the protocol version (IPv4 or IPv6 or both); certificate and server settings; mobile politicians. In general, there is something to “twist up” for your needs!
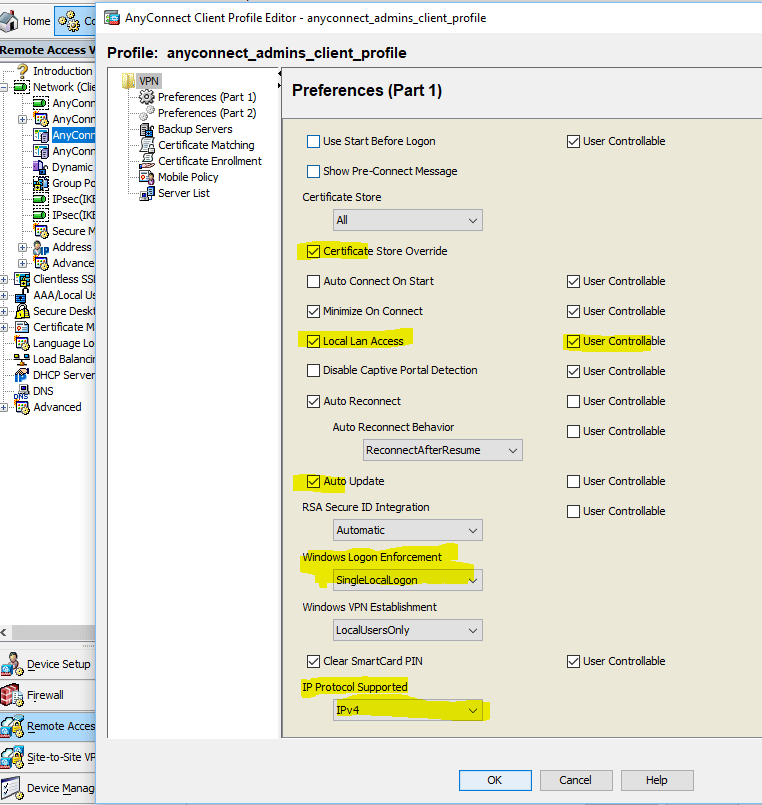
Configuration> Remote Access VPN> Network (Client) Access> AnyConnect Client Profile> Edit
For the second group - “ VPN-USERS ” we are doing the same thing ...
PS: for fans of the console - lay out the configuration later
PPS: do not consider it an advertisement - just like it very much: Duo Security
So let's get started. Let's start with setting up the LDAP server (in our case, this is DC ActiveDirectory), for this we go to Configuration> DeviceManagement> Users / AAA> AAA Server Groups and create a group, let's call it OFFICE , specify the LDAP
Cisco ASA AAA Server Groups Configuration
In order to add a server to the created group, we need to first create an LDAP Atribute Map . To do this, go to the appropriate section: Configuration> DeviceManagement> Users / AAA> LDAP Attribute Map and create a new map: in our case, this is Map Name: AD , Mapping of Attribute Name> LDAP Attribute Name: memberOf , Cisco Attribute Name: IETF-Radius -Class
')
LDAP Attribute Map
Now you can add a server (set up a connection to the domain controller), specify the interface through which we will connect, the IP address of the DC, Server Type: Microsoft, Base DN, Naming Attribute: sAMAccountName, Login DN, Login Password, the newly created LDAP Attribute Map : AD, Group Base DN:
AAA Server - Microsoft DC
Add AAA Server
After adding the server, we do the verification, we authenticate with the AD account:
Test AAA Server - Authentication
Now you can add a certificate from a certification authority (used by Microsoft CA, I’m not going to talk about its configuration, the only thing you need to remember is: Cisco ASA doesn’t accept certificates with Signature algorithm RSASSA-PSS , which Microsoft proposes to use by default. We changed to sha512RSA ):
Identity Certificates Signature algorithm RSASSA-PSS - sha512
Go to Configuration> DeviceManagement> Certificate Management> Identity Certificates and import in PKCS12 format (* .pfx certificate + private key):
Identity Certificates Signature algorithm sha512RSA (ECDSA 521 bits)
With the preparations completed, you can proceed to setting up profiles for AnyConnect VPN. For example, we will use 2 profiles, which will have different IP Address Pools and acc. ACL, Dynamic Access Policies, Group Policies and, accordingly, 2 ActiveDirectory groups. When connecting users via VPN, we use the “Tunneling only specified networks” policy, the so-called Split Tunneling , in order not to drive all user traffic through VPN. But this is “an amateur”, maybe someone, on the contrary, will need this - lately it is very important;)
Let's start with IP Address Pools , for this go to Configuration> Remote Access VPN> Network (Client) Access> Address Assignment> Address Pools
Create an address pool (segment) for administrators (let's call, for example, VPN_Admins):
Address Assignment - Address Pools
Next, create a policy (this is the main part of the profile settings in which you can set: protocols to be used for tunnels, access time, number of simultaneous logins, close access to certain VLANs, set timeouts, set DNS servers, configure Split Tunneling , client firewall and td and tp) - in general, this setting should be given special attention! Let's start: Configuration> Remote Access VPN> Network (Client) Access> Group Policies, Add Internal Group Policy
All the parameters set are purely individual - in our case, a little paranoid. The protocols that are allowed to create a tunnel (Tunneling Protocols), the time period for access by VPN (Access Hours), the number of simultaneous connections with one account (Simultaneous Logins), the maximum time for session, etc .:
Configuration> Remote Access VPN> Network (Client) Access> Group Policies> Add Internal Group Policy
The next useful setting is the Servers tab, in which we can specify internal. DNS servers, for users of AnyConnect VPN, so that they can access internal resources by name:
Configuration> Remote Access VPN> Network (Client) Access> Group Policies> Edit Group Policy - Servers
Now let's move on to another interesting option - setting up Split Tunneling . As I wrote earlier, we will use the policy of “tunneling only specified networks” (we do not wrap all traffic of users into the tunnel and allow access to local resources - the option “ Local Lan Access ” will be further considered separately):
Configuration> Remote Access VPN> Network (Client) Access> Group Policies> Edit Group> Advanced> Split Tunneling
Earlier, we specified which networks \ hosts we allowed access to, and now we will restrict access to them by protocols \ ports (one more ACL ):
Configuration> Remote Access VPN> Network (Client) Access> Group Policies> Edit Group> Advanced> AnyConnect Client> Client Firewall> Private Network Rule
As a result, after connecting to the AnyConnect vpn client, you can see the routes in the direction of the tunnel and the firewall rules:
AnyConnect Client> Route Details
AnyConnect Client> Firewall
Now you can go directly to the creation of the AnyConnect profile, go to Configuration> Remote Access VPN> Network (Client) Access> AnyConnect Connection Profiles>, Add AnyConnect Connection Profile
and specify: Name , Aliases , then Authentication Method (AAA and certificate) , AAA Server Group , Client Address Pools , Group Policy - everything created before!
Configuration> Remote Access VPN> Network (Client) Access> AnyConnect Connection Profiles> Add AnyConnect Connection Profile> Basic
And now a small “life hack” - we will pull out the E-mail value from the user certificate and using the regular program
(.*)@ We will cut off @domain.ru from it(the E-mail value should be
%AD username%@somedomain.ru ) and substitute it in the Username field when connecting.Configuration> Remote Access VPN> Network (Client) Access> AnyConnect Connection Profiles> Add AnyConnect Connection Profile> Advanced> Authentication> Username Mapping from Certificate
When the profiles are configured, we can already connect, because the default DfltAccessPolicy policy will work for all authenticated users (it has the highest priority). We want for different ActiveDirectory groups to use their profile and work out their own group policy / access policy. Therefore, go to: Configuration> Remote Access VPN> Network (Client) Access> Dynamic Access Policies and prohibit DfltAccessPolicy (in fact, do not prohibit, but do Terminate with a user notification - a good diagnosis that the user is not included in the required ActiveDirectory group):
Configuration> Remote Access VPN> Network (Client) Access> Dynamic Access Policies
Terminate connection from users who are not in the access group
After the policy has been banned by default, we will create a new one:
Configuration> Remote Access VPN> Network (Client) Access> Dynamic Access Policies> Add Dynamic Access Policy
Configuration> Remote Access VPN> Network (Client) Access> Dynamic Access Policies> Add Dynamic Access Policy with AAA Attributes
where g_vpn_level_01 is the security group created in ActiveDirectory, where we include the necessary admin accounts for connecting via AnyConnect VPN connection with the VPN-ADMINS profile :
Configuration> Remote Access VPN> Network (Client) Access> Dynamic Access Policies> Add Dynamic Access Policy with AAA Attributes> Get AD Groups
Well, the final “touch” - I recommend saving the created profile to a file (useful, for example, to synchronize profiles for the StandBy unit with a failover configuration):
Configuration> Remote Access VPN> Network (Client) Access> AnyConnect Client Profile
After the profile is saved - it can be a little “tuned”: remember, I was talking about the option “ Local Lan Access ”? It is just configured here. And here you can also configure the selection of the certificate store; auto update of AnyConnect client; Allow \ deny the ability to connect to the computer via the RDP, with the Vpn connected; specify the protocol version (IPv4 or IPv6 or both); certificate and server settings; mobile politicians. In general, there is something to “twist up” for your needs!
Configuration> Remote Access VPN> Network (Client) Access> AnyConnect Client Profile> Edit
For the second group - “ VPN-USERS ” we are doing the same thing ...
PS: for fans of the console - lay out the configuration later
PPS: do not consider it an advertisement - just like it very much: Duo Security
Source: https://habr.com/ru/post/334880/
All Articles