Kubernetes on bare gland in 10 minutes

Kubernetes is an open source framework for container orchestration. It was created taking into account Google’s rich experience in creating container management environments and allows you to run containerized applications in a cluster ready for industrial use. In the Kubernetes mechanism, there are many moving parts and ways to configure them - these are various system components, network transport drivers, command line utilities, not to mention applications and workloads.
In the course of this article, we will install Kubernetes 1.6 on a real (non-virtual) machine running Ubuntu 16.04 in about 10 minutes. As a result, you will have the opportunity to start exploring the interaction with Kubernetes through its CLI kubectl .Kubernetes Review:
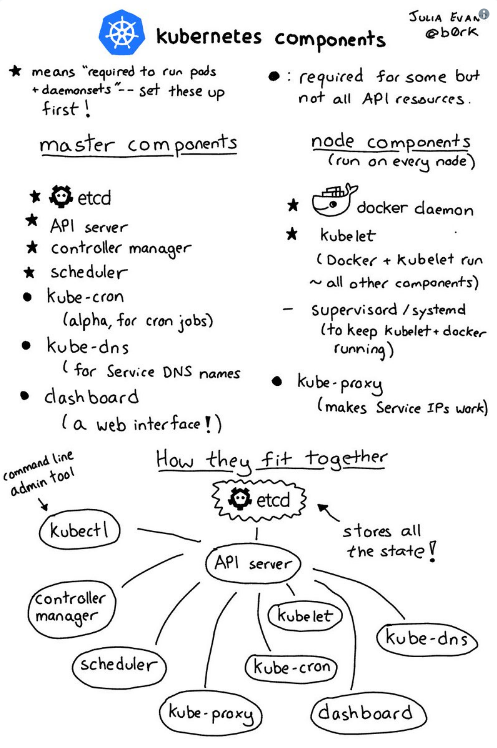
Components Kubernetes by Julia Evans
What we need
To deploy a cluster, I suggest using a physical machine from the Packet service. You can also do the steps I described in a virtual machine or on a home computer if Ubuntu 16.04 is installed as an operating system on them.
Go to Packet.net and create a new project. For the purposes of this article, we will have enough Type 0 host (4 Atom cores and 8GB RAM for $ 0.05 / hour).
When setting up a host, be sure to choose Ubuntu 16.04 as the OS. Unlike Docker Swarm, Kubernetes works better with time-tested Docker releases. Fortunately, the Ubuntu apt repository contains Docker 1.12.6.
- Install Docker.
$ apt-get update && apt-get install -qy docker.io Do not update Docker on this host. You can use more recent versions for image assembly in the CI toolkit or on a laptop.
Installation
- Install the Kubernetes apt repository.
$ apt-get update && apt-get install -y apt-transport-https $ curl -s https://packages.cloud.google.com/apt/doc/apt-key.gpg | apt-key add - OK $ cat <<EOF >/etc/apt/sources.list.d/kubernetes.list deb http://apt.kubernetes.io/ kubernetes-xenial main EOF Now update the package list with apt-get update .
- Install
kubelet,kubeadmandkubernetes-cni.
kubelet is responsible for running containers on cluster hosts. kubeadm is a handy utility for configuring the various components that make up a cluster, and kubernetes-cni needed for working with network components.
CNI stands for Container Networking Interface and is a specification that defines the interaction of network drivers with Kubernetes.
$ apt-get update $ apt-get install -y kubelet kubeadm kubernetes-cni - Initialize the cluster with
kubeadm.
From the documentation :
kubeadm is designed to create right out of the box a secure cluster using mechanisms such as RBAC.
In Docker Swarm, by default, there is an overlay network driver, but with kubeadm solution is ours. The team is still working on updating the instructions, so I’ll show you how to use the driver that is most similar to the Docker’s, the flannel from CoreOS.
Flannel
Flannel allows you to organize software-defined network (Software Defined Network, SDN) using the Linux overlay and ipvlan kernel modules.
In Packet, the machine connects to two networks: the first is the data center network that connects the hosts in a particular region and project, and the second is the Internet connection. The default firewall is not configured, so if you want to limit network activity you will have to configure iptables or ufw manually.
The internal IP address can be found using ifconfig :
root@kubeadm:~# ifconfig bond0:0 bond0:0 Link encap:Ethernet HWaddr 0c:c4:7a:e5:48:d4 inet addr:10.80.75.9 Bcast:255.255.255.255 Mask:255.255.255.254 UP BROADCAST RUNNING MASTER MULTICAST MTU:1500 Metric:1 We will use this internal IP address to broadcast the Kubernetes API.
$ kubeadm init --pod-network-cidr=10.244.0.0/16 --apiserver-advertise-address=10.80.75.9 --skip-preflight-checks --kubernetes-version stable-1.6 --pod-network-cidrrequired by the--pod-network-cidrdriver and defines the address space for containers.--apiserver-advertise-addressspecifies the IP address that Kubernetes will advertise as its API server.--skip-preflight-checksallowskubeadmnot to check the host kernel for the required functions. This is necessary due to the lack of kernel metadata on the Packet hosts.--kubernetes-version stable-1.6rigidly determines the version of the cluster (in this case, 1.6); if you wish to use, for example, Kubernetes 1.7, skip this flag.
Here is what we should get at the exit:
[init] Using Kubernetes version: v1.6.6 [init] Using Authorization mode: RBAC [preflight] Skipping pre-flight checks [certificates] Generated CA certificate and key. [certificates] Generated API server certificate and key. [certificates] API Server serving cert is signed for DNS names [kubeadm kubernetes kubernetes.default kubernetes.default.svc kubernetes.default.svc.cluster.local] and IPs [10.96.0.1 10.80.75.9] [certificates] Generated API server kubelet client certificate and key. [certificates] Generated service account token signing key and public key. [certificates] Generated front-proxy CA certificate and key. [certificates] Generated front-proxy client certificate and key. [certificates] Valid certificates and keys now exist in "/etc/kubernetes/pki" [kubeconfig] Wrote KubeConfig file to disk: "/etc/kubernetes/kubelet.conf" [kubeconfig] Wrote KubeConfig file to disk: "/etc/kubernetes/controller-manager.conf" [kubeconfig] Wrote KubeConfig file to disk: "/etc/kubernetes/scheduler.conf" [kubeconfig] Wrote KubeConfig file to disk: "/etc/kubernetes/admin.conf" [apiclient] Created API client, waiting for the control plane to become ready [apiclient] All control plane components are healthy after 36.795038 seconds [apiclient] Waiting for at least one node to register [apiclient] First node has registered after 3.508700 seconds [token] Using token: 02d204.3998037a42ac8108 [apiconfig] Created RBAC rules [addons] Created essential addon: kube-proxy [addons] Created essential addon: kube-dns Your Kubernetes master has initialized successfully! To start using your cluster, you need to run (as a regular user): sudo cp /etc/kubernetes/admin.conf $HOME/ sudo chown $(id -u):$(id -g) $HOME/admin.conf export KUBECONFIG=$HOME/admin.conf You should now deploy a pod network to the cluster. Run "kubectl apply -f [podnetwork].yaml" with one of the options listed at: http://kubernetes.io/docs/admin/addons/ You can now join any number of machines by running the following on each node as root: kubeadm join --token 02d204.3998037a42ac8108 10.80.75.9:6443 - Create an unprivileged user.
There is no regular user in the Ubuntu installation from Packet, so let's create it.
# useradd packet -G sudo -m -s /bin/bash # passwd packet - Set up environment variables for the new user.
Now, using the above cluster creation message, you can set up environment variables.
Log in as a new user: sudo su packet .
$ cd $HOME $ sudo whoami $ sudo cp /etc/kubernetes/admin.conf $HOME/ $ sudo chown $(id -u):$(id -g) $HOME/admin.conf $ export KUBECONFIG=$HOME/admin.conf $ echo "export KUBECONFIG=$HOME/admin.conf" | tee -a ~/.bashrc - Apply network configuration for hearths (flannels).
Now, using kubectl and two entries from the flannel documentation, we apply the network configuration to the cluster:
$ kubectl apply -f https://raw.githubusercontent.com/coreos/flannel/master/Documentation/kube-flannel-rbac.yml clusterrole "flannel" created clusterrolebinding "flannel" created $ kubectl create -f https://raw.githubusercontent.com/coreos/flannel/master/Documentation/kube-flannel.yml serviceaccount "flannel" created configmap "kube-flannel-cfg" created daemonset "kube-flannel-ds" created Network for pods configured.
- Enable the use of a single-host (single-host) cluster.
Usually, several hosts are included in the Kubernetes cluster, so by default containers cannot be started on the wizard. But since we have only one node, we allow containers to be launched on it using the taint operation.
$ kubectl taint nodes --all node-role.kubernetes.io/master- Alternatively, a second machine could be added to the cluster usingjoin tokenfrom the output ofkubeadm.
- Check cluster performance.
Many Kubernetes components run as cluster containers in the kube-system hidden namespace. You can display information about them as follows:
$ kubectl get all --namespace=kube-system NAME READY STATUS RESTARTS AGE po/etcd-kubeadm 1/1 Running 0 12m po/kube-apiserver-kubeadm 1/1 Running 0 12m po/kube-controller-manager-kubeadm 1/1 Running 0 13m po/kube-dns-692378583-kqvdd 3/3 Running 0 13m po/kube-flannel-ds-w9xvp 2/2 Running 0 1m po/kube-proxy-4vgwp 1/1 Running 0 13m po/kube-scheduler-kubeadm 1/1 Running 0 13m NAME CLUSTER-IP EXTERNAL-IP PORT(S) AGE svc/kube-dns 10.96.0.10 <none> 53/UDP,53/TCP 14m NAME DESIRED CURRENT UP-TO-DATE AVAILABLE AGE deploy/kube-dns 1 1 1 1 14m NAME DESIRED CURRENT READY AGE rs/kube-dns-692378583 1 1 1 13m As you can see from the listing, all services are in the Running state, which means that the cluster is OK. If these components are in the Internet download state, they may not yet be running.
Run the container
Now in the cluster, you can run the container. In Kubernetes, containers are organized into pods (Pods) that use a common IP address, are attached to the same node (host), and can use shared volumes.
Check that you currently have no running pods (containers):
$ kubectl get pods Now use the kubectl run to start the container. We will deploy Node.js- and Express.js-microservice that generates GUIDs via HTTP.
This code was originally written for the Docker Swarm tutorial. Relevant sources can be found at this link: Scale a real microservice with Docker 1.12 Swarm Mode
$ kubectl run guids --image=alexellis2/guid-service:latest --port 9000 deployment "guids" created Now in the Name column you can see which name was assigned to the new hearth and when it was launched:
$ kubectl get pods NAME READY STATUS RESTARTS AGE guids-2617315942-lzwdh 0/1 Pending 0 11s Use Name to check the status of the hearth:
$ kubectl describe pod guids-2617315942-lzwdh ... Pulling pulling image "alexellis2/guid-service:latest" ... Once we have a working container, we can take its IP address and get the generated identifiers using curl :
$ kubectl describe pod guids-2617315942-lzwdh | grep IP: IP: 10.244.0.3 $ curl http://10.244.0.3:9000/guid ; echo {"guid":"4659819e-cf00-4b45-99d1a9f81bdcf6ae","container":"guids-2617315942-lzwdh"} $ curl http://10.244.0.3:9000/guid ; echo {"guid":"1604b4cb-88d2-49e2-bd38-73b589da0469","container":"guids-2617315942-lzwdh"} To view the pod logs, you can use the following command:
$ kubectl logs guids-2617315942-lzwdh listening on port 9000 A very useful feature for debugging containers is the ability to connect to their console and execute various commands there:
$ kubectl exec -t -i guids-2617315942-lzwdh sh / # head -n3 /etc/os-release NAME="Alpine Linux" ID=alpine VERSION_ID=3.5.2 / # exit - Toolbar (Dashboard).
The Kubernetes toolbar is also set as a hearth, which we can then access on the local machine. Since we did not open Kubernetes Internet access, we’ll use an SSH tunnel to access the toolbar.
$ kubectl create -f https://git.io/kube-dashboard $ kubectl proxy Starting to serve on 127.0.0.1:8001 Now we will create a tunnel to the Host Packet and open the http: // localhost: 8001 / ui / page in the web browser.
$ ssh -L 8001:127.0.0.1:8001 -N 
More information can be found here: Dashboard check it out on Github .
Let's sum up
You created Kubernetes cluster and launched your first microservice. Now you can start exploring the cluster components using the kubectl command line kubectl .
- Learn from examples.
The manual Kubernetes by Example , created by Michael Hausenblas , seemed detailed and accessible to me.
- Add more nodes.
We now have a cluster consisting of one node; we can begin to add more Type 0 nodes using the join token received from kubeadm .
- Compare with Docker Swarm.
Docker Swarm is an orchestration tool built into Docker CE and EE. A Docker Swarm cluster can be raised with a single command. More information can be gleaned from my lessons on Docker Swarm .
Thanks:
Thanks to @mhausenblas , @_errm and @kubernetesonarm for feedback and tips on setting up the Kubernetes cluster.
References:
- Original: Kubernetes on bare-metal in 10 minutes .
')
Source: https://habr.com/ru/post/334846/
All Articles