Contra, Battledods and Mortal Kombat in one box. The story of how I made a slot machine and put it in the office

Many children of the Russian 90s warmly remember the hours they spent on consoles — they played “tanchiki”, Battletods, Rockenroll Racing and a bunch of other games with friends. I am sure that among you there are those who still play and collect classic consoles and games for them. Something in them is such that connects with a carefree childhood.
I myself am partly sick of it. But when I immersed myself a bit in the world of retrogaming, it turned out that in my childhood there was a lot of things that somehow bypassed me. Now I'm talking about arcade machines - a phenomenon that in the 80-90s was actually the engine of progress. Many familiar games to us were first written under the arcade machines, and only then they were ported to home consoles in a reduced form.
')
Among those interested in retrogaming there is an opinion that it is necessary to play on the original hardware, and emulation is not true. This means that if you decide to remember the old days and drive Chip and Dale with your friends, please get yourself a prefix (preferably the original NES or Famicom) and a couple of cartridges for it. In the modern world, this is not a problem - you can buy all this at online auctions. The only question is how much you are willing to part with.
But what to do with arcade games? You can buy the original machine. But its delivery will cost an indecently large amount of American money, and the game will be there alone.
Here we inevitably come to emulation. But the feeling of the game you want to get special, as in the arcade room.
Exit - to collect the arcade machine yourself
What will be built our arcade machine
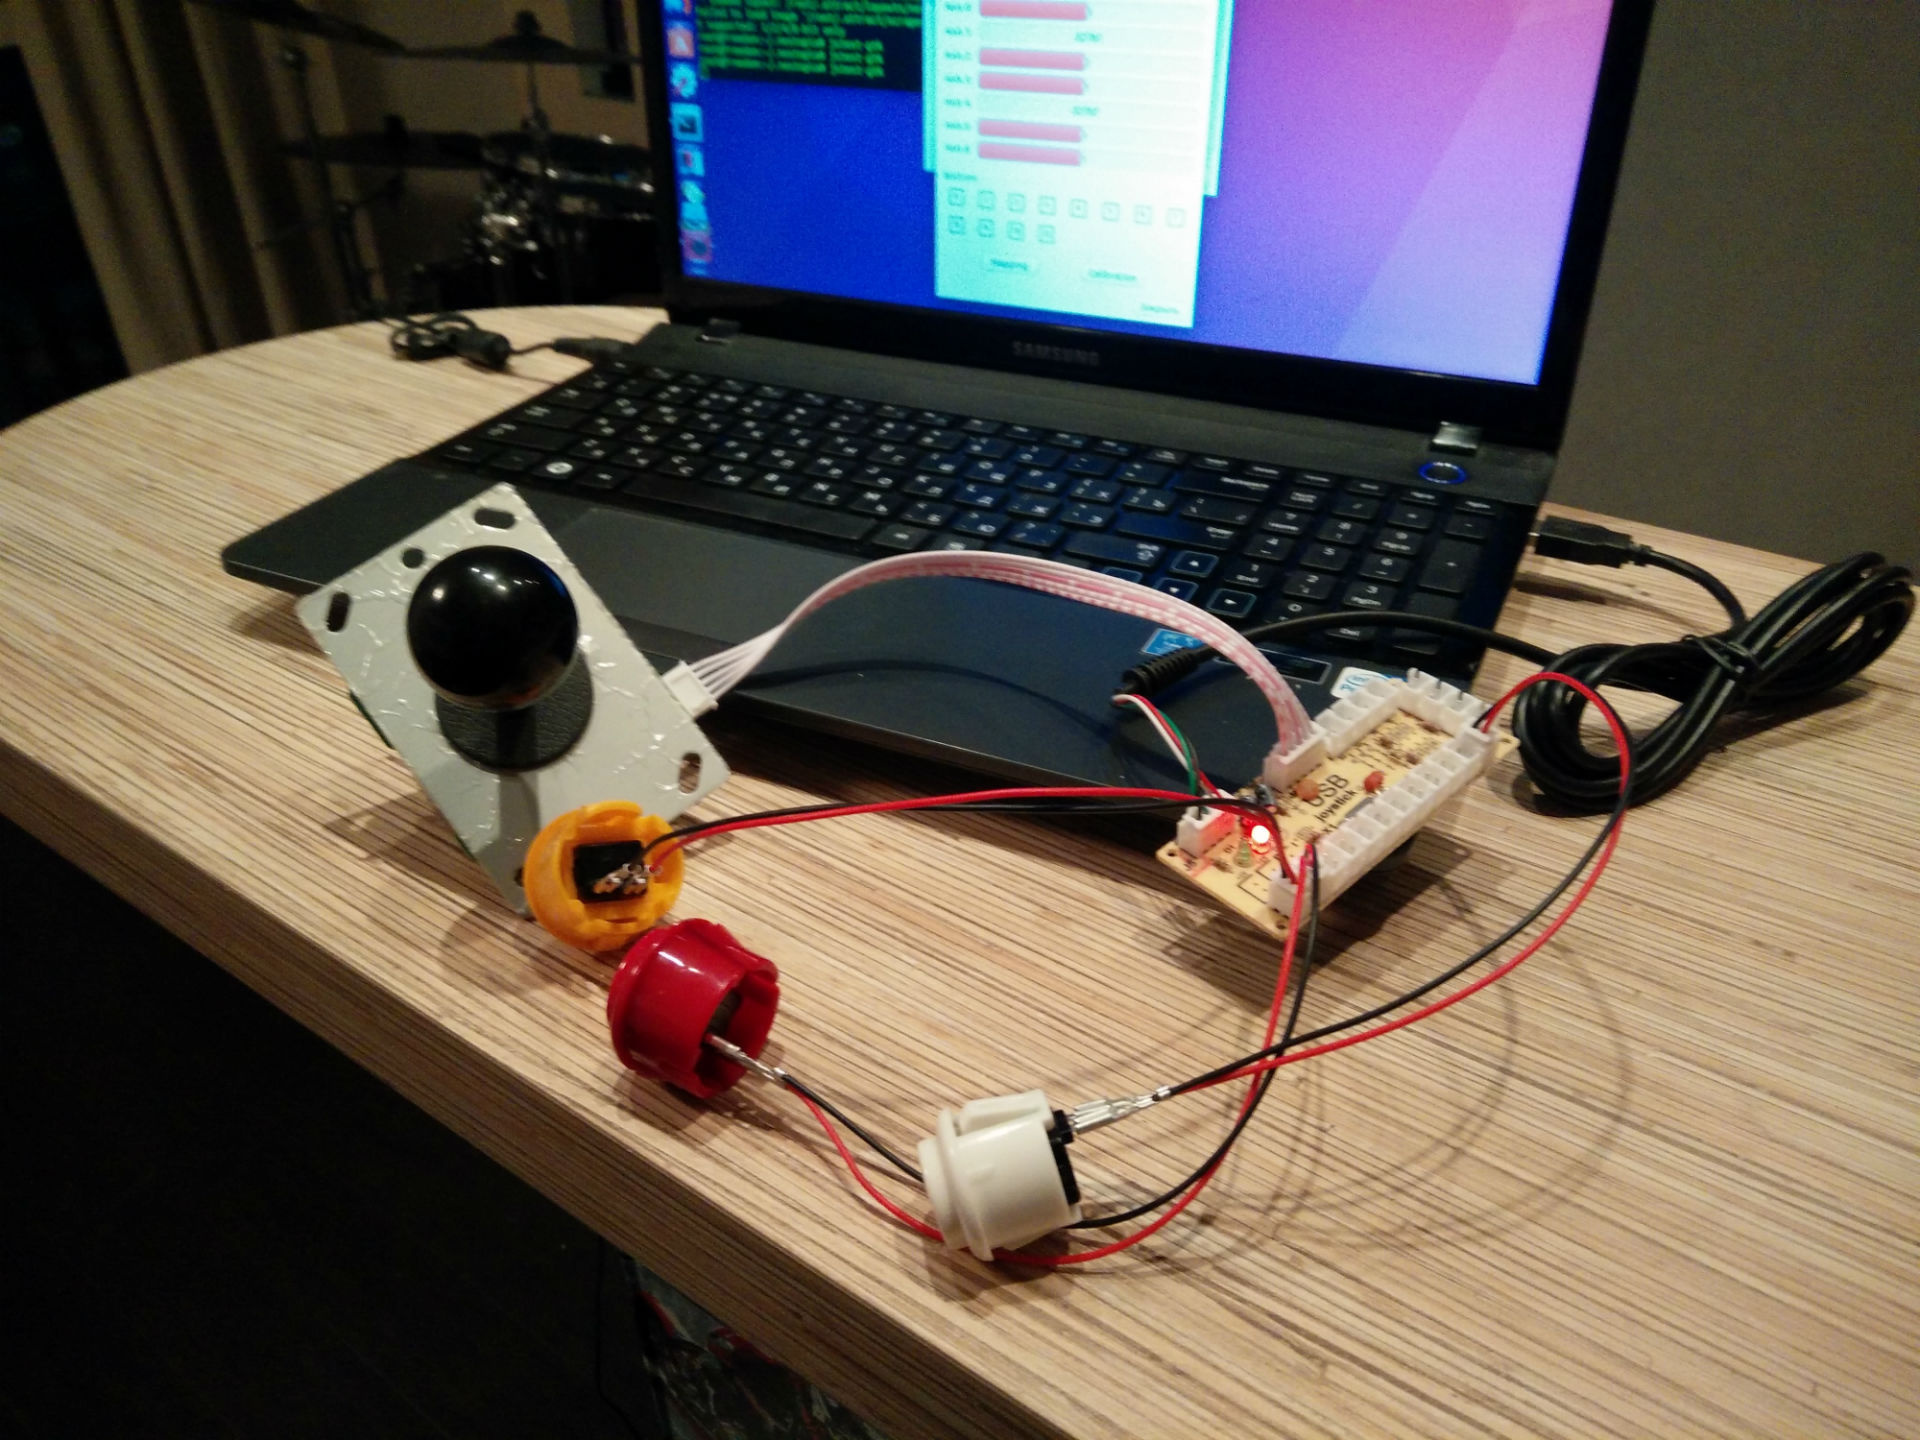
The heart of the arcade machine is an arcade joystick, it is he along with the general entourage that should help us go back to the 80-90s and try to catch the atmosphere of the arcade room.
Which joystick to use is not important. On AliExpress, a lot of offers a variety of DIY-kits. My choice fell on this .
As I already wrote, the games we are going to run on the emulator. So, the brain of our machine will be quite an ordinary PC. You can, of course, do everything on a single-board computer, but:
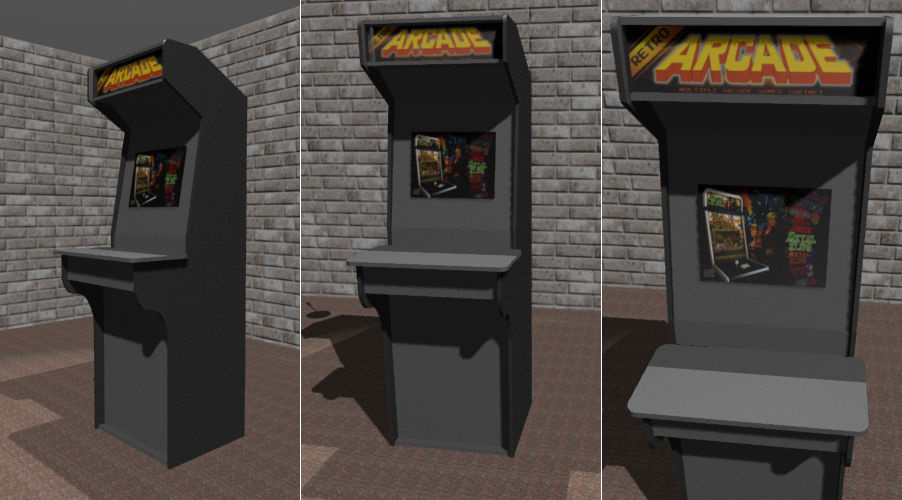
- I chose the full version of the machine. Its height is about two meters. So you can not save on the place inside the machine.
- With a full-fledged PC is easier in terms of modifications and connection of peripherals.
- Since the machine needs a 4: 3 monitor, you do not want to create a problem for you to connect an old monitor via HDMI.
- I got the system unit cheaper than a single board computer.
Power in this case is not very important. Let me just say that I used a PC on Core 2 Duo, 1GB RAM, 120GB HDD.
As for the monitor: having run through commission fees, the maximum that I could find suitable was a 20-inch HP L2035 monitor. The main criterion was the 4: 3 aspect ratio. Well, the bonus turned out to be a convenient design, which is extremely well amenable to modification.
The last major part of the machine is its body. Without it, it's just a PC. I decided to assemble it from LDSP - so that it is reliable.
Housing assembly
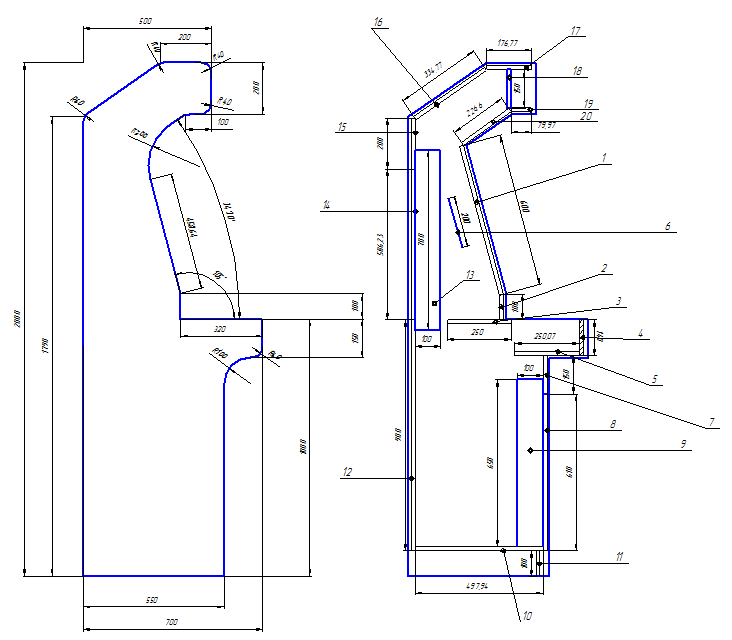
It seems that the most difficult task for the person who decided to make a gaming machine is the assembly of the case for the machine. It sounds easy - in fact, you just need to build a cabinet in which the PC will be installed and the monitor is built in. In fact, everything is a little more complicated - it is difficult to find ready-made size drawings (or I was looking bad). What I found allowed us to sketch a 3D model curve.
Evaluating the result as satisfactory, I decided that it was easier and more convenient to order a saw cut.
To do this, you need a specific list of parts with exact dimensions. Therefore, we recall the students and the "Compass" and draw a drawing of the side panel. We mark on it all the internal details. Now with these artifacts you can go to any company that sells laminated chipboard and provides cutting services for it.
That's what happened specifically for me: cutting and drawing
In principle, for most parts you can order PVC-edging, but, most likely, curved parts will refuse to edge at the place where you order the cut. There are three ways out:
- Buy PVC tape and cut off the ends independently with the help of a building hair dryer.
- Buy invoice piping and stick it on double-sided tape or glue.
- Buy a mortise edging and install it using a milling cutter, charged face milling cutter and mallet.
I chose the latter option, since it is the most canonical one and I had access to the tool.
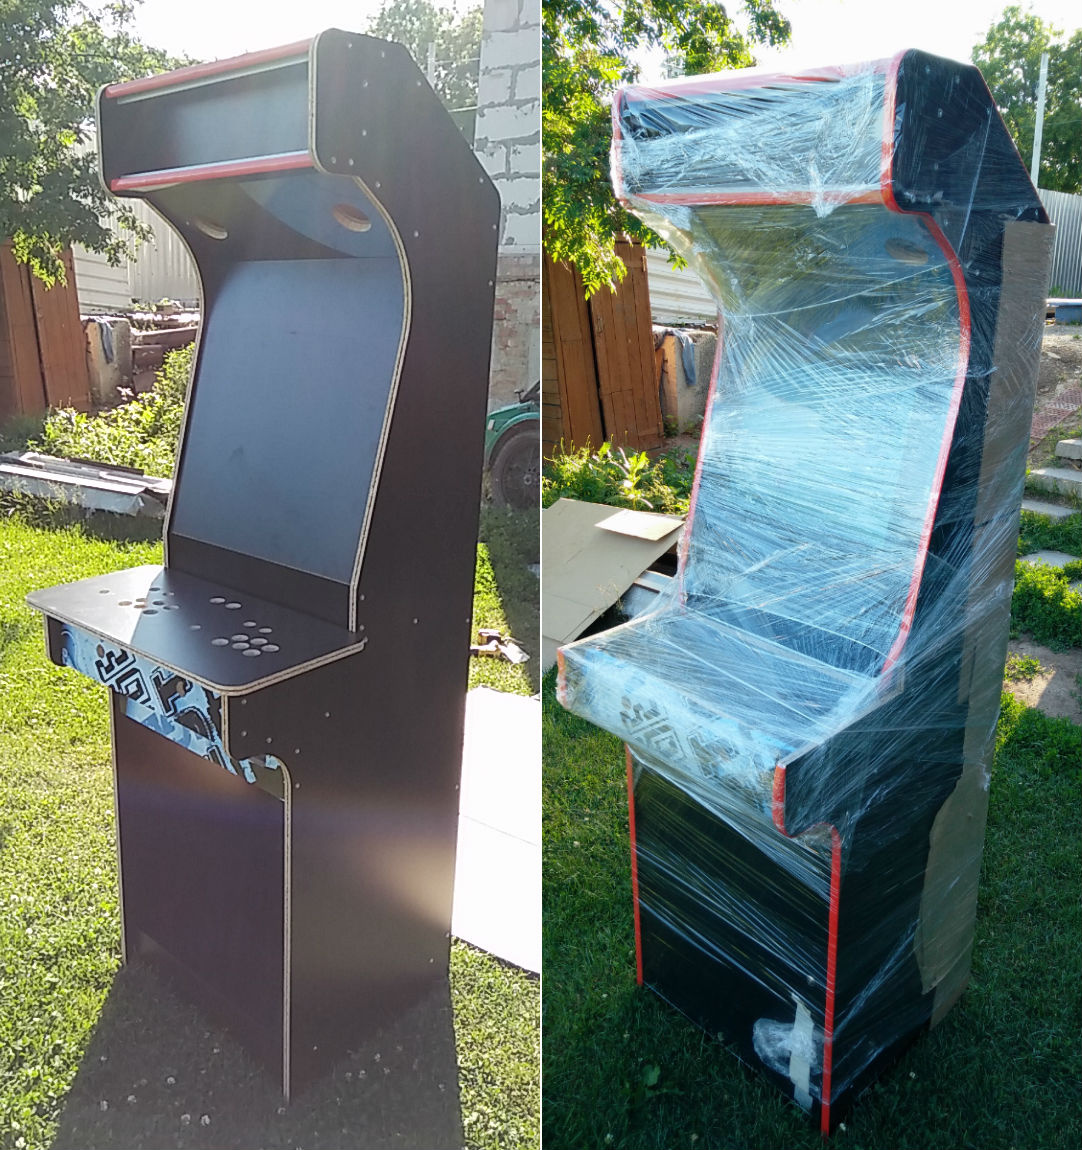
In the designs of all the arcade machines of the 80-90s there was always a visor on which the game logo glowed proudly, luring players. Of course, here he is also needed. I made the logo myself from a piece of plexiglass, pasted over with a pre-printed sticker with the name of the machine.

To make the front panel of the machine look beautiful, you need a piece of Plexiglas 5 mm thick, ordering such a size is not a problem. On one of the sides we paint the plexiglass with black spray paint, leaving a non-painted rectangle the size of a monitor screen in the center.
I summarize the algorithm:
- We order cutting chipboard according to the list of details.
- We buy the edging (mortise, invoice or tape).
- We buy consumables (evrovint, furniture hinges, locks on the doors if necessary, ventilation grilles, etc.).
- We order plexiglas in the sizes .
- Armed with a drill, screwdriver, jigsaw, mill (optional).
- We spend an unpredictable amount of time on the assembly of the hull.
- Profit!
Soft
Since the inside of the machine in my version - the PC, the question arises of choosing the operating system. The task can be solved on both Windows and Linux. The last option is somehow closer to me (and I don’t need to buy a system), so I’ll tell you a little about how to deploy everything on Linux. The most appropriate distribution kit, in my opinion, for this purpose is Lubuntu 16.04 LTS.
An important question is the convenience of selecting and launching games, I want to control the machine only with the help of an installed joystick. For this you need a kind of frontend-shell, conveniently showing the list of games and launching an emulator with the selected game on demand. The benefit of the Open source community has long solved this problem. As the saying goes: "everything is already written before us." For example, the Attract-mode project has versions for all popular platforms, including those of interest to Ubuntu. The shell supports themes that, by the way, are written in Squirrel, so that mod lovers will have where to turn. Well, or you can visit the project forum and find something to your liking.
Working with the shell is extremely simple: after launch, press the tab and get into the menu. First of all, we set up emulators - the paths to games and all sorts of beautiful things: logos, video previews, covers, posters. Depending on the theme different beauty can be used. By the way, you can try to pull them down using the built-in scrape artwork function. Do not think that there is everything, but for most popular games, everything will come automatically. To search for video previews of games, you can still use the project Progettosnaps.net - the guys have collected a very large collection of videos and distribute it absolutely free.
After setting up the paths, it is necessary to press the generate romlist item - after the counter reaches 100%, the screen (display) of this emulator will be automatically added. After leaving the menu, on this screen you can already look through the list of games and try to run something.
The main emulator will be the famous MAME - good, its build exists under Linux. For me, it was a discovery that the Roma for this emulator is also versioned as the emulator itself, so it will not work on the new emulator to run the rum from the old version. But since the version of the Roma will not work out, you will have to download a lot of update packs and update the Roma that you choose for your arcade machine. Many rums and updates to them can be found on the project Emuparadise.me .
For a change, you can put a few more emulators: nestopia, gens, zsnes and configure them in attract-mode.
There is a small nuance - not all emulators have the opportunity to wipe the output from the emulator on the joystick button. It is solved by installing the antimicro package, which is hanging in the processes and map the joystick buttons to the keyboard buttons: simply select the button on the joystick and map it to Esc.
It only remains to do so that the attraction-mode and antimicro are started immediately upon login and that's it!
Wires and stuff
So, we already have a case and a configured PC. All that is left for us is to build in the joystick, speakers, lights and dissipate the wires inside the case.
Embed the joystick in the machine, or rather, in the control panel, is not difficult. In fact, you just need to drill holes of the required size. But to arrange them is a creative process and a field for experiments. I did it like this:
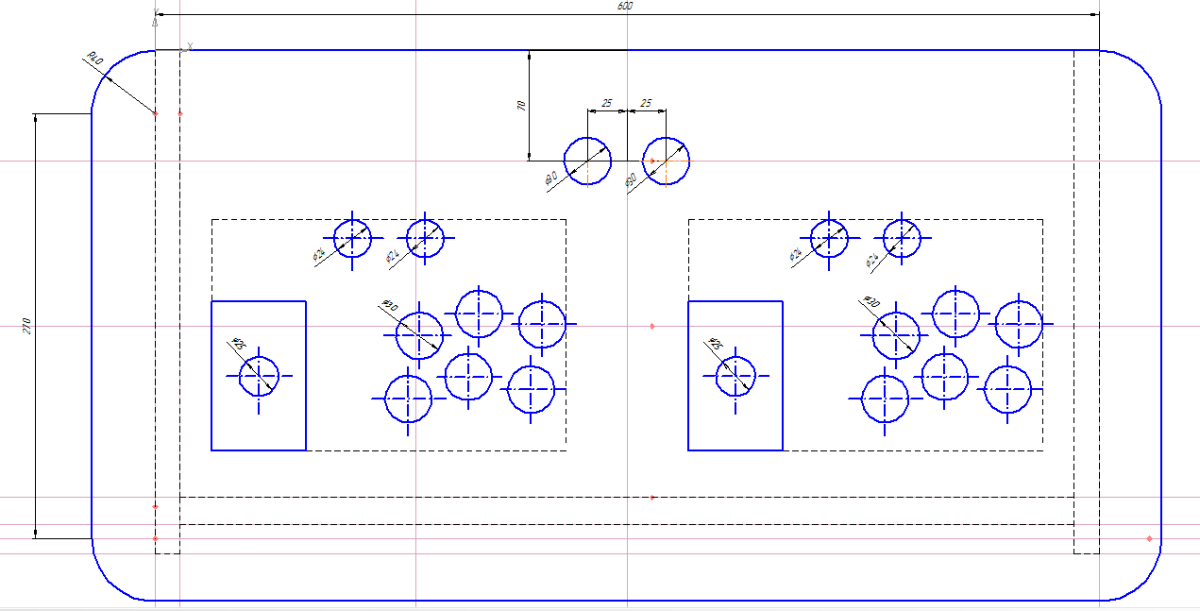
The drawing can be found here.
To illuminate the logo, I used two 12V LED tapes (because the easiest way to power the PC power supply).
The speakers are easier to take with USB power - it is somehow more comfortable to work with 5V instead of 220V.
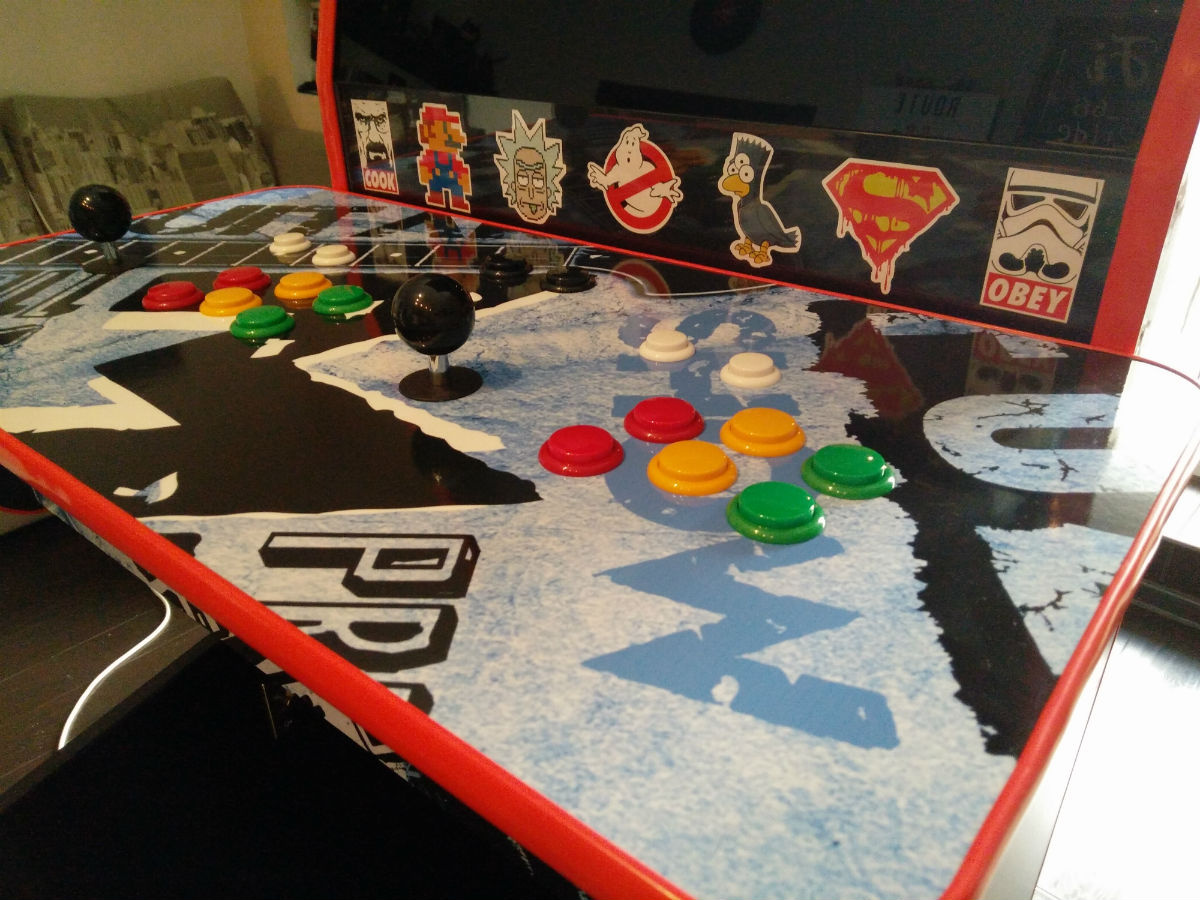
To make it convenient to turn the machine on and off, adjust the volume level and turn on the backlight, we make a small control unit on the front panel of the machine.
We take out on the panel:
- power button from the system unit;
- volume control;
- sound switch (just solder the power switch to the power supply column);
- backlight switch.

At this point, only the design work remains: if you can design and print beautiful sideboards, so that the black box will play with new colors, then I envy you white envy. And if you are the same techie as me, then you have to look for ways to get out of the situation. For example, to buy an abstract vinyl sticker or to order indecently on AliExpress a lot of stickers and close up the whole machine. The last option I took advantage of. It took about 500 stickers.
Instead of conclusion
I told the story of the assembly of an arcade machine, but the story of his life has just begun. Almost immediately, a desire to share joy and emotions with my colleagues arose in my head, because playing is always better in a company.
As a result, the arcade machine has moved to the 2GIS office on the 20th floor and at the moment is causing good and causing joy to everyone. Feels like a lot of people trying to play the machine. After work, you can consistently catch someone who is trying to find exactly the game from his childhood, even had orders to add something. On Friday evening, a small crowd of people creates the feeling of a small arcade room. It seems to me exactly as it was - when you wait for your turn to play the machine - you watch with interest how your friends play and sincerely experience with them particularly difficult moments.
All right, with the obligatory program finished, now an arbitrary part.
UPD: According to the requests of users:

Source: https://habr.com/ru/post/334752/
All Articles