Let's play in Firebase
Inside: board games, NFC tags, Firebase, ESP 8266, RFID-RC522, Android and a pinch of magic.
 My name is Oksana and I am an Android developer in a small but very cool Trinity Digital team. Here I will talk about the experience of creating a desktop toy based on Firebase and all sorts of different pieces of hardware.
It just so happened that the desire to gash something funny with us coincided with the need to conduct a Firebase meeting in the Google Developer Group format in Petrozavodsk. We began to think what could be arranged, so that it was interesting, and it was possible to show on the mitap, and then work on the development, but in the end got carried away in earnest and came up with a whole intellectual board game.
Suppose there is a whole bunch of games of varying degrees of “boardness” - MTG, Munchkin, DND, Evolution, Mafia, Scrabble, thousands of them. We love the desktops for their atmosphericity and “materiality”, that is, for the opportunity to hold beautiful cards / chips in their hands, look at them, soundfully slam them on the table. And all the desktops are different in many ways, but they have a number of drawbacks that prevent you from plunging into the game with your head:
')
All these things are a little unsettling, make distractions, reduce the dynamics. And we came up with what needs to be done: shove them ... into the server! The basic idea of our toy is this: let all the rules, sequence of moves, counting values, randomizer and other logical parts be the responsibility of some external system. And players will make moves with full dedication, learn the patterns of the game world, build strategies, try new things and become emotionally involved.
About the concept of the toy, to which we want to come to the finals, I will not even tell here: this, of course, is interesting, but why share the skin of an unkilled project. I will tell you about the demo that we made in order to find out if it’s really possible to do what is intended.
Proof of concept, so to speak.
We need to make a small, simple game like “magic combat”. A couple of opponents throws spells at each other, the one who finishes the opponent first wins. Players have some stats, for example, health and mana. Each spell is a card, the spell costs some mana and produces some effect (heals, cripples, or something else).
Anything like “hello world” about Firebase I will not cover, the benefit of materials on this subject is enough, including in Habré. I will not mention any subtleties of the model either, in order not to load with details. More interesting is how we will read, write and process data.
So in our database look game games.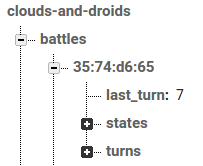
“35: 74: d6: 65” is the batch id
states are players
turns is a sequence of moves
In addition to information about the parties themselves, we need to keep a list of cards and some preliminary settings (for example, the maximum possible values of health and mana).
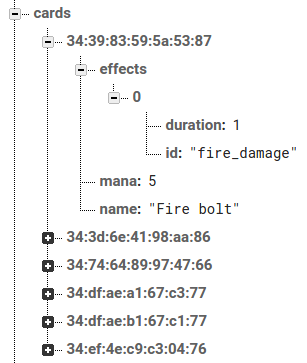
Each NFC tag can memorize some information. Since we use tickets of the Moscow metro as cards, each of them already has a unique key, which is what we need. Consider these keys can, for example, any application under the android, which is able to NFC.
Here is a piece from the base, which puts its name, the amount of mana required for a cast, and a set of effects, each with its own duration (in turns), according to the unique key of the card.
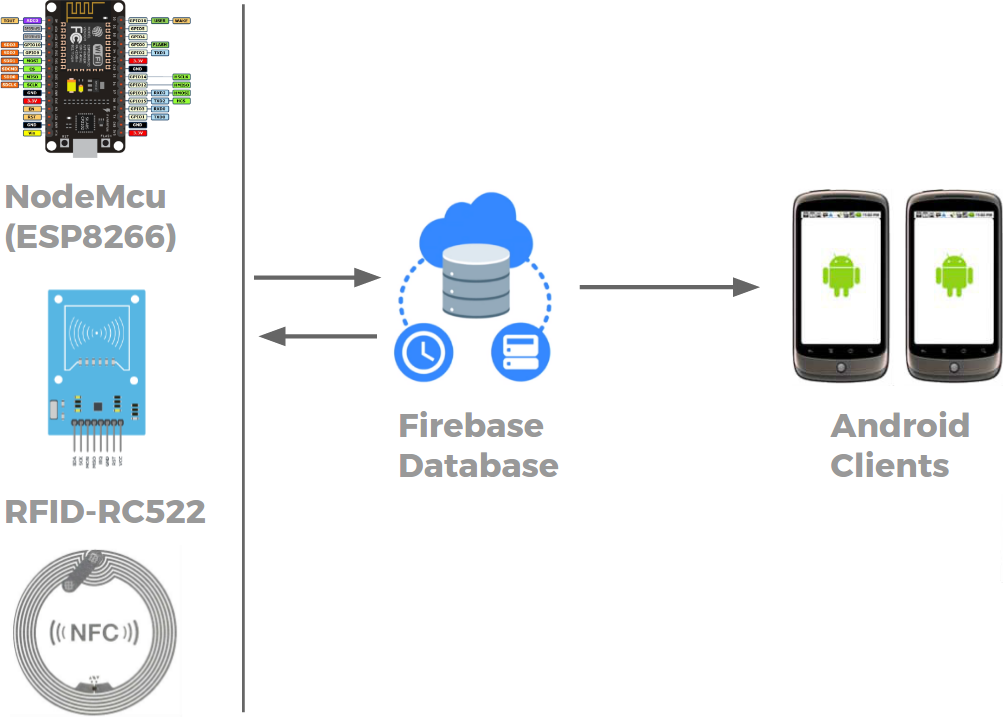
And we have these glands: ESP 8266 microcontroller and RFID / NFC RFID-RC522 reader. ESP 8266 in our case is good because it is small in size, eats little, there is a built-in WI-FI module, as well as Arduino compatibility (which allows you to write firmware in the usual Arduino IDE).
For the prototype, we took the Node MCU v3 board, which is made on the basis of ESP 8266. It allows you to upload firmware and eat directly via USB, which is beautiful in prototyping. You can write for it in C and Lua. Leaving aside our love for scripting languages in general, and for Lua in particular, we chose C because almost immediately found the necessary stack of libraries to implement our idea.
Well, RFID-RC522 is probably the easiest and most common card reader. The module works through SPI and has the following pinout for connecting to ESP 8266:

Talk is cheap, show me the code!
Used library MFRC522. Interaction with the scanner goes through SPI:
For Firebase there is a wonderful library FirebaseArduino, which out of the box allows you to send data and track events. Supports the creation and sending of Json requests.
Interaction with Firebase turned out well, very simple and can be briefly described in two lines:
Where firebaseFailed () is:
Json request can be sent as follows:
That's basically all that we needed from the “iron part”. We initially wanted to abstract from it as much as possible, and on the whole we succeeded. Since writing the first firmware, it has changed only once, and only slightly.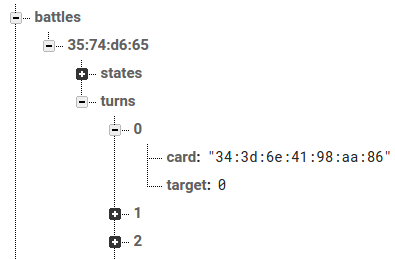
This is a piece of the base where the moves of the current game are stored. In each course, it is indicated what card was played and which player it was directed at. If we want something to happen during the new move, we write a Firebase function that will track changes at the “turns” node:
The playEffects function looks like this (yes, there is an eval, but we think that this is quite acceptable in a demo project):
Each of the effects will be something like this:
It is probably worth explaining here that the players in our database are represented as follows:
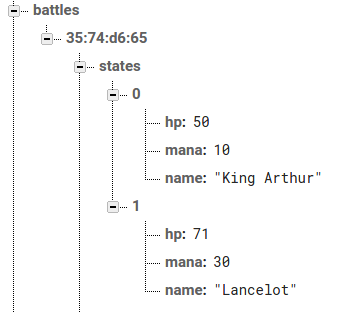
That is, each of them has a name, health and mana. And if something arrives in them, then effects will also appear:
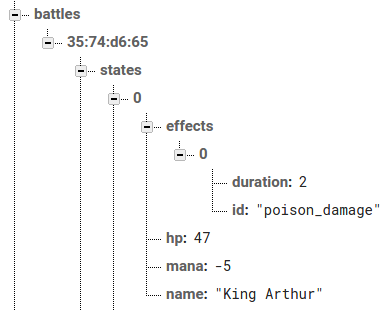
By the way, there is another task related to the effects: those that have already completed their duration should be removed. Let's write another function:
For example, like this:
Yes exactly:
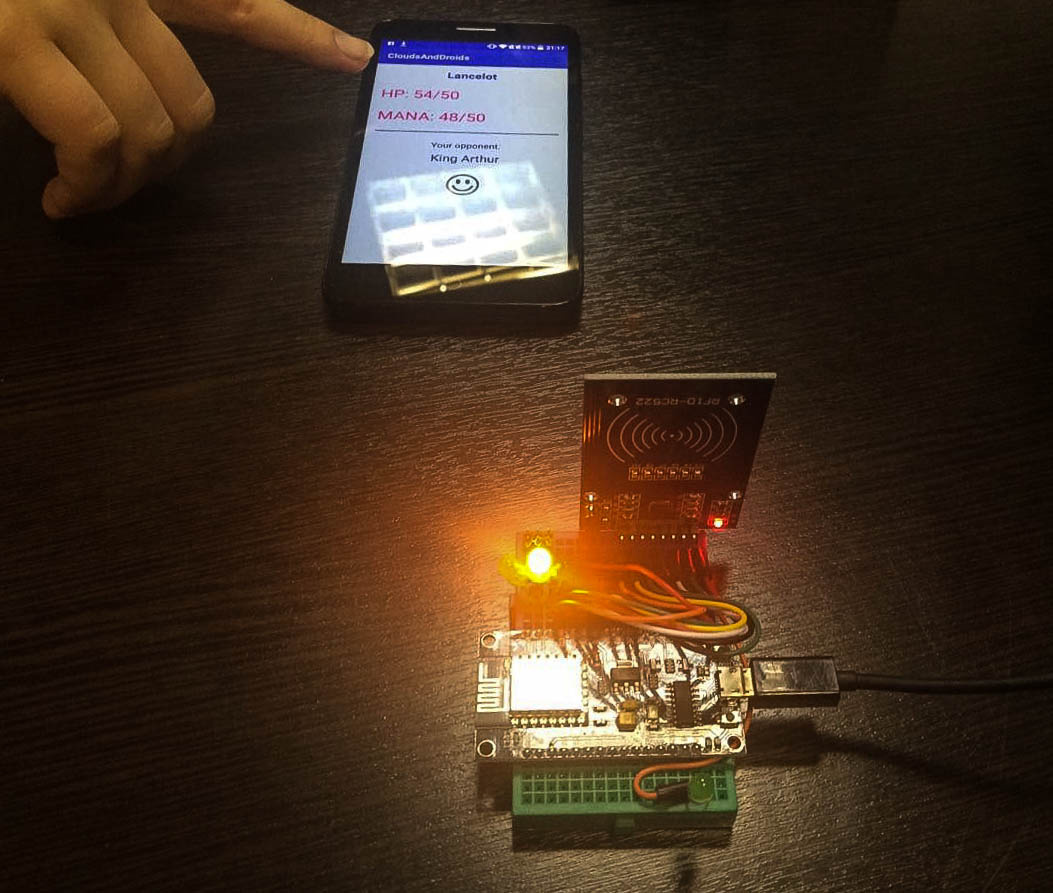
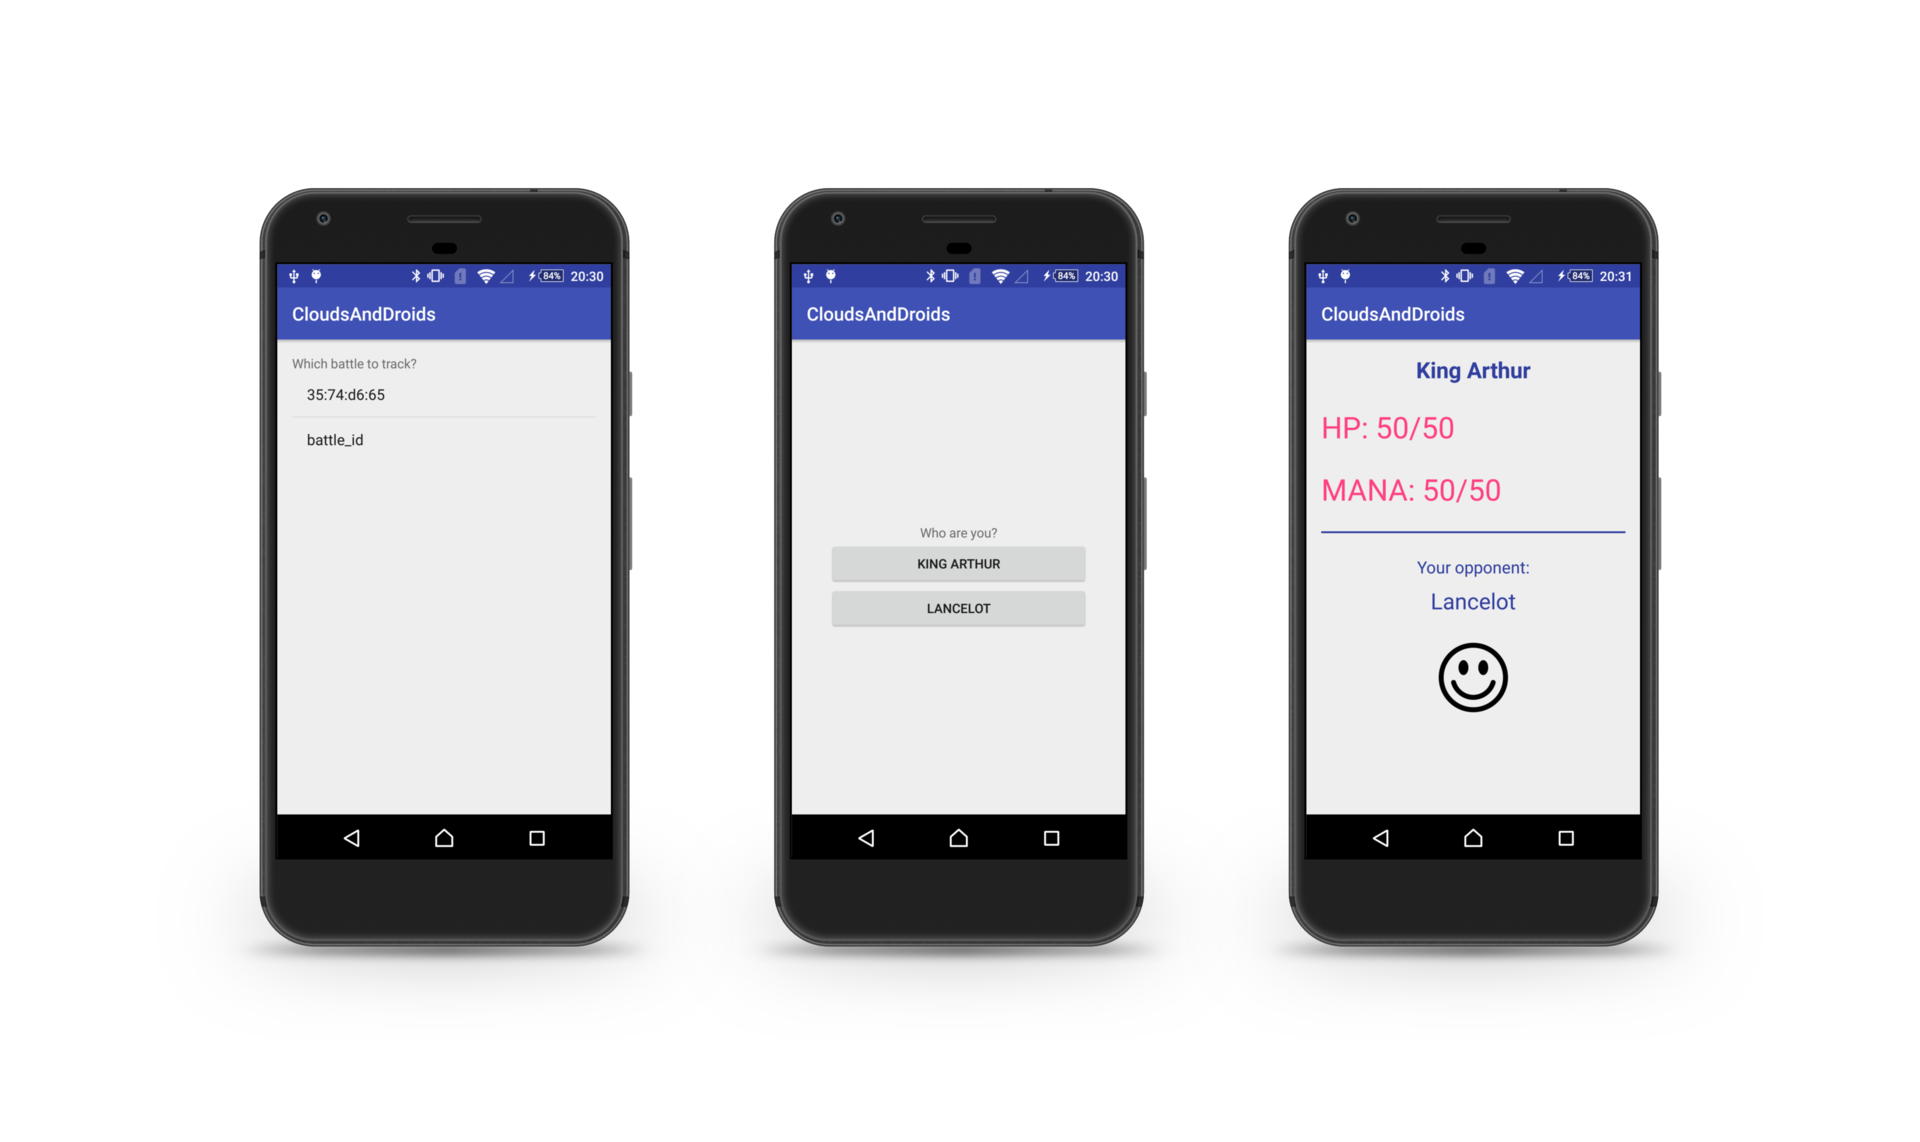
We select the game and which of the opponents to keep track of, and then we observe our stats in numbers, and the opponent's stats in a generalized form (let it be a smiley of different degrees of gaiety).
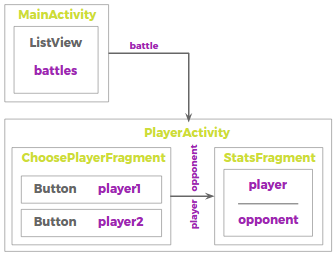
Here is the conditional scheme of the application, so that further the code is easier to read:
Reading data from Firebase on Android is simple enough: we hang the listeners on certain nodes in the database, catch DataSnapshot's and send them to the UI. This is how we will show the list of batches on the first screen (I greatly shorten the code in order to highlight only moments about receiving and displaying data):
I probably will not give the markup files - everything is quite trivial.
So, we want to launch PlayerActivity when clicking on a certain party:
ChoosePlayerFragment reads the states node for the selected batch, pulls out two opponents from there and puts their names in the buttons (for details, see the source code, links at the end of the article).
At this point, it is worthwhile to talk about StatsFragment, which tracks changes in the stats of opponents and displays them:
That's all the parts from which we collected our demo toy. The full source code lives on a githaba, and further ideas live in our imagination. Now we are modifying the model with a file, stumble over design and produce content. And if the idea survives, then it will surely generate some more stateek.
My name is Oksana and I am an Android developer in a small but very cool Trinity Digital team. Here I will talk about the experience of creating a desktop toy based on Firebase and all sorts of different pieces of hardware.It just so happened that the desire to gash something funny with us coincided with the need to conduct a Firebase meeting in the Google Developer Group format in Petrozavodsk. We began to think what could be arranged, so that it was interesting, and it was possible to show on the mitap, and then work on the development, but in the end got carried away in earnest and came up with a whole intellectual board game.
Idea:
Suppose there is a whole bunch of games of varying degrees of “boardness” - MTG, Munchkin, DND, Evolution, Mafia, Scrabble, thousands of them. We love the desktops for their atmosphericity and “materiality”, that is, for the opportunity to hold beautiful cards / chips in their hands, look at them, soundfully slam them on the table. And all the desktops are different in many ways, but they have a number of drawbacks that prevent you from plunging into the game with your head:
')
- The need to remember the rules: you must keep in mind which actions are correct and which are not, how the order of moves is determined, what are the exceptions in the process, at which point you need to count the glasses for a whole lot more;
- Counting values: how much health do I have now? And what bonus will give me this card with all my stats? Did I pass the skill check now under these environmental conditions?
- A waste of time in the proceedings in the system, recording, throwing dice ...
- The inability to create a fairly complete and realistic model, because it lives in the heads of the players, and the heads are limited in capacity;
- The players have meta-information about the system and the rules: you can not enjoy the knowledge of the system and discover new things in the game world, because you need to know everything in advance, because you control the gameplay.
All these things are a little unsettling, make distractions, reduce the dynamics. And we came up with what needs to be done: shove them ... into the server! The basic idea of our toy is this: let all the rules, sequence of moves, counting values, randomizer and other logical parts be the responsibility of some external system. And players will make moves with full dedication, learn the patterns of the game world, build strategies, try new things and become emotionally involved.
About the concept of the toy, to which we want to come to the finals, I will not even tell here: this, of course, is interesting, but why share the skin of an unkilled project. I will tell you about the demo that we made in order to find out if it’s really possible to do what is intended.
Proof of concept, so to speak.
Task:
We need to make a small, simple game like “magic combat”. A couple of opponents throws spells at each other, the one who finishes the opponent first wins. Players have some stats, for example, health and mana. Each spell is a card, the spell costs some mana and produces some effect (heals, cripples, or something else).
To implement we need the following:
- a bunch of NFC tags to make cards of them (hello Moscow subway tickets!);
- two pieces (for each player) ESP8266 + RFID-RC522 to read them when a move is made and send to the network;
- Firebase - to store data, process moves and change values in the model in accordance with the rules;
- Android - to display everything that happens (your stats, other people's stats) for players.
Anything like “hello world” about Firebase I will not cover, the benefit of materials on this subject is enough, including in Habré. I will not mention any subtleties of the model either, in order not to load with details. More interesting is how we will read, write and process data.
A little bit about the model
So in our database look game games.
“35: 74: d6: 65” is the batch id
states are players
turns is a sequence of moves
In addition to information about the parties themselves, we need to keep a list of cards and some preliminary settings (for example, the maximum possible values of health and mana).
Each NFC tag can memorize some information. Since we use tickets of the Moscow metro as cards, each of them already has a unique key, which is what we need. Consider these keys can, for example, any application under the android, which is able to NFC.
Here is a piece from the base, which puts its name, the amount of mana required for a cast, and a set of effects, each with its own duration (in turns), according to the unique key of the card.
The move is as follows:
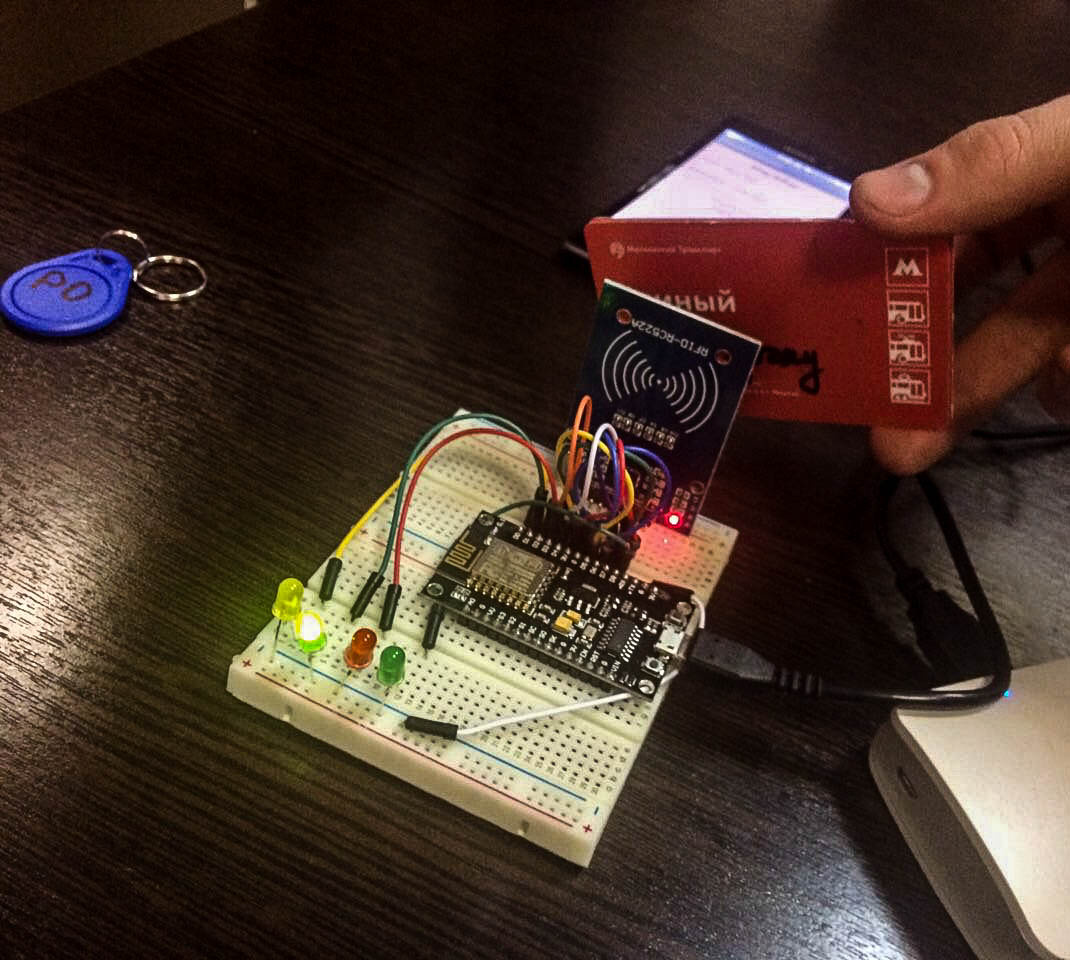
- the player chooses a card, brings it to one of the readers (depending on whether he wants to apply effects - to himself or his opponent);
- he writes in the Firebase Database - “N card played on player M”;
- The Firebase function sees that a new entry has appeared in the sequence of moves and processes it: it takes the player mana for the played card, assigns effects to the target player from the current card, and then applies all the effects that already hang on the players and reduces their duration by 1;
- Well, the Android client simply tracks changes in the Firebase Database and displays the latest player stats in a readable form.
Smoothly move to the glands and code
And we have these glands: ESP 8266 microcontroller and RFID / NFC RFID-RC522 reader. ESP 8266 in our case is good because it is small in size, eats little, there is a built-in WI-FI module, as well as Arduino compatibility (which allows you to write firmware in the usual Arduino IDE).
For the prototype, we took the Node MCU v3 board, which is made on the basis of ESP 8266. It allows you to upload firmware and eat directly via USB, which is beautiful in prototyping. You can write for it in C and Lua. Leaving aside our love for scripting languages in general, and for Lua in particular, we chose C because almost immediately found the necessary stack of libraries to implement our idea.
Well, RFID-RC522 is probably the easiest and most common card reader. The module works through SPI and has the following pinout for connecting to ESP 8266:
Talk is cheap, show me the code!
Our task is this:
- Read the card;
- If this is a batch creation key card, create a new batch in Firebase;
- If this is a game card, then get the card and send it to Firebase (create a new turn);
- Blink light bulb.
Scanner
Used library MFRC522. Interaction with the scanner goes through SPI:
<code>void Scanner::init() { SPI.begin(); // SPI rc522->PCD_Init(); // rc522->PCD_SetAntennaGain(rc522->RxGain_max); // } String Scanner::readCard() { // if(rc522->PICC_IsNewCardPresent() && rc522->PICC_ReadCardSerial()) { // XX:XX String uid = ""; int uidSize = rc522->uid.size; for (byte i = 0; i < uidSize; i++) { if(i > 0) uid = uid + ":"; if(rc522->uid.uidByte[i] < 0x10) uid = uid + "0"; uid = uid + String(rc522->uid.uidByte[i], HEX); } return uid; } return ""; } Firebase
For Firebase there is a wonderful library FirebaseArduino, which out of the box allows you to send data and track events. Supports the creation and sending of Json requests.
Interaction with Firebase turned out well, very simple and can be briefly described in two lines:
Firebase.setInt("battles/" + battleId + "/states/" + player + "/hp", 50); if(firebaseFailed()) return; Where firebaseFailed () is:
int Cloud::firebaseFailed() { if (Firebase.failed()) { digitalWrite(ERROR_PIN, HIGH); // Serial.print("setting or getting failed:"); Serial.println(Firebase.error()); // delay(1000); digitalWrite(ERROR_PIN, LOW); // return 1; } return 0; } Json request can be sent as follows:
StaticJsonBuffer<200> jsonBuffer; JsonObject& turn = jsonBuffer.createObject(); turn["card"] = cardUid; turn["target"] = player; Firebase.set("battles/" + battleId + "/turns/" + turnNumber, turn); if(firebaseFailed()) return 1; That's basically all that we needed from the “iron part”. We initially wanted to abstract from it as much as possible, and on the whole we succeeded. Since writing the first firmware, it has changed only once, and only slightly.
Now, about the specially trained Firebase functions.
This is a piece of the base where the moves of the current game are stored. In each course, it is indicated what card was played and which player it was directed at. If we want something to happen during the new move, we write a Firebase function that will track changes at the “turns” node:
exports.newTurn = functions.database.ref('/battles/{battleId}/turns/{turnId}').onWrite(event => { // , if (event.data.previous.val()) return; // admin.database().ref('/battles/' + event.params.battleId + '/turns').once('value') .then(function(snapshot) { // , var whoCasts = (snapshot.numChildren() + 1) % 2; // admin.database().ref('/battles/' + event.params.battleId + '/states').once('value') .then(function(snapshot) { var states = snapshot.val(); var castingPlayer = states[whoCasts]; var notCastingPlayer = states[(whoCasts + 1) % 2]; var targetPlayer; if (whoCasts == event.data.current.val().target) targetPlayer = castingPlayer; else targetPlayer = notCastingPlayer; // admin.database().ref('/cards/' + event.data.current.val().card).once('value') .then(function(snapshot) { var card = snapshot.val(); // castingPlayer.mana -= card.mana; // var cardEffects = card.effects; if (!targetPlayer.effects) targetPlayer.effects = []; for (var i = 0; i < cardEffects.length; i++) targetPlayer.effects.push(cardEffects[i]); // , playEffects(castingPlayer); playEffects(notCastingPlayer); // return event.data.adminRef.root.child('battles').child(event.params.battleId) .child('states').update(states); }) }) }) }); The playEffects function looks like this (yes, there is an eval, but we think that this is quite acceptable in a demo project):
function playEffects(player) { if (!player.effects) return; for (var i = 0; i < player.effects.length; i++) { var effect = player.effects[i]; if (effect.duration > 0) { eval(effect.id + '(player)'); effect.duration--; } } } Each of the effects will be something like this:
function fire_damage(targetPlayer) { targetPlayer.hp -= getRandomInt(0, 11); } It is probably worth explaining here that the players in our database are represented as follows:
That is, each of them has a name, health and mana. And if something arrives in them, then effects will also appear:
By the way, there is another task related to the effects: those that have already completed their duration should be removed. Let's write another function:
exports.effectFinished = functions.database.ref('/battles/{battleId}/states/{playerId}/effects/{effectIndex}') .onWrite(event => { effect = event.data.current.val(); if (effect.duration === 0) return event.data.adminRef.root.child('battles').child(event.params.battleId).child('states') .child(event.params.playerId).child('effects').child(event.params.effectIndex).remove(); }); And it remains to make so that all this beauty was visible on the screen of the phone.
For example, like this:
Yes exactly:
We select the game and which of the opponents to keep track of, and then we observe our stats in numbers, and the opponent's stats in a generalized form (let it be a smiley of different degrees of gaiety).
Here is the conditional scheme of the application, so that further the code is easier to read:
Reading data from Firebase on Android is simple enough: we hang the listeners on certain nodes in the database, catch DataSnapshot's and send them to the UI. This is how we will show the list of batches on the first screen (I greatly shorten the code in order to highlight only moments about receiving and displaying data):
public class MainActivity extends AppCompatActivity { // ... @Override protected void onCreate(Bundle savedInstanceState) { // ... FirebaseDatabase database = FirebaseDatabase.getInstance(); // "battles" ( , // - ) database.getReference().child("battles").addValueEventListener(new ValueEventListener() { @Override public void onDataChange(DataSnapshot battles) { final List<String> battleIds = new ArrayList<String>(); for (DataSnapshot battle : battles.getChildren()) battleIds.add(battle.getKey()); ArrayAdapter<String> adapter = new ArrayAdapter<>(MainActivity.this, android.R.layout.simple_list_item_1, battleIds.toArray(new String[battleIds.size()])); battlesList.setAdapter(adapter); battlesList.setOnItemClickListener(new AdapterView.OnItemClickListener() { @Override public void onItemClick(AdapterView<?> adapterView, View view, int i, long l) { PlayerActivity.start(MainActivity.this, battleIds.get(i)); } }); } @Override public void onCancelled(DatabaseError databaseError) { // ... } }); } } I probably will not give the markup files - everything is quite trivial.
So, we want to launch PlayerActivity when clicking on a certain party:
public class PlayerActivity extends AppCompatActivity implements ChoosePlayerFragment.OnPlayerChooseListener { // ... @Override protected void onCreate(Bundle savedInstanceState) { // ... battleId = getIntent().getExtras().getString(EXTRA_BATTLE_ID); // , if (savedInstanceState == null) getSupportFragmentManager() .beginTransaction() .replace(R.id.container, ChoosePlayerFragment.newInstance(battleId)) .commit(); } @Override public void onPlayerChoose(String playerId, String opponentId) { // - getSupportFragmentManager() .beginTransaction() .replace(R.id.container, StatsFragment.newInstance(battleId, playerId, opponentId)).addToBackStack(null) .commit(); } } ChoosePlayerFragment reads the states node for the selected batch, pulls out two opponents from there and puts their names in the buttons (for details, see the source code, links at the end of the article).
At this point, it is worthwhile to talk about StatsFragment, which tracks changes in the stats of opponents and displays them:
public class StatsFragment extends Fragment { // ... @Override public void onViewCreated(View view, @Nullable Bundle savedInstanceState) { // ... // , // addSingleValueEventListener , // database.getReference().child("settings") .addSingleValueEventListener(new ValueEventListener() { @Override public void onDataChange(DataSnapshot settings) { maxHp = Integer.parseInt(settings.child("max_hp").getValue().toString()); maxMana = Integer.parseInt(settings.child("max_mana").getValue().toString()); } // ... }); // database.getReference().child("battles").child(battleId).child("states").child(playerId) .addValueEventListener(new ValueEventListener() { @Override public void onDataChange(DataSnapshot player) { hp = player.child("hp").getValue().toString(); mana = player.child("mana").getValue().toString(); hpView.setText("HP: " + hp + "/" + maxHp); manaView.setText("MANA: " + mana + "/" + maxMana); } // ... }); // database.getReference().child("battles").child(battleId).child("states").child(opponentId) .addValueEventListener(new ValueEventListener() { @Override public void onDataChange(DataSnapshot opponent) { opponentName.setText(opponent.child("name").getValue().toString()); if (opponent.hasChild("hp") && opponent.hasChild("mana")) { int hp = Integer.parseInt(opponent.child("hp").getValue().toString()); float thidPart = maxHp / 3.0f; if (hp <= 0) { opponentView.setImageResource(R.drawable.grumpy); return; } else if (hp < thidPart) { opponentView.setImageResource(R.drawable.sad); return; } else if (hp < thidPart * 2) { opponentView.setImageResource(R.drawable.neutral); return; } opponentView.setImageResource(R.drawable.smile); } } // ... }); } } That's all the parts from which we collected our demo toy. The full source code lives on a githaba, and further ideas live in our imagination. Now we are modifying the model with a file, stumble over design and produce content. And if the idea survives, then it will surely generate some more stateek.
Source: https://habr.com/ru/post/334560/
All Articles