Beginner's Guide to Progressive Web Applications and the Frontend

Developing a web-frontend, adhering to the JavaScript ecosystem, all these newfangled features and pretentious frameworks, can be a daunting exercise, to say the least. I have long wanted to plunge into it, and finally gathered my courage. By the end of this article, I hope you will learn something new, or at least hone your web development skills a little more. What irony is that the length of the article and the vast amount of information can also scare. But I really hope that you will find time to master at least the chapters you are interested in. At the end of each section there is a paragraph TL; DR , so you can quickly navigate the content.
RESTful API
The first thing I want to talk about is the concept of a RESTful API . The term REST, or RESTful API, comes up in many conversations between web developers, and for good reason. REST (REpresentational State Transfer, View State Transfer) API and web services provide an easy way to interact with the backend architecture without having to figure out this very architecture.
Simply put, as a front-end developer, you will interact with one or more endpoints (that is, a URI ) that are part of an API located on a server, in a cluster, or some other backend that someone else has created for you. If the API is well developed, then you will receive clear and understandable documentation for querying, creating and editing resources on the backend (assuming that you are logged in), without having to write code or climb into the database lying on the mentioned backend.
RESTful APIs are very different. The most popular of them return JSON objects, which can be easily manipulated via JavaScript on the client side, which allows front-end developers to work effectively with only parts of the View and Controller MVC pattern (Model-View-Controller).
TL; DR: RESTful APIs are very popular and provide front-end developers with the ability to interact with resources on the web, focusing on developing the frontend and not worrying about architecture.
AJAX
AJAX (Asyncronous JavaScript And XML) has been around for many years, and each developer has used it one way or another in his work (most of us use jQuery). Here, I will not go deep into the AJAX device, as there are hundreds of better sources on the network, but I want to take a minute of your time just to admire the possibilities that this technology gives front-end developers.
With AJAX, we can request resources from one or more places (or locally if the page is located on the same server as the requested URI) and at any time, without slowing down web applications or the need to start drawing all the data. In fact, we can not load any content on the page, and then simply request it as soon as an empty HTML page is loaded. In conjunction with the RESTful API, an incredibly flexible, highly portable, and maintainable solution for web applications is obtained.
TL; DR: AJAX is a very powerful tool that, in combination with the RESTful API, allows you to create truly dynamic web applications that quickly load and display content from resources on the web.
Retrieving content from the web
At first, creating your first web page may seem like a rather difficult task, so we’ll go gradually. We'll start by getting content from the RESTful API using AJAX calls.
The first step is to find a high-quality API, preferably one that returns JSON. For example, here are some resources that display placeholder-content and are suitable for creating an example web application:
- JSON Placeholder is a placeholder text produced in JSON format suitable for many use cases. Very simple for beginners, perfect for filling out a mockup of a web application, something like what we will do.
- Unsplash It - placeholder-content will not be complete without images, and it is from here that they must be taken. The documentation is very clear and easy to use, so you can immediately start using it.
- Random User Generator is another high-quality resource that provides generated user profiles that can be configured to fit your needs. There are a lot of settings here, but for the purposes of the article you need quite a bit.
We will use these three resources, but you can go through the list at the end of the article in search of more interesting APIs suitable for generating placeholder content for your page.
The first thing to do before starting to write code is to visit the end point of one of the APIs and see what you will receive. Let's send a GET request to the Random User Generator , just for checking. You will get something like this:

This is called a JSON file (JavaScript Object Notation) that should look familiar to you if you have ever used objects in JavaScript. Let's request the same resource programmatically:
// 'GET'- URL callback- function httpGetAsync(url, callback) { var xmlHttp = new XMLHttpRequest(); xmlHttp.onreadystatechange = function() { if (xmlHttp.readyState == 4 && xmlHttp.status == 200) callback(xmlHttp.responseText); }; xmlHttp.open('GET', url, true); xmlHttp.send(null); } This is exactly what the given code does, which takes only 10 lines (9 without a comment). We feed the appropriate URL endpoint API and the callback function, and we will see some content. Suppose you create an empty HTML page and link the above JS code. Now just run it in the browser toolkit for developers:
httpGetAsync( 'https://randomuser.me/api/', function(e){console.log(e)} ); You will get a result similar to the previous one, only now it will be wrapped in double quotes. Naturally, this is a string value. And what is even more natural, now we can convert it to a JS object using JSON.parse() , and then use it as intended.
We just received some content from the API and brought it to the console. Before we go further, let's explore this API a little bit in order to use it more efficiently later.
In particular, I would focus on the seed and results parameters that can be embedded in our URL in order to receive the same set of users each time. To add them you just need to add a sign after the URL ? and then {parameter_name}={value} , separating the parameters with & . I think everyone knows about it, but still it was necessary to mention it. In this article, I will also use the nationalities parameter to make sure that there are no non-Latin characters in HTML that will complicate my life. From now on, my target endpoint for getting users will be this one , it will help me get the same 25 users, and everyone from the USA.
TL; DR: To start developing a web application, you need to find a high-quality JSON API. Using 10 lines of JavaScript code, you can easily request resources from the RESTful API, which give out random users, and then convert them to JavaScript objects.
View and puzzle with CSS framework
Having solved the problem of getting some content from the API, we can now draw it to show the user. But working with CSS styles and selectors can be a headache, so many resort to using the CSS framework . Bootstrap is very popular, it is well documented, has a large and pleasant community, and is rich in its capabilities. But I will use mini.css , which I developed myself and know better than Bootstrap. You can read more about this framework in my other articles.
The instructions for using the classes and framework selectors apply only to mini.css, but with very minor edits they will be true for Bootstrap (consider the presentation of the web application as your homework, because here I will not go into details about CSS).
Before we can display something on the screen, we need to create an application shell. Nothing special, just a navigation bar and a small header, well, there might still be a footer. I will use the <header> element that is already present in mini.css, but you can solve this problem as you prefer. I will also add a .drawer to the navigation .drawer , which can be replaced with some buttons, and finally, <footer> , so that the application looks clean and neat:

I’ll show a little bit of my code (after adding a user card), but first I’ll say why using the CSS framework is a good idea. Simply put, when you build for the web, there are too many test cases, and some combinations of device / OS / browser are more peculiar than others. The CSS framework works with these features on its own, although at the same time it provides you with a basic framework that will help you create a responsive application. Adaptability is extremely important in the development of mobile devices, so read more about it.
Suppose everything suits us in the application shell, let's move on to drawing the data received from the Random User Generator. I'm not going to complicate this procedure and will display for each user the name, image, nickname, mail, location and birthday. But you can come up with your own set of positions. Remember to access the .results key of your object after parsing the JSON data, because everything is wrapped in it. To make it look beautiful, I will use the wonderful Feather icon pack , as well as the .card class and some CSS tricks.
An example of an application with cards of randomly generated users.
Now our application is dynamically filled with content that we display on the screen using JavaScript and HTML. We have just created our first view (View), which is a fancy way of saying that we created a visual display of the data requested from the API.
TL; DR: Responsiveness and styles are extremely important for any web application, so it would be a good idea to use a CSS framework to create a simple HTML wrapper for the application, and then draw using JavaScript data from the API.
JavaScript libraries
Our web application layout works well, but the JavaScript code, especially the renderUsers() method, is rather confusing and looks very difficult to maintain. Fortunately, there is a good way to do everything the same, but with the help of a tool that all cool guys today use - React . If any of you have not heard about it: this is a very powerful JavaScript library, which greatly facilitates page rendering and refreshing, while at the same time increasing the speed of its work using a virtual DOM and a technique known as diffing. The network has a bunch of explanatory publications on this subject.
Converting our code into React is not difficult. In fact, you only need to take a loop out of the drawing process, so that you can retrieve a function that draws one user at a time , and then iterate over our array of users, drawing them as before. Here are a few React-specific moments, like the fact that the name of our new function must begin with a capital letter, we must pass it a single props argument, and items from the list must be tied to keys . It sounds cumbersome, but in fact it is not at all difficult to observe.
React also allows you to use JSX , so we can write HTML inside JavaScript without having to wrap it in quotes. So our code can be a little cleaner. However, remember that you have to do some conversion, for example from class to className . But over time, you get used to it, and debugging messages in the console really help a lot in solving such problems.
I also took the liberty to transform the three inline SVGs into their own functions, so now the whole rendering process looks like this :
// . function SvgMail(props){ return <svg xmlns="http://www.w3.org/2000/svg" width="24" height="24" viewBox="0 0 24 24" fill="none" stroke="#424242" strokeWidth="2" strokeLinecap="round" strokeLinejoin="round"><path d="M4 4h16c1.1 0 2 .9 2 2v12c0 1.1-.9 2-2 2H4c-1.1 0-2-.9-2-2V6c0-1.1.9-2 2-2z"></path><polyline points="22,6 12,13 2,6"></polyline></svg>; } // . function SvgCalendar(props){ return <svg xmlns="http://www.w3.org/2000/svg" width="24" height="24" viewBox="0 0 24 24" fill="none" stroke="#424242" strokeWidth="2" strokeLinecap="round" strokeLinejoin="round"><rect x="3" y="4" width="18" height="18" rx="2" ry="2"></rect><line x1="16" y1="2" x2="16" y2="6"></line><line x1="8" y1="2" x2="8" y2="6"></line><line x1="3" y1="10" x2="21" y2="10"></line></svg>; } // . function SvgMapPin(props){ return <svg xmlns="http://www.w3.org/2000/svg" width="24" height="24" viewBox="0 0 24 24" fill="none" stroke="#424242" strokeWidth="2" strokeLinecap="round" strokeLinejoin="round"><path d="M21 10c0 7-9 13-9 13s-9-6-9-13a9 9 0 0 1 18 0z"></path><circle cx="12" cy="10" r="3"></circle></svg>; } // . function UserCard(props){ var user = props.user; return <div className="col-md-offset-1 col-lg-offset-2"> <div className="card fluid" id={"user_"+user.login.username}> <div className="section row"> <div className="col-sm-2 col-md-1"> <img src={user.picture.medium} alt={user.login.username} className="user-image" /> </div> <div className="col-sm"> <h4 className="user-name">{user.name.title} {user.name.first} {user.name.last} <small>{user.login.username}</small> </h4> </div> </div> <div className="section"> <p className="user-email"> <SvgMail /> {user.email}</p> </div> <div className="section"> <p className="user-birth"> <SvgCalendar /> {user.dob.split(" ")[0].split("-").reverse().join("/")}</p> </div> <div className="section"> <p className="user-location"> <SvgMapPin /> {user.location.city}, {user.location.state}</p> </div> </div> </div>; } // . function renderUsers(){ var userCards = users.map( function(user, key){ return <UserCard user={user} key={key}/>; } ); ReactDOM.render( <div>{userCards}</div> ,contentArea); } We simply extracted a functional component from the previous code, making it a reusable entity. It’s worth looking at what happens under the hood when Babel transforms the HTML provided by the calls to React.createElement() :
function SvgMapPin(props) { return React.createElement( 'svg', { xmlns: 'http://www.w3.org/2000/svg', width: '24', height: '24', viewBox: '0 0 24 24', fill: 'none', stroke: '#424242', strokeWidth: '2', strokeLinecap: 'round', strokeLinejoin: 'round' }, React.createElement('path', { d: 'M21 10c0 7-9 13-9 13s-9-6-9-13a9 9 0 0 1 18 0z' }), React.createElement('circle', { cx: '12', cy: '10', r: '3' }) ); } On the other hand, if you want to start with a lighter version of React, without JSX and some more fancy and complicated things, then I highly recommend turning to Preact , because it is a great alternative that can reduce download time by one or two seconds.
TL; DR: Transforming unstructured HTML rendering calls into functional components using React is a simple task and the result is much easier to maintain. At the same time, the developer gets more control over his code, and the degree of reuse increases.
Add a second view (view)
In most web applications, there is more than one view, so that’s what we’ll do. We will use the other two APIs mentioned at the beginning to create a second view that dynamically fills up and contains text and images when the page reloads every time new ones. If you read carefully, then do it without prompts, but I will outline the course of action:
- We will send a GET request to
https://jsonplaceholder.typicode.com/comments?postId={id}, which will allow you to get 5 text segments at a time in JSON format, incrementing{id}. - We will also send GET requests to
https://unsplash.it/800/800?image={id}, at the same time we will receive some kind of picture. To do this, use the code that will generate random{id}for each request. In my Codepen-example, I also added an array of incorrect values{id}, which I extracted from the API, so that we will not have a single answer without an image. - After performing both requests, we will create a card for each post, randomly assigning the user from the list as the author, and then draw it using React.
- Also add a button to switch between two views to be able to go to the list of users. I'll add it to the drop down menu, but you can do it to your taste.
After careful coding of the above mentioned and subsequent improvement, you will get something similar to the Singe Page Application (SPA) : https://codepen.io/chalarangelo/pen/zzXzBv
TL; DR: To make your layout look like a real web application, just add a second presentation and some interactive elements.
Downloading more content.
If you have already been involved in web development, you will immediately notice what is missing in our application: endless scrolling . Its essence: when you scroll down to a certain boundary, a new portion of content is loaded, and this happens until the content runs out. In our example, we will set the boundary to 80%, but you can adjust this parameter. To do this, we need a very simple method that calculates the page scroll fraction.
// . function getScrollPercent() { return ( (document.documentElement.scrollTop || document.body.scrollTop) / ( (document.documentElement.scrollHeight || document.body.scrollHeight) - document.documentElement.clientHeight) * 100); } The method counts all cases and returns a value in the range [0,100] (inclusive). If you scroll and resize events on the window , you can be sure that when the user reaches the end of the page, more content will be loaded. This is what our web application looks like after adding an infinite scroll to the post view.
TL; DR: Infinite scrolling is the main feature of any modern web application. It is easy to implement and allows you to dynamically load content as needed.
Note: If you read everything and follow all the recommendations, take a 10-minute break, because the next few chapters are quite complex and require more effort.
Web Application Manifest
Before we can say that we really made a web application (not to mention a progressive web application), we need to work with the file manifest.json , which consists of a heap of properties of our application, including name , short_name , icons . The manifest provides the client browser with information about our web application. But before we do it, we need to use npm and the React settings to raise the application and run it on localhost. I believe that you are already familiar with both things and will not encounter difficulties, therefore we proceed to the manifesto.
In my experience, to get a working application, you need to fill in so many fields that I suggest using the Web App Manifest Generator and fill in what you want. If you have time to make a neat icon, then the Favicon & App Icon Generator will help you with this.
Once done, your manifest will look like this:
{ "name": "Mockup Progressive Web App", "short_name": "Mock PWA", "description": "A mock progressive web app built with React and mini.css.", "lang": "en-US", "start_url": "./index.html", "display": "standalone", "theme_color": "#1a237e", "icons": [ { "src": "\/android-icon-48x48.png", "sizes": "48x48", "type": "image\/png", "density": "1.0" }, { "src": "\/android-icon-72x72.png", "sizes": "72x72", "type": "image\/png", "density": "1.5" } ] } By creating a manifest, we “polished” our web application, making its behavior as it should. But this is only the beginning of the way to turn our web application into a progressive one.
TL; DR: The manifest.json file is used to define specific properties of a web application, paving the way for us to create a progressive web application.
Service Workers
The final step is to create service workers. This is one of the key requirements for a progressive web application in order for it to work autonomously to some extent. Although service workers have been used for a long time, the documentation for them looks still too technical and complicated. But lately, this trend has begun to change. If you want to read more about progressive web applications and service workers, refer to the sources at the end of the article.
We will create the simplest version of the service worker, allowing you to cache responses to requests, passing them as they become available. First, create a file service-worker.js , which will be our service worker.
Now let's deal with three main events with which we will have to work:
installgenerated at the first boot and is used to perform the initial installation of the service worker, such as setting up offline caches.activategenerated after registration of the service worker and its successful installation.fetchgenerated on every AJAX request sent over the network and can be used to serve cached resources (especially useful when there is no network).
The first thing we need to do during the installation is to use the CacheStorage Web API to create a cache for the web application and store any static content (icons, HTML, CSS, and JS files). It is very easy to do:
// caches — , CacheStorage caches.open(cacheName).then(function(cache) { // - }); // : https://developer.mozilla.org/en-US/docs/Web/API/CacheStorage/open You can quickly create a simple install event handler that caches our index.html , JavaScript file, and manifest.json . But first you need to set the name of the cache. This will allow us to separate the versions of the same files or data from the application shell. Here we will not go into details regarding the caches, but at the end of the article there are useful links. In addition to the cache name, you need to determine which files will be cached using an array. Here is the install handler:
var cacheName = 'mockApp-v1.0.0'; var filesToCache = [ './', './index.html', './manifest.json', './static/js/bundle.js' ]; self.addEventListener('install', function(e) { e.waitUntil(caches.open(cacheName) .then(function(cache) { return cache.addAll(filesToCache) .then(function() { self.skipWaiting(); }); })); }); In less than 20 lines, we made our web application use a cache for its resources. Let me explain one thing. During development, our JS code is compiled into a ./static/js/bundle.js file. This is one of the quirks of our development / production-environment, and we will deal with it in the next step.
The activate handler is also pretty simple. Its main task is to update cached files when something changes in the application shell. If we need to update any files, we will have to change the cacheName (preferably in the style of SemVer ). Finally, the fetch handler checks whether the requested resource is stored in the cache. If it is there, it will be transferred from the cache. Otherwise, the resource will be requested as usual, and the answer will be stored in the cache so that it can be used in the future. Putting it all together:
self.addEventListener('activate', function(e) { e.waitUntil(caches.keys() .then(function(keyList) { return Promise.all(keyList.map(function(key) { if (key !== cacheName) return caches.delete(key); })); })); return self.clients.claim(); }); self.addEventListener('fetch', function(e) { e.respondWith(caches.match(e.request) .then(function(response) { return response || fetch(e.request) .then(function (resp){ return caches.open(cacheName) .then(function(cache){ cache.put(e.request, resp.clone()); return resp; }) }).catch(function(event){ console.log('Error fetching data!'); }) }) ); }); We built a service worker, but it needs to be registered from inside the web application to take advantage of it. Just add a few lines of code to our main JS file, and we are ready to turn our web application into a progressive one:
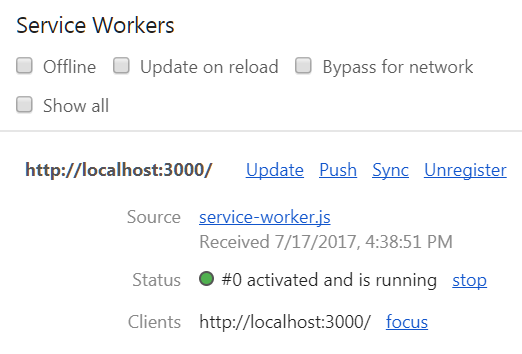
if ('serviceWorker' in navigator) { navigator.serviceWorker .register('./service-worker.js') .then(function() { console.log('Registered service worker!'); }); } After all the settings, open the Application window in Chrome Dev Tools and see if everything works as it should. The service worker must register correctly, activate and start. If you scroll down, check the Offline box and update, then the offline version of the page will start working, using cached resources.
- , . production.
TL;DR: - - , - .
production
, , localhost, production- npm run build , . , / HTML-. package.json :
"homepage" : "." HTML- , . "homepage" , , . , .
: - JS-, static/js/bundle.js . , , JS main.{hash}.js , {hash} . - main.js . , , index.html, . npm — renamer replace . service-worker.js , , public, uglify-js .
npm install --save-dev renamer npm install --save-dev replace npm install --save-dev uglify-js , . , , "scripts" package.json .
"scripts": { "start": "react-scripts start", "build": "react-scripts build && npm run build-rename-replace && npm run build-sw", "test": "react-scripts test --env=jsdom", "eject": "react-scripts eject", "build-sw" : "npm run build-replace-sw-refs && npm run build-minify-sw", "build-rename-replace": "npm run build-rename && npm run build-replace", "build-rename": "npm run build-rename-js && npm run build-rename-css", "build-rename-js": "renamer --regex --find main\\.\\w+\\.js --replace main.js build/static/js/*.js", "build-rename-css": "renamer --regex --find main\\.\\w+\\.css --replace main.css build/static/css/*.css", "build-replace": "npm run build-replace-js && npm run build-replace-css", "build-replace-js": "replace main\\.\\w+\\.js main.js build/index.html", "build-replace-css": "replace main\\.\\w+\\.css main.css build/index.html", "build-replace-sw-refs": "replace './static/js/bundle.js' './static/js/main.js','./static/css/main.css' build/service-worker.js", "build-minify-sw" : "uglifyjs build/service-worker.js --output build/service-worker.js" } , :
build-rename, JavaScript- CSS-, (main.jsmain.css).build-replace, JavaScript- CSS- .build-rename-replace.build-sw-static/js/bundle.js,main.js,main.css. -.- ,
build,build.
npm run build production -, , build .
TL;DR: - production , . .
, - production. , - Github, Lighthouse , .
development- localhost , , , alt , rel="noopener" , - (landmark region), HTML- <main> . , , Lighthouse:
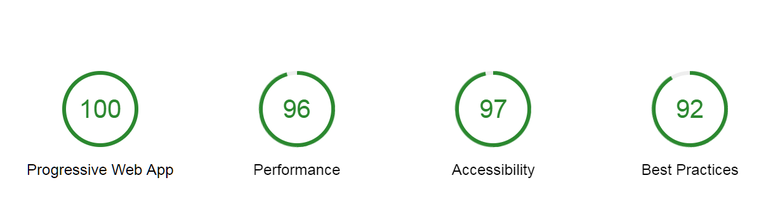
, . Github. ; . Online/Offline, . !


TL;DR: -, Lighthouse , .
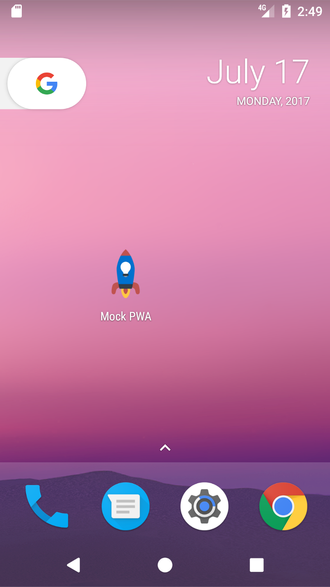
-. , - . !
Links
- MDN's Getting started with AJAX — , AJAX -.
- JSON API, :
UI Names — .
Robohash — . placeholder-.
Adorable Avatars — . , Robohash, . - CSS- , Bootstrap , Semantic UI , Bulma Foundation . , mini.css , - .
- UI- FontAwesome , Feather , .
- diffing DOM, .
- JavaScript-, React . Preact VueJS , , .
- - MDN Google Developers . Web App Manifest Generator, manifest.json.
- - -, , . - . , Indicating Offline ( Online/Offline-) Offline Recipes for Service Workers .
- CacheStorage Web API , MDN .
- - , Lighthouse Mobile Speed Test .
- , Github.
')
Source: https://habr.com/ru/post/334536/
All Articles