Working with databases in the 3CX Call Flow Designer development environment
Introduction
In this article we will explain how to query SQL Server database from 3CX Call Flow Designer using Database Access. Note that the Database Access component can also work with the PostgreSQL database, which is used by 3CX Phone System.
The demo project of this voice application comes with the 3CX CFD distribution and is located in the Documents \ 3CX Call Flow Designer Demos folder. If you want to use it - just specify the location of your database and access credentials.
Our voice application will request the user PIN (it can be a client number, insurance policy, etc.), checks it in the database and transfers it to the specified extension number (it can be a service employee, a voice menu prepared in advance or another voice application ) if pin is found.
')
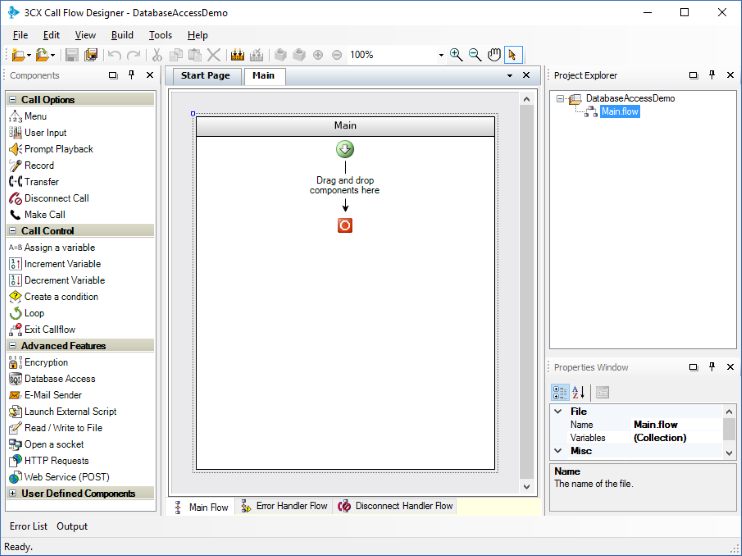
Project creation
To create a CFD project, go to File → New → Project , specify the folder where the project is located and its name, for example, DatabaseAccessDemo .
Request PIN from user
User PIN is requested using the User Input component. Add the component to the voice application:
- Drag the User Input component from the component set on the left to the main application screen. Select the component and in the Properties window rename it to requestPIN .
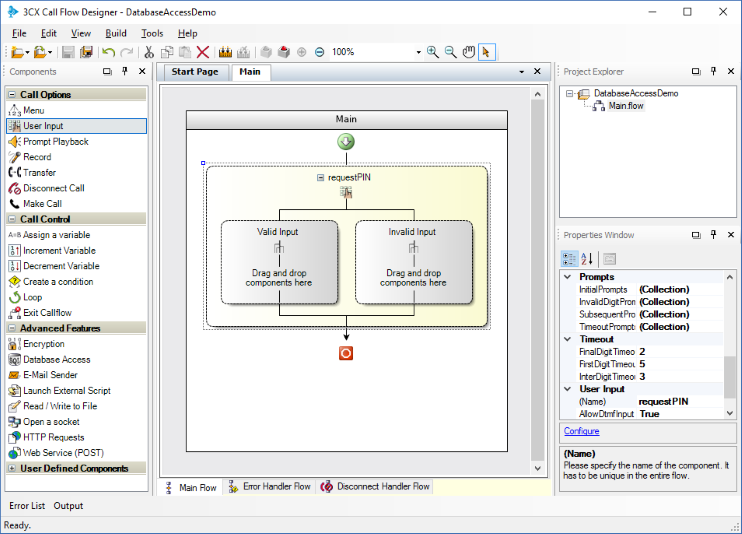
- Double-click on the component to open the configuration window, and set the following properties:
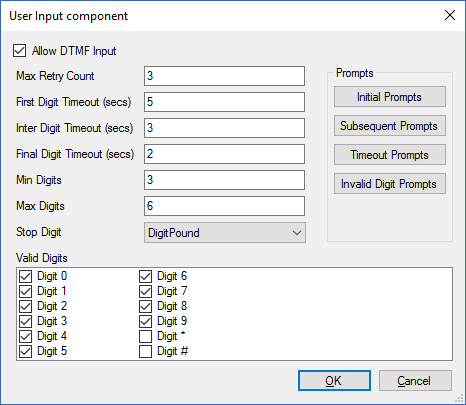
- Initial Prompts - specify a WAV file in which the user will be asked for a PIN, for example, “Enter your personal identification number”. WAV file format: PCM, 8 kHz, 16 bit, Mono.
- Subsequent Prompts - specify a WAV file with more detailed explanations of the entry. It is played only if the user has made an incorrect input or has not entered anything at all. For example, “Enter your personal identification number. Numbers from 0 to 9 and length from 3 to 6 digits are allowed. ”
- Timeout Prompts - enter a WAV file with a warning that nothing has been entered, for example, “Sorry, we did not receive input from you”.
- Invalid Digit Prompts - enter a WAV file with a warning about an incorrect one (too few digits or they are invalid), for example, “Unfortunately, you entered a PIN incorrectly”.
- Configure the remaining options as shown below and click OK to save.
Validation of the entered PIN in the database
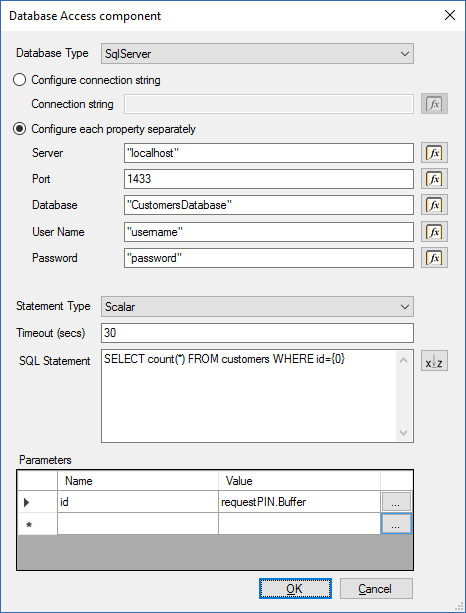
After receiving the PIN from the user, it should be checked in the database. To do this, add the Database Access component to the branch of the Valid Input component, assuming the correct input. Rename the component to validatePIN and double click on it to set the properties:
- Database Type - select SqlServer .
- Configure each property separately - select this option to specify connection parameters separately. However, you can also specify a database connection string .
- Server - the name or IP address of the database server. This field can also be an expression, so if you specify a constant, put it in quotes .
- Port - the port of the SQL server. When using the standard port number, this field can be left blank.
- User Name and Password - database connection credentials. Values are also variable.
- Statement Type - specify Scalar , since you only need to get one value from the database - the number of user records with this PIN.
- Timeout - leave the default 30 seconds. or change, if necessary.
- SQL Statement - this field indicates the database query string. But first, we add a parameter to the Parameters section, which is used in the query string. The parameter is a PIN entered by the user.
- id is the variable name, requestPIN.Buffer is the value, i.e. input buffer in the User Input component (which we previously called requestPIN )
Now enter the query string to the database. Use the small button to the right of the input box to insert the value of the id variable . Our line has the form:
SELECT count (*) FROM customers WHERE id = {0} The properties of the Database Access component should look like this:
Checking the result of an SQL query and choosing further actions
After configuring the Database Access component, we proceed to the PIN verification. To do this, add the Create a Condition component with two conditions (branches) - successful and unsuccessful validation.
Drag the component from the left side and rename it to validateDatabaseResult . Rename the branch to success and error . The development environment window should look like this:
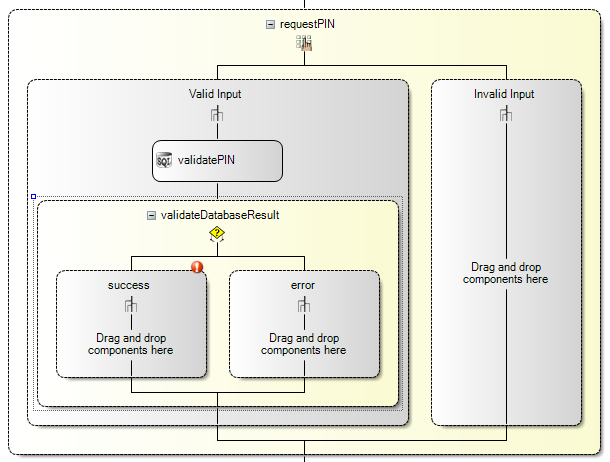
In order for the success branch to be executed, the database request must return 1, which means that a client with such a PIN code was found (one record was found). To do this manually or using the expression constructor, we introduce a conditional operator:
EQUAL (validatePIN.ScalarResult, 1)

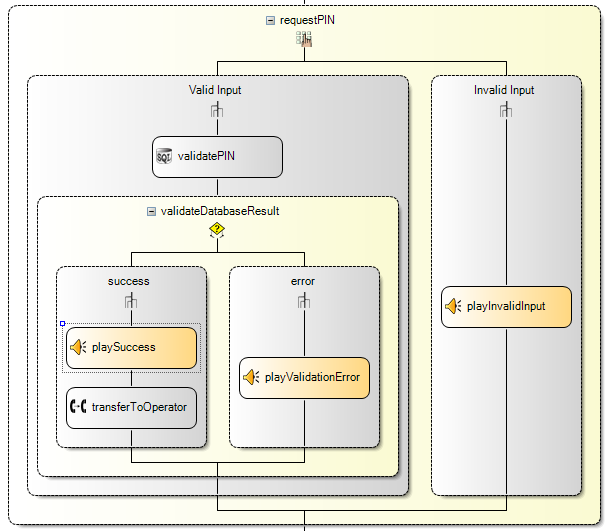
After you have specified the conditions for the success branch, add the Prompt Playback components for all possible voice application branches: PIN found, PIN not found, and the PIN is not entered correctly the allowed number of times (we have User Retract Max Retry Count = 3 ). In the parameters of the components, specify the appropriate WAV notification file.
After that, add the Transfer component to the success branch, which will transfer the call to the employee. The voice application will look something like this:
Compiling and installing the application on the 3CX server
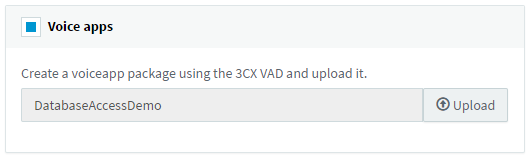
Voice application is ready! Now it should be compiled and uploaded to the 3CX server. For this:
- Go to Build> Build All , and the CFD will create a DatabaseAccessDemo.tcxvoiceapp file.
- Go to the 3CX management interface, in the Call Queues section. Create a new Call Queue, specify the name and extension number of the Queue, and then set the Voice Applications option and download the compiled file .
- Save your changes to the Call Queue. Voice application is ready to use.
You can check the operation of the application by calling the Queue extension number and entering the PIN for verification. If it is found in the database, the call will be transferred to the operator.
Downloads and Documentation
Source: https://habr.com/ru/post/334472/
All Articles