How to keep track of identified flying objects with the Raspberry Pi
Did you know that with the help of the Raspberry Pi you can follow the identified flying objects? You can tune in to the radio signals of the aircraft at a distance of up to 400 km from you and track all flights. To do this, you just need to find a cheap USB TV and a couple of free minutes.
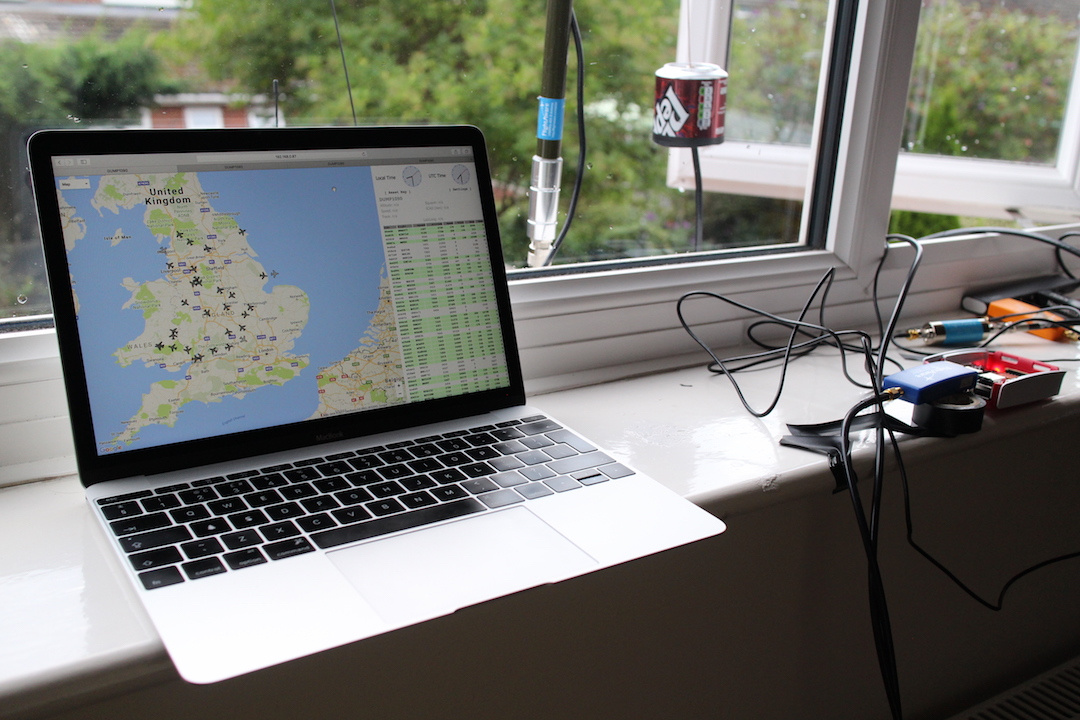
Image: dump1090 - I'm testing a FlightAware antenna against a quarter-wave flexible antenna and a antenna from a can.
In this article you will find a brief introduction to tracking flights: an overview of software, hardware, and - most importantly - the necessary terminology and slang expressions. I will also show how Docker and containerization technology will help manage the software in IoT projects.
On sites like FlightAware.com, you can track tens of thousands of airplanes with crowdsourcing: the task is performed by people around the world using their Raspberry Pi computers (issue price $ 35) and cheap USB TV tuners.
You can monitor flights solely for personal use, or you can make your little contribution on sites such as FlightAware.com , FlightRadar24 and PlaneFinder.net and receive detailed indicators in return - radar data and other nishtyaki.

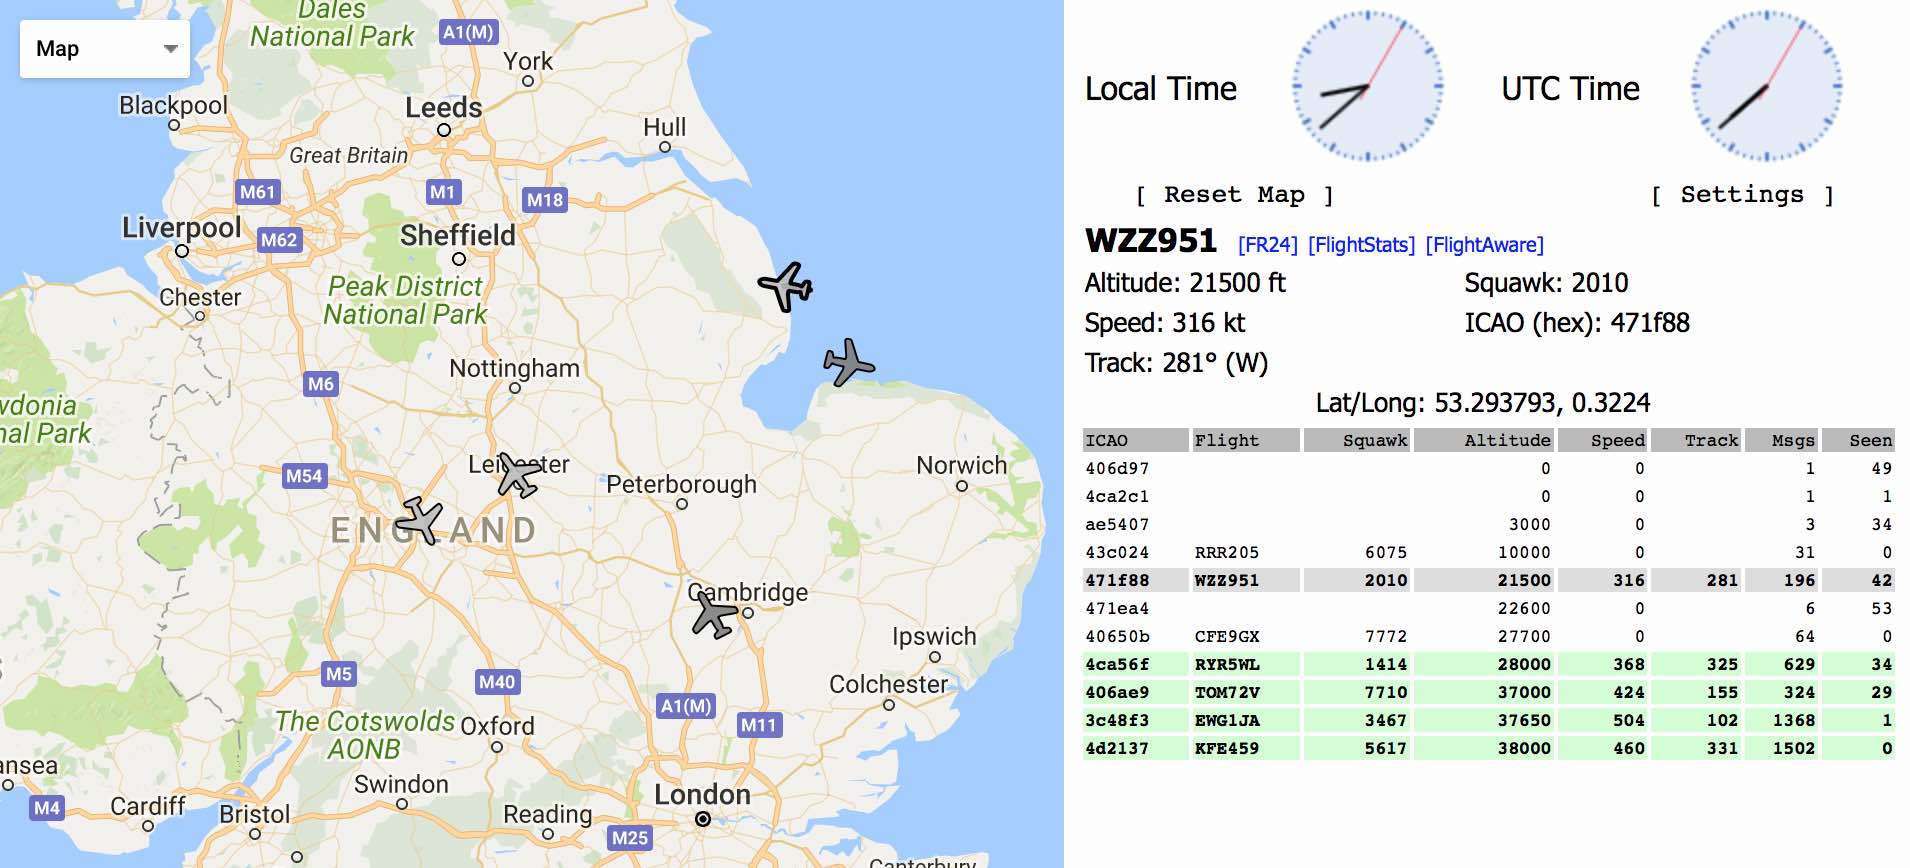
Image: FlightRadar shows airplanes in UK airspace.
Why track flights?
Here are a few reasons:
- This is a super-cheap application that you can put into practice for your old Raspberry Pi in a dusty pantry.
- You can become a local leader in tracking flights, if you transfer this information to the online trackers.
- You can collect detailed statistics and choose the best antenna and the place where to place it.
- You can not only collect data for your software projects, but at the same time learn a lot of interesting things about aviation.
And most importantly - it's just a fun project that you can crank with your Pi and get instant satisfaction from each piece. In this case, the cost of it tends to zero.
What we need
Raspberry Pi, SD card with Raspbian Lite
Better use Raspberry Pi 2 or 3, because they have more memory and they are better suited for multitasking.
- If you are trying to install multiple receivers and save money, then Pi Zero is also quite suitable.
USB TV Tuner - issue price from 8 to 30 dollars.
- ModMyPi FlightAware Pro Stick is the coolest option with a built-in noise filter, SMA connector. The antenna at 1090 MHz must be purchased separately.
- Generic DVB-T USB tuner from Pimoroni - they sent me a sample for testing. It works well, the chipset is correct, but the telescopic antenna must be installed in the smallest slot.
- NESDR Smart Premium SDR - includes 3 antennas, a thick SMA cable and a built-in noise filter for the urban environment.
- If you want to save, then eBay is full of much cheaper options, but when choosing, be careful: the device should work on the R820T chipset.
If you need a result, it is better to buy equipment (DVB-T sticks) of famous brands. The above links are not PR for affiliate program.
- Antennas
Most DVB-T tuners come with antennas that catch TV signals on land rather than the ADS-B signals we need at a frequency of 1090 MHz.
If you need a 1090 MHz antenna, you can buy a home version of 3 dBi with the SMA function. The antenna, which I tested, caught flights at a distance of 240 km, if it was put on the window sill.
FlightAware antenna caught the signal in the built-up area even steeper, at a distance of over 400 km, when I hung it out the window. They say the results will be even steeper if you place it on the roof.
- You will also need a 2.5-3 Ampere power source to be enough for the Pi and TV tuner for sure. You can find something on the official site of Pimoroni , the supplier of power supplies.
On the ModMyPi website you can also buy all the necessary kit in one bottle.
Glossary
So, our goal is to set up a USB TV tuner so that it catches ADS-B broadcasts of flights in a given range. To begin with, let's define some definitions and terms from the field of tracking flights.
ADS-B
On board modern aircraft, there are automatic transponders that collect information from navigation instruments and transmit it to the environment via ADS-B. This information is not encrypted, so anyone can pick it up - that the dispatcher, that the other plane, that the owner of the Raspberry Pi.
ADS-B (Automatic dependent surveillance-broadcast) is a technology that allows both pilots in the cockpit and air traffic controllers at the ground station to observe the movement of aircraft with greater accuracy than it was previously available and to receive aeronautical information. Source - Wikipedia .
DVB-T
The TV tuner we need is called DVB-T, which stands for Digital Video Broadcasting - Terrestrial. This is the European standard for terrestrial digital television. This device can also be used as a TV antenna to watch your favorite TV shows. Not all DVB-T devices can be configured for air signals, so it’s better to choose one of the recommended ones or you should carefully study the characteristics yourself before purchasing.
SMA antenna connector
Wikipedia: sub-miniature version A. Such connectors are smaller than coaxial ones and usually have premium or targeted DVB-T. Cheap DVB-T will most likely have a small connector. Pighetyle can be bought on eBay or at any electronics store. He will need to combine any large antenna connectors - coaxial, SMA or RF.
dump1090
The key component for decoding ADS-B signals is the software dump1090. This number means the frequency at which we work, and dump, the command it performs, decrypts and dumps the raw data.
The dump1090 application is an open-source project that has several forks thanks to different people who contributed new and improved old features. Choosing the right fork can be quite difficult.
I recreated the history of this application from GitHub:
- Antirez launched a project in 2012 on Christmas holidays
- MalcolmRobb took over - launched a new fork in the code and improved some features
- Mutability launched fork from MalcomRobb
- FlightAware also supports fork from the mutability repository.
We will use Docker to build the code, but if you wish, you can also run commands separately in the terminal. Here are some reasons why you should use Docker containers:
- Playable build scripts
- Provides a robust code builder, much more convenient than the README pages.
- Allow you to switch between different versions of the code.
- Directly on our Pi, nothing is put, so the device remains in its original form
- Allow to share an image with friends who have a Pi
Most versions of dump1090 also have a web interface where you can see planes in a specific range in real time.
FlightAware
FlightAware is one of several aggregator sites that collect data from the dump1090 program. With the help of virtual radar visualization, you can collect detailed statistics on the flights that you helped track and find out what range you were working with.
Here are my results that I saw in my profile. I used a dedicated antenna and a DVB-T tuner with noise isolation.
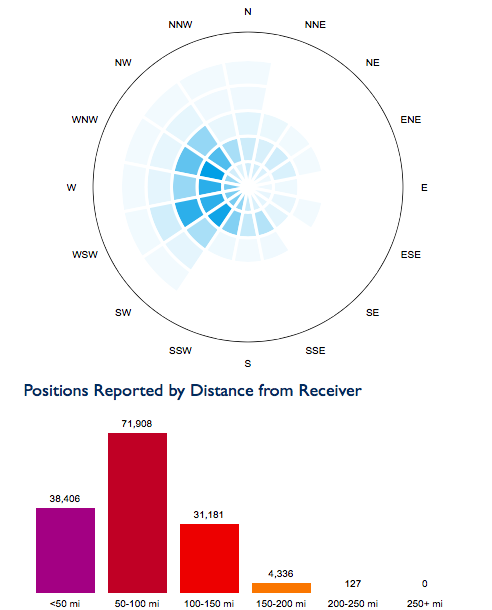
You can also view my FlightAware profile for more data.
MLAT
MLAT (abb. Multilateration) is a technology in which a number of ground stations can be used to track aircraft that do not transmit ADS-B data. You can read more in the article on the FlightAware website .
It is based on an estimate of the difference in arrival times of signals: it should work out of the box, and therefore allows you to track much more flights than you could with ADS-B alone.
Software installation
- We put Docker.
We will use the Docker image to get reproducible builds of various components that we need, and at the same time keep all additional binaries outside the host file system. - Clone the GitHub repository:
$ git clone https://github.com/alexellis/eyes-in-the-sky - We put in the blacklist USB TV stick
In order for dump1090 to access the USB TV stick, we need to add its kernel module to the blacklist.
Add this line to /etc/modprobe.d/blacklist.conf:blacklist dvb_usb_rtl28xxu
Now reboot.
Dump1090 decoder
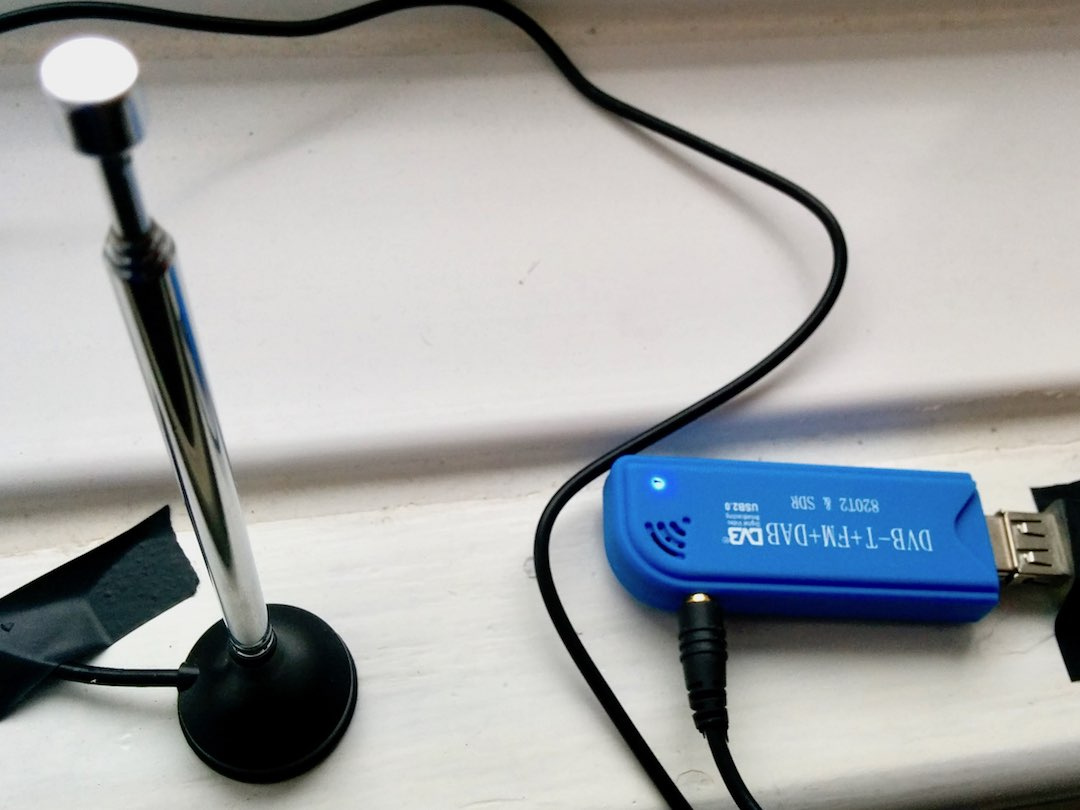
Image: testing DVB-T from Pimoroni, attached to Pi Zero and left at home with relatives.
- Build the image dump1090
If you want to enter your position (latitude and longitude), then edit the last line in Dockerfile.malcolmrobb, which starts with CMD. You can determine your position on Google Maps.$ cd eyes-in-the-sky/dump1090 $ docker build -t alexellis2/dump1090:malcomrobb . -f Dockerfile.malcolmrobb
'-t' - sets the name of the image for future use.
-f - allows you to select a Dockerfile with a custom name. I also set a name for fork mutability.
Docker allows you to share your images with anyone using the push command, which uploads them to the Docker Hub. To download dump1090 without building a code from scratch, execute the command:
$ docker pull alexellis2/dump1090:malcolmrobb - Test dump1090 image
Now you can potestit.
$ docker rm -f 1090 # remove any old container $ docker run --privileged -p 8080:8080 -p 30005:30005 -p 30003:30003 --privileged --name 1090 -d alexellis2/dump1090:malcomrobb The docker run is responsible for running our code. To stop the code later, use docker rm -f 1090 , and if you have restarted Pi, restart 1090 .
With -p Docker determines which ports need to be opened from the container. You can run two copies of the code dump1090, if you change the port number and the name of the container.
With -d container is moved to the background as a daemon, so if you want to see console output, just write 'docker logs --tail 20 -f 1090'
Example logs:

If you know the IP address of your Raspberry Pi, then you can open it in the embedded page: http://192.168.0.10:8080/
To find out the IP address, write ifconfig .
Now you can log into your Pi from anywhere and see the flights in your area, as well as how good your range is in this location.
Hint for advanced: launch without privileges
If you do not want to run the container with privileges, then you can find out the USB device ID, and then replace --privileged with --device=/dev/bus/usb/001/004 , for example.
For your case, you should replace the last digits, i.e. 004 in my example. You can get the required numbers using the lsusb command:
$ lsusb Bus 001 Device 004: ID 0bda:2838 Realtek Semiconductor Corp. RTL2838 DVB-T Install FlightAware
There are several flight tracking sites, I started with FlightAware. Their software connects to your dump1090 code and sends data to their servers, where you can already compare statistics and compare your data with other participants.
You can install the .deb file directly to your Pi, but I created a separate Dockerfile. It has two advantages: you can run two or more copies of the software and switch between versions without flashing Pi.
Next, build the image using the following command or download the image using docker pull alexellis2/flightaware:3.5.0 :
$ cd eyes-in-the-sky/flightaware $ docker build -t alexellis2/flightaware:3.5.0 . Pay attention to the point at the end of the line, do not miss it.
Now we register at FlightAware.com and set the username and password.
Edit the piaware.conf file, replace the following fields:
- receiver-host (use your Pi's IP address)
- flightaware-user
- Flightaware-password (use the data you provided during registration)
FlightAware has a cool feature that allows you to track your Raspberry Pi by MAC address. Fortunately, Docker allows you to substitute MAC addresses, and therefore we can run multiple copies of the software. If you do, just change the MAC so that it is unique for each copy.
Now run the image and see the logs:
$ cd eyes-in-the-sky/flightaware $ docker rm -f piaware_1 $ docker run --mac-address 02:42:ac:11:00:01 -v `pwd`/piaware.conf:/etc/piaware.conf --name piaware_1 -d alexellis2/piaware:3.5.0 Look at the logs and press Control + C at any time.
$ docker logs --tail 20 -f piaware_1
Your Pi will appear on the site in a few minutes.
Answers on questions
What will be the consumption of electricity?
Pi Zero or 2/3 consumes 2-3 Watts during idle time. The dump1090 application uses the Pi processor, up to 50% of its capacity at Zero, so keep in mind that additional electricity will be consumed for the load and USB DVB-T.Is it possible to crank the operation with a USB battery?
Yes, for a limited time. The battery, which I usually had for 3 days, went away in 3 hours, when I used it to track flights.Is it possible to use solar energy?
Solar energy may not be the right decision. Raspberry Pi will not work reliably directly from a solar panel. You will need complex equipment, including a charge controller, solar panels of adequate size and batteries, which should be enough for several days.
It is better to connect Pi via Power over Ethernet with a waterproof case. Here is a list of necessary details .Is there a boxed solution - image or ISO?
You can find a complete image on the SD card on the FlightAware website, but if you build a system of modular components, then you will have an advantage over any other software developed under dump1090.- Will there be a detailed review on any equipment?
Wait for the next post about the results that I received with the help of different antennas and tuners.

Image: testing antennas - antenna from a can, FlightAware, 2x 1090 MHz.
Additional materials
You might also like the following blogs and articles about what you can do with Raspberry Pi and Docker:
- Hands-on Docker for Raspberry Pi - video tutorial, includes equipment manual
- Deep Dive - Docker Swarm Clustering on the Pi - live footage
- Create a hardened Raspberry Pi NAS - in-depth guide
')
Source: https://habr.com/ru/post/334360/
All Articles