Work with servlets for dummies. GET / POST
In the last article, Creating Servlets for Dummies. I described the walkthrough how to create servlets and tried to explain how it works. In this article, we will teach our servlets to work with UI via HTTP GET and POST requests.
In fact, these requests are much more , but for the purity of the experiment, we analyze only two main ones.
')
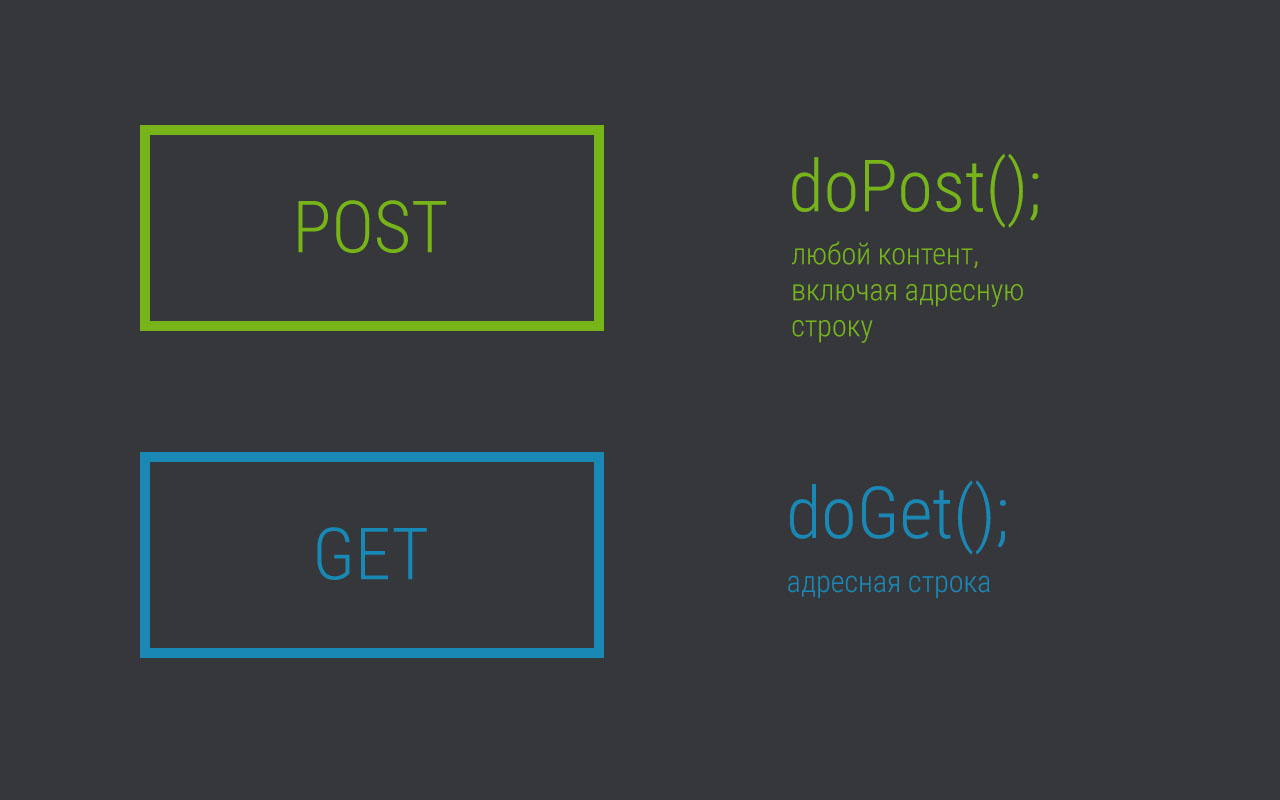
- GET - handles the address bar, which is obtained when the servlet is called. For example, site.com/example?action=test&id=10&admin=true
- POST - processes downloaded content (image, file, lines, object data), in general, everything that can be transferred via HTTP
In a Java servlet, POST and GET requests handle the corresponding doPost () methods; and doGet ().
To clarify the principles of processing requests, we will create:
- simple object of class Bot, which will have a name, serial and id
- the page to which we will display object data
- the page where we will change the object data
- servlet that will handle the corresponding requests
Create a Singleton Bot class with three fields, as well as getters, setters and the overloaded toString ():
/** * - Bot. * . * * Created by promoscow on 26.07.17. */ public class Bot { private Integer id; private String name; private String serial; private static Bot ourInstance = new Bot(); public static Bot getInstance() { return ourInstance; } private Bot() { } public Bot(String name, String serial, Integer id) { this.name = name; this.serial = serial; this.id = id; } public Integer getId() { return id; } public void setId(Integer id) { this.id = id; } public String getName() { return name; } public void setName(String name) { this.name = name; } public String getSerial() { return serial; } public void setSerial(String serial) { this.serial = serial; } @Override public String toString() { return "Bot{" + "id=" + id + ", name='" + name + '\'' + ", serial=" + serial + '}'; } } Mark the servlet in the xml document web.xml:
<servlet> <servlet-name>botServlet</servlet-name> <servlet-class>web.BotServlet</servlet-class> <load-on-startup>0</load-on-startup> </servlet> <servlet-mapping> <servlet-name>botServlet</servlet-name> <url-pattern>/bot</url-pattern> </servlet-mapping> We are writing this bot.jsp page (for now, just copy, then analyze):
<%-- Created by IntelliJ IDEA. User: promoscow Date: 26.07.17 Time: 9:28 To change this template use File | Settings | File Templates. --%> <%@ page contentType="text/html;charset=UTF-8" language="java" %> <%@ taglib prefix="c" uri="http://java.sun.com/jsp/jstl/core" %> <html> <head> <title>Bot</title> </head> <body> <section> <h3>Bot info</h3> <jsp:useBean id="bot" scope="request" type="ru.javawebinar.topjava.model.Bot"/> <tr> <td>ID: ${bot.id} | Name: ${bot.name} | Serial number: ${bot.serial}</td> <td><a href="bot?action=update">Update</a></td> </tr> </section> </body> </html> This page displays the bot data.
Line
<jsp:useBean id="bot" scope="request" type="ru.javawebinar.topjava.model.Bot"/> processes the argument “bot”, whereby we make it clear that this is an object of the class Bot. $ {bot.name} and the like are variables that we take from the object received in the argument (this will be in the servlet).
Note that the Update link translates to the address bot? Action = update contains data for a GET request.
Also, we will have a page that sends the modified bot data (update.jsp):
<%-- Created by IntelliJ IDEA. User: promoscow Date: 01.08.17 Time: 13:43 To change this template use File | Settings | File Templates. --%> <%@ page contentType="text/html;charset=UTF-8" language="java" %> <html> <head> <title>Update</title> </head> <body> <section> <jsp:useBean id="bot" scope="request" type="ru.javawebinar.topjava.model.Bot"/> <form method="post" action="bot?action=submit"> <dl> <dt>ID: </dt> <dd><input type="number" name="id" value="${bot.id}" placeholder="${bot.id}" /></dd> </dl> <dl> <dt>Name: </dt> <dd><input type="text" name="name" value="${bot.name}" placeholder="${bot.name}" /></dd> </dl> <dl> <dt>Serial number: </dt> <dd><input type="number" name="serial" value="${bot.serial}" placeholder="${bot.serial}" /></dd> </dl> <button type="submit">Save</button> </form> </section> </body> </html> We also get the bot data and insert it into the fields, change it and send the modified data in the POST request. Note that the POST request is initiated by submitting the form.
<form method="post" action="bot?action=submit"> where method = "post" means that these forms will get into POST, and action = "bot? action = submit" means that after submitting the form, you will go to the address bot? action = submit
Let's analyze for clarity one form field:
<input type="number" name="id" value="${bot.id}" placeholder="${bot.id}" /> By pressing the Save button, all entered data will be sent to the doPost () method of our servlet. In this line, we set the new id.
The name of the form attribute: “id” (name = “id”), the value that we pass to is the id field of the bot object ($ {bot.id}); also, we enter in the field the existing value obtained in the attribute “bot” ( placeholder = "$ {bot.id}).
Since the purpose of this article is to describe the operation of POST and GET requests, I explain the meaning of the code of strings in passing. More details on page attributes can be found in the HTML Reference .
Well, let's add the most primitive index.html page containing a single link to the bot page:
<html> <head> <meta charset="UTF-8"> <title>Bot Test Servlet Page</title> </head> <body> <ul> <li><a href="bot">Bot</a></li> </ul> </body> </html> We are done with jsp / html and can finally go to my favorite Java code.
BotServlet.java:
import model.Bot; import javax.servlet.ServletConfig; import javax.servlet.ServletException; import javax.servlet.http.HttpServlet; import javax.servlet.http.HttpServletRequest; import javax.servlet.http.HttpServletResponse; import java.io.IOException; /** * Bot Servlet class. * * Created by promoscow on 26.07.17. */ public class BotServlet extends HttpServlet { private Bot bot; @Override public void init(ServletConfig config) throws ServletException { super.init(); bot = new Bot("Amigo", "228274635", 1); } @Override protected void doGet(HttpServletRequest request, HttpServletResponse response) throws ServletException, IOException { System.out.println("Enter doGet"); String action = request.getParameter("action"); request.setAttribute("bot", bot); switch (action == null ? "info" : action) { case "update": request.getRequestDispatcher("/update.jsp").forward(request, response); break; case "info": default: request.getRequestDispatcher("/bot.jsp").forward(request, response); break; } } @Override protected void doPost(HttpServletRequest request, HttpServletResponse response) throws ServletException, IOException { System.out.println("Enter doPost"); request.setCharacterEncoding("UTF-8"); String action = request.getParameter("action"); if ("submit".equals(action)) { bot.setId(Integer.parseInt(request.getParameter("id"))); bot.setName(request.getParameter("name")); bot.setSerial(request.getParameter("serial")); } request.setAttribute("bot", bot); request.getRequestDispatcher("/bot.jsp").forward(request, response); } } The servlet contains 3 methods: init (), doGet () and doPost ().
init () is called when the servlet is first initialized and once executes the code written in it. In our case, an instance of the class Bot is created.
doGet () - handles a GET request.
doPost () - handles a POST request.
Now we will go through the chain of the execution logic of the application and analyze what works.
So, we load the project in Tomcat. Before us - a lonely link "Bot". Push it.
We go to the servlet BotServlet. The doGet () method is always executed (the address bar is always there), the doPost () method is executed only on request (we have it - <form method = "post" ...
@Override protected void doGet(HttpServletRequest request, HttpServletResponse response) throws ServletException, IOException { // , doGet System.out.println("Enter doGet"); // . <i>"bot?action=update"</i> (bot.jsp, 20 ) -, &. action=update. () action, update String. String action = request.getParameter("action"); // , . . , bot "bot", jsp- request.setAttribute("bot", bot); switch (action == null ? "info" : action) { // update (action=update), /update.jsp, ( bot) case "update": request.getRequestDispatcher("/update.jsp").forward(request, response); break; // (action == null ? "info"), bot.jsp, ( ) case "info": default: request.getRequestDispatcher("/bot.jsp").forward(request, response); break; } } As you can see, the doGet () method works with the address bar, extracts attributes from it and processes them. The toolbox of the doGet () method is great, for example, the line can contain? Action = update & id = 23847 & admin = true (for example), we can extract id, send the robot with the id field equal to 23847 for revision and make it admin.
Since the index.html attribute of the address bar by reference has the value update, we execute this part of the doGet () code:
request.setAttribute("bot", bot); request.getRequestDispatcher("/update.jsp").forward(request, response); - add an attribute with the bot object and the “bot” key and send all this to the /update.jsp page
In the update.jsp page, we add new values to the forms corresponding to the fields of the Bot class and send everything to the address “bot? Action = submit” . I repeat - this article does not set a task to parse jsp / html tags, for this there is the HTML Reference .
So, we press the "Save" button. Because the form contains method = "post" action = "bot? Action = submit" , we process the data received in the form in the doPost () method. In this method, you can both process incoming data and extract the attributes of the address bar.
@Override protected void doPost(HttpServletRequest request, HttpServletResponse response) throws ServletException, IOException { System.out.println("Enter doPost"); // UTF-8 — , , ( , ) request.setCharacterEncoding("UTF-8"); // action Stiring, doGet() String action = request.getParameter("action"); // action=submit, , . , . , (, update.jsp name="id" value=${bot.id} id, bot.setId(Integer.parseInt(request.getParameter("id"))); if ("submit".equals(action)) { bot.setId(Integer.parseInt(request.getParameter("id"))); bot.setName(request.getParameter("name")); bot.setSerial(request.getParameter("serial")); } // bot /bot.jsp, request.setAttribute("bot", bot); request.getRequestDispatcher("/bot.jsp").forward(request, response); } That's the whole article. We have worked on the servlet POST and GET requests through the corresponding methods doPost () and doGet ().
The purpose of this article is to create an understanding among beginning JavaEE developers how servlet requests work and what logic is used to work with these requests in Java code.
This is my second article on the topic of servlets, we discussed the launch of the first servlet in the article Creating Servlets for Dummies. Walkthrough
Source: https://habr.com/ru/post/334138/
All Articles