Inside Docker Networks: How Docker Uses iptables and Linux Interfaces
I got to know Docker quite a long time ago and, like most of its users, was instantly fascinated by its power and ease of use. Simplicity is the main pillar on which Docker is based, whose strength lies in lightweight CLI commands. When I studied Docker, I wanted to find out what was going on with him in the background, how everything was happening, especially with regard to working with the network (for me this is one of the most interesting areas).
I found a lot of different documentation on how to create and manage container networks, but there is a lot less material about how they work. Docker makes extensive use of Linux iptables and bridge interfaces to create container networks, and in this article I want to examine this aspect in detail. I gathered the information mainly from comments on github, various presentations, and from my own experience. At the end of the article you can find a list of useful resources.
I used Docker version 1.12.3 for the examples in this article. I did not set as my goal to give a comprehensive description of the Docker network or write a full introduction to this topic. I hope that this material will be useful for users, and I will be glad if you leave feedback in the comments, point out errors or say what is missing.
Table of contents
- Docker Network Overview
- Bridge type networks
- Total
- Links / Resources
- Part 2: Connection Between Containers in Docker Swarm and Overlay Networks
Docker Network Overview
The Docker network is built on the Container Network Model (CNM), which allows anyone to create their own network driver. Thus, containers have access to different types of networks and they can connect to several networks at the same time. In addition to various third-party network drivers, Docker itself has 4 built-in ones:
- Bridge : on this network, containers run by default. Communication is established via the bridge interface on the host. Containers that use the same network have their own subnet, and they can transfer data to each other by default.
- Host : this driver gives the container access to its own host space (the container will see and use the same interface as the host).
- Macvlan : this driver gives containers direct access to the interface and sub-interface (vlan) of the host. It also allows trunking.
- Overlay : this driver allows you to build networks on multiple hosts with Docker (usually on the Docker Swarm cluster). Containers also have their own network and subnet addresses, and they can directly exchange data, even if they are located physically on different hosts.
Bridge and Overlay network drivers are probably used most often, so in this article I will pay more attention to them.
Bridge type networks
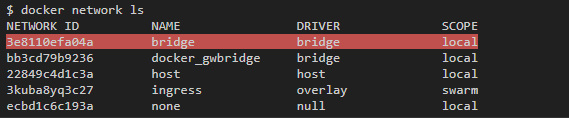
The default container is bridge. When you first start the container Docker creates a default bridge-network with the same name. This network can be seen in the general list with the docker network ls :
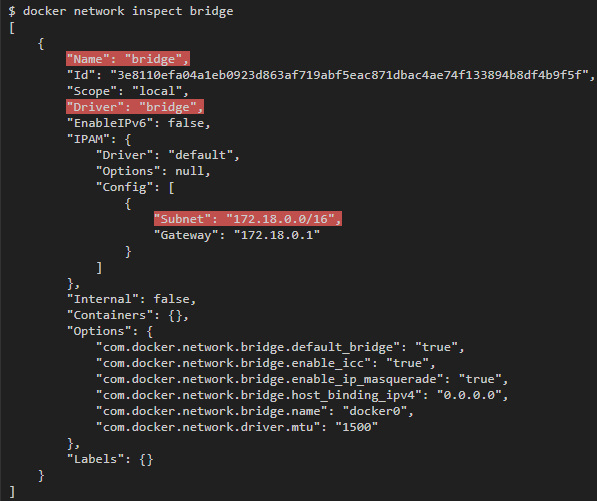
To inspect its properties, run the docker network inspect bridge :
You can also create your own bridge networks using the docker network create , specifying the - --driver bridge option.
For example, the command docker network create --driver bridge --subnet 192.168.100.0/24 --ip-range 192.168.100.0/24 my-bridge-network creates another bridge-network with the name “my-bridge-network” and a subnet 192.168.100.0/24.
Linux Bridge Interfaces
Each bridge-network has its own idea in the form of an interface on the host. The default “docker0” interface is usually associated with the “bridge” network, and each new network that is created using the docker network create will be associated with its own new interface.
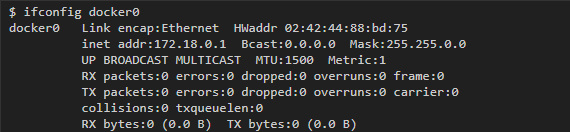
To find the interface that is associated with the network you created, enter the ifconfig command to display all the interfaces, and then find the interface that belongs to the subnet you created. For example, if we need to find an interface for the my-bridge-network network that we have just created, then we can run the following command:

Linux bridge interfaces are similar to switches in that they connect multiple interfaces to the same subnet and redirect traffic based on MAC addresses. As will be seen below, each container tied to a bridge network will have its own virtual interface on the host, and all containers on the same network will be tied to one interface, which will allow them to send data to each other. You can get more information about the status of the bridge using the brctl utility:

As soon as we launch the containers and link them to this network, the interface of each of these containers will be displayed in a list in a separate column. And if you enable traffic capture in the bridge interface, you can see how data is transferred between containers on the same subnet.
Linux virtual interfaces
Container Networking Model gives each container its own network space. If you run the ifconfig command inside the container, you can see its interfaces as the container itself sees them:
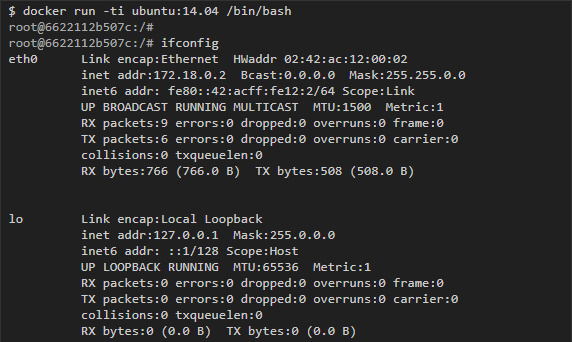
However, eth0, which is presented in this example, can only be seen from inside the container, and outside, on the host, Docker creates the corresponding copy of the virtual interface, which serves as a link to the outside world. Then these virtual interfaces are connected to the bridge interfaces, which we discussed above, to more easily establish communication between different containers on the same subnet.
To consider this process, we first start two containers connected to the default bridge network, and then we will look at the configuration of the host interface.
Prior to launching any containers, the docker0 bridge interface has no other interfaces attached:

Then I launched two containers on the ubuntu image: 14.04:

It immediately became apparent that the two interfaces are connected to the docker0 bridge interface (one for each container):

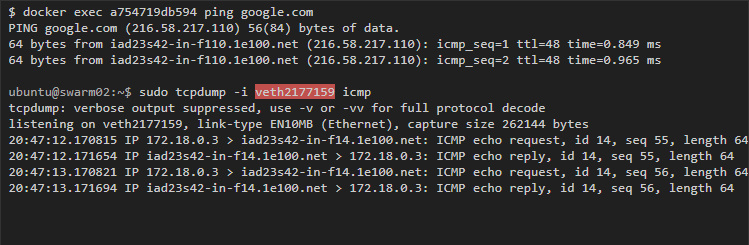
If you start pinging Google from one of the containers, then capturing traffic from the host to the virtual container interface will show us the container traffic:
Similarly, you can ping from one container to another.
First, you need to get the IP address of the container. This can be done either with the help of the ifconfig command, or with the help of docker inspect , which allows you to inspect the container:

Then we start pinging from one container to another:

To see the traffic from the host, we can capture it on any of the virtual interfaces that correspond to the containers, or on the bridge interface (in this case, docker0), which will show us all the communications inside the containers of this subnet:

Find Veth-interface in the container
If you want to find out which veth-interface of the host is bound to the interface inside the container, then you will not find a simple way. However, there are several methods that can be found in various forums and discussions on github. The easiest way, in my opinion, I learned from this discussion on github , changing it a bit. It depends on whether ethtool is ethtool in the container.
For example, I have 3 containers running on my system:

First, I run the following command in a container and get the number peer_ifindex:

Then on the host I use peer_ifindex to find out the interface name:

In this case, the interface is called veth7bd3604.
iptables
Docker uses linux iptables to control the communication between the interfaces and the networks it creates. Linux iptables consist of different tables, but we are primarily interested in only two of them: filter and nat. The filter table contains security rules that decide whether to allow traffic to IP addresses or ports. Using the nat Docker table allows containers in bridge networks to communicate with destinations that are outside the host (otherwise you would have to add routes to the container networks on the host network).
iptables: filter
Tables in iptables consist of different chains that correspond to different states or stages of packet processing on a host. By default, the filter table has 3 chains:Input to handle incoming packets destined for the same host to which they arrive;Output for packets originating on the host intended for the external destination;Forward to handle incoming packets destined for an external destination.
Each chain includes rules that determine which actions and under what conditions should be applied to the package (for example, reject or accept it). Rules are processed sequentially until a match is found, otherwise the default chaining rules are applied. Also in the table, you can specify custom chains.
To see the current chain rules and default settings in the filter table, run the command iptables -t filter -L or iptables -L , if the filter table is used by default and no other table is specified:

Different chains and default installations for each of them are highlighted in bold (there are no default installations in custom chains). You can also see that Docker added two custom chains: Docker and Docker-Isolation, also added rules to the Forward chain, the goal of which are these two new chains.
Docker-isolation chain
Docker-isolation contains rules that restrict access between different networks. To learn more, add -v when running iptables:
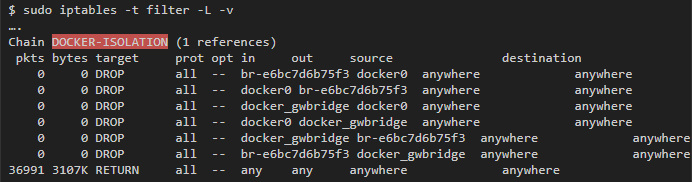
You can see several DROP rules that block traffic between all the bridge interfaces that Docker created, and thus prevent the networks from exchanging data.
icc = false
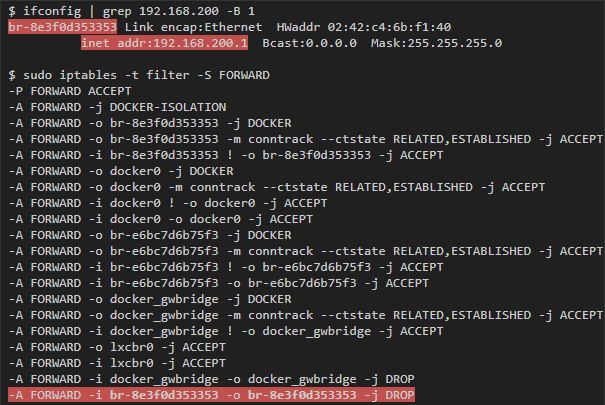
One of the options that you can pass to the docker network create is the option that is responsible for passing data inside the container: com.docker.network.bridge.enable_icc . If you set it to false, then data transfer between containers within the same network will be blocked. To do this, add a DROP rule to the forward chain that matches the packets coming from the bridge interface connected to the network for this interface.
For example, if you create a new network using the docker network create --driver bridge --subnet 192.168.200.0/24 --ip-range 192.168.200.0/24 -o "com.docker.network.bridge.enable_icc"="false" no-icc-network , we get the following:
iptables: nat
With nat, you can change the IP address or port of a packet. In this case, it is used to hide the source addresses of packets that come from bridge networks (for example, hosts on the 172.18.0.0/24 subnet) behind the IP address of the host and are directed to the outside world. This feature is controlled by the com.docker.network.bridge.enable_ip_masquerade option, which you can pass to docker network create (if you do not specify anything specific, then the default value is true).
The result of this command can be seen in the nat table:

In this postrouting chain, you can see all the networks that are created by the masquerade, which is used when they transmit data to any host outside their own network.
Total
- The bridge-network has a corresponding bridge-interface in Linux on the host, which acts as a layer2 switch and which connects different containers of the same subnet.
- Each network interface has a corresponding virtual interface on the host that is created when the container is running.
- Capturing traffic from the host on the bridge interface is equivalent to creating a SPAN port in the switch, in which you can see all internal communications between the containers of this network.
- Capturing traffic from a host on a virtual interface (veth- *) will show all traffic originating from the container on a specific subnet.
- The iptables rules in the filter chain are used to prevent different networks (and sometimes even hosts on the network) to exchange data. These rules are usually added to the Docker-isolation chain.
- Containers that communicate with the outside world via a bridge interface hide their IP behind the host address. For this, the necessary rules for the nat table in iptables are added.
Links / Resources
')
Source: https://habr.com/ru/post/333874/
All Articles