SwiftyBeaver iOS Guide: Logging Platform for Swift
 Errors come in different shapes and sizes. Some bugs are cute and fluffy and easy to fix, because you can run your application and go straight to the place where the error occurs. If you're lucky, Xcode will show you which line caused your application to crash.
Other mistakes are more sinister. They lurk in the background and happen when you least expect it. They are horrors of nightmares and Listerine commercials.
In this lesson you will find a secret weapon that you can deal with these sinister bugs that lurked in the background. When properly used, this weapon looks like a flashlight in the deepest and darkest crevices of your application. These terrible mistakes will not have a single chance.
')
This weapon is SwiftyBeaver , Swift-based logging system for iOS and macOS.
In this guide, you will learn how to debug your applications using SwiftyBeaver and get the following useful skills along the way:
- When SwiftyBeaver logging is better than print () and NSLog ()
- How to access SwiftyBeaver logs in Crypto Cloud
- How to use logging levels for different types of log messages
- How to filter entries to make it easier to find errors
Note: Before starting the lesson you should be familiar with Cocoapods and the CoreLocation framework. First read these guides to get the skills you need.
Start
Download the initial project . This archive contains the project and all the necessary files to complete the lesson.
You are going to create an application to track your children. If they move too far away from home, the app will alert them.
This application is called Ten PM (Do you know where your children are?).
Open TenPM.xcworkspace and view the project. Now open the Main.storyboard and you will see two view controllers inside the navigation controller:
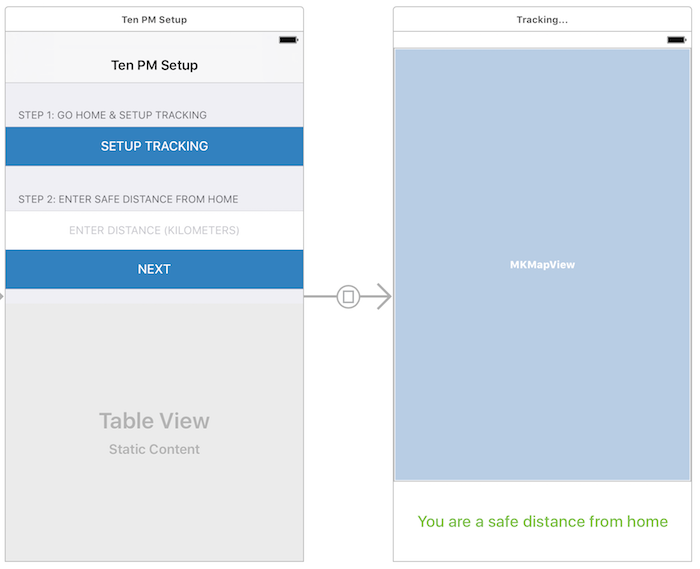
The left view controller is one that parents can use to tell the application where the “home” is and also set the maximum distance children can move. The class is TrackingSetupViewController , which requests access to geolocation services and stores the entered distance to limit the distance.
The view controller on the right is the one that the children will use. It displays a map with a green circle representing a safe area. It also contains a block of text below to let them know whether they are currently in a safe area or not. The class is TrackingViewController , in which MKMapView is used, which displays the area allowed for children.
And here are a few more lines to note:
- LocationTracker.swift : Acts as delegate for CLLocationManager. It processes location updates and permission changes for geolocation services.
- ParentProfile.swift : saves important user data to NSUserDefaults. This data includes the location of the house and the distance that their children can move away from home.
We use the initial application
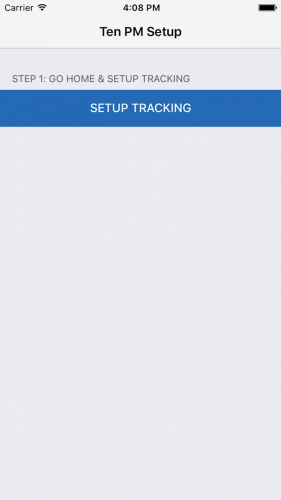
Run the offer on the iOS simulator. You will see the view controller which is represented by the TrackingSetupViewController class:
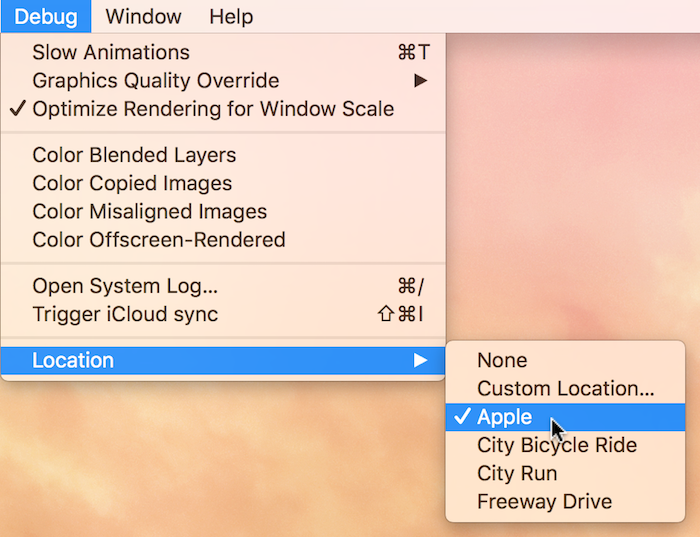
Before setting up tracking, you need to be sure that the simulator provides the initial location data. To do this, select a simulator, then select Debug \ Location \ Apple in the panel.
Press the SETUP TRACKING button and the application will ask for permission to start collecting location data. Since this screen is for parents, there is one extra window to confirm that you are a parent and are at home. Select Yes and then Allow . Once the application determines your location and saves it as a home, in order to use it as a safe zone for children.
Now enter 1 in the text field below as a safe distance from home. This means that you do not want to continue to be further than 1 kilometer from the simulated Apple location.

Click the NEXT button and you will be taken to the view supported by TrackingViewController . On this screen, there is one annotation with your current location and a green circle indicating your safe area.

Now that everything is set up, it's time to pretend that now is 2011, you got a prototype iPhone 4 and go for a walk. Let's simulate a new location, outside the safe zone, in the place where you made an appointment with a Gawker reporter.
In the iOS Simulator menu, go back to Debug \ Location , but this time choose Custom Location . Enter 37.3393 as latitude and -122.0426 as longitude and then click OK .
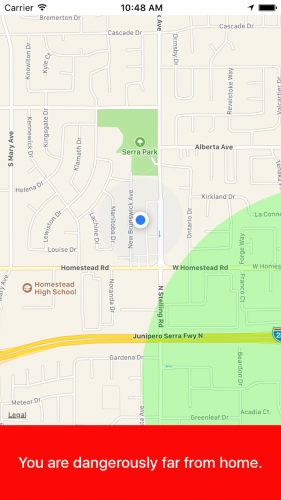
You should see the blue dot move to the new location and the message at the bottom of the screen changes to tell you that you are at a dangerous distance from home.
This is a brief description of the Ten PM application functionality. This is a fairly simple application that can be easily extended. You could start sending notifications to parents when their child is outside the safe zone, etc.
But today you are not going to do that. Instead, you will use this application to mimic some nasty background errors that you then fix with SwiftyBeaver.
Install SwiftyBeaver
First, install SwiftyBeaver using Cocoapods. Find the root directory of the project and find the Podfile there. Open it in the editor that is most convenient for you and add the following line under the # Pods for TenPM line :
pod 'SwiftyBeaver' Open Terminal, go to the directory with these Podfiles and enter the following command:
pod installAfter a minute or maybe a little more, SwiftyBeaver installation in your project will be completed. Now open AppDelegate.swift and add the following line in a suitable place at the top of the file:
import SwiftyBeaver Compile this project and you will see that SwiftyBeaver is now available in the project because it was successfully combined.
Note: this installation guide works with Cocoapods and Swift 3. More detailed installation instructions can be found on the SwiftyBeaver project repository page on GitHub .
Writing your first logs with SwiftyBeaver
Fuh. Are you ready to write some code?
Check out AppDelegate.swift again. This is where you set up logging for SwiftyBeaver right now. Have you noticed the billet method in the start project?
setupSwiftyBeaverLogging () is called every time your application starts, and as the name implies, you will use it to prepare SwiftyBeaver for use. Go to this method and add the following:
let console = ConsoleDestination() SwiftyBeaver.addDestination(console) SwiftyBeaver is an unusual logging tool. It has several entrances called Destinations , which you can configure to suit your needs.
Destination determines where your logs appear.
ConsoleDestination () creates the Console Destination , which you added as an active destination for SwiftyBeaver.
In the application method (_: didFinishLaunchingWithOptions :), add the following line of code, after calling the setupSwiftyBeaverLogging () method:
SwiftyBeaver.info("Hello SwiftyBeaver Logging!") This code displays the info level log in the console when the application starts. You will learn more about log levels later.
Run Ten PM again. Check the console when the application starts and you will see the entry:
12: 06: 05.402
Cool! You log in to the console using SwiftyBeaver. Heart imagery refers to the level of the logs, which are explained below.
Brief explanation of log levels
I am sure that at this stage you wonder why SwiftyBeaver forces you to use a method called info () instead of more clear and logical names such as log () or print () .
This is due to what is called Log Levels .
Not all logs are equally important. Some logs are useful for providing the programmer with additional contextual information. Other logs are needed for more serious problems, such as errors and warnings. When studying logs, it is quite useful to have records that are classified according to the level of threat to the application. It helps to filter less important messages faster in order to correct errors faster.
SwiftyBeaver adheres to the agreements and uses these 5 levels of logs:
- Verbose : lowest priority level. Use them for contextual information.
- Debug : Use this level to display variables or other results that will help you correct the error or solve the problem.
- Info : usually used for information useful in a more general context of support. In other words, information is useful for non-developers looking for problems.
- Warning : use this level when you reach a state that does not necessarily cause a problem, but strongly leads the application in this direction.
- Error : the most serial and high priority logs. Use it only when your application caused a serious error.
How to record different levels of logs with SwiftyBeaver
Just as you used the info () method for logging at the info level, you can use four other methods: verbose () , debug () , warning () , and error () for logging on the other four levels.
Try it. Go back to the application method (_: didFinishLaunchingWithOptions :) and replace the info () call with the following code:
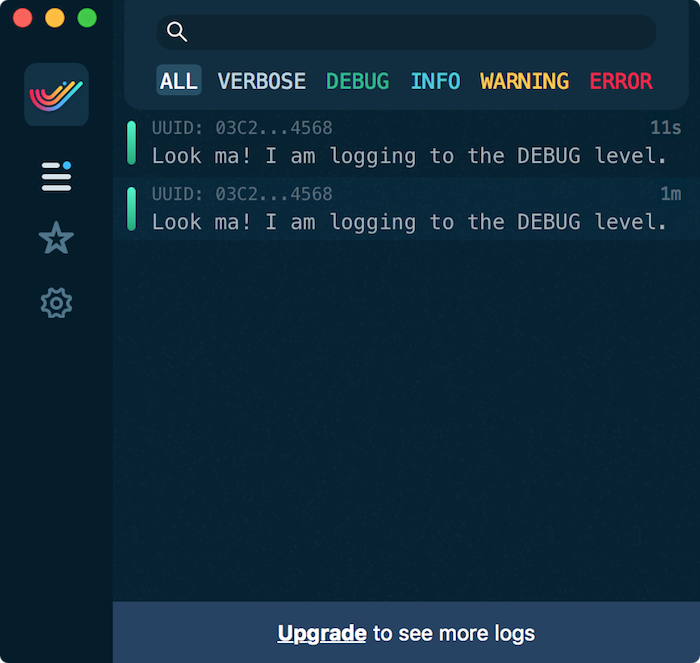
SwiftyBeaver.debug("Look ma! I am logging to the DEBUG level.") Now start your application. You should see a different color for the heart icon and another message at the debug level.
14: 48: 14.155
Please note that the color of the icon has changed to green to indicate the debug log level. This is one of the reasons why SwiftyBeaver is better than print () and NSLog () . You can quickly view the logs and find messages at the level that interests you.
Note: try not to abuse higher logging levels. Warnings and errors should be reserved for situations requiring proper attention.
Setup SwiftyBeaver Crypto Cloud
One of the coolest features of SwiftyBeaver is the ability to log directly in the cloud. SwiftyBeaver has an application for macOS , which allows you to view logs in real time. If you have ever wondered what happens in your application installed on thousands of devices, now you can know it.
Download SwiftyBeaver for Mac . Open it and fill out the form to create an account.

Further you will be redirected directly to the file saving window. This is a bit strange because they don’t tell what the file is for.
Name this file TenPMLogs , select any location you like, and click Save .
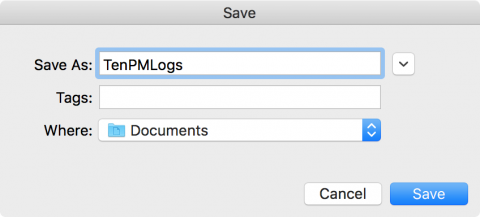
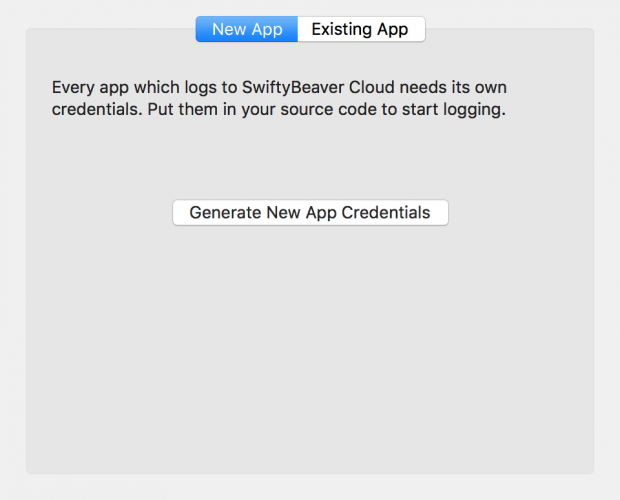
The file that you created in the logs for one application, for this reason you called it TenPMLogs. When you open this file using the SwiftyBeaver Mac App, you can see logs related to the Ten PM application. After saving the file you will be given a choice. You can register a new application or view logs from a previously registered application. You will continue on the New App tab.
Click on the Generate New App Credentials button. You should see the following screen showing the generated ID and keys for your application:
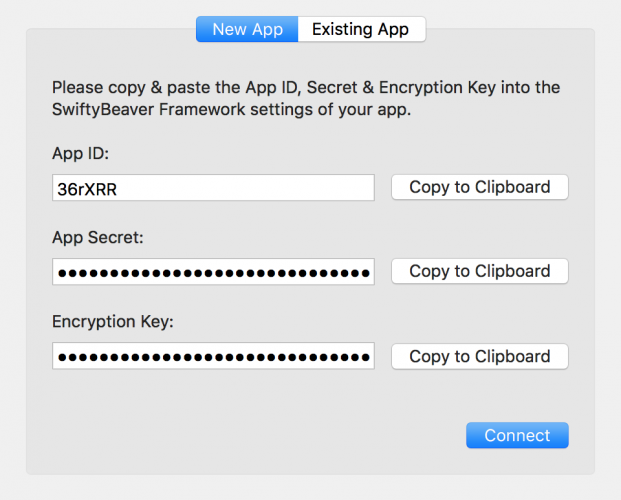
Now it's time to add another destination for logs using the Crypto Cloud security credentials you just created. Leave this window open and return to the setupSwiftyBeaverLogging () method in AppDelegate.swift .
Add these lines to the bottom of this method, replacing the lines with the appropriate values from the SwiftyBeaver Mac App:
let platform = SBPlatformDestination(appID: "Enter App ID Here", appSecret: "Enter App Secret Here", encryptionKey: "Enter Encryption Key Here") SwiftyBeaver.addDestination(platform) Return to the SwiftyBeaver Mac App and click on the Connect button. Now launch the Ten PM application.
Note: if you strayed like me and clicked the Connect button before you copied your credentials to your application, you can click on the settings button (gear) in the SwiftyBeaver Mac App to view them after connecting.
Now check it out! Your logs appear in the SwiftyBeaver Mac App. If you do not see the recording right away, then do not worry. Sometimes it takes a few minutes before log entries get to the cloud. In the end, they still appear. SwiftyBeaver also automatically provides one-hour storage for your logs if you have not switched to a paid account. For most debugging tasks this will not be a problem. It's just worth noting if you wonder why your older logs are no longer visible.
Filtering logs by logging level, selected records and minimum logging levels
The really cool thing in the SwiftyBeaver Mac App is the ability to filter logs by logging level. This greatly simplifies the process of digging in the logs to find the cause of the critical error.
You may have noticed different tabs at the top. Each of these tabs represents a logging level. You can view several levels at a time, or you can view only warnings and errors.
You can also mark a post as favorite. You can see all favorites by clicking on a star in the left menu.
Filtering by minimum logging level
This is another feature that you really love. SwiftyBeaver allows you to set a minimum level for a given destination. If you want to use your Crypto Cloud account for serious warnings and errors, you can do this.
First, replace the current logging code in applicationDidFinishLaunching () with the following:
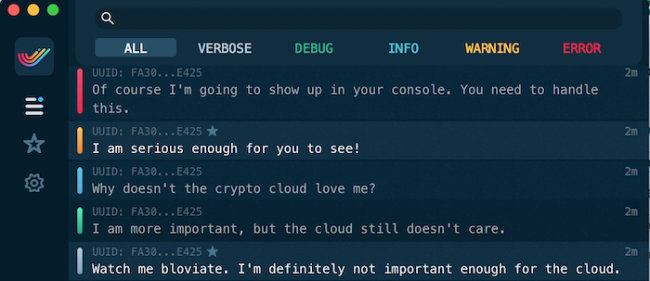
SwiftyBeaver.verbose("Watch me bloviate. I'm definitely not important enough for the cloud.") SwiftyBeaver.debug("I am more important, but the cloud still doesn't care.") SwiftyBeaver.info("Why doesn't the crypto cloud love me?") SwiftyBeaver.warning("I am serious enough for you to see!") SwiftyBeaver.error("Of course I'm going to show up in your console. You need to handle this.") Now you log a message at each level. Launch the app and you should see all these entries go to the Crypto Cloud.
In the setupSwiftyBeaverLogging () method, add the following before adding this platform to the destination:
platform.minLevel = .warning Run the application again. Look at the new look of your Crypto Cloud console.

You should only see warnings and errors lately. No other entries will fall into the crypto cloud. You still see everything in the Xcode console!
Note: You can set a minimum level for any type of logging (destination) in SwiftyBeaver. You can create several Crypto Cloud logs for different logging levels. SwiftyBeaver has a lot of room for different logging methods.
Fix hard-to-find errors
It was fun to talk about logging into the Crypto Cloud, but you have some sinister bugs that you need to fix. Well, or at least you have the sinister mistakes that you intend to simulate and then correct them.
Start by clearing all early entries. Remove all logging from the application (_: didFinishLaunchingWithOptions :) . Also remove the setting for platform.minLevel so that by default all entries are displayed. For this test you will need to see all the entries in the logs.
Error simulation
Now you are ready to use cloud logging and this is the time to simulate an unpleasant background bug.
Open LocationTracker.swift and find the locationManager method (_: didUpdateLocations :) . Paste the following code there after declaring two guard values at the top of the method:
let bug = true if bug == true { return } This is pretty silly, but you pretend here that somewhere in LocationTracker there is an error that prevents the tracking of the user's location. This code here prevents notifications that a user has entered or left a safe zone. When "error" is "disabled" this code will work fine.
Run the application to make sure that there is an “error”.

As long as you stay at the location previously set using the coordinates you will see an error. Despite the fact that you are clearly outside the safe zone, the text says that you are at a safe distance from home.
Bug tracking with SwiftyBeaver
How could we track this error with SwiftyBeaver? If you have received error reports in the failed location tracking, but do not have any good error assumptions, add logging wherever you can to get as much information from users as possible.
To get started, import SwiftyBeaver at the top of LocationTracker :
import SwiftyBeaver Next, add an entry at the top of the locationManager method (_: didUpdateLocations :) :
SwiftyBeaver.info("Got to the didUpdateLocations() method") Now add a few lines at the bottom and paste this line right after the declaration of the bug constant:
SwiftyBeaver.debug("The value of bug is: \(bug)") Next, add information when we check the value of this constant, but before return :
SwiftyBeaver.error("There's definitely a bug... Aborting.") Finally, add an entry at the end of the locationManager method (_: didUpdateLocations :) :
SwiftyBeaver.info("Got to the end the didUpdateLocations method") This information should be enough to start calculating what happens in your code. Here’s what the entire contents of the locationManager method (_: didUpdateLocations :) should look like:
SwiftyBeaver.info("Got to the didUpdateLocations() method") guard let homeLocation = ParentProfile.homeLocation else { ParentProfile.homeLocation = locations.first return } guard let safeDistanceFromHome = ParentProfile.safeDistanceFromHome else { return } let bug = true SwiftyBeaver.debug("The value of bug is: \(bug)") if bug == true { SwiftyBeaver.error("There's definitely a bug... Aborting.") return } for location in locations { let distanceFromHome = location.distance(from: homeLocation) if distanceFromHome > safeDistanceFromHome { NotificationCenter.default.post(name: TenPMNotifications.UnsafeDistanceNotification, object: nil) } else { NotificationCenter.default.post(name: TenPMNotifications.SafeDistanceNotification, object: nil) } } SwiftyBeaver.info("Got to the end the didUpdateLocations method") In the simulator, set the location in Apple as you did before. Now run the application. Although logs are now available to you in the Xcode console, ignore them and imagine that you are tracking records in the Crypto Cloud from a remote user.
Enter a safe distance of 1 kilometer and click NEXT . After loading the map, change your location to the latitude of 37.3397 and the longitude of -122.0426 through a special location.
And again you went outside your safe zone without updating the text.

You should notice the following entries repeated in the SwiftyBeaver Crypto Cloud after you set the filter to ALL :
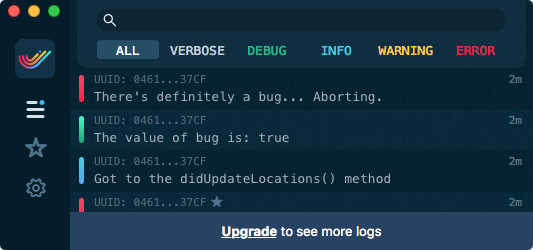
Wow, this is really useful! If you return to your code in the LocationTracker class, you will be able to compare this with the logs and you will see how far your code passes before it stops. Here it is explicit in if bug == true where the error record was displayed.
To “fix” this “error” simply set the bug constant to false where it is declared in the locationManager method (_: didUpdateLocations :) :
let bug = false Run the application. Model the starting position at Apple with an offset beyond the safe zone. This time, you will see a safe zone warning that worked correctly.
You should also see the following entries in your Crypto Cloud console.

It looks as if the application has passed the error and successfully responds to location changes again. You have successfully corrected this error!
Where to go?
You can find the completed project for this lesson here . See also file logging with SwiftyBeaver. If you have an iPhone and you want to be 100% sure that you get all your records (even if there is no Internet connection). For more interesting cases, read the formatting of records.
Source: https://habr.com/ru/post/333852/
All Articles