LibGDX + Scene2d (we program on Kotlin). Part 2
Hello. Today I will talk about texture atlas, skins, let's go through the layout work again. Further internationalization and in conclusion a couple of subtleties on working with color. And in the next lesson, let's move on to the game model and the linking of game logic and UI elements.
One of the most important parameters of the "comfort" of the application is the load time. A narrow link in this regard is reading from the drive. If we use such constructions everywhere
To optimize the work with textures, it is much cheaper for us to load one large picture once and use its fragments in our work. This approach is called texture atlas.
In our application, the loading of the atlas is implemented a little differently, using AssetManager, but at the moment it does not matter.
')
One of the features of the LibGDX library is the rigid coupling of the code of logic and representation. We create elements, specify dimensions, position, color directly in the code. At the same time, the visual style requires multiple repetition of the same lines of code (violation of the DRY principle). It is very expensive in cost. Not even the copy-paste itself, but the synchronization of changes. For example, you wanted to change the text color from black to bronze. And in the case of a hardcode, you need to go around the whole application, change one color to another. The part you miss, the part change where it should not have changed. To solve this problem, the skins mechanism is implemented in LibGDX. Here is our example:
How does it work inside? Before the banal is simple. ObjectMap <Class, ObjectMap <String, Object >> resources = new ObjectMap (); Named instance sets are stored for each class. Json above just fills this map with values. An object is created through reflexion and fields are also filled through reflexion. Here is an example of creating and working skins:
The result of today's work will be the appearance of the expedition panel when you click on the "boot" button. In this example, we will look at how to expand the layout of the application while retaining the basic idea, adding / removing actors to the scene, a couple of new layout containers. So our past code:
For layout terrain we will use two new layout-container. VerticalGroup and HorizontalGroup. These are “lightweight” versions of the table, which, among other things, have one merit. Deleting an element from them results in deleting a row / column. This is not true for the table. Even if you have a single row table, deleting an item in a column simply makes the cell empty. Also, the expand / fill / space / pad modifiers for Container, VerticalGroup, HorizontalGroup apply to all elements at once. For a table, these values apply to each cell.
And here is the location die:
Those who have worked with internationalization, at least in any form, will have nothing new for those. Internationalization works the same way. There is a base .properties file in which key-value pairs are stored. There are auxiliary files xxx_ru.properties, xxx_en.properties, xxx_fr.properties. Depending on the device locale, the appropriate auxiliary file (if defined) or the base file (if there are no matches) is loaded. In our case, the internationalization files look like this:
I rendered the name i18n to the global namespace
In the skins really want to use color constants. But if you try to write like this, the program will crash with an error.
This is an example using AssetManager. You can do this as well (the main thing is to do before loading the skin.json file):
And finally. Label can be "painted" in two ways. Right and wrong.
The second option works fine. The font is generated white, in my case with a translucent dark stroke.
In the final example, there is no normal layout for action dies. You can try to implement it yourself by analogy with the TerrainPane.
Update:
Previous parts
Texture atlas
One of the most important parameters of the "comfort" of the application is the load time. A narrow link in this regard is reading from the drive. If we use such constructions everywhere
Image(Texture("backgrounds/main-screen-background.png")) To optimize the work with textures, it is much cheaper for us to load one large picture once and use its fragments in our work. This approach is called texture atlas.
Example atlas
And although I’m a big opponent of premature optimization, working with texture atlas gives me great advantages both in terms of application speed and readability. Ignore texture atlas is more expensive. We already have a class AtlasGenerator in the project, which itself can combine images from a folder into an atlas. Here is his code: object AtlasGenerator { @JvmStatic fun main(args: Array<String>) { val settings = TexturePacker.Settings() settings.maxWidth = 2048 settings.maxHeight = 2048 TexturePacker.process(settings, "images", "atlas", "game") } } In principle, everything is simple. Parameters: the name of the source folder, the name of the folder for the location of the atlas and the name of the atlas itself. In large applications, it makes sense to make several atlases. For example, the level of "ancient Egypt" - some pictures, the level of "space" - others. At the same time they are not used. Much faster in time to load only the part that is needed at the moment. But in our application graphics will be at least, you can do with one atlas. Loading atlas and reading textures looks like this: val atlas = TextureAtlas(Gdx.files.internal("atlas/game.atlas")) atlas.findRegion("texture-name") In our application, the loading of the atlas is implemented a little differently, using AssetManager, but at the moment it does not matter.
')
Skins
One of the features of the LibGDX library is the rigid coupling of the code of logic and representation. We create elements, specify dimensions, position, color directly in the code. At the same time, the visual style requires multiple repetition of the same lines of code (violation of the DRY principle). It is very expensive in cost. Not even the copy-paste itself, but the synchronization of changes. For example, you wanted to change the text color from black to bronze. And in the case of a hardcode, you need to go around the whole application, change one color to another. The part you miss, the part change where it should not have changed. To solve this problem, the skins mechanism is implemented in LibGDX. Here is our example:
{ "com.badlogic.gdx.scenes.scene2d.ui.Label$LabelStyle": { "default": { "font": "regular-font" }, "large": { "font": "large-font" }, "small": { "font": "small-font" }, "pane-caption": { "font": "large-font", "fontColor": "color-mongoose" } } } And here is an example of using the skin Label("some text here", uiSkin, "pane-caption") How does it work inside? Before the banal is simple. ObjectMap <Class, ObjectMap <String, Object >> resources = new ObjectMap (); Named instance sets are stored for each class. Json above just fills this map with values. An object is created through reflexion and fields are also filled through reflexion. Here is an example of creating and working skins:
val atlas = TextureAtlas(Gdx.files.internal("atlas/game.atlas")) val skin = Skin(atlas) skin.getDrawable("texture-name") skin.get("default", Label.LabelStyle::class.java) Label("some text here", skin , "pane-caption") Layout
The result of today's work will be the appearance of the expedition panel when you click on the "boot" button. In this example, we will look at how to expand the layout of the application while retaining the basic idea, adding / removing actors to the scene, a couple of new layout containers. So our past code:
row().let { add(Image(Texture("backgrounds/main-screen-background.png")).apply { setScaling(Scaling.fill) }).expand() } In the center of the window we have placed the picture. Now we want to use this central part as a container. There are two options. Use Container with background or use Stack. A stack is a layout container that draws all its children on top of itself in the order it was added. Element dimensions are always set as Stack dimensions. We will focus on the first option, because The picture is a “stub” again. In the final version, we will use the TiledMapRenderer to draw the map. val centralPanel = Container<WidgetGroup>() row().let { add(centralPanel.apply { background = TextureRegionDrawable(TextureRegion(Texture("backgrounds/main-screen-background.png"))) fill() pad(AppConstants.PADDING * 2) }).expand() } In this case, we declare the variable CentralPanel outside of row (). Let {...} because we will pass it as a parameter. Such an idea, CommandPanel (panel with buttons below) should not know where it is located and where to insert new elements into the overall scene. Therefore, we pass the centralPanel to the constructor and inside the CommandPanel we hang the handler on the button: class CommandPanel(val centralPanel: Container<WidgetGroup>) : Table() { ... add(Button(uiSkin.getDrawable("command-move")).apply { addListener(object : ChangeListener() { override fun changed(event: ChangeEvent?, actor: Actor?) { when (isChecked) { false -> centralPanel.actor = null true -> centralPanel.actor = ExplorePanel() } } }) }) Since the parameter has the keyword val in the constructor, this final field will be available anywhere in the class. If it were not, then this parameter would be available only in the block init {...}. Instead of if-then I used when (java-switch). it gives better readability. When the button is pressed, ExplorePanel is embedded in the panel; when it is pressed, the center panel is cleared.Layout dies terrain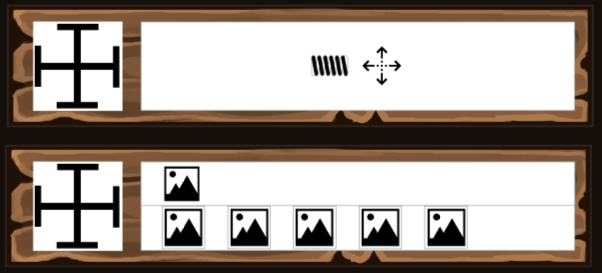
Expedition panel layout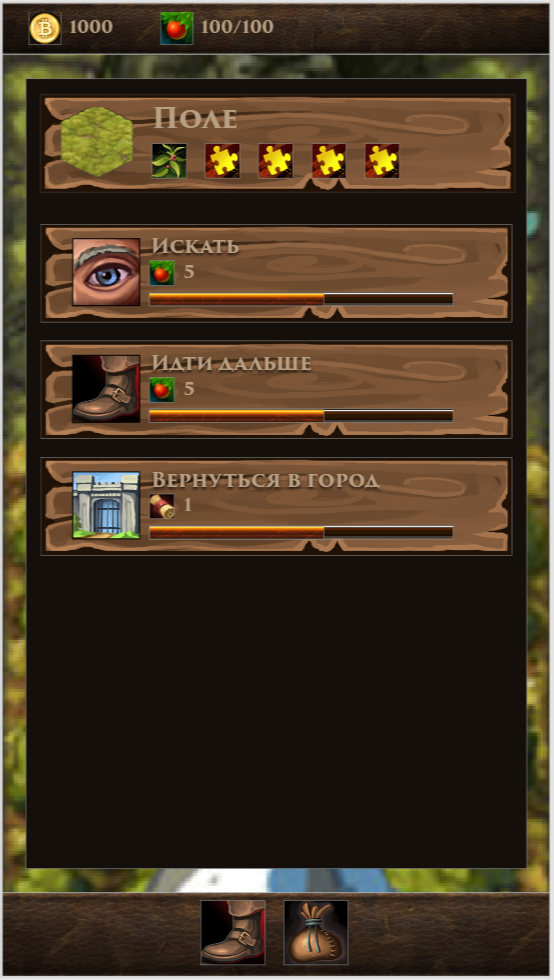
For layout terrain we will use two new layout-container. VerticalGroup and HorizontalGroup. These are “lightweight” versions of the table, which, among other things, have one merit. Deleting an element from them results in deleting a row / column. This is not true for the table. Even if you have a single row table, deleting an item in a column simply makes the cell empty. Also, the expand / fill / space / pad modifiers for Container, VerticalGroup, HorizontalGroup apply to all elements at once. For a table, these values apply to each cell.
class ExplorePanel : Table() { init { background = uiSkin.getDrawable("panel-background") pad(AppConstants.PADDING) row().let { add(TerrainPane()) } row().let { add(SearchPane()) } row().let { add(MovePane()) } row().let { add(TownPortalPane()) } row().let { add().expand() // } } } In this case, ExplorePanel is implemented through a table, but no one bothers to do it through VerticalGroup. This is basically a matter of taste. The bottommost element is the addition of an empty cell with the expand modifier. This cell tries to occupy the maximum space, thereby “springing” the first elements upwards.And here is the location die:
class TerrainPane : WoodenPane() { init { add(Image(uiSkin.getDrawable("terrain-meadow"))).width(160f).height(160f).top() add(VerticalGroup().apply { space(AppConstants.PADDING) addActor(Label(i18n["terrain.meadow"], uiSkin, "pane-caption")) addActor(HorizontalGroup().apply { space(AppConstants.PADDING) addActor(Image(uiSkin.getDrawable("herbs-01"))) addActor(Image(uiSkin.getDrawable("herbs-unidentified"))) addActor(Image(uiSkin.getDrawable("herbs-unidentified"))) addActor(Image(uiSkin.getDrawable("herbs-unidentified"))) addActor(Image(uiSkin.getDrawable("herbs-unidentified"))) }) }).expandX().fill() } } For now, do the “razvidet” internationalization (i18n) and just pay attention to the layout. WoodenPane is actually a Table (in fact, Button, which, as I mentioned, is the heir to the Table). It adds two actors. Picture of the area and vertical group. In the vertical group one cell is text, the second cell is a horizontal group of five pictures. The action planes are made in a similar way - Search, Movement and Return to the city. As I already mentioned, we will hang the logic and associate with the data model in the next part.Internationalization
Those who have worked with internationalization, at least in any form, will have nothing new for those. Internationalization works the same way. There is a base .properties file in which key-value pairs are stored. There are auxiliary files xxx_ru.properties, xxx_en.properties, xxx_fr.properties. Depending on the device locale, the appropriate auxiliary file (if defined) or the base file (if there are no matches) is loaded. In our case, the internationalization files look like this:
medieval-tycoon.properties
medieval-tycoon_en.properties
medieval-tycoon_ru.properties
... ...
explore.move=
explore.search=
explore.town-portal=
terrain.forest=
terrain.meadow=
terrain.swamp=
I rendered the name i18n to the global namespace
val i18n: I18NBundle get() = assets.i18n class MedievalTycoonGame : Game() { lateinit var assets: Assets class Assets { val i18n: I18NBundle by lazy { manager.get(i18nDescriptor) } Again, the download goes through the asset manager. The classic I18NBundle boot option looks like this: val i18n = I18NBundle.createBundle(Gdx.files.internal("i18n/fifteen-puzzle"), Locale.getDefault()) Further, instead of text, we simply insert i18n.get (“name.key”)A couple of subtleties when working with color
In the skins really want to use color constants. But if you try to write like this, the program will crash with an error.
{ "com.badlogic.gdx.scenes.scene2d.ui.Label$LabelStyle": { "pane-caption": { "font": "large-font", "fontColor": "color-mongoose" } } } The point is not even that LibGDX knows nothing about the color “mongoose”, skins by default do not even know about “black” & “white”. But when creating the skin, we can pass the ObjectMap <String, Any> () parameter into which to put the running colors and the base colors of the application palette. It looks like this:Adding text color identifiers
private val skinResources = ObjectMap<String, Any>() private val skinDescriptor = AssetDescriptor("default-ui-skin.json", Skin::class.java, SkinLoader.SkinParameter("atlas/game.atlas", skinResources)) ... loadColors() manager.load(skinDescriptor) ... private fun loadColors() { skinResources.put("color-mongoose", Color.valueOf("BAA083")) skinResources.put("clear", Color.CLEAR) skinResources.put("black", Color.BLACK) skinResources.put("white", Color.WHITE) skinResources.put("light_gray", Color.LIGHT_GRAY) skinResources.put("gray", Color.GRAY) skinResources.put("dark_gray", Color.DARK_GRAY) skinResources.put("blue", Color.BLUE) skinResources.put("navy", Color.NAVY) skinResources.put("royal", Color.ROYAL) skinResources.put("slate", Color.SLATE) skinResources.put("sky", Color.SKY) skinResources.put("cyan", Color.CYAN) skinResources.put("teal", Color.TEAL) skinResources.put("green", Color.GREEN) skinResources.put("chartreuse", Color.CHARTREUSE) skinResources.put("lime", Color.LIME) skinResources.put("forest", Color.FOREST) skinResources.put("olive", Color.OLIVE) skinResources.put("yellow", Color.YELLOW) skinResources.put("gold", Color.GOLD) skinResources.put("goldenrod", Color.GOLDENROD) skinResources.put("orange", Color.ORANGE) skinResources.put("brown", Color.BROWN) skinResources.put("tan", Color.TAN) skinResources.put("firebrick", Color.FIREBRICK) skinResources.put("red", Color.RED) skinResources.put("scarlet", Color.SCARLET) skinResources.put("coral", Color.CORAL) skinResources.put("salmon", Color.SALMON) skinResources.put("pink", Color.PINK) skinResources.put("magenta", Color.MAGENTA) skinResources.put("purple", Color.PURPLE) skinResources.put("violet", Color.VIOLET) skinResources.put("maroon", Color.MAROON) } This is an example using AssetManager. You can do this as well (the main thing is to do before loading the skin.json file):
uiSkin.add("black", Color.BLACK) uiSkin.load(Gdx.files.internal("uiskin.json")) And finally. Label can be "painted" in two ways. Right and wrong.
color = Color.BLACK // style.fontColor = Color.BLACK // I do not have enough knowledge to explain the mechanics of rendering. On the fingers it is like this: any actor can be drawn with a touch. Take a picture made in shades of white and gray, set the color and instead of the white and gray image you get for example yellow-dark yellow or red-dark red. The problem is that the final shade is "multiplication." And if instead of the white-gray base there is a red picture and a shade of blue, then the result will be black. In fact, this is a very bad and time-consuming option to get a good result. To pick up the intensity of gray so that the red-green-yellow-blue variants looked reliably very difficult. Plus, if I'm not mistaken, there is some kind of problem with maintaining transparency.The second option works fine. The font is generated white, in my case with a translucent dark stroke.
val largeFont = FreetypeFontLoader.FreeTypeFontLoaderParameter() largeFont.fontFileName = "fonts/Merriweather-Bold.ttf" ... largeFont.fontParameters.borderColor = Color.valueOf("00000080") largeFont.fontParameters.borderWidth = 4f ... Result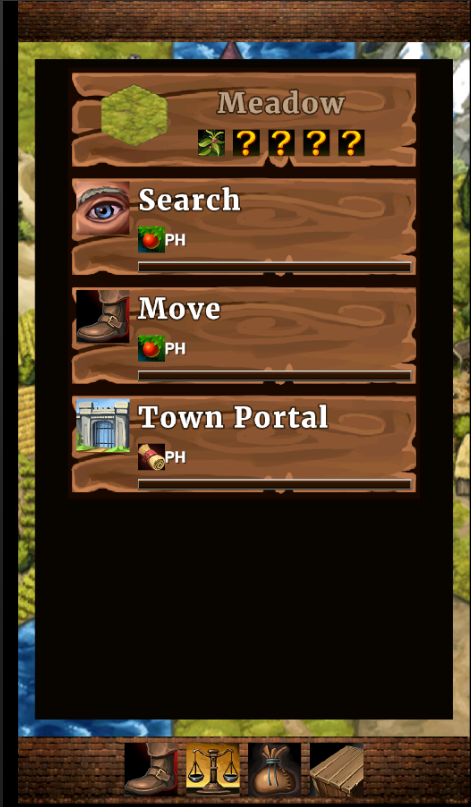
In the final example, there is no normal layout for action dies. You can try to implement it yourself by analogy with the TerrainPane.
Update:
A little funny offtopic
HEX code color name
Paletton.com - I liked it
Article from Habr
Color palette selection
Cooler Classics of the genrePaletton.com - I liked it
Article from Habr
Source: https://habr.com/ru/post/333386/
All Articles