Testing in Openshift: Internal cluster structure
This is a continuation of a series of three articles ( first article , third article ) about automated testing of software products in Openshift Origin. This article will describe the main objects of Openshift, as well as the principles of the cluster. I deliberately do not attempt to describe all possible objects and their features, since this is a very time-consuming task, which is beyond the scope of this article.
Cluster:
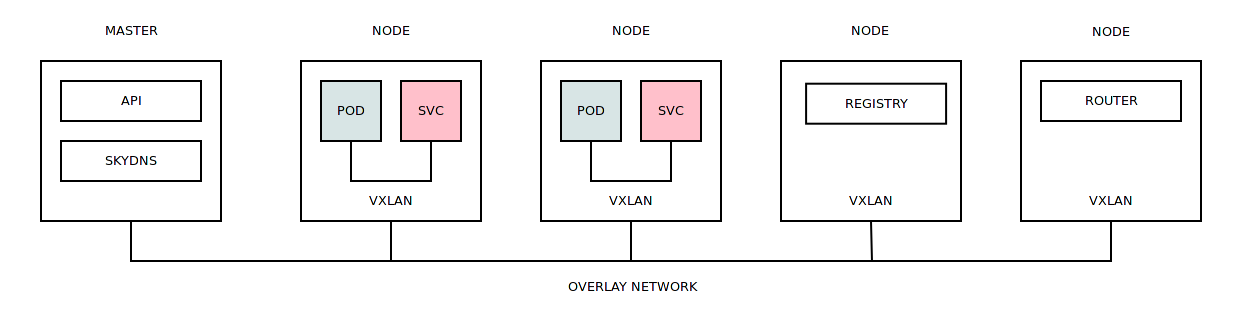
In general, the operation of the Openshift Origin cluster is not much different from other solutions. Incoming tasks are distributed across work nodes based on their workload, this distribution is assumed by the scheduler.
Container launch requires a Docker image that can be loaded from an internal or external register. Containers are directly launched in various security contexts ( security policies that restrict container access to various resources).
By default, containers from different projects can communicate with each other using the overlay network (one large subnet is allocated, which is divided into smaller subnets for all working nodes of the cluster). When a container is launched on a working node, it is assigned an IP address from the subnet that was assigned to this node. The overlay network itself is based on the Open vSwitch, which uses VXLAN for communication between the working nodes.
On each working node, a dedicated instance of Dnsmasq is launched, which redirects all DNS container requests to SkyDNS to the internal service subnet.
If the container has crashed its work or simply cannot be initialized, then the task of deploying it is transferred to another work node.
It is worth noting that:
SELinux is not a strict condition for cluster operation. Turning it off ( not recommended for security reasons ) will introduce some kind of speed increase (as well as turning off monitoring, by the way) when working with containers. If SELinux interferes with the operation of the application in the container, it is possible to add SELinux exceptions directly to the work node of the cluster.
By default, LVM is used as the Docker Engine repository. This is not the fastest solution, but you can use any other type of storage ( BTRFS , for example).
It should be borne in mind that the name of the service (see Service) - is the DNS name, which entails restrictions on the length and valid characters.
To reduce the time and hardware costs when building Docker images, you can use the so-called "layered" approach ( multi-stage in Docker ). This approach uses basic and intermediate images that complement each other. We have the basic image "centos: 7" (fully updated), we have the intermediate image "centos: 7-tools" (installed tools), we have the final image "centos: 7-app" (contains "centos: 7" and "centos: 7 -tools "). That is, you can create build tasks that are based on other images (see BuildConfig).
A fairly flexible solution is the approach when there is one project that only builds Docker images and then links the image data to other projects (see ImageStream). This allows you to not produce unnecessary entities in each project and will lead to some unification.
Most objects in the cluster can be assigned arbitrary labels with which you can perform bulk operations on these objects (deleting certain containers in a project, for example).
If the application requires some kernel functionality of the Linux kernel, then it is required to load this module on all the work nodes where this application needs to be launched.
It should immediately worry about the removal of old images and forgotten environments. If the first is solved with the help of the garbage collector / oadm prune, then the second requires the study and familiarization of all participants with the rules of joint work in Openshift Origin.
Any cluster is limited by resources, so it is very desirable to organize monitoring at least at the level of work nodes (monitoring at the application level in the container is possible). This can be done both with the help of a ready-made solution Openshift Metrics , and with the help of third-party solutions ( Sysdig , for example). In the presence of cluster load metrics (as a whole or according to design), it is possible to organize flexible dispatching of incoming tasks.
I especially want to note the fact that work nodes can be dynamically initialized, which means that you can expand your Openshift Origin cluster on existing IaaS facilities. That is, during pre-release testing, you can significantly expand your capacities and reduce testing time.
Objects:
Project - The object is a Kubernetes namespace . The upper level of abstraction, which contains other objects. Objects created in the project do not overlap with objects in other projects. Quotas, privileges, labels of cluster nodes, etc. can be set up for a project. There is no nested hierarchy and inheritance between projects; a "flat" project structure is available. There are several system projects (kube-system, openshift, openshift-infra) that are intended for the normal functioning of the cluster.
Creating a new project:
oc adm new-project project1 --node-selector='node_type=minion' Editing project settings:
oc edit namespace project1 # Please edit the object below. Lines beginning with a '#' will be ignored, # and an empty file will abort the edit. If an error occurs while saving this file will be # reopened with the relevant failures. # apiVersion: v1 kind: Namespace metadata: annotations: openshift.io/description: "" openshift.io/display-name: "" openshift.io/node-selector: node_type=minion ... Pod is an object that has become one of the decisive factors, as it allows you to run arbitrary commands inside the container using special hooks (and not only). Pod is the main unit of work in the cluster. Any client running in the cluster - Pod. At its core, a group of one or more containers, which work in the same namespaces (network, ipc, uts, cgroup) for these containers, use shared data storage and secrets. The containers that make up the Pods are always running on one node of the cluster, and not distributed in equal proportions across all nodes (if Pod consists of 10 containers, all 10 will work on one node).
Pod:
apiVersion: "v1" kind: "Pod" metadata: name: "nginx-redis" spec: containers: - name: "nginx" image: "nginx:latest" - name: "redis" image: "redis:latest" Pod status:
NAME READY STATUS RESTARTS AGE nginx-redis 2/2 Running 0 7s ')
Secret - can be a string or a file, designed for forwarding sensitive (stored in clear form in etcd ( support for encryption in Kubernetes 1.7 )) information in the Pod. One Secret can contain many values.
Create Secret:
oc secrets new gitconfig .gitconfig=/home/user/.gitconfig Using Secret in BuildConfig:
apiVersion: "v1" kind: "BuildConfig" metadata: name: "nginx-bc" spec: source: type: "Git" git: uri: "https://github.com/username/nginx.git" sourceSecret: name: "gitconfig" strategy: type: "Docker" dockerStrategy: dockerfilePath: docker/nginx-custom noCache: true output: to: kind: "ImageStreamTag" name: "nginx-custom:latest" ServiceAccount is a special type of object that is designed to interact with cluster resources. At its core is a system user.
By default, the new project contains three ServiceAccount:
- builder is responsible for building Docker images and uploading them to the register (see BuildConfig).
- deployer - deployment tasks are launched from this account (see DeploymentConfig).
- default - all other Pods (which are not related to deployment tasks) are launched from this particular account.
Listed service accounts:
- Contains automatically created secrets that are used to access cluster resources.
- Possess roles that allow them to perform certain actions in a cluster.
ServiceAccount:
apiVersion: "v1" kind: "ServiceAccount" metadata: name: "jenkins" ServiceAccount properties:
Name: jenkins Namespace: project1 Labels: <none> Image pull secrets: jenkins-dockercfg-pvgsr Mountable secrets: jenkins-dockercfg-pvgsr jenkins-token-p8bwz Tokens: jenkins-token-p8bwz jenkins-token-zsn9p Adding admin rights to the ServiceAccount project:
oc policy add-role-to-user admin system:serviceaccount:project1:jenkins DeploymentConfig is an object that operates with the same Pod, but at the same time introduces a number of additional mechanisms for managing the life cycle of running applications, namely:
- Adds a deployment strategy, i.e. allows you to determine how the application will be updated: when a new version is released, rolled back to a working version in case of failure.
- Allows you to set the triggers that will cause the configuration to be redeployed.
- Allows you to specify the number of instances / replicas of the application.
DeploymentConfig:
apiVersion: "v1" kind: "DeploymentConfig" metadata: name: "nginx-dc" spec: template: metadata: labels: name: "nginx-dc" spec: containers: - name: "nginx" image: "nginx:latest" replicas: 3 selector: name: "nginx-dc" DeploymentConfig Status:
NAME READY STATUS RESTARTS AGE nginx-dc-1-1wl8m 1/1 Running 0 7s nginx-dc-1-k3mss 1/1 Running 0 7s nginx-dc-1-t8qf3 1/1 Running 0 7s ImageStream is essentially a “link” container (ImageStreamTag) that points to a Docker image or other ImageStream.
ImageStream:
apiVersion: "v1" kind: "ImageStream" metadata: name: "third-party" Creating a tag / link to the Docker image between projects:
oc tag project2/app:v1 project1/third-party:app Creating a tag / link to the Docker image, which is located on the Docker Hub:
oc tag --source=docker nginx:latest project1/third-party:nginx BuildConfig - an object is a script of how a Docker image will be assembled and where it will be placed. Building a new image can be based on other images, the "from:" section is responsible for this.
Sources of assembly (the place where the source data for the assembly):
- Binary
- Dockerfile
- Git
- Image
- Input secrets
- External artifcats
Build strategies (how the data source should be interpreted):
- Custom
- Docker
- Pipeline
- S2i
Purpose of the assembly (where the assembled image will be unloaded):
- DockerImage
- ImageStreamTag
BuildConfig:
apiVersion: "v1" kind: "BuildConfig" metadata: name: "nginx-bc" spec: source: type: "Git" git: uri: "https://github.com/username/nginx.git" strategy: type: "Docker" dockerStrategy: from: kind: "ImageStreamTag" name: "nginx:latest" dockerfilePath: docker/nginx-custom noCache: true output: to: kind: "ImageStreamTag" name: "nginx-custom:latest" What operations this BuildConfig will perform:
- Based on ImageStream "nginx: latest"
- Clones the Git repository, finds the docker / nginx-custom file in this repository, loads the Dockerfile instructions from this file, and executes these instructions in a basic way.
- The resulting image will put "nginx-custom: latest" in ImageStream
Service is an object that has become one of the decisive factors when choosing a system for launching environments, as it allows the flexibility to customize communications between environments (which is very important in testing). In cases using other systems, preparatory manipulations were required: select IP address ranges, register DNS names, perform port forwarding, etc. etc. Service can be declared before the actual deployment of the application.
What happens during the publication of the service in the project:
- For the service is allocated an IP address from a special service subnet.
- Register the DNS name of the service. All Pods in a project that were run before / after publishing a service will be able to resolve this DNS name.
- All Pods in the project that will be launched after the service is published will receive a list of environment variables that contain the IP address and ports of the published service.
Service:
apiVersion: v1 kind: Service metadata: name: "nginx-svc" spec: selector: name: "nginx-pod" ports: - port: 80 targetPort: 80 name: "http" - port: 443 targetPort: 443 name: "https" DNS name resolution:
root@nginx-pod:/# ping nginx-svc PING nginx-svc.myproject.svc.cluster.local (172.30.217.250) 56(84) bytes of data. Environment variables:
root@nginx-pod:/# env | grep -i nginx NGINX_SVC_PORT_443_TCP_ADDR=172.30.217.250 HOSTNAME=nginx-pod NGINX_VERSION=1.13.1-1~stretch NGINX_SVC_PORT_80_TCP_PORT=80 NGINX_SVC_PORT_80_TCP_ADDR=172.30.217.250 NGINX_SVC_SERVICE_PORT=80 NGINX_SVC_PORT_80_TCP_PROTO=tcp NGINX_SVC_PORT_443_TCP=tcp://172.30.217.250:443 NGINX_SVC_SERVICE_HOST=172.30.217.250 NGINX_SVC_PORT_443_TCP_PROTO=tcp NGINX_SVC_SERVICE_PORT_HTTPS=443 NGINX_SVC_PORT_443_TCP_PORT=443 NGINX_SVC_PORT=tcp://172.30.217.250:80 NGINX_SVC_SERVICE_PORT_HTTP=80 NGINX_SVC_PORT_80_TCP=tcp://172.30.217.250:80 Conclusion:
All cluster objects can be described using YAML, this, in turn, makes it possible to fully automate any processes that occur in Openshift Origin. The whole difficulty in working with a cluster is in the knowledge of the principles of operation and mechanisms of interaction of objects. Routine operations like initialization of new work nodes are covered by Ansible scripts. The availability of the API opens up the opportunity to work with the cluster directly bypassing intermediaries.
Source: https://habr.com/ru/post/333012/
All Articles