How isometric worlds are created
We all played amazing isometric games , be it the first Diablo, Age of Empires or Commandos. When you first meet with an isometric game, you can ask yourself: is it two-dimensional , three-dimensional, or something completely different. The world of isometric games itself has a magical appeal to developers. Let's try to solve the mystery of isometric projection and create a simple isometric level.
For this, I decided to use Phaser with code on JS. The result is an interactive HTML5 application.
')
Please note that this is not a Phaser development tutorial, we simply use it to easily familiarize yourself with the basic concepts of creating an isometric scene. In addition, Phaser has easy ways to create isometric content, such as the Phaser Isometric Plugin .
To simplify the creation of the scene, we will use tiles.
1. Games based on tiles
In two-dimensional tile games, each visual element is broken into small pieces of standard size, called tiles. From such tiles, based on the level data (usually a two-dimensional array), the game world is formed.
Most often in tile games used top or side view . Let's present a standard two-dimensional view from above with two tiles - a grass tile and a wall tile shown in the figure:

Both of these tiles are square images of the same size, that is, the height and width of the tiles are the same. Suppose that the level of the game is a lawn bounded on all sides by walls. In this case, the level data is such a two-dimensional array:
[ [1,1,1,1,1,1], [1,0,0,0,0,1], [1,0,0,0,0,1], [1,0,0,0,0,1], [1,0,0,0,0,1], [1,1,1,1,1,1] ] Here,
0 is the grass tile, and 1 is the wall tile. Placing the tiles according to the level data, we will create a fenced lawn shown in the figure:
You can take another step and add corner tiles, as well as separate tiles of vertical and horizontal walls. This will require five additional tiles, in addition, you will have to change the level data:
[ [3,1,1,1,1,4], [2,0,0,0,0,2], [2,0,0,0,0,2], [2,0,0,0,0,2], [2,0,0,0,0,2], [6,1,1,1,1,5] ] See the image below, where I marked the tiles with numbers corresponding to their values in the level data:

We have dealt with the concept of tile levels, let's now look at how to use simple pseudo-code of a two-dimensional grid to assemble our level:
for (i, loop through rows) for (j, loop through columns) x = j * tile width y = i * tile height tileType = levelData[i][j] placetile(tileType, x, y) If we use the above image tiles with equal width and height, then we get the same level dimensions. If the width and height of the tile in our example are 50 pixels, then the total size of the level will be 300 by 300 pixels.
As mentioned above, tiles are usually used in games with a top or side view. For an isometric view, we need to implement an isometric projection .
2. Isometric projection
The best technical explanation for isometric projection , I think, is given in this article by Clint Bellanger :
We tilt the camera in two axes (turn the camera 45 degrees sideways, then 30 degrees down). This creates a rhombic grid, in which the width of the cells is twice the height. This style has become popular due to strategic games and action-RPG. If we look at the cube in this form, we see its three sides (the top and two sides).
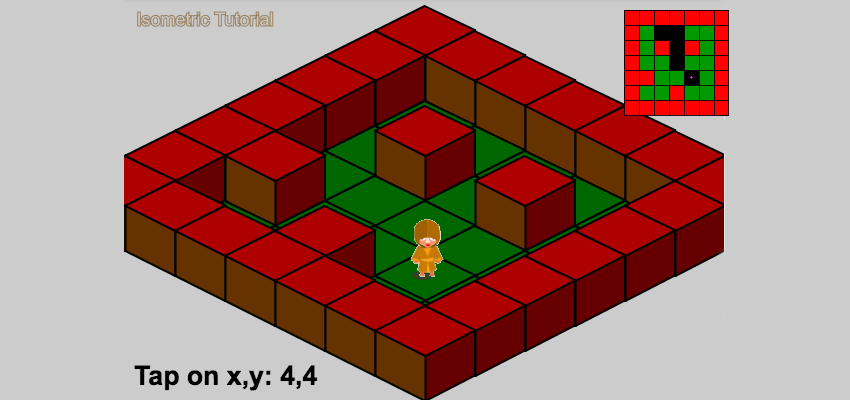
Although this sounds a bit tricky, the implementation of this type is quite simple. We need to understand how two-dimensional and isometric spaces correspond, that is, to understand the relationship between the level data and the view. We need to convert the Cartesian coordinates of the top view into isometric coordinates. The figure below shows a graphical transformation:

Isometric tile placement
Let us try to simplify the connection between the level data stored in a two-dimensional array and the isometric view, that is, the process of converting Cartesian coordinates to isometric. We will create an isometric view for our fenced lawn. The two-dimensional implementation of this level was a simple two-cycle iteration, arranging square tiles offset by their width and height. For an isometric view, the pseudocode remains the same, but the
placeTile() function changes.The original function simply draws the images of the tiles in the
x and y passed to it, and for the isometric view we need to calculate the corresponding isometric coordinates. The equations for this are presented below. isoX and isoY represent the isometric coordinates X and Y, and cartX and cartY are the Cartesian coordinates X and Y: // : isoX = cartX - cartY; isoY = (cartX + cartY) / 2; // : cartX = (2 * isoY + isoX) / 2; cartY = (2 * isoY - isoX) / 2; Yes, that's all. These simple equations create the magic of isometric projection. Here are Phaser utility functions that can be used to convert from one system to another using the very convenient
Point class: function cartesianToIsometric(cartPt){ var tempPt=new Phaser.Point(); tempPt.x=cartPt.x-cartPt.y; tempPt.y=(cartPt.x+cartPt.y)/2; return (tempPt); } function isometricToCartesian(isoPt){ var tempPt=new Phaser.Point(); tempPt.x=(2*isoPt.y+isoPt.x)/2; tempPt.y=(2*isoPt.y-isoPt.x)/2; return (tempPt); } So, we can use the auxiliary
cartesianToIsometric method to convert input 2D coordinates to isometric inside the placeTile method. Except for this, the display code remains the same, but we need to create new tile images. We cannot use old square tiles from the top view. The figure below shows the new isometric tiles of grass and walls along with the finished isometric level: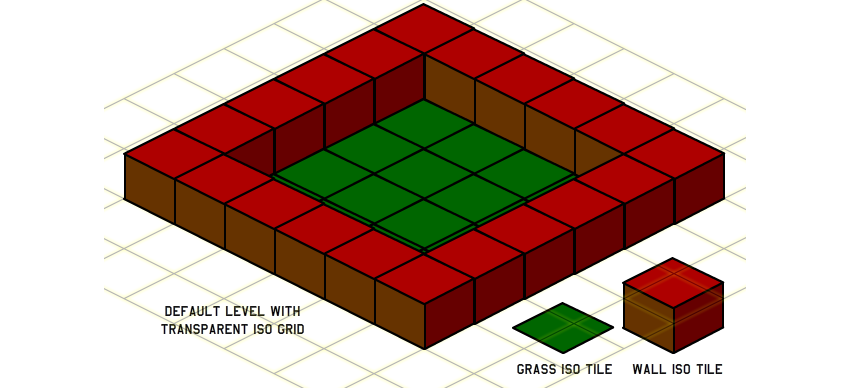
Incredible, right? Let's see how the usual two-dimensional position is converted to isometric:
2D point = [100, 100]; // isoX = 100 - 100; // = 0 isoY = (100 + 100) / 2; // = 100 Iso point == [0, 100]; That is, the input data
[0, 0] converted to [0, 0] , and [10, 5] - to [5, 7.5] .For our fenced lawn, we can determine the passable areas by checking whether the value of the element of the array is equal to
0 in the desired coordinate. If equal, then this is grass. To do this, we need to determine the coordinates of the array. We can find the coordinates of a tile in the level data from its Cartesian coordinates using this function: function getTileCoordinates(cartPt, tileHeight){ var tempPt=new Phaser.Point(); tempPt.x=Math.floor(cartPt.x/tileHeight); tempPt.y=Math.floor(cartPt.y/tileHeight); return(tempPt); } (Here we assume that the height and width of the tile are the same, as happens in most cases.)
That is, knowing the pair of screen (isometric) coordinates, we can find the coordinates of the tile by calling the function:
getTileCoordinates(isometricToCartesian(screen point), tile height); This point on the screen can be, say, the position of the mouse cursor or the item being picked up.
Registration Points
In Flash, you can choose arbitrary graphics points as a base point or
[0,0] . An analogue of this in the Phaser is the Pivot . When we have the graphics, say, at point [10,20] , then this point Pivot corresponds to [10,20] . By default, [0,0] or Pivot is considered the left upper point. If you try to create the level above using this code, you will not get the desired result. Instead, you will have a flat land without walls, as shown below:
This is because the tile images are of different sizes, and we do not take into account the height attribute of the wall tile. The figure below shows the different tile images we use and the white circle, in which by default they are [0,0]:

Note that when using base points (Pivot), by default the hero is in the wrong place. Also note that we lose the height of the wall when we draw it with the base point by default. The picture on the right shows how they should be positioned correctly so that the height of the wall tile is taken into account and the hero is in the middle of the grass tile. This problem can be solved in different ways.
- Make the sizes of the images of all the tiles the same, and correctly place the graphics in the image. At the same time, in each tile image, many empty areas are created.
- Manually set the base point for each tile so that they are positioned correctly.
- Draw tiles with a certain offset.
For this tutorial, I chose the third method, because it will work even in a framework in which you cannot change the base points.
3. Motion in isometric coordinates
You should never move characters or objects in isometric coordinates directly. Instead, we will manage the data of the game world in Cartesian coordinates and simply use the above functions to update the position on the screen. For example, if we want to move a character forward in the positive direction along the Y axis, then we can simply increase its
y property in two-dimensional coordinates, and then convert the final position to isometric coordinates: y = y + speed; placetile(cartesianToIsometric(new Phaser.Point(x, y))) Let's summarize all the new concepts that we have studied, and try to implement a working example of an object moving in an isometric world. You can use the necessary graphical resources from the
assets folder in the git source code repository .Depth sorting
If you tried to move the image of the ball in a fenced garden, you noticed problems with sorting by depth . If there are moving elements in the isometric world, then besides the usual location, we need to take care of the sorting by depth . Proper sorting ensures that objects closer to the screen will be drawn on top of more distant objects. As mentioned in this article , the simplest sorting method is to use the Cartesian Y coordinate: the higher the object is on the screen, the sooner it should be drawn. This may work well for simple isometric scenes, but it would be better to redraw the entire isometric scene while moving according to the coordinates of the tile in the array. Let me explain this approach in detail using the pseudocode for drawing a level:
for (i, loop through rows) for (j, loop through columns) x = j * tile width y = i * tile height tileType = levelData[i][j] placetile(tileType, x, y) Imagine that an object or character is on a tile
[1,1] , that is, on the topmost green tile in an isometric form. For the level to be properly drawn, the character needs to be drawn after the corner tile of the wall, the left and right tile of the wall, and the ground are drawn, as shown in the figure:
If we perform the rendering cycle in accordance with the pseudocode, the middle corner wall will be drawn first, then the cycle will continue to draw all the walls in the upper right part until it reaches the right corner. In the next cycle, he will draw a wall to the left of the character, and then a grass tile on which the character stands. Since we have determined that this is the tile that the character takes, we draw the character after the grass tile. Thus, if on the free three tiles of the grass next to the character's tile there were walls, then these walls would overlap the character, ensuring correct sorting by depth.
4. Creating graphics
Isometric graphics can, but need not be, pixel art. When working with isometric pixel art, it is useful to study the RhysD manual , which contains everything you need. The theory can be studied in Wikipedia .
When creating isometric graphics, you need to follow the following rules:
- Start with an empty isometric grid and stick to it with pixel-by-pixel accuracy.
- Try to break the graphics into simple isometric tile images.
- Make each tile passable or impassable . Otherwise it will be difficult to work with tiles containing both passable and impassable areas.
- Most tiles should be seamless so that they can level the level in any direction.
- Shadows are difficult to create if you do not use a solution with layers, in which the shadows are first drawn on the ground layer, and then the character is drawn on the upper layer (or trees and other objects). If you do not use several layers, then make sure that the shadows fall forward and, for example, do not cover the hero standing behind the tree.
- If you need to use a tile image larger than the standard size of an isometric tile, then try to choose a size that is a multiple of the standard tile size. In such cases, it is better to use layers so that you can cut the graphics into different pieces depending on its height. For example, a tree can be cut into three parts - the root, the trunk and the foliage. So it will be easier to sort the depths, because it will be possible to draw parts in the corresponding layers that correspond to their heights.
Isometric tiles larger than a single tile size cause problems when sorting by depth. Such problems are discussed in the following articles:
Posts on the topic
5. Isometric characters
First we need to decide on the directions in which we can move in our game. Usually in games it is allowed to move in four or eight directions. Look at the figure below to understand the connection between two-dimensional and isometric space:

Please note that in a game with a top view, when you press the up key, the character will move vertically upwards, but in an isometric game, it will move at a 45 degree angle towards the upper right corner.
For the top view, we can create one set of animations of a character looking in one direction, and then just rotate all the animations. For an isometric character's graphics, you need to create an animation for each of the allowed directions, that is, to move in eight directions, you need to create eight animations for each action.
For ease of understanding, directions are commonly referred to as “north,” “north-west,” “west,” and so on. In the frames of the character in the picture are shown frames of a fixed position, starting from the southeast and clockwise:

We will have the characters in the same way as the tiles. The movement of the character is performed by calculating the Cartesian coordinates and converting them into isometric ones. Suppose you use a keyboard to control a character.
We will assign two variables,
dX and dY , the value of which depends on the control keys pressed. By default, these variables are equal to 0 , and the values are assigned to them according to the table below, where 1 under the key indicates that the key is pressed, 0 means that it is not pressed. dX dY ================ 0 0 0 0 0 0 1 0 0 0 0 1 0 1 0 0 0 -1 0 0 1 0 1 0 0 0 0 1 -1 0 1 0 1 0 1 1 1 0 0 1 -1 1 0 1 1 0 1 -1 0 1 0 1 -1 -1 Now, using the
dX and dY we can update the Cartesian coordinates as follows: newX = currentX + (dX * speed); newY = currentY + (dY * speed); So,
dX and dY are a change in the position of the character in X and Y, depending on the keystrokes. As stated above, we can easily calculate new isometric coordinates: Iso = cartesianToIsometric(new Phaser.Point(newX, newY)) Having received a new isometric position, we must move the character to this position. Based on the
dX and dY we can understand in which direction the character is looking and use the appropriate animation. After moving the character, do not forget to redraw the level with the appropriate sorting by depth, because the character's tile coordinates may change.Collision detection
Collision detection is performed by checking whether the tile in the new computed position of the object is impassable. So, after finding a new position, we can’t immediately move a character there, we first need to check what kind of tile it takes.
tile coordinate = getTileCoordinates(isometricToCartesian(current position), tile height); if (isWalkable(tile coordinate)) { moveCharacter(); } else { // ; } In the
isWalkable() function, we check whether the value of the level data array in the given coordinate is passable. We also need to update the direction in which the character is looking, even if he is not moving , in case he is confronted with an impassable tile.This looks like the right solution, but it will only work for objects without a volume. To calculate collisions, we consider only one point (the center point of the character). In fact, we need to find all four angles from a given two-dimensional center point and calculate the collisions for all these angles. If any of the corners falls into an impassable tile, then the character cannot be moved.
Depth sorting with characters
Consider a character and a tree tile in an isometric world that have the same image size , no matter how unnatural it looks.
To understand the depth sorting well, we need to understand that when the X and Y coordinates of a character are smaller than those of a tree, the tree overlaps the character. When the X and Y coordinates of a character are larger than those of a tree, the character overlaps the tree. When their X coordinates are equal, then the decision is made only on the Y coordinate: an object with a higher Y coordinate overlaps another one. If the Y coordinates coincide, then the decision is made only on X: an object with a large X overlaps another.
As mentioned above, the simplified version of the algorithm consists in a simple drawing of levels from distant tiles (ie,
tile[0][0] ) to neighbors, line by line. If a character takes a tile, first we draw a land tile, and then draw the character tile. This will work well because the character cannot occupy the tile walls.6. Time for a demo!
Here is a Phaser demo . Click the mouse to switch to the interactive area, and then control the character with the arrow keys. To move diagonally, press two keys.
7. Collected items
Assembled objects are objects that can be picked up at a level, usually just stepping on them. For example, it could be coins, crystals, ammunition, etc.
Item data can be stored directly in the level data, as shown below:
[ [1,1,1,1,1,1], [1,0,0,0,0,1], [1,0,8,0,0,1], [1,0,0,8,0,1], [1,0,0,0,0,1], [1,1,1,1,1,1] ] In this level data, we use
8 to denote an object on a grass tile ( 1 and 0 , as before, denote grass and walls). This can be a tile image with a grass tile on which an image of an object is superimposed. According to this logic, we will need two different states of the tile for each tile on which the item may be located: one with the item, and the other without it, which is displayed after receiving the item.Usually in isometric graphics there are many passable tiles. Suppose we have 30 of them. If we use the above approach, then if we have N lifted items, we will need N x 30 to the existing 30 tiles. This is not very efficient. Therefore, we should create such combinations dynamically. To solve this problem, you can use the same method that we used above to place your character. When we get to the tile with the item, we first draw the grass tile, and then place the item on it. Thus, in addition to the 30 passable tiles, we need all N tiles of items, but we will need numerical values to denote each combination in the level data. In order not to enter N x 30 values, you can store a separate
pickupArray array for storing data about objects, separate from levelData . The finished level with the item is shown below:
In our example, I will make it easier and will not use a separate array for objects.
Collecting items
Object recognition is performed in the same way as collision detection, but after moving a character.
if(onPickupTile()){ pickupItem(); } function onPickupTile(){//, return (levelData[heroMapTile.y][heroMapTile.x]==8); } In the function
onPickupTile(), we check whether the value of the array levelDatain the coordinate is heroMapTiletile with the object. The number in the array levelDataat the coordinate of this tile indicates the type of item. We check the collisions before moving the character, but checking the items is done after: in the case of collisions, the character will not be able to take a point if she is already occupied by an impassable tile, and in the case of items the character can move to the tile.It is also worth noting that collision data usually never changes, and object data changes when we pick up an item. (This usually just changes the value in the array
levelData, for example, from 8to 0.)This leads to the problem: what happens when we need to restart the level, that is, to restore all the objects at their initial points? We have no information for this, because the array
levelDatachanges when the object is picked up. The solution is to use a copy of the array level in the game and save the constant array levelData. For example, we use levelDataand levelDataLive[]clone the last of the first one at the beginning of the level, and then change it during the game only levelDataLive[].For example, I create a random item on a free grass tile after each assembled item and increase the value
pickupCount. The function is pickupItemas follows: function pickupItem(){ pickupCount++; levelData[heroMapTile.y][heroMapTile.x]=0; // spawnNewPickup(); } You probably noticed that we check the availability of items always when the character is on the tile. This can happen several times a second (we check only when the user moves, but we can repeat it over and over again in one tile), but the above logic will be executed without error. Once we assign the array data
levelDatavalue 0at the first detection of lifting the object, all subsequent checks onPickupTile()will return to the tile false. See this interactive example.8. Trigger Tiles
As the name implies, trigger tiles trigger some actions when a player steps on them or presses a key on them. They can teleport the player to another location, open the gate, create enemies, and so on. In a sense, collected items are simply a special type of trigger: when a player steps on a coin tile, the coin disappears and the coin counter increases.
Let's see how you can realize the door that takes the player to another level. The tile next to the door will trigger. When a player presses the x key , it moves to another level.
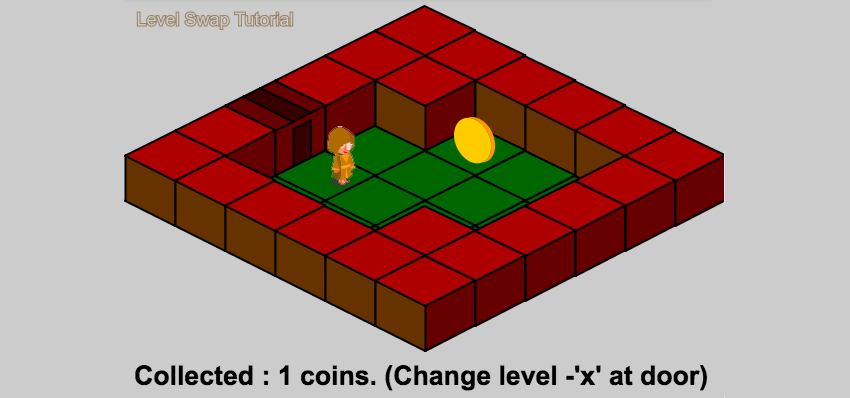
To change levels, you just need to replace the current array
levelDatawith an array of a new level, and then assign a new position and directionheroMapTilecharacter. Suppose there are two levels with doors through which you can pass. Since the land tile next to the door will be the active tile in both levels, you can use it as a new character position appearing on the level.The logic of implementation here is the same as for the collected items. To store the values of the trigger tiles, we again use an array
levelData. In our example, it 2will mean a tile with a door, and the value next to it will be a trigger. I used 101and 102, having decided that any tile with a value greater than 100 will be the active tile, and the value minus 100 will be the level to which it leads: var level1Data= [[1,1,1,1,1,1], [1,1,0,0,0,1], [1,0,0,0,0,1], [2,102,0,0,0,1], [1,0,0,0,1,1], [1,1,1,1,1,1]]; var level2Data= [[1,1,1,1,1,1], [1,0,0,0,0,1], [1,0,8,0,0,1], [1,0,0,0,101,2], [1,0,1,0,0,1], [1,1,1,1,1,1]]; The test code for the trigger trigger event is shown below:
var xKey=game.input.keyboard.addKey(Phaser.Keyboard.X); xKey.onUp.add(triggerListener);// Signal listener up function triggerListener(){ var trigger=levelData[heroMapTile.y][heroMapTile.x]; if(trigger>100){// trigger-=100; if(trigger==1){// 1 levelData=level1Data; }else {// 2 levelData=level2Data; } for (var i = 0; i < levelData.length; i++) { for (var j = 0; j < levelData[0].length; j++) { trigger=levelData[i][j]; if(trigger>100){// heroMapTile.y=j; heroMapTile.x=i; heroMapPos=new Phaser.Point(heroMapTile.y * tileWidth, heroMapTile.x * tileWidth); heroMapPos.x+=(tileWidth/2); heroMapPos.y+=(tileWidth/2); } } } } } The function
triggerListener()checks whether the value of the data array of the triggers in the given coordinate is greater than 100. If so, then we determine which level we need to go to by subtracting 100 from the tile value. The function finds the tile trigger in the new one levelData, which will be the coordinate of the character creation. I made the trigger activate when the x key was released ; if you simply read a key that is pressed, we will end up in a cycle that will move us between levels while the key is being pressed, because the character is always created on a new level on the active tile. Here is a working demo . Try to pick up objects, stepping on them, and change levels, standing in front of the door and pressing x .9. Shells
We call shells what moves in a certain direction at a certain speed, for example, a bullet, a magic spell, a ball, etc. Everything related to characters is applicable to shells, with the exception of height: shells usually do not roll on the ground, but fly at a certain height. The bullet flies at the level of the character’s waist, and the ball may even jump.
Interestingly, the isometric height corresponds to the height in a two-dimensional side view, although smaller in magnitude. There are no complex transformations. If the ball in Cartesian coordinates is ten pixels above the ground, then in isometric coordinates it can be above the ground at 10 or 6 pixels. (In our case, the corresponding axis will be the Y axis.)
Let's try to realize the ball, galloping in our fenced garden. For extra realism, we will add a shadow to the ball. All that is needed is to add the height of the rebound to the isometric value of the Y ball. The value of the rebound height will change frame by frame depending on gravity, and as soon as the ball touches the ground, we will change the sign of the current speed along the Y axis.
Before we start to deal with jumps in the isometric system, we will try to implement them in a two-dimensional Cartesian system. We denote the force of the ball rebound variable
zValue. To begin with, imagine that the ball rebound force is 100, that is zValue = 100.We use two variables:
incrementValuethat initially has a value 0, and gravitythat has a value -1. In each frame we will subtractincrementValuefrom zValueand subtract gravityfrom incrementValueto create a damping effect. When it zValuereaches 0, it means that the ball has reached the ground. At this moment we change the sign incrementValue, multiplying it by -1, and turning it into a positive number. This means that from the next frame the ball will start moving upwards, that is, it will rebound.Here is how it looks in code:
if(game.input.keyboard.isDown(Phaser.Keyboard.X)){ zValue=100; } incrementValue-=gravity; zValue-=incrementValue; if(zValue<=0){ zValue=0; incrementValue*=-1; } For an isometric view, the code also remained the same, with a slight difference: we use a lower initial value
zValue. The following shows how it zValueadds to the value of the isometric coordinate of the yball when drawing. function drawBallIso(){ var isoPt= new Phaser.Point();// var ballCornerPt=new Phaser.Point(ballMapPos.x-ball2DVolume.x/2,ballMapPos.y-ball2DVolume.y/2); isoPt=cartesianToIsometric(ballCornerPt);// gameScene.renderXY(ballShadowSprite,isoPt.x+borderOffset.x+shadowOffset.x, isoPt.y+borderOffset.y+shadowOffset.y, false);// gameScene.renderXY(ballSprite,isoPt.x+borderOffset.x+ballOffset.x, isoPt.y+borderOffset.y-ballOffset.y-zValue, false);// } See interactive sample .
The role played by the shadow is very important, it adds the realism of this illusion. In addition, notice that we now use two screen coordinates (x and y) to represent the three dimensions in isometric coordinates — the Y axis in screen coordinates is also the Z axis in isometric coordinates. This can be confusing.
10. Finding a path and moving on it.
Finding a path and moving along it is a rather complicated process. To find the path between two points, there are many different solutions using different algorithms, but since it
levelDatais a two-dimensional array, everything is much simpler than it could be. We have clearly defined unique nodes that can be occupied by the player, and we can easily check whether it is possible to pass through them.Posts on the topic
- A * Pathfinding for Beginners
- Goal-Based Vector Field Pathfinding
- Speed Up A * Pathfinding With Jump Point Search Algorithm
- The "Path Following" Steering Behavior
A detailed overview of the pathfinding algorithms is too large for this article, but I will try to explain the most common method: the shortest path algorithm, the most famous implementations of which are A * and the Dijkstra algorithm.
Our goal is to find the nodes connecting the start node to the end node. From the start node, we visit all eight neighboring nodes, and mark them as visited. This process repeats recursively for each new visited node.
Each thread keeps track of the nodes visited. When passing to neighboring nodes, already visited nodes are skipped (recursion is stopped). The process continues until we reach the end node where the recursion is completed and the entire path passed is returned as an array of nodes. Sometimes the end node cannot be reached, that is, the path search fails. Usually we find several paths between nodes. In this case, we choose one of them with the minimum number of nodes.
Finding the way
It is foolish to reinvent the wheel when it comes to clearly described algorithms, so we will use existing solutions to find the way. In Phaser, we need a JavaScript solution, so I chose EasyStarJS . The initialization of the search engine is performed as follows:
easystar = new EasyStar.js(); easystar.setGrid(levelData); easystar.setAcceptableTiles([0]); easystar.enableDiagonals();// , easystar.disableCornerCutting();// Since the array
levelDatacontains only 0and 1, we can immediately transfer it to the array of nodes. 0We denoted the passable node by value . We also included the ability to move diagonally, but turned it off when the movement occurs near the corners of impassable tiles.This is done because with a diagonal movement a character can crash into an impassable tile. In this case, the collision recognition system will not allow the character to go through. In addition, it should be noted that in the example I completely deleted the recognition of collisions, because in our example of the character artificial intelligence will move along the way and it is not required.
We will recognize mouse click on any free tile in the level and calculate the path using the function
findPath. The callback method plotAndMovereceives an array of nodes of the created path. We mark the path found on game.input.activePointer.leftButton.onUp.add(findPath) function findPath(){ if(isFindingPath || isWalking)return; var pos=game.input.activePointer.position; var isoPt= new Phaser.Point(pos.x-borderOffset.x,pos.y-borderOffset.y); tapPos=isometricToCartesian(isoPt); tapPos.x-=tileWidth/2;// - tapPos.y+=tileWidth/2; tapPos=getTileCoordinates(tapPos,tileWidth); if(tapPos.x>-1&&tapPos.y>-1&&tapPos.x<7&&tapPos.y<7){// if(levelData[tapPos.y][tapPos.x]!=1){// isFindingPath=true; // easystar.findPath(heroMapTile.x, heroMapTile.y, tapPos.x, tapPos.y, plotAndMove); easystar.calculate(); } } } function plotAndMove(newPath){ destination=heroMapTile; path=newPath; isFindingPath=false; repaintMinimap(); if (path === null) { console.log("No Path was found."); }else{ path.push(tapPos); path.reverse(); path.pop(); for (var i = 0; i < path.length; i++) { var tmpSpr=minimap.getByName("tile"+path[i].y+"_"+path[i].x); tmpSpr.tint=0x0000ff; //console.log("p "+path[i].x+":"+path[i].y); } } } Driving on the way
Having received the path in the form of an array of nodes, we must force the character to move along it.
Suppose we want the character to move to the tile we clicked on. First we look for the path between the node occupied by the character and the node that is clicked. If the path is found, then we need to move the character to the first node of the node array, marking it as a destination. Having reached the destination node, we check if there are any more nodes in the array of nodes, and if so, then mark the next node as the destination point, and so on, until we reach the destination node.
Also, each time a node is reached, we will change the direction of the player based on the current node and the new destination node. Between the nodes we just go in the right direction until we reach the destination node. This is a very simple AI, and in our example it is implemented in a method
aiWalkpartially shown below: function aiWalk(){ if(path.length==0){// if(heroMapTile.x==destination.x&&heroMapTile.y==destination.y){ dX=0; dY=0; isWalking=false; return; } } isWalking=true; if(heroMapTile.x==destination.x&&heroMapTile.y==destination.y){// , , // , stepsTaken++; if(stepsTaken<stepsTillTurn){ return; } console.log("at "+heroMapTile.x+" ; "+heroMapTile.y); // heroMapSprite.x=(heroMapTile.x * tileWidth)+(tileWidth/2)-(heroMapSprite.width/2); heroMapSprite.y=(heroMapTile.y * tileWidth)+(tileWidth/2)-(heroMapSprite.height/2); heroMapPos.x=heroMapSprite.x+heroMapSprite.width/2; heroMapPos.y=heroMapSprite.y+heroMapSprite.height/2; stepsTaken=0; destination=path.pop();// if(heroMapTile.x<destination.x){ dX = 1; }else if(heroMapTile.x>destination.x){ dX = -1; }else { dX=0; } if(heroMapTile.y<destination.y){ dY = 1; }else if(heroMapTile.y>destination.y){ dY = -1; }else { dY=0; } if(heroMapTile.x==destination.x){ dX=0; }else if(heroMapTile.y==destination.y){ dY=0; } //...... } } We need to filter out the right mouse points. To do this, we determine that we clicked in a passable area, and not on the wall tile or another impassable tile.
Another interesting moment of coding AI: we do not want the character to turn to face the next tile in the array of nodes as soon as it reaches the current one, because such an instantaneous turn will lead to the character walking along the boundaries of the tiles. Instead, we should wait for the character to walk a few steps to the tile, and then start looking for the next destination. It is also best to manually place the character in the middle of the current tile just before the turn, so that everything looks the best.
You can see the working demo .
11. Isometric scrolling
When the level area is much larger than the screen area, it is necessary to perform scrolling .

The visible screen area can be viewed as a small rectangle in a large right-guard area of the entire level area. Scrolling is a simple movement of the inner rectangle in the inner one. Usually in the scrolling process, the position of the character in the screen rectangle remains constant - most often it is located in the center of the screen. Interestingly, to implement scrolling, we only need to track the corner point of the inner rectangle.
This corner point, which we denote in Cartesian coordinates, falls into one of the tiles in the level data. To scroll, we increase the position of the corner point along the X and Y axes in Cartesian coordinates. Now we can convert this point to isometric coordinates and use them to draw the screen.
New converted values in isometric space should be the angle of the screen, that is, new
(0, 0). Therefore, when parsing and drawing the level data, we subtract this value from the isometric position of each tile. We can determine if the new tile position is within the screen.Alternatively, we can draw an isometric tile grid of size x x y on the screen so that the draw cycle is effective for large levels.
All these steps can be expressed as follows:
- Update the Cartesian coordinates X and Y of the corner point.
- Transformation into isometric space.
- Subtracting this value from the isometric position of drawing each tile.
- Drawing on the screen only a specified number of tiles, starting from this new angle.
- Advanced: Tile rendering only if the new isometric drawing position is within the screen.
var cornerMapPos=new Phaser.Point(0,0); var cornerMapTile=new Phaser.Point(0,0); var visibleTiles=new Phaser.Point(6,6); //... function update(){ //... if (isWalkable()) { heroMapPos.x += heroSpeed * dX; heroMapPos.y += heroSpeed * dY; // cornerMapPos.x -= heroSpeed * dX; cornerMapPos.y -= heroSpeed * dY; cornerMapTile=getTileCoordinates(cornerMapPos,tileWidth); // heroMapTile=getTileCoordinates(heroMapPos,tileWidth); // renderScene(); } } function renderScene(){ gameScene.clear();// , var tileType=0; // var startTileX=Math.max(0,0-cornerMapTile.x); var startTileY=Math.max(0,0-cornerMapTile.y); var endTileX=Math.min(levelData[0].length,startTileX+visibleTiles.x); var endTileY=Math.min(levelData.length,startTileY+visibleTiles.y); startTileX=Math.max(0,endTileX-visibleTiles.x); startTileY=Math.max(0,endTileY-visibleTiles.y); // for (var i = startTileY; i < endTileY; i++) { for (var j = startTileX; j < endTileX; j++) { tileType=levelData[i][j]; drawTileIso(tileType,i,j); if(i==heroMapTile.y&&j==heroMapTile.x){ drawHeroIso(); } } } } function drawHeroIso(){ var isoPt= new Phaser.Point();// var heroCornerPt=new Phaser.Point(heroMapPos.x-hero2DVolume.x/2+cornerMapPos.x,heroMapPos.y-hero2DVolume.y/2+cornerMapPos.y); isoPt=cartesianToIsometric(heroCornerPt);// 2D- gameScene.renderXY(sorcererShadow,isoPt.x+borderOffset.x+shadowOffset.x, isoPt.y+borderOffset.y+shadowOffset.y, false);// gameScene.renderXY(sorcerer,isoPt.x+borderOffset.x+heroWidth, isoPt.y+borderOffset.y-heroHeight, false);// } function drawTileIso(tileType,i,j){// var isoPt= new Phaser.Point();// var cartPt=new Phaser.Point();// . cartPt.x=j*tileWidth+cornerMapPos.x; cartPt.y=i*tileWidth+cornerMapPos.y; isoPt=cartesianToIsometric(cartPt); // . if(tileType==1){ gameScene.renderXY(wallSprite, isoPt.x+borderOffset.x, isoPt.y+borderOffset.y-wallHeight, false); }else{ gameScene.renderXY(floorSprite, isoPt.x+borderOffset.x, isoPt.y+borderOffset.y, false); } } Notice that the increment of the corner point occurs in the opposite direction to the update of the character’s position as it moves. Thanks to this, the character remains in the same place relative to the screen. See this example (use the arrow keys to scroll, click to increase the visible grid).
A couple of notes:
- , .
- , , . , X Y, X , Y . , .
- - , .
- , . . . ?
Conclusion
This tutorial is mainly intended for beginners learning isometric game worlds. Many of the concepts presented here have other, slightly more complex solutions, and I deliberately chose the simplest ones.
Perhaps this guide will not solve all the problems you have, but the information obtained will allow you to develop these concepts to create more complex solutions. For example, the implemented simple sorting by depth will not help in the case of levels with several floors and platform tiles moving from one floor to another. But this is a task for another tutorial.
Source: https://habr.com/ru/post/332922/
All Articles