Port forwarding or how to get to the network for NAT using Node.JS
Hello! I want to share another way of port forwarding, now on Node.JS!
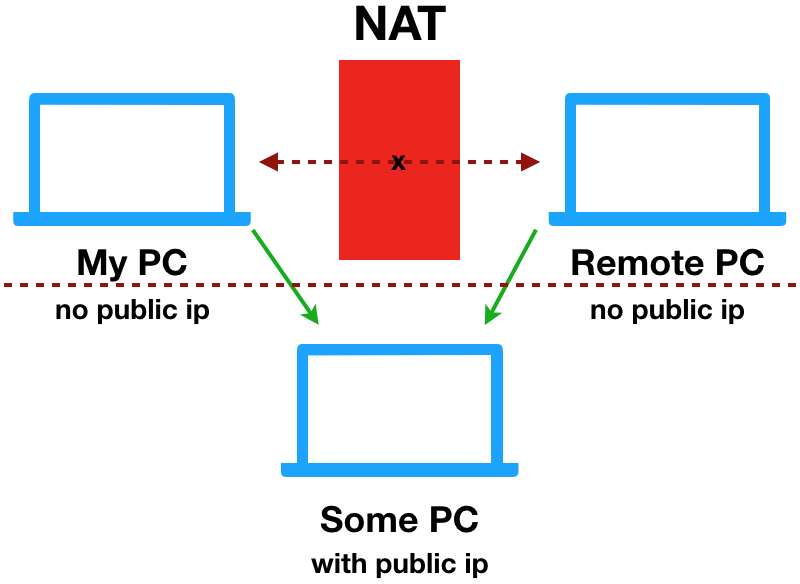
What is it for? Suppose there is a remote computer to which you want to connect, for example, via ssh, rdp, http (s), proxy, vnc, etc. But, alas, it does not have a public IP for one reason or another.

This example assumes your device has an external IP.
What then can be done? Connect using a remote PC to yours (which listens, for example, port 3000), having forwarded a certain port , for example, 22. As a result, going through ssh to localhost: 3000, we will establish a connection with the remote PC.
')
What is needed for this? On your and remote PC:
We clone github.com/mgrybyk/node-tunnel and install the npm modules:
Run
On your PC, run:
in another terminal:
On the remote PC, create a .env file, where we indicate which port to forward:
At this setting is completed, we can connect:
Ssh session to remote machine is set!
To start (and to play) server, client and agent can be run on the same device, then, by connecting to localhost: 8000 via ssh, you will go to yourself. You can specify another host instead of localhost; instead of ssh, you can use another TCP port, for example, http (s)
But what to do if you do not have an external IP ? We need to find an intermediate point where it is available, for example, a free container on AWS .
The essence is about the same, for example, now take the rdp port and give the names of the agent and the client.
The names of the individual agent and clients must match.
On the remote PC, edit the .env file, this time also specifying the Windows PC host within your network:
And run:
On a PC with an external IP, we simply start the
On your PC, create a .env file, specifying the port that the client will listen to:
Run the
More customers?
You can tell how to configure (create .env) client, a friend. Having started the client, he will also be able to access rdp there as well.
.env
For convenience, you can create many files such as .env.ssh, .env.rdp, .env.proxy, etc., and then run agent / client / server, passing the file name as an argument, for example:
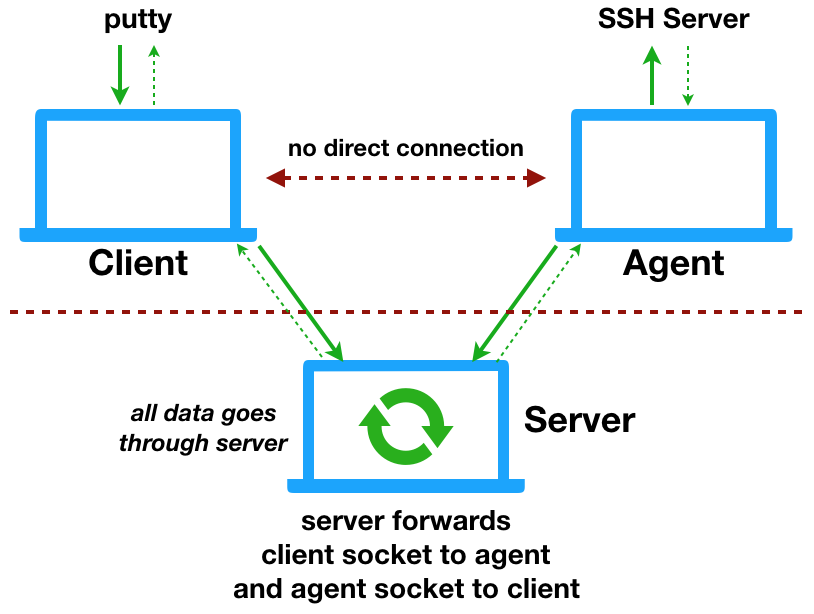
Wow, I will begin the most difficult, I will try to explain in a few words how it works .
Used the standard module Net , which works on TCP .
Clients and agents connect to the server, which forwards traffic from the agent to the client and back. This is the main magic.
The client, server, and agent have two important parts.
The first is a socket for establishing a connection; to make it clear who is who, let's call it - a service socket.
The second is a socket for data transfer. This is where the creation of pipes occurs:
Ssh example
... a little for each separately
Server
Knowing who is who, the server created for the agent redirects traffic from the agent to the client and back. No encryption! It works like this:
Agent
After establishing a connection with the server, the agent waits for commands from clients. As soon as the command arrives, the agent establishes a connection to the specified host: port, and then redirects traffic from the server to the open connection and back.
Client
the client creates a local server (port N_T_CLIENT_PORT). Upon successful connection to the remote server, it redirects all traffic from the remote server to the local server and back.
It's all!

Thanks for reading.
I hope you had at least a little bit of interest, a bit of it is understandable and, maybe, even this application is useful, as it was useful for me and my colleagues.
→ Github
What is it for? Suppose there is a remote computer to which you want to connect, for example, via ssh, rdp, http (s), proxy, vnc, etc. But, alas, it does not have a public IP for one reason or another.
This example assumes your device has an external IP.
What then can be done? Connect using a remote PC to yours (which listens, for example, port 3000), having forwarded a certain port , for example, 22. As a result, going through ssh to localhost: 3000, we will establish a connection with the remote PC.
')
What is needed for this? On your and remote PC:
We clone github.com/mgrybyk/node-tunnel and install the npm modules:
cd node-tunnel npm install Run
On your PC, run:
node server in another terminal:
node client On the remote PC, create a .env file, where we indicate which port to forward:
N_T_AGENT_DATA_HOST=localhost
N_T_AGENT_DATA_PORT=22
node agent At this setting is completed, we can connect:
ssh -p 8000 localhost Ssh session to remote machine is set!
To start (and to play) server, client and agent can be run on the same device, then, by connecting to localhost: 8000 via ssh, you will go to yourself. You can specify another host instead of localhost; instead of ssh, you can use another TCP port, for example, http (s)
But what to do if you do not have an external IP ? We need to find an intermediate point where it is available, for example, a free container on AWS .
The essence is about the same, for example, now take the rdp port and give the names of the agent and the client.
The names of the individual agent and clients must match.
On the remote PC, edit the .env file, this time also specifying the Windows PC host within your network:
N_T_SERVER_HOST= IP
N_T_AGENT_DATA_HOST=Windows PC
N_T_AGENT_DATA_PORT=3389
N_T_AGENT_NAME=test-rdp
And run:
node agent On a PC with an external IP, we simply start the
node server first tilting the repository and installing the npm modules.On your PC, create a .env file, specifying the port that the client will listen to:
N_T_SERVER_HOST= IP
N_T_CLIENT_NAME=test-rdp
N_T_CLIENT_PORT=3388
Run the
node client . Great! Now we can connect via RDP to localhost: 3388 by opening the rdp session to the PC inside the agent network.More customers?
You can tell how to configure (create .env) client, a friend. Having started the client, he will also be able to access rdp there as well.
.env
For convenience, you can create many files such as .env.ssh, .env.rdp, .env.proxy, etc., and then run agent / client / server, passing the file name as an argument, for example:
node client .env.rdp Encryption
ATTENTION! Traffic encryption is not ready yet, until I figured out how to do it better.
When data is encrypted, its length increases, which is why the message is often divided into two. After that, on the other side they need to be glued together before letting go further. It looks too crooked :(
When data is encrypted, its length increases, which is why the message is often divided into two. After that, on the other side they need to be glued together before letting go further. It looks too crooked :(
Wow, I will begin the most difficult, I will try to explain in a few words how it works .
Used the standard module Net , which works on TCP .
Clients and agents connect to the server, which forwards traffic from the agent to the client and back. This is the main magic.
The client, server, and agent have two important parts.
The first is a socket for establishing a connection; to make it clear who is who, let's call it - a service socket.
The second is a socket for data transfer. This is where the creation of pipes occurs:
agentSocket.pipe(clientSocket) clientSocket.pipe(agentSocket) Ssh example
- Connecting to client
- Client redirects traffic to server
- The server redirects traffic to the agent.
- The agent creates a connection to the specified host: port and forwards traffic there.
Well, and vice versa: the response of the SSH server to the agent, then - the server, client, ssh client.
... a little for each separately
Server
- Server is waiting on clients and agents
- When an agent arrives, the server creates a dedicated server for it, through which all traffic will continue
- When a client connects with the same name as the agent, the server sends the client port of the server to the client
- there may be many agents, but the names must be unique
- there can be many clients for each agent, a bunch of "many to one"
Knowing who is who, the server created for the agent redirects traffic from the agent to the client and back. No encryption! It works like this:
- The client comes, we save the link to the socket
- The server notifies the agent that there is a client and it is time to open a connection.
- When the agent arrives - the server "paypit" agent's socket on the first available client socket and back
- The server notifies the client that the pipe has been created and it is time to forward traffic.
In the future, the server does not listen to the “data” event of the client and agent.
Agent
After establishing a connection with the server, the agent waits for commands from clients. As soon as the command arrives, the agent establishes a connection to the specified host: port, and then redirects traffic from the server to the open connection and back.
Client
the client creates a local server (port N_T_CLIENT_PORT). Upon successful connection to the remote server, it redirects all traffic from the remote server to the local server and back.
It's all!
Thanks for reading.
I hope you had at least a little bit of interest, a bit of it is understandable and, maybe, even this application is useful, as it was useful for me and my colleagues.
→ Github
Interesting modules
Who needs to work with pipes, I recommend to watch through2 .
With it, you can wedge in the middle of a chain of pipes for various purposes, for example, logging, error handling, after all, replacing all keywords with your own ones or even ones with zeros :)
With it, you can wedge in the middle of a chain of pipes for various purposes, for example, logging, error handling, after all, replacing all keywords with your own ones or even ones with zeros :)
PS
I am writing an article for the first time and with Russian is bad. Please do not judge strictly.
Pps
Initially, the application was written for myself, since it was just interesting to do something similar on Node. I use it myself for ssh, rdp, proxy, vnc and other purposes :)
Pps
Initially, the application was written for myself, since it was just interesting to do something similar on Node. I use it myself for ssh, rdp, proxy, vnc and other purposes :)
Source: https://habr.com/ru/post/332876/
All Articles