Canvas & SVG: working with graphics
In HTML5, there are two elements for working with web graphics: Canvas and SVG. These two technologies are quite different from each other. It is important to know about their advantages and disadvantages in order to choose the most appropriate technology for a specific task. The SVG element allows you to create vector graphics, and the Canvas element is used to create bitmap images. The Canvas element is also used by WebGL technology for hardware accelerated 3D graphics.
Scalable Vector Graphics (SVG) is a markup language extended from XML to describe 2D vector graphics.
To create an image in vector graphics using geometric primitives (points, lines, curves, polygons). With their help, you can create scalable images that do not lose quality when scaled.
')
SVG - drawing technology with storage of objects in memory (Retained mode graphics). Like HTML, SVG has a document object model (DOM). DOM in SVG, like HTML, has an event model. This means that using this technology to implement interactive actions (such as mouse control, etc.) on the part of the programmer requires less effort, since events are tied directly to DOM elements.
SVG has both regular attributes and presentation attributes. The key point is that you can apply styles to view attributes in accordance with the rules for using CSS styles. For example, to change the color of a shape, you can use the fill property.
An element is used to embed the SVG into the document.
Example 1: Line Drawing
Example 2: Drawing a filled circle
HTML:
CSS:
<Sanvas> is an HTML element that is used to create raster graphics using JavaScript. The <canvas> element provides a convenient API for drawing 2D graphics using JavaScript.
Unlike svg, canvas works with raster graphics. This is an instant drawing technology, it does not store its elements in the DOM tree, therefore there is no way to modify an existing drawing or respond to events. This means that when a new frame is required, it will be necessary to redraw the whole scene.
The <canvas> element has only two attributes - width and height. If the height and width attributes are not set, then according to the html5 specification, the width of the canvas element will be 300 pixels, and the height will be 150. If you change these attributes, the canvas is cleared.
You can also set dimensions arbitrarily in CSS, but during rendering the image will be scaled according to its size and orientation. This may cause the image to look distorted.
To draw, you first need to access the context, which provides an API for creating graphics. The context can be obtained using the getContext () method of the canvas element. As the first parameter, you must specify the type of context that we want to use. At the moment, most modern browsers support 2 types of context "2d" (allows you to create 2D graphics) and "webgl" (allows you to use WebGL technology to create three-dimensional graphics). If the specified context type is not supported by the browser, the getContext () method returns null.
Example: Line Drawing
WebGL is another new technology that uses the canvas element to create graphics. WebGL allows web content to use an API based on OpenGL ES 2.0 to visualize three-dimensional graphics, but it is possible to work with two-dimensional graphics.
To start drawing in the same way as in the previous case, you need to access the context. This is done using the getContext method. The context type must be webgl or experimental-webgl. A context called “experimental-webgl” is a temporary name for the context used during the specification development process.
WebGL works with raster graphics, respectively, the features described in the previous paragraph, are applicable to this technology. But WebGL is characterized by higher performance (comparable to the performance of native applications), since WebGL uses hardware accelerated graphics.
The choice of a particular technology depends on the objectives and goals of a particular project. One of the projects was tasked with plotting graphs with a large number of points (about 10,000 points), it was necessary to provide for the possibility of scaling and moving graphs, as well as redrawing graphs in case of changes in data on the server.
One of the most important parameters that was taken into account when choosing a technology was performance. This parameter depends on the number of objects and surface area. In general, as the number of objects on the screen increases, the SVG performance drops as the objects are gradually added to the DOM, while the canvas performance hardly changes. WebGL has very good performance, but not all modern browsers support this technology, for example, IE began to support webGL starting from version 11 only. WebGL support on mobile browsers is rather limited, most mobile browsers started supporting WebGL only from 2017. Some mobile browsers do not currently support this technology at all.
In addition, in addition to WebGL support by the browser, its support by the graphics processor of the client is also required. Some browsers may disable WebGL support on devices with older graphics processors. Learn more about these limitations in this article.
Due to the weak support of the WebGL technology, only two technologies will be considered further: canvas 2d and svg.
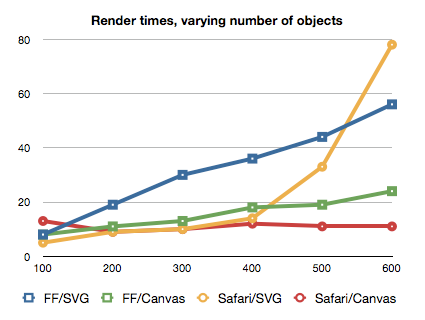
Fig.1 Rendering time (y) depending on the number of objects (x).
Since working with SVG requires a lot of manipulation of the DOM, this technology is not suitable for heavy animation, for example, to build rapidly changing detailed graphs.
However, canvas is not well suited for high resolution screens. From the graph below, it can be seen that as the screen size increases, the performance of the Canvas decreases as more pixels need to be processed.
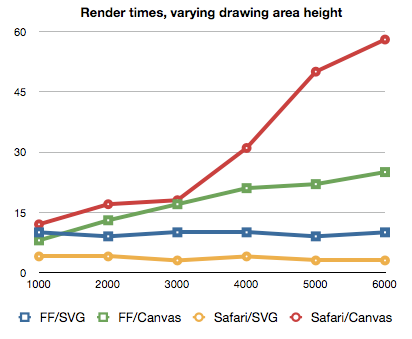
Fig.2 Rendering time (y) depending on the height of the drawing area (x).
It should also be borne in mind that when enlarged, images created using canvas lose a lot of quality. The image below shows lines drawn with svg and canvas.
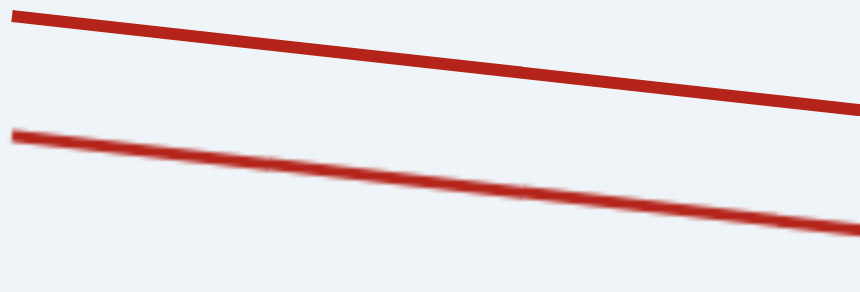
Fig.3 Lines drawn with SVG (top) and Canvas (bottom) when zoomed.
Another problem you might encounter when working with canvas is the limited ability to track events and determine the location of the mouse pointer on the image. There is a built-in isPointInPath API, which allows you to determine whether the specified point is in the last drawn element of the path. * There are third-party libraries that allow you to work with events quite comfortably.
Despite the shortcomings listed above, it was decided to use canvas, primarily because of its high performance compared to svg when drawing a large number of objects.
* There is an experimental Path2D interface that can be used to create a path that can later be reused. For example, this object can be passed as the first argument to the isPointInPath method. At the moment, this technology is supported by Firefox, Google Chrome and Opera browsers.
When working with anvas, first of all, it is necessary to take into account the fact that we work with a raster image. First of all, this means that when the size of the drawing area is changed (for example, when the window is resized), the image on the canvas is scaled, which leads to distortion and loss of quality. In the figure below, in the first case, the css properties of the width and height of the canvas element are twice as large as the corresponding attributes specified initially. Nearby is the same graph without scaling. To avoid such problems, when resizing the window, set the necessary values for the width and height attributes of the canvas element and redraw the current scene with the new dimensions.
A similar problem can be encountered when working with screens with increased pixel density. Images on canvas may look blurry. The reason for this is the difference between the display resolution in physical pixels and the resolution in logical (CSS) pixels. The ratio of these two values can be obtained using the window.devicePixelRatio property. For example, with devicePixelRatio equal to two, the width of the canvas in physical pixels is 2 times larger than its width in logical pixels (specified in the width attribute). That is, we get the same effect as in the first case. One of the possible ways to solve this problem is to specify values in the attributes of the canvas more than in styles by the size of devicePixelRatio.
Example:
In this case, when drawing it is necessary to take into account that such values as line thickness and font size decrease by the size of devicePixelRatio. Therefore, when setting the font size, you must multiply it by devicePixelRatio so that the text does not appear too small on displays with an increased pixel density.
Canvas optimization:
One of the most expensive operations when working with canvas is drawing. Therefore, it is better to avoid redrawing large images.
One way to do this is to apply the canvas elements in several layers. This allows you to redraw only those parts of the scene that are needed, and not the entire scene.
Example: Layout of canvas elements in 2 layers:
Another way to reduce the time spent on drawing is to avoid floating point coordinates and using integer coordinates. When using fractional coordinates on the canvas element, sub-pixel rendering is applied. This leads to the fact that additional calculations are made to create a smoothing effect.
There are many techniques for optimizing the canvas element. Their effectiveness depends on the characteristics of the project and the desired result. Read more about the various approaches to optimization can be found in this article .
SVG is well suited for creating static images, high-quality complex vector documents (for example, drawings, diagrams) of interactive graphs. But it should be borne in mind that with an increase in the number of objects, the drawing speed will decrease greatly. Using the canvas element allows you to quickly draw images on the screen, which is why this technology is well suited for displaying complex scenes and animation in real time. Canvas can be used to create various visual effects and complex 3D scenes. But when using this technology, it is quite difficult to make an image or a graph interactive.
Svg
Scalable Vector Graphics (SVG) is a markup language extended from XML to describe 2D vector graphics.
To create an image in vector graphics using geometric primitives (points, lines, curves, polygons). With their help, you can create scalable images that do not lose quality when scaled.
')
SVG - drawing technology with storage of objects in memory (Retained mode graphics). Like HTML, SVG has a document object model (DOM). DOM in SVG, like HTML, has an event model. This means that using this technology to implement interactive actions (such as mouse control, etc.) on the part of the programmer requires less effort, since events are tied directly to DOM elements.
SVG has both regular attributes and presentation attributes. The key point is that you can apply styles to view attributes in accordance with the rules for using CSS styles. For example, to change the color of a shape, you can use the fill property.
An element is used to embed the SVG into the document.
Example 1: Line Drawing
<svg xmlns="http://www.w3.org/2000/svg" version="1.1" width="600" height="70"> <line x1="5" y1="5" x2="500" y2="60" stroke="#b4241b" stroke-width="3" /> </svg> Example 2: Drawing a filled circle
HTML:
<svg xmlns="http://www.w3.org/2000/svg" version="1.1" width="100" height="100"> <circle cx="50" cy="50" r="40" y2="60" stroke="#b4241b" stroke-width="3" /> </svg> CSS:
svg { fill: blue; } Canvas 2d
<Sanvas> is an HTML element that is used to create raster graphics using JavaScript. The <canvas> element provides a convenient API for drawing 2D graphics using JavaScript.
Unlike svg, canvas works with raster graphics. This is an instant drawing technology, it does not store its elements in the DOM tree, therefore there is no way to modify an existing drawing or respond to events. This means that when a new frame is required, it will be necessary to redraw the whole scene.
The <canvas> element has only two attributes - width and height. If the height and width attributes are not set, then according to the html5 specification, the width of the canvas element will be 300 pixels, and the height will be 150. If you change these attributes, the canvas is cleared.
You can also set dimensions arbitrarily in CSS, but during rendering the image will be scaled according to its size and orientation. This may cause the image to look distorted.
To draw, you first need to access the context, which provides an API for creating graphics. The context can be obtained using the getContext () method of the canvas element. As the first parameter, you must specify the type of context that we want to use. At the moment, most modern browsers support 2 types of context "2d" (allows you to create 2D graphics) and "webgl" (allows you to use WebGL technology to create three-dimensional graphics). If the specified context type is not supported by the browser, the getContext () method returns null.
Example: Line Drawing
<canvas id="myCanvas" width="600px" height="70px"></canvas> const canvas = document.getElementById('canvas'); const context = canvas.getContext('2d'); context.beginPath(); context.moveTo(5, 5); context.lineTo(500, 60); context.lineWidth = 3; context.strokeStyle = '#b4241b'; context.stroke(); Webgl
WebGL is another new technology that uses the canvas element to create graphics. WebGL allows web content to use an API based on OpenGL ES 2.0 to visualize three-dimensional graphics, but it is possible to work with two-dimensional graphics.
To start drawing in the same way as in the previous case, you need to access the context. This is done using the getContext method. The context type must be webgl or experimental-webgl. A context called “experimental-webgl” is a temporary name for the context used during the specification development process.
WebGL works with raster graphics, respectively, the features described in the previous paragraph, are applicable to this technology. But WebGL is characterized by higher performance (comparable to the performance of native applications), since WebGL uses hardware accelerated graphics.
Technology comparison
The choice of a particular technology depends on the objectives and goals of a particular project. One of the projects was tasked with plotting graphs with a large number of points (about 10,000 points), it was necessary to provide for the possibility of scaling and moving graphs, as well as redrawing graphs in case of changes in data on the server.
One of the most important parameters that was taken into account when choosing a technology was performance. This parameter depends on the number of objects and surface area. In general, as the number of objects on the screen increases, the SVG performance drops as the objects are gradually added to the DOM, while the canvas performance hardly changes. WebGL has very good performance, but not all modern browsers support this technology, for example, IE began to support webGL starting from version 11 only. WebGL support on mobile browsers is rather limited, most mobile browsers started supporting WebGL only from 2017. Some mobile browsers do not currently support this technology at all.
In addition, in addition to WebGL support by the browser, its support by the graphics processor of the client is also required. Some browsers may disable WebGL support on devices with older graphics processors. Learn more about these limitations in this article.
Due to the weak support of the WebGL technology, only two technologies will be considered further: canvas 2d and svg.
Fig.1 Rendering time (y) depending on the number of objects (x).
Since working with SVG requires a lot of manipulation of the DOM, this technology is not suitable for heavy animation, for example, to build rapidly changing detailed graphs.
However, canvas is not well suited for high resolution screens. From the graph below, it can be seen that as the screen size increases, the performance of the Canvas decreases as more pixels need to be processed.
Fig.2 Rendering time (y) depending on the height of the drawing area (x).
It should also be borne in mind that when enlarged, images created using canvas lose a lot of quality. The image below shows lines drawn with svg and canvas.
Fig.3 Lines drawn with SVG (top) and Canvas (bottom) when zoomed.
Another problem you might encounter when working with canvas is the limited ability to track events and determine the location of the mouse pointer on the image. There is a built-in isPointInPath API, which allows you to determine whether the specified point is in the last drawn element of the path. * There are third-party libraries that allow you to work with events quite comfortably.
Despite the shortcomings listed above, it was decided to use canvas, primarily because of its high performance compared to svg when drawing a large number of objects.
* There is an experimental Path2D interface that can be used to create a path that can later be reused. For example, this object can be passed as the first argument to the isPointInPath method. At the moment, this technology is supported by Firefox, Google Chrome and Opera browsers.
Features of working with Canvas
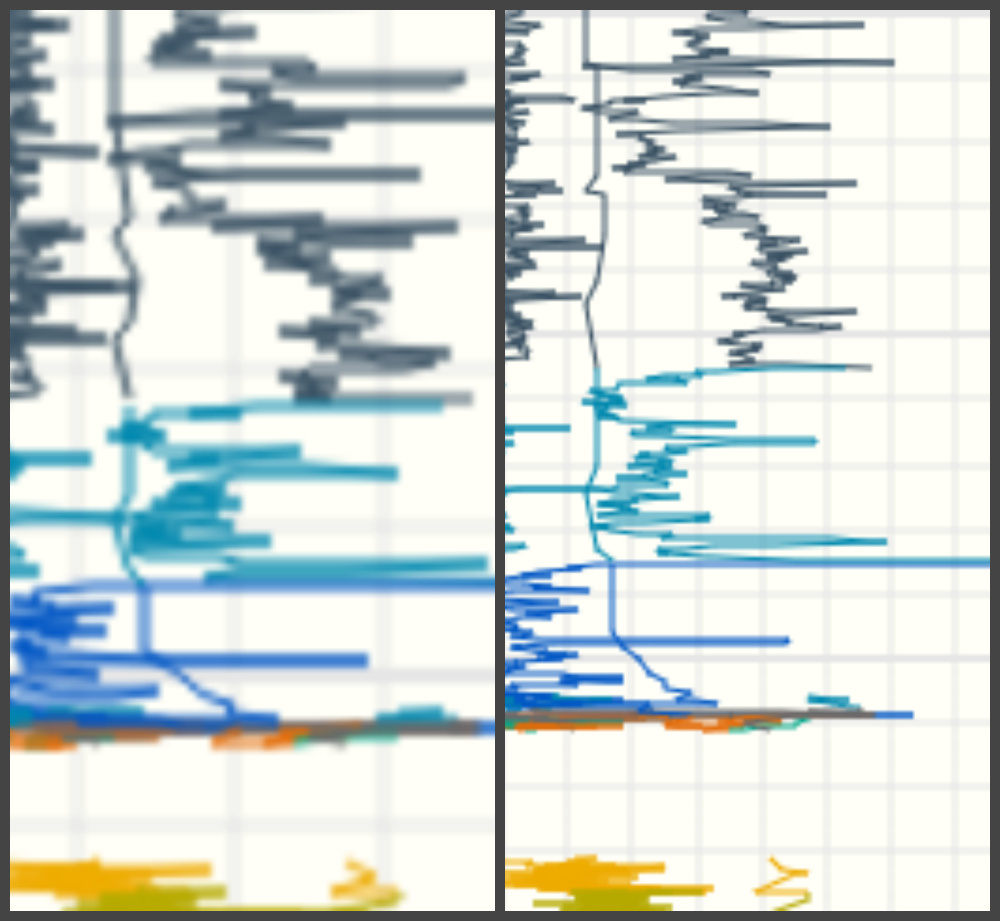
When working with anvas, first of all, it is necessary to take into account the fact that we work with a raster image. First of all, this means that when the size of the drawing area is changed (for example, when the window is resized), the image on the canvas is scaled, which leads to distortion and loss of quality. In the figure below, in the first case, the css properties of the width and height of the canvas element are twice as large as the corresponding attributes specified initially. Nearby is the same graph without scaling. To avoid such problems, when resizing the window, set the necessary values for the width and height attributes of the canvas element and redraw the current scene with the new dimensions.
A similar problem can be encountered when working with screens with increased pixel density. Images on canvas may look blurry. The reason for this is the difference between the display resolution in physical pixels and the resolution in logical (CSS) pixels. The ratio of these two values can be obtained using the window.devicePixelRatio property. For example, with devicePixelRatio equal to two, the width of the canvas in physical pixels is 2 times larger than its width in logical pixels (specified in the width attribute). That is, we get the same effect as in the first case. One of the possible ways to solve this problem is to specify values in the attributes of the canvas more than in styles by the size of devicePixelRatio.
Example:
canvas.width = canvasWidth * window.devicePixelRatio; canvas.height = canvasHeight * window.devicePixelRatio; canvas.style.width = canvasWidth + 'px'; canvas.style.height = canvasHeight + 'px'; In this case, when drawing it is necessary to take into account that such values as line thickness and font size decrease by the size of devicePixelRatio. Therefore, when setting the font size, you must multiply it by devicePixelRatio so that the text does not appear too small on displays with an increased pixel density.
Canvas optimization:
One of the most expensive operations when working with canvas is drawing. Therefore, it is better to avoid redrawing large images.
One way to do this is to apply the canvas elements in several layers. This allows you to redraw only those parts of the scene that are needed, and not the entire scene.
Example: Layout of canvas elements in 2 layers:
<canvas id="bg" width="640" height="480" style="position: absolute; z-index: 0"></canvas> <canvas id="fg" width="640" height="480" style="position: absolute; z-index: 1"></canvas> Another way to reduce the time spent on drawing is to avoid floating point coordinates and using integer coordinates. When using fractional coordinates on the canvas element, sub-pixel rendering is applied. This leads to the fact that additional calculations are made to create a smoothing effect.
There are many techniques for optimizing the canvas element. Their effectiveness depends on the characteristics of the project and the desired result. Read more about the various approaches to optimization can be found in this article .
Conclusion
SVG is well suited for creating static images, high-quality complex vector documents (for example, drawings, diagrams) of interactive graphs. But it should be borne in mind that with an increase in the number of objects, the drawing speed will decrease greatly. Using the canvas element allows you to quickly draw images on the screen, which is why this technology is well suited for displaying complex scenes and animation in real time. Canvas can be used to create various visual effects and complex 3D scenes. But when using this technology, it is quite difficult to make an image or a graph interactive.
Source: https://habr.com/ru/post/332750/
All Articles