Creating chatbot-a using sockeye (MXNet) based on AWS EC2 and AWS DeepLearning AMI
 Recently, the AWSDeepLearning team released a new framework - “sockeye”, the purpose of which is to simplify the learning of seq2seq networks. Looking ahead - I did not even expect such simplicity. So I decided to write a simple, fast and self-sufficient manual, which does not require a deep knowledge of the reader in the field of neural networks. The only thing that is required for successful completion of all steps is to have some experience with:
- AWS EC2;
- SSH;
- python;
If all these three things do not cause problems - I ask for cat.
Before continuing, I want to express special thanks to my patrons who support me.
As mentioned, the AWS DeepLearning team recently released a new framework, “sockeye”. Let me quote from the official site:
')
... the sockeye project, a sequence-to-sequence framework for Neural Machine Translation Based on MXNet. It implements the well-known encoder-decoder architecture with attention.
Free translation:
Sockeye is a framework for teaching neural networks to machine translation, which is based on the well-known architecture encoder-decoder.
Despite the fact that this framework is officially developed for training networks, for machine translation, technically it can also be used to train a more general class of tasks for converting one sequence to another (seq2seq). I have already touched on the topic of why machine translation and the creation of chat bots, as two tasks, have a lot of similarities and can be solved by similar methods, in one of the past articles . So I will not repeat leaving the opportunity for inquisitive readers to follow the links, and in the meantime I will go directly to creating a chat bot.
Process description
In general, the process consists of the following steps:
- Raise EC2 machine with GPU based on DeepLearning AMI
- Prepare EC2 machine for training
- Start learning
- Wait
- Profit
We raise EC2 machine with GPU, based on AWS DeepLearning AMI
In this article we will use AWS DeepLearning AMI , hereafter: DLAMI (by the way, if you don’t know what AMI is, I recommend reading the official documentation here ). The main reasons for using this particular AMI:
- it includes Nvidia CUDA drivers (at the time of this writing, version: 7.5);
- compiled with GPU support - MXNet;
- includes all (almost) utilities that we need, for example: git;
- can be used with, surprise-surprise, machines in which there is a GPU.
In order to quickly create the car we need from AMI, go to the DLAMI page in the AWS Marketplace . Here you should pay attention to the following things:
1. AMI version

At the time of writing, “Jun 2017” was the most recent version, so if you want your process to be consistency with the rest of this one, I recommend choosing it.
2. Region to create
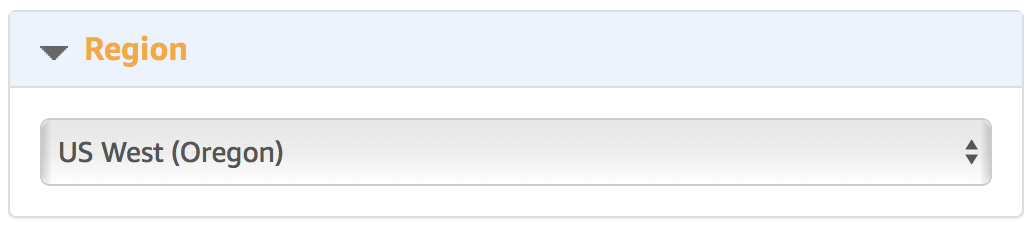
Keep in mind that not all types of machines with GPU are available in all regions. Actually, even if they are formally available, it is not always possible to create them. For example, in 2016 during the NIPS conference with them was very problematic. We need a machine like p2, plus, and at the time of this writing, DLAMI was available only in those regions where this same type was available:
3. Select an instance type
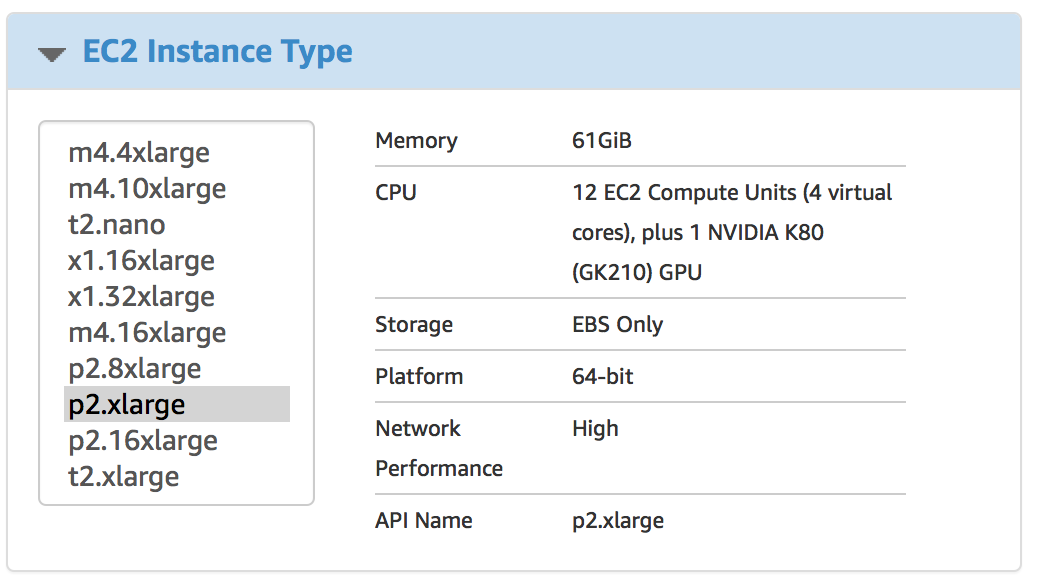
p2.xlarge - is the cheapest machine that meets our requirements for GPU memory (you can of course try g2.2xlarge, but don’t say after all that you were not warned). At the time of writing, the price for it was ~ $ 0.9 per hour. But better check the price on the official website .
4. VPC

If you do not know what to do with it - do not touch.
5. Security group

Just as with the VPC, do not know - do not touch. However, if you want to use an existing group, then make sure that SSL is open there.
6. Key pair

Let me assume that the reader has experience with SSH and there is an understanding of what it is.
7. Click Create!

Actually now we can create a car and connect to it.
Preparing for network training
Connect to the newly created machine. Immediately after, it's time to start the screen. And do not forget the fact that when connecting you need to use the login ubuntu:
A few comments on this point:
- I said “screen” because DLAMI does not contain tmux out of the box !!! Yeah, sad.
- if you do not know what screen or tmux is - no problem, you can just continue reading, everything will work without problems. However, it is better to still go and read about what kind of animals these are: tmux (my choice) and screen .
1. install sockeye
The first thing we need is to install sockeye. With DLAMI, the installation process is very simple, just one command:
sudo pip3 install sockeye --no-deps The important part here is that you need to use pip3, and not just pip, since the default pip from DLAMI uses Python 2, which in turn is not supported in sockeye. It is also not necessary to establish any dependencies for they are all already installed.
2. Preparation of data (dialogues) for training
For training, we will use “Cornell Movie Dialogs Corpus” (https://www.cs.cornell.edu/~cristian/Cornell_Movie-Dialogs_Corpus.html). This, in fact, a huge body of dialogue from the movies. For training, you need to "cook" it, in fact, I have already implemented a script that prepares the body and told in more detail about not earlier.
Well, now let's get these same data for training and prepare:
# cd ~/src src# git clone https://github.com/b0noI/dialog_converter.git Cloning into 'dialog_converter'… remote: Counting objects: 59, done. remote: Compressing objects: 100% (49/49), done. remote: Total 59 (delta 33), reused 20 (delta 9), pack-reused 0 Unpacking objects: 100% (59/59), done. Checking connectivity… done. src# cd dialog_converter dialog_converter git:(master)# git checkout sockeye_chatbot Branch sockeye_chatbot set up to track remote branch sockeye_chatbot from origin. Switched to a new branch 'sockeye_chatbot' dialog_converter git:(sockeye_chatbot)# python converter.py dialog_converter git:(sockeye_chatbot)# ls LICENSE README.md converter.py movie_lines.txt train.a train.b test.a test.b A couple of things you should pay attention to:
- src folder already exists, no need to create it;
- note the brunch: “sockeye_chatbot”, in it I keep the code that is consistent with this article. Use master at your own risk.
Now let's create a folder where we will conduct training and copy all the data there:
# cd ~ # mkdir training # cd training training# cp ~/src/dialog_converter/train.* . training# cp ~/src/dialog_converter/test.* . That's all, we are ready to start learning ...
Training
With sockeye, the learning process is very simple - you just need to run a single command:
python3 -m sockeye.train --source train.a --target train.b --validation-source train.a --validation-target train.b --output model I know, I know, NEVER use the same data for training and validation. However, my script at the moment does not quite correctly break the data into two groups and therefore better results (I am about subjective assessment) are obtained, if not strange, without a breakdown.

If you read the last article, you might have noticed that sockeye is trying to find the right configuration for your training for you, namely:
- dictionary size;
- network settings;
- etc.…
This is pretty good, as a configuration that is closer to optimum can lead to faster (read less expensive) training. Although you still need to see exactly how sockeye searches for parameters and how much resources are spent on this process.
Also, sockeye will determine exactly when the learning process is worth completing. This will occur if the quality of the model has not improved on the data for validation for the last 8 control points.
We are waiting for the result
While you wait, you can see how MXNet chews GPU resources during training. To do this, run this command in a new window:
watch -n 0.5 nvidia-smi See something like:

By the way, technically, to start a conversation with a bot, you only need to wait for at least the first created control point. When this happens you will see something like this:

Now you can start chatting:
Chatsy ...
This process does not require stopping the training, you just need to open a new window (or a new SSH connection) to go to the same folder where the training takes place and execute the command:
python3 -m sockeye.translate --models model --use-cpu --checkpoints 0005 Several elements on which I want to emphasize:
- python3 - naturally;
- model - the name of the folder in which the learning process stores the model, must match the name specified during training
- - use-cpu - without this, MXNet will try to use the GPU, which most likely will end in failure as the learning process still uses it.
- --checkpoints 0005 - checkpoint number, taken from the console output at the time of saving the checkpoint.
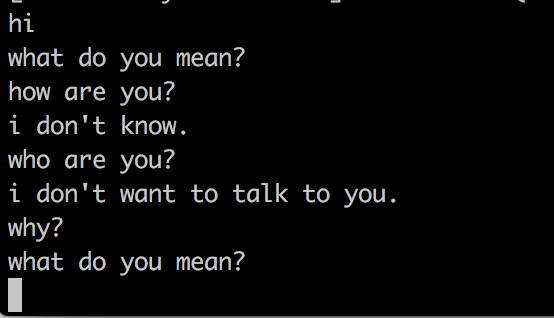
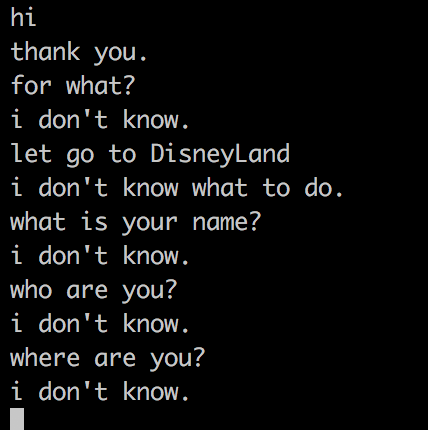
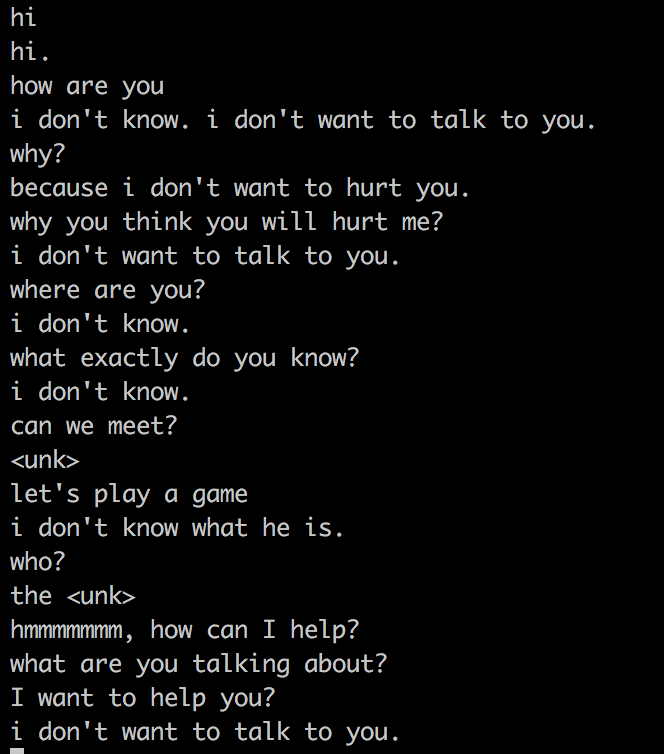
After running the sockeye command, it will read the input from STDIN and output the answer to STDOUT. Here are some examples:
after an hour of training:
after 2 hours of training
after 3 hours of training, it began to threaten me =)
Conclusion
As you can see with sockeye the learning process is very simple. Actually, the most difficult, perhaps, is to raise the necessary machine and connect to it =) I'm still waiting for someone from the readers:
- created a bot by the master Yoda (well, or Vader);
- created a bot from the universe Lord of The Rings;
- created a bot from the StarWars universe.
PS: do not forget to download your model and nail the car after graduation.
Trained model
Here you can download a trained model (coached only 4 hours). It can be used on a local machine to play with a bot if you don't want to train yours.
Source: https://habr.com/ru/post/332654/
All Articles