Core ML Testing and Review
At WWDC'17, Apple introduced a new framework for working with machine learning technologies Core ML. Based on it, iOS implements Apple’s own products: Siri, Camera and QuickType. Core ML allows you to simplify the integration of machine learning into applications and create various “smart” functions using a couple of lines of code.
Core ML features
Using Core ML in an application, you can implement the following functions:
- image recognition in real time;
- predictive text input;
- pattern recognition;
- tonality analysis;
- handwriting recognition;
- search ranking;
- stylization of images;
- face recognition;
- voice identification;
- definition of music;
- text referencing;
- and not only.
Core ML makes it easy to import various machine learning algorithms into your application, such as: tree ensembles, SVMs, and generalized linear models. It uses low-level technologies such as Metal, Accelerate and BNNS. The results of the calculations occur almost instantly.

Vision
The Vision framework is based on Core ML and helps with tracking and recognizing faces, text, objects, barcodes. Also available is the definition of the horizon and getting the matrix to align the image.
NSLinguisticTagger
With iOS 5, Apple introduced NSLinguisticTagger, which allows you to analyze natural language, supports many languages and alphabets. With the release of iOS 11, the class has been improved, now you can feed the string with text in different languages and it will return the dominant language in this string and many more other improvements. NSLinguisticTagger also uses machine learning for a deep understanding of the text and its analysis.
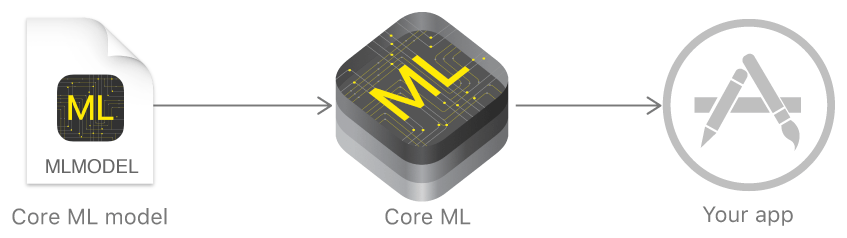
Core ML Model
Apple provided 4 models on the Core ML promo page . All of them analyze images. Core ML models work locally and are optimized to run on mobile devices, minimizing memory usage and power consumption.
You can generate your own models using Core ML Tools .
Working way to load models at runtime:
- Put the model file in the application target.
- Compile new model from .mlmodel to .mlmodelc, without changing its interface.
- Put these files on the server.
- Download them inside the app.
- Initialize a new model, for example:
CoreMLModelClass.init(contentOf: URL) Performance after the release of the application in the App Store has not been tested.
Core ML Features
- Apple’s decision cannot take data and train models. Only accept some types of trained models, convert them into a proprietary format and make predictions.
- The model does not shrink.
- It is not encrypted. You will have to take care of data protection yourself.
Testing Core ML
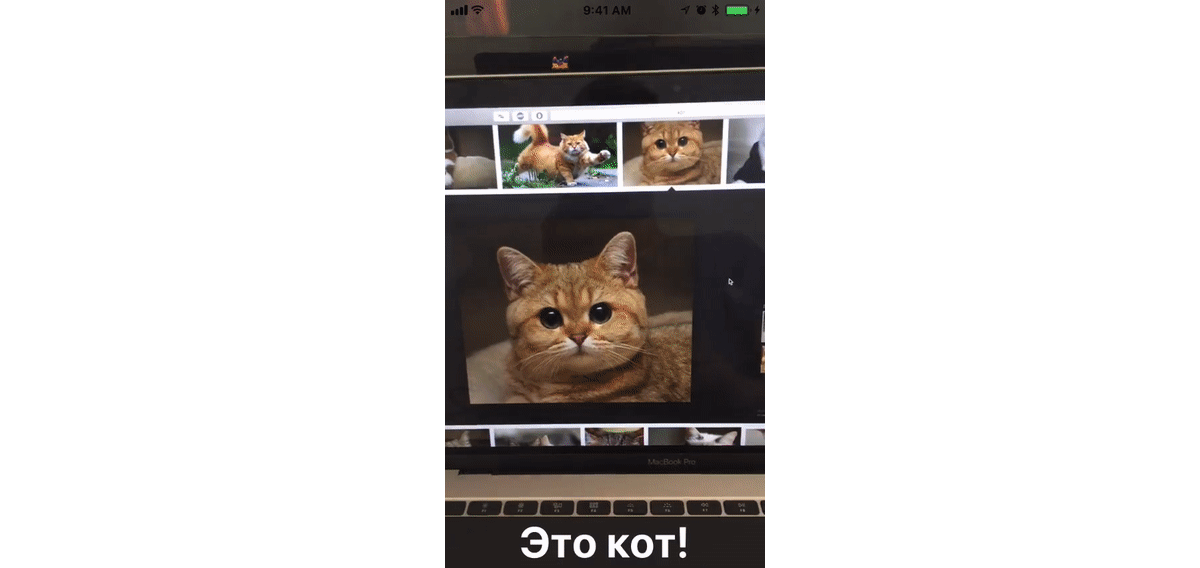
I prepared a test project using Core ML. We will make a simple cat locator that will distinguish everything in this universe from a cat.
Create a project and select Single View Application. First you need to download the Core ML model, which will analyze objects from the camera. In this project I use Inception v3. Next, you need to transfer the model to the Project Navigator, Xcode will automatically generate an interface for it.
On a storyboard we add the whole View screen, there we will display the image from the camera. Above we add the Visual Effect View and Label. We throw outlets in ViewController.
Do not forget to add permission to use the camera in plist.

We need to display the image from the camera in real time, for this we will create AVCaptureSession and a queue for receiving new frames of DispatchQueue. Add an AVCaptureVideoPreviewLayer layer to our View, it will display the image from the camera, you also need to create an array of VNRequest - these are requests to Vision. Immediately in viewDidLoad check the availability of the camera.
import UIKit import AVFoundation import Vision class ViewController: UIViewController { @IBOutlet var resultLabel: UILabel! @IBOutlet var resultView: UIView! let session = AVCaptureSession() var previewLayer: AVCaptureVideoPreviewLayer! let captureQueue = DispatchQueue(label: "captureQueue") var visionRequests = [VNRequest]() override func viewDidLoad() { super.viewDidLoad() guard let camera = AVCaptureDevice.default(for: .video) else { return } do { previewLayer = AVCaptureVideoPreviewLayer(session: session) resultView.layer.addSublayer(previewLayer) } catch { let alertController = UIAlertController(title: nil, message: error.localizedDescription, preferredStyle: .alert) alertController.addAction(UIAlertAction(title: "Ok", style: .default, handler: nil)) present(alertController, animated: true, completion: nil) } } } Next, configure cameraInput and cameraOutput, add them to the session and start it to get the data stream.
let cameraInput = try AVCaptureDeviceInput(device: camera) let videoOutput = AVCaptureVideoDataOutput() videoOutput.setSampleBufferDelegate(self, queue: captureQueue) videoOutput.alwaysDiscardsLateVideoFrames = true videoOutput.videoSettings = [kCVPixelBufferPixelFormatTypeKey as String: kCVPixelFormatType_32BGRA] session.sessionPreset = .high session.addInput(cameraInput) session.addOutput(videoOutput) let connection = videoOutput.connection(with: .video) connection?.videoOrientation = .portrait session.startRunning() Now we need to initialize the Core ML model for Vision and configure the query.
guard let visionModel = try? VNCoreMLModel(for: Inceptionv3().model) else { fatalError("Could not load model") } let classificationRequest = VNCoreMLRequest(model: visionModel, completionHandler: handleClassifications) classificationRequest.imageCropAndScaleOption = VNImageCropAndScaleOptionCenterCrop visionRequests = [classificationRequest] Create a method that will process the results. Taking into account the error, we take the 3 most probable according to the result model and look for the word cat among them.
private func handleClassifications(request: VNRequest, error: Error?) { if let error = error { print(error.localizedDescription) return } guard let results = request.results as? [VNClassificationObservation] else { print("No results") return } var resultString = " !" results[0...3].forEach { let identifer = $0.identifier.lowercased() if identifer.range(of: "cat") != nil { resultString = " !" } } DispatchQueue.main.async { self.resultLabel.text = resultString } } The last thing left for us to do is to add the AVCaptureVideoDataOutputSampleBufferDelegate delagate method, which is called for each new frame received from the camera. In it, we configure the request and execute it.
extension ViewController: AVCaptureVideoDataOutputSampleBufferDelegate { func captureOutput(_ output: AVCaptureOutput, didOutput sampleBuffer: CMSampleBuffer, from connection: AVCaptureConnection) { guard let pixelBuffer = CMSampleBufferGetImageBuffer(sampleBuffer) else { return } var requestOptions: [VNImageOption: Any] = [:] if let cameraIntrinsicData = CMGetAttachment(sampleBuffer, kCMSampleBufferAttachmentKey_CameraIntrinsicMatrix, nil) { requestOptions = [.cameraIntrinsics: cameraIntrinsicData] } let imageRequestHandler = VNImageRequestHandler(cvPixelBuffer: pixelBuffer, orientation: 1, options: requestOptions) do { try imageRequestHandler.perform(visionRequests) } catch { print(error) } } } Done! You have written an application that distinguishes cats from all other objects!
→ Link to repository.
findings
Despite the features, Core ML will find its audience. If you are not ready to put up with limitations and small features, there are many third-party frameworks. For example, YOLO or Swift-AI .
')
Source: https://habr.com/ru/post/332500/
All Articles