Color segmentation for dummies
This article is designed for beginners who are just beginning to master the methods of image processing. I myself often encounter a lack of light examples, especially in Russian, so I hope this material will be useful.
Somehow the next task arose before me. I had a lot of pictures of bell peppers and it was necessary to separate the plant from the background. Using this task as an example, I will show one of the most primitive ways how this can be done with openCV 2.4.
The essence of the task: to paint over white all that is not a plant.
')
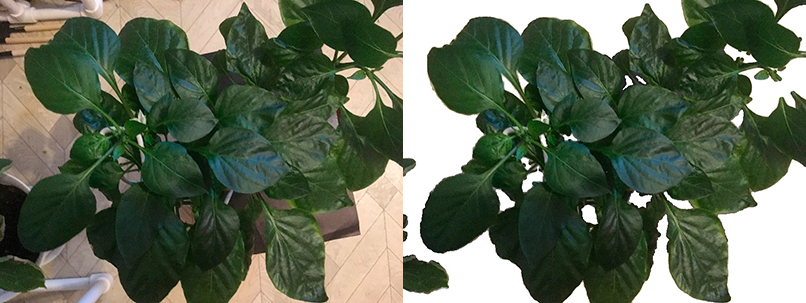
Original photo (left) and what should happen (right).
First, download the image:
By default, a color image is stored in opencv in the BGR palette. Determining the color in BGR is not very convenient, so for a start we will convert the image to HSV format.

Since we will search for a plant precisely by color, we are most interested in the tone.
Transform the image into the HSV palette and split it into three components Hue Saturation Value, respectively.
Let's set the range of tone values. In OpenCV, green is in the range from 34 to 72. The peppers in the photos are not completely green. Therefore, the range of 21 to 110 was chosen by experience.
Next, run over our image. For each pixel we get all three components. We will not use the intensity, but in order to make it clearer and not skip the indices I will leave it. If the tone does not fit into the specified range or the brightness is too low, then this is the background, so paint everything in white.
As a result, we get the following image:
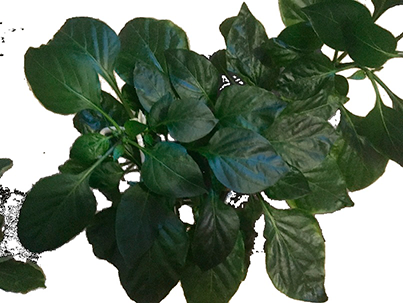
In general, the background retired, but there were incomprehensible noises in the left corner.
One of the ways to remove small, incoherent particles is morphological image processing.
You can read more about this case here . Let's apply morphological operations to our pictures. We take an ellipse as a structural element.

The result of morphological processing.
Most of the noise was removed, but the image itself was blurred, and this is not exactly what we wanted. Therefore, we will use the converted image as a mask to remove unwanted noise.

Left mask, the right result of applying the mask.
This way you can primitively select an object from the background.
→ Full sample code
UPD: fixed broken link.
Somehow the next task arose before me. I had a lot of pictures of bell peppers and it was necessary to separate the plant from the background. Using this task as an example, I will show one of the most primitive ways how this can be done with openCV 2.4.
The essence of the task: to paint over white all that is not a plant.
')
Original photo (left) and what should happen (right).
First, download the image:
Mat src = imread("1.jpg"); // By default, a color image is stored in opencv in the BGR palette. Determining the color in BGR is not very convenient, so for a start we will convert the image to HSV format.
HSV (or HSB) means Hue, Saturation, Value (Brightness), where:
Hue - color tone, i.e. color shade.
Saturation - saturation. The higher this parameter, the “cleaner” the color will be, and the lower, the closer it will be to gray.
Value (Brightness) - the value (brightness) of the color. The higher the value, the brighter the color will be (but not whiter). And the lower, the darker (0% - black)
Since we will search for a plant precisely by color, we are most interested in the tone.
Transform the image into the HSV palette and split it into three components Hue Saturation Value, respectively.
// HSV Mat hsv = Mat(src.cols, src.rows, 8, 3); // vector<Mat> splitedHsv = vector<Mat>(); cvtColor(src, hsv, CV_BGR2HSV); split(hsv, splitedHsv); Let's set the range of tone values. In OpenCV, green is in the range from 34 to 72. The peppers in the photos are not completely green. Therefore, the range of 21 to 110 was chosen by experience.
const int GREEN_MIN = 21; const int GREEN_MAX = 110; Next, run over our image. For each pixel we get all three components. We will not use the intensity, but in order to make it clearer and not skip the indices I will leave it. If the tone does not fit into the specified range or the brightness is too low, then this is the background, so paint everything in white.
for (int y = 0; y < hsv.cols; y++) { for (int x = 0; x < hsv.rows; x++) { // HSV- int H = static_cast<int>(splitedHsv[0].at<uchar>(x, y)); // int S = static_cast<int>(splitedHsv[1].at<uchar>(x, y)); // int V = static_cast<int>(splitedHsv[2].at<uchar>(x, y)); // // , if ((V < 20) || (H < GREEN_MIN) || (H > GREEN_MAX)) { src.at<Vec3b>(x, y)[0] = 255; src.at<Vec3b>(x, y)[1] = 255; src.at<Vec3b>(x, y)[2] = 255; } } } As a result, we get the following image:
In general, the background retired, but there were incomprehensible noises in the left corner.
One of the ways to remove small, incoherent particles is morphological image processing.
Dilation (morphological expansion) - a convolution of an image or a selected image area with some kernel. The kernel can have any shape and size. In this case, the only leading position in the kernel is allocated, which is combined with the current pixel in the calculation of convolution. In many cases, a square or a circle with a leading position in the center is chosen as the core. The kernel can be viewed as a pattern or mask. The use of dilatation is reduced to a pattern passing through the entire image and the application of the local maximum search operator to the image pixel intensities covered by the template. Such an operation causes the growth of bright areas in the image. In the figure, pixels are marked in gray, which will be white as a result of the use of dilatation.
Erosion (morphological contraction) is the reverse operation. The effect of erosion is similar to dilatation, the only difference is that the local minimum search operator is used; the pixels that turn black as a result of erosion are grayed out.
You can read more about this case here . Let's apply morphological operations to our pictures. We take an ellipse as a structural element.
int an = 5; // . Mat element = getStructuringElement(MORPH_ELLIPSE, Size(an * 2 + 1, an * 2 + 1), Point(an, an)); dilate(src, tmp, element); erode(tmp, tmp, element); The result of morphological processing.
Most of the noise was removed, but the image itself was blurred, and this is not exactly what we wanted. Therefore, we will use the converted image as a mask to remove unwanted noise.
Mat grayscaleMat; cvtColor(tmp, grayscaleMat, CV_BGR2GRAY); // Mat mask(grayscaleMat.size(), grayscaleMat.type()); Mat out(src.size(), src.type()); threshold(grayscaleMat, mask, 200, 255, THRESH_BINARY_INV); // out = Scalar::all(255); // src.copyTo(out, mask); Left mask, the right result of applying the mask.
This way you can primitively select an object from the background.
→ Full sample code
UPD: fixed broken link.
Source: https://habr.com/ru/post/332464/
All Articles