"Factory Method" in the development for Android. The best way to handle pushes
In this article I would like to talk about one of the classic design patterns in Android development: the fabric method (Fabric method). We will study it on the example of working with Firebase Cloud Messaging (hereinafter referred to as FCM). The goal is to convey to beginner developers, who have not yet fully mastered the full benefits of OOP, the importance of using object-oriented design techniques , as we did in Live Typing
Why on example FCM?
FCM is one of the ready messaging services (the so-called push), which operates according to the publisher-subscriber model. If you once again receive a notification on your device about a new message (news / discount / new product and many other things), then it is likely that this functionality is implemented through FCM or its equivalent. At the moment, FCM is positioned by Google as a reference solution. Therefore, the article is written on the basis that the reader is either already familiar with this service, or he will most likely be left with the opportunity to meet him.
And why exactly about push-messages?
Writing a push message in an application using the factory method is a great excuse to deal with this template once and for all. When designing UI objects or business logic objects, it is excusable for a beginner to make a mistake: do not envisage expanding the number of objects and / or not laying the possibility to easily change the logic of each of them. But, as experience shows, handling of pushes is often complicated and expands throughout the entire project development period. Imagine if you had to write VKontakte application. The user receives a bunch of different notifications for pushing, which look differently and by pressing open different screens. And if the module responsible for handling push notifications was initially designed incorrectly, then each new push is hello, new if else, hello, regression testing and you, new bugs, also hello.
Sample project using FCM
Idea
Imagine a startup whose idea is to establish communication between kindergarten teachers and parents of children who attend this kindergarten. A single application for teachers and parents is not suitable, because through the teacher application the content is created, and through the parent application it is consumed. We take into account the third type of service users - the kindergarten administration. They do not need a mobile application due to the fact that the main part of their working day is at their desk, but they need a convenient way to inform parents and caregivers about important news.
Total:
- mobile application for parents (the "parent");
- mobile application for educators (hereinafter referred to as "teacher");
- web application for the administration of the kindergarten (hereinafter the "admin");
The structure of the Android project
The project in Android Studio will have the following structure
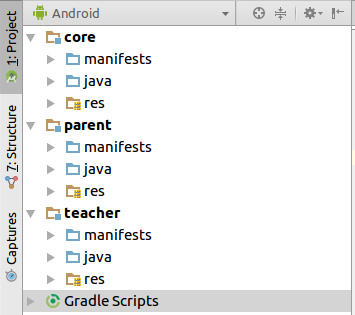
The core module is common for two applications. It contains the parent and teacher modules — the modules of the parent and teacher applications, respectively.
Tasks at the stage of connecting push notifications - show the notification to the user when the data on the server changes, regardless of whether the application is open to the user or not.
For teacher and parent applications come different types of push. Therefore, notifications can have different icons, and by clicking on the notification, different screens open.
Examples of notifications
For teacher applications:
- a new student was added to the group (after adding a child in the admin panel);
- birthday of one of the children in the group.
For parent application:
- the child received an assessment (after adding an assessment in the teacher's application);
- do not forget to take the child on a short day (push is initiated from the admin);
Push processing
After all the preparatory work on the connection and setting up the work of FCM in the Android project, the processing of push notifications is reduced to the implementation of one class, the successor of FirebaseMessagingService.
public class MyFirebaseMessagingService extends FirebaseMessagingService { @Override public void onMessageReceived(RemoteMessage remoteMessage) { super.onMessageReceived(remoteMessage); } } The FCM connection and setup is well written here:
→ Official documentation on connecting FCM to Android project
→ Repository with an example on the Firebase account
The onMessageReceived () method accepts an object of the RemoteMessage class, which contains everything that the server sent: text and message header, Custom data Map, push notification time, and other data.
There is one important condition. If push was sent with text and a header for notification, then when the application is minimized or not started, the onMessageReceived () method will not work. In this case, the firebase-messaging library will configure the notification itself from the parameters received on push and show it in the status bar. The developer cannot influence this process. But if you transfer all the necessary data (including the text and the title for notification) through the data object, then all messages will be processed by the MyFirebaseMessagingService class. The code examples below imply the exact use of FCM. All event information is passed in the data object.
→ Learn more about the types of Firebase messages
Problem
So, if we didn't know anything about the design patterns, then the implementation of the task for the teacher's application would look something like this:
public class TeacherFirebaseMessagingService extends FirebaseMessagingService { private static final String KEY_PUSH_TYPE = "type"; private static final String KEY_PUSH_TITLE = "title"; private static final String KEY_PUSH_CONTENT = "content"; private static final String TYPE_NEW_CHILD = "add_child"; private static final String TYPE_BIRTHDAY = "birthday"; private static final String EMPTY_STRING = ""; private static final int DEFAULT_NOTIFICATION_ID = 15; @Override public void onMessageReceived(RemoteMessage remoteMessage) { super.onMessageReceived(remoteMessage); Map<String, String> data = remoteMessage.getData(); if (data.containsKey(KEY_PUSH_TYPE)) { NotificationCompat.Builder notificationBuilder; String notificationTitle = null; if (data.containsKey(KEY_PUSH_TITLE)) { notificationTitle = data.get(KEY_PUSH_TITLE); } String notificationContent = null; if (data.containsKey(KEY_PUSH_CONTENT)) { notificationContent = data.get(KEY_PUSH_CONTENT); } NotificationCompat.Builder builder = new NotificationCompat.Builder(this); String pushType = data.get(KEY_PUSH_TYPE); if (pushType.equals(TYPE_NEW_CHILD)) { builder.setSmallIcon(R.drawable.ic_add_child) .setContentTitle(notificationTitle != null ? notificationTitle : EMPTY_STRING) .setContentText(notificationContent != null ? notificationContent : EMPTY_STRING); } else if (pushType.equals(TYPE_BIRTHDAY)) { // notificationBuilder = .... // } NotificationManager notificationManager = (NotificationManager) getSystemService(Context.NOTIFICATION_SERVICE); notificationManager.notify(DEFAULT_NOTIFICATION_ID, builder.build()); } } The keys to get the title and content from the remoteMessage data are:
private static final String KEY_TITLE = "title"; private static final String KEY_CONTENT = "content"; Types of push for teacher applications:
private static final String TYPE_NEW_CHILD = "add_child"; private static final String TYPE_BIRTHDAY = "birthday"; Of course, for each type of notification, you can make your own private method that would return an object of class NotificationCompat.Builder. But if we recall the VK application with its large number of different notifications and a variety of actions when you click on them, the flaws in this class design are obvious:
- In the example, there is no work with PendingIntent to implement the opening of different application screens by clicking on the notification. Adding this functionality leads to an increase in code in the class.
- With each push of a separate type comes additional information inherent only to him. It also needs to be extracted from data , processed and transferred to the application during the transition by pressing. This code will be different for each type of notification, which will also significantly increase the size of our class.
With such an approach, a TeacherFirebaseMessagingReceiver class object in a matter of hours of development becomes a huge unruly god object . And the support of its code runs the risk of becoming a clot of pain even before the first release of the application. And the most interesting thing is that something like that will have to be done in the parent application.
Decision
Now about the implementation of this functionality in a more elegant way using the “Factory Method” pattern.
The base class that is in the core module:
public class CoreFirebaseMessagingService extends FirebaseMessagingService { @Override public void onMessageReceived(RemoteMessage remoteMessage) { super.onMessageReceived(remoteMessage); } } CoreFirebaseMessagingService subclasses will be registered in the manifests of the two application modules.
Now let's design the CoreNotification object. It will contain the implementation of the appearance of the notification in the status bar, depending on what type of push came.
public abstract class CoreNotification { public static final String KEY_FROM_PUSH = "CoreNotification.FromNotification"; private static final String KEY_TITLE = "title"; private static final String KEY_CONTENT = "body"; protected static final String STRING_EMPTY = ""; protected RemoteMessage remoteMessage; public CoreNotification(RemoteMessage remoteMessage) { this.remoteMessage = remoteMessage; } protected String getTitleFromMessage() { Map<String, String> data = remoteMessage.getData(); if (data.containsKey(KEY_TITLE)) { return data.get(KEY_TITLE); } else { return STRING_EMPTY; } } protected String getContentFromMessage() { Map<String, String> data = remoteMessage.getData(); if (data.containsKey(KEY_CONTENT)) { return data.get(KEY_CONTENT); } else { return STRING_EMPTY; } } public String getTitle() { return getTitleFromMessage(); } public String getContent() { return getContentFromMessage(); } protected abstract PendingIntent configurePendingIntent(Context context); protected abstract @DrawableRes int largeIcon(); protected abstract String getNotificationTag(); } The object takes in the constructor and stores the received RemoteMessage .
All abstract methods will be overridden for specific notifications. STRING_EMPTY may be needed in implementations, so we make it protected .
If you follow the aforementioned book , Object-Oriented Design Techniques. Design Patterns ” or, in my opinion, a very easy-to-understand book for Java developers Design Patterns , then CoreNotification should be an interface, not a class. This approach is more flexible. But then we would have to write code to get the title and content for each notification in all implementations of this interface. Therefore, it was decided to avoid duplicating the code through an abstract class that contains the getTitleFromMessage () and getContentFromMessage () methods. After all, these values for each push are extracted the same way (the title and content fields in RemoteMessage.getData () will always be present, this is how the backend is implemented). Just in case, these methods are left protected if the title and content for any notification will need to be obtained in another way.
Next, we design the abstract class CoreNotificationCreator . An object of this class will create and display notifications in the status bar. He will work with the heirs of the CoreNotification class.
public abstract class CoreNotificationCreator { private static final String KEY_NOTIFICATION_TAG = "CoreNotificationCreator.TagKey"; private static final String DEFAULT_TAG = "CoreNotificationCreator.DefaultTag"; private static final String KEY_TYPE = "type"; private NotificationManager notificationManager; public CoreNotificationCreator(Context context) { notificationManager = ((NotificationManager) context.getSystemService(Context.NOTIFICATION_SERVICE)); } public void showNotification(Context context, RemoteMessage remoteMessage) { String notificationType = getNotificationType(remoteMessage); CoreNotification notification = factoryMethod(notificationType, remoteMessage); if (notification != null) { NotificationCompat.Builder builder = builderFromPushNotification(context, notification); notify(builder); } } private String getNotificationType(RemoteMessage remoteMessage) { Map<String, String> data = remoteMessage.getData(); if (data.containsKey(KEY_TYPE)) { return data.get(KEY_TYPE); } return ""; } @Nullable protected abstract CoreNotification factoryMethod(String messageType, RemoteMessage remoteMessage); private final static int DEFAULT_NOTIFICATION_ID = 15; private static final @DrawableRes int SMALL_ICON_RES_ID = R.drawable.ic_notification_small; protected NotificationCompat.Builder builderFromPushNotification(Context context, CoreNotification notification) { Bitmap largeIcon = BitmapFactory.decodeResource(context.getResources(), notification.largeIcon()); NotificationCompat.Builder builder = new NotificationCompat.Builder(context) .setSmallIcon(SMALL_ICON_RES_ID) .setAutoCancel(true) .setDefaults(NotificationCompat.DEFAULT_ALL) .setContentTitle(notification.getTitle()) .setContentText(notification.getContent()) .setLargeIcon(largeIcon); builder.getExtras().putString(KEY_NOTIFICATION_TAG, notification.getNotificationTag()); builder.setContentIntent(notification.configurePendingIntent(context)); return builder; } private void notify(@NonNull NotificationCompat.Builder builder) { final String notificationTag = getNotificationTag(builder); notificationManager.cancel(notificationTag, DEFAULT_NOTIFICATION_ID); notificationManager.notify(notificationTag, DEFAULT_NOTIFICATION_ID, builder.build()); } private String getNotificationTag(NotificationCompat.Builder builder) { Bundle extras = builder.getExtras(); if (extras.containsKey(KEY_NOTIFICATION_TAG)) { return extras.getString(KEY_NOTIFICATION_TAG); } else { return DEFAULT_TAG; } } } The showNotification () method is the only public method. We will call him when we receive new push to display notifications. All other methods are an internal implementation of creating and displaying notifications.
Creating notifications in Android
public void showNotification(Context context, RemoteMessage remoteMessage) { String notificationType = getNotificationType(remoteMessage); CoreNotification notification = factoryMethod(notificationType, remoteMessage); if (notification != null) { NotificationCompat.Builder builder = builderFromPushNotification(context, notification); notify(builder); } } In turn, showNotification () defines the type of push that is contained in the remoteMessage data. And then the push type and the remoteMessage object are passed to the factory method , which will create for us the necessary object of the CoreNotification class.
factoryMethod () @Nullable because a push type may come that the application knows nothing about. In theory. Insurance.
So, the implementation of one class for two applications that works with push is ready. The point remains: to implement for each application its specific NotificationCreator.
Example from the teacher's application
public class TeacherNotificationCreator extends CoreNotificationCreator { public TeacherNotificationCreator(Context context) { super(context); } @Nullable @Override protected CoreNotification factoryMethod(String messageType, RemoteMessage remoteMessage) { switch (messageType) { case NewChildNotification.TYPE: return new NewChildNotification(remoteMessage); case BirthdayNotification.TYPE: return new BirthdayNotification(remoteMessage); } return null; } } In the factory method, the messageType variable determines which CoreNotification subclass will be returned.
For example, for a teacher's application one of the types of notifications could be implemented as follows:
class NewChildNotification extends CoreNotification { static final String TYPE = "add_child"; private static final String KEY_CHILD_NAME = "child_name"; NewChildNotification(RemoteMessage remoteMessage) { super(remoteMessage); } @Override protected PendingIntent configurePendingIntent(Context context) { Intent intent = new Intent(context, MainActivity.class) .setPackage(context.getApplicationContext().getPackageName()) .setFlags(Intent.FLAG_ACTIVITY_SINGLE_TOP | Intent.FLAG_ACTIVITY_CLEAR_TOP); intent.putExtra(CoreNotification.KEY_FROM_PUSH, getAddChildInfo()); return PendingIntent.getActivity(context, 1, intent, PendingIntent.FLAG_UPDATE_CURRENT); } @Override protected int largeIcon() { return R.drawable.ic_add_child; } @Override protected String getNotificationTag() { return getClass().getName() + getChildName(); } private String getChildName() { Map<String, String> data = remoteMessage.getData(); if (data.containsKey(KEY_CHILD_NAME)) { return data.get(KEY_CHILD_NAME); } return STRING_EMPTY; } private String getAddChildInfo() { return "New child " + getChildName() + " was added to your group"; } } The configurePendingIntent () method is put into the implementation of a specific notification so that it remains possible to open different screens with parameters of a specific push message.
Absolutely similar approach in the parent application:
public class ParentNotificationCreator extends CoreNotificationCreator { public ParentNotificationCreator(Context context) { super(context); } @Nullable @Override protected CoreNotification factoryMethod(String messageType, RemoteMessage remoteMessage) { switch (messageType) { case PickUpNotification.TYPE: return new PickUpNotification(remoteMessage); case GradeNotification.TYPE: return new GradeNotification(remoteMessage); default: return null; } } } Similar to the teacher application, unique notifications are created for the parent application with its implementation and its unique type.
In this repository you will find the source code of the project. If you want to build it, you will need to create your own Firebase project. The process is simple and free, and Android Studio simplifies it in many ways: Tools → Firebase → Cloud Messaging — conveniently generating the necessary dependencies in Gradle scripts and setting up a firebase project from the studio. And once again the official step-by-step instructions for adding FCM to the Android project
What we got in the end
When new push notifications are added to a specific application, the implementation of the heir of the abstract CoreNotificationCreator (in two lines) + is changed + a new class is created that implements the abstract CoreNotification . In this case, the logic of forming and displaying existing notifications does not change. The likelihood of implementing a new subclass of CoreNotification so that it somehow affects the work of the rest of the working functionality, tends to zero. And each CoreNotification subclass independently decides:
- what largeIcon to use for notification;
- what intent to open which activity;
- by overriding getNotificationTag (), it is possible to decide whether the notifications will replace each other or will be created for each notification of this class separately.
And the most valuable, in my opinion, is that if a customer wants to develop a new application for, for example, a kindergarten administrator, the implementation of push will not affect the work of the entire system of push notifications for him and reduces to inheritance and redefinition following the example of several classes.
Once again about literature
A more detailed understanding of the “Factory Method” pattern and other classic design patterns will be given to you by the literature that has become “desktop” for the Android development department in our company.
- Very understandable book "Design Patterns" . Acquaintance with the topic of classical techniques in the PLO and with the factory method in particular. I advise you to start with it, especially Android developers, because all the examples in Java
- "Object-oriented design techniques. Design patterns" . Classic work. No water only
hardcoresober concise description of the pattern and an example implementation in C ++.
P.S
To write at the end of an article about the usefulness of classical design patterns in a programmer’s work would be extremely trite. I would even say went. Surely on Habré this utility has already been proved dozens of times. But I hope that the application example in the development for a specific platform will be useful for Android-juniors in this difficult, but exciting business.
The choice of a specific design pattern for the implementation of a specific task is a topic for heated discussion. So welcome to the comments. Bye everyone!
')
Source: https://habr.com/ru/post/332006/
All Articles