Using Python and Excel to process and analyze data. Part 2: libraries for working with data
The first part of the article was published here .
How to read and edit Excel files with openpyxl
TRANSFER
Original article - www.datacamp.com/community/tutorials/python-excel-tutorial
Author - Karlijn Willems
')
This library is useful if you want to read and edit .xlsx, xlsm, xltx and xltm files.
Install openpyxl using pip. General recommendations for installing this library - do it in a virtual Python environment without system libraries. You can use a virtual environment to create isolated Python environments: it creates a folder containing all the necessary files to use the libraries that are required for Python.
Go to the directory where your project is located, and re-activate the virtual environment venv. Then go to the installation of openpyxl using pip to make sure that you can read and write files with it:
Now that you have installed openpyxl, you can start downloading data. But what exactly is this data? For example, in the data book you are trying to get in Python, there are the following sheets:

The load_workbook () function takes the file name as an argument and returns the workbook object that represents the file. This can be checked by running type (wb). Remember to make sure you are in the correct directory where the spreadsheet is located. Otherwise, you will receive an error message when importing.
Remember, you can change the working directory with os.chdir (). The code snippet above returns the sheet names of the book loaded in Python. You can use this information to obtain individual sheets of a book. You can also check which sheet is currently active using wb.active. In the code below, you can also use it to load data on another sheet of the book:
At first glance, with these Worksheet objects, there is little that can be done. However, you can extract values from specific cells on a book sheet using square brackets [], to which you need to transfer the exact cell from which you want to get the value.
Note that this is similar to selecting, retrieving, and indexing NumPy and Pandas DataFrames arrays, but this is not all that needs to be done to get the value. It is necessary to add the attribute value:
In addition to value, there are other attributes that can be used to check the cell, namely row, column, and coordinate:
The row attribute returns 2;
Adding the column attribute to “C” will give you “B”;
coordinate will return "B2".
You can also get cell values using the cell () function. Pass the row and column arguments, add values to these arguments that correspond to the cell values you want to get, and, of course, do not forget to add the value attribute:
Note that if you do not specify the value of the value attribute, you will get <Cell Sheet3.B1>, which says nothing about the value that is contained in this particular cell.
You use a loop using the range () function to help you output the values of the rows that have values in column 2. If these specific cells are empty, you will get None.
Moreover, there are special functions that you can call to get other values, for example get_column_letter () and column_index_from_string.
In the two functions it is already more or less indicated what you can get by using them. But it's best to make them explicit: as long as you can get the letter of the previous column, you can do the opposite or get the index of the column by sorting letter by letter. How it works:
You have already obtained values for rows that have values in a specific column, but what should you do if you need to output the lines of a file without focusing on only one column?
Of course, use another cycle.
For example, you want to focus on the area between “A1” and “C3”, where the first indicates the upper left corner, and the second the lower right corner of the area you want to focus on. This area will be the so-called cellObj, which you see in the first line of code below. Then you specify that for each cell that is in this area, you want to output the coordinate and the value that is contained in this cell. After the end of each line, you want to output a message signaling that the line of this cellObj region has been output.
Note that selecting a region is very similar to choosing, retrieving and indexing a list and the NumPy elements, where you also use square brackets and a colon to indicate the region from which you want to get values. In addition, the above loop also makes good use of the attributes of the cell!
To visualize the above, you may want to check the result, which will return the completed cycle to you:
Finally, there are some attributes that you can use to verify the import result, namely max_row and max_column. These attributes, of course, are common ways to ensure the data is loaded correctly, but nevertheless, in this case, they can and will be useful.
This is all very cool, but we can almost hear that you now think that this is an awfully difficult way to work with files, especially if you need to manage data as well.
Should be something simpler, right? It's like that!
Openpyxl has support for Pandas DataFrames. And you can use the Pandas DataFrame () function to put the sheet values in the DataFrame:
Then you can start managing the data with all the features that Pandas has. But remember that you are in a virtual environment, so if the library is not already connected, you will need to install it again via pip.
To write Pandas DataFrames back to an Excel file, you can use the dataframe_to_rows () function from the utils module:
But this is definitely not all! The openpyxl library offers you great flexibility in how you write your data to Excel files, change cell styles, or use write-only mode. This makes it one of those libraries that you really need to know if you often work with spreadsheets.
And don't forget to deactivate the virtual environment when you're done with the data!
Now let's look at some other libraries that you can use to retrieve data in a Python spreadsheet.
Ready to learn more?
Reading and formatting Excel xlrd files
This library is ideal if you want to read data and format data in files with the .xls or .xlsx extension.
If you do not want to review the entire book, you can use functions such as sheet_by_name () or sheet_by_index () to extract the sheets you want to use in the analysis.
Finally, you can get the values at specific coordinates indicated by indices.
About how xlwt and xlutils relate to xlrd further.
Writing data to an Excel file using xlrd
If you need to create spreadsheets that contain data, in addition to the XlsxWriter library, you can use the xlwt libraries. Xlwt is ideal for writing and formatting data in files with the .xls extension.
When you manually want to write to a file, it will look like this:
If you need to write data to a file, you can resort to a for loop to minimize manual labor. This will automate the process a bit. We make a script in which the book is created, in which the sheet is added. Next, specify a list with columns and with values that will be transferred to the worksheet.
The for loop will ensure that all values fall into the file: we specify that we are going to take actions with each element in the range from 0 to 4 (5 is not included). We will fill in the values line by line. To do this, specify the row element, which will “jump” in each cycle. And then we have the next for loop, which will go through the columns of the sheet. We set the condition that for each row on the sheet we look at the column and fill in the value for each column in the row. When we have filled all the columns of the row with values, we proceed to the next line until we have filled all the rows.
As an example, a screenshot of the resulting file:
Now that you have seen how xlrd and xlwt interact together, it's time to look at a library that is closely related to these two: xlutils.
Xlutils utility collection
This library is basically a collection of utilities for which both xlrd and xlwt are required. Includes the ability to copy and modify / filter existing files. Generally speaking, both of these cases now fall under openpyxl.
Use pyexcel to read .xls or .xlsx files
Another library that can be used to read table data in Python is pyexcel. This is a Python Wrapper, which provides one API for reading, processing and writing data in .csv, .ods, .xls, .xlsx and .xlsm files.
To get the data in an array, you can use the get_array () function, which is contained in the pyexcel package:
However, if you want to return two-dimensional arrays to the dictionary or, in other words, get all the sheets of a book in one dictionary, you should use the get_book_dict () function.
Keep in mind that both the mentioned data structures, arrays and dictionaries of your spreadsheet allow you to create your data's DataFrames with pd.DataFrame (). This will simplify the processing of your data!
Finally, you can simply get entries with pyexcel thanks to the get_records () function. Just pass the argument to the file_name function and get back the list of dictionaries:
File Records with pyexcel
Just as you can load data into arrays using this package, you can also easily export arrays back to a spreadsheet. To do this, use the save_as () function with passing the array and the name of the target file to the argument dest_file_name:
Note: if you specify a delimiter, you can add the argument dest_delimiter and pass the character you want to use as a delimiter between “”.
However, if you have a dictionary, you will need to use the save_book_as () function. Transfer the two-dimensional dictionary in bookdict and specify the file name, and everything is OK:
Remember that when you use the code that is printed in the code snippet above, the order of the data in the dictionary will not be saved!
Read and write .csv files
If you are still looking for libraries that allow you to upload and write data to CSV files other than Pandas, we recommend the csv library:
Note that NumPy has a genfromtxt () function that allows you to load data contained in CSV files into arrays, which can then be placed in DataFrames.
Final data check
When the data is prepared, do not forget the last step: check that the data is loaded correctly. If you put your data in the DataFrame, you can quickly and easily check whether the import was successful by running the following commands:
Note: Use DataCamp Pandas Cheat Sheet when you plan to upload files as Pandas DataFrames.
If the data is in an array, you can check it using the following attributes of the array: shape, ndim, dtype, etc .:
What's next?
Congratulations, you now know how to read Excel files in Python :) But importing data is only the beginning of the workflow in the data area. When you have data from spreadsheets in your environment, you can focus on what really matters: data analysis.
If you want to dive deeper into the topic - meet PyXll, which allows you to write functions in Python and call them in Excel.
How to read and edit Excel files with openpyxl
TRANSFER
Original article - www.datacamp.com/community/tutorials/python-excel-tutorial
Author - Karlijn Willems
')
This library is useful if you want to read and edit .xlsx, xlsm, xltx and xltm files.
Install openpyxl using pip. General recommendations for installing this library - do it in a virtual Python environment without system libraries. You can use a virtual environment to create isolated Python environments: it creates a folder containing all the necessary files to use the libraries that are required for Python.
Go to the directory where your project is located, and re-activate the virtual environment venv. Then go to the installation of openpyxl using pip to make sure that you can read and write files with it:
# Activate virtualenv $ source activate venv # Install `openpyxl` in `venv` $ pip install openpyxl Now that you have installed openpyxl, you can start downloading data. But what exactly is this data? For example, in the data book you are trying to get in Python, there are the following sheets:
The load_workbook () function takes the file name as an argument and returns the workbook object that represents the file. This can be checked by running type (wb). Remember to make sure you are in the correct directory where the spreadsheet is located. Otherwise, you will receive an error message when importing.
# Import `load_workbook` module from `openpyxl` from openpyxl import load_workbook # Load in the workbook wb = load_workbook('./test.xlsx') # Get sheet names print(wb.get_sheet_names()) Remember, you can change the working directory with os.chdir (). The code snippet above returns the sheet names of the book loaded in Python. You can use this information to obtain individual sheets of a book. You can also check which sheet is currently active using wb.active. In the code below, you can also use it to load data on another sheet of the book:
# Get a sheet by name sheet = wb.get_sheet_by_name('Sheet3') # Print the sheet title sheet.title # Get currently active sheet anotherSheet = wb.active # Check `anotherSheet` anotherSheet At first glance, with these Worksheet objects, there is little that can be done. However, you can extract values from specific cells on a book sheet using square brackets [], to which you need to transfer the exact cell from which you want to get the value.
Note that this is similar to selecting, retrieving, and indexing NumPy and Pandas DataFrames arrays, but this is not all that needs to be done to get the value. It is necessary to add the attribute value:
# Retrieve the value of a certain cell sheet['A1'].value # Select element 'B2' of your sheet c = sheet['B2'] # Retrieve the row number of your element c.row # Retrieve the column letter of your element c.column # Retrieve the coordinates of the cell c.coordinate In addition to value, there are other attributes that can be used to check the cell, namely row, column, and coordinate:
The row attribute returns 2;
Adding the column attribute to “C” will give you “B”;
coordinate will return "B2".
You can also get cell values using the cell () function. Pass the row and column arguments, add values to these arguments that correspond to the cell values you want to get, and, of course, do not forget to add the value attribute:
# Retrieve cell value sheet.cell(row=1, column=2).value # Print out values in column 2 for i in range(1, 4): print(i, sheet.cell(row=i, column=2).value) Note that if you do not specify the value of the value attribute, you will get <Cell Sheet3.B1>, which says nothing about the value that is contained in this particular cell.
You use a loop using the range () function to help you output the values of the rows that have values in column 2. If these specific cells are empty, you will get None.
Moreover, there are special functions that you can call to get other values, for example get_column_letter () and column_index_from_string.
In the two functions it is already more or less indicated what you can get by using them. But it's best to make them explicit: as long as you can get the letter of the previous column, you can do the opposite or get the index of the column by sorting letter by letter. How it works:
# Import relevant modules from `openpyxl.utils` from openpyxl.utils import get_column_letter, column_index_from_string # Return 'A' get_column_letter(1) # Return '1' column_index_from_string('A') You have already obtained values for rows that have values in a specific column, but what should you do if you need to output the lines of a file without focusing on only one column?
Of course, use another cycle.
For example, you want to focus on the area between “A1” and “C3”, where the first indicates the upper left corner, and the second the lower right corner of the area you want to focus on. This area will be the so-called cellObj, which you see in the first line of code below. Then you specify that for each cell that is in this area, you want to output the coordinate and the value that is contained in this cell. After the end of each line, you want to output a message signaling that the line of this cellObj region has been output.
# Print row per row for cellObj in sheet['A1':'C3']: for cell in cellObj: print(cells.coordinate, cells.value) print('--- END ---') Note that selecting a region is very similar to choosing, retrieving and indexing a list and the NumPy elements, where you also use square brackets and a colon to indicate the region from which you want to get values. In addition, the above loop also makes good use of the attributes of the cell!
To visualize the above, you may want to check the result, which will return the completed cycle to you:
('A1', u'M') ('B1', u'N') ('C1', u'O') --- END --- ('A2', 10L) ('B2', 11L) ('C2', 12L) --- END --- ('A3', 14L) ('B3', 15L) ('C3', 16L) --- END --- Finally, there are some attributes that you can use to verify the import result, namely max_row and max_column. These attributes, of course, are common ways to ensure the data is loaded correctly, but nevertheless, in this case, they can and will be useful.
# Retrieve the maximum amount of rows sheet.max_row # Retrieve the maximum amount of columns sheet.max_column This is all very cool, but we can almost hear that you now think that this is an awfully difficult way to work with files, especially if you need to manage data as well.
Should be something simpler, right? It's like that!
Openpyxl has support for Pandas DataFrames. And you can use the Pandas DataFrame () function to put the sheet values in the DataFrame:
# Import `pandas` import pandas as pd # Convert Sheet to DataFrame df = pd.DataFrame(sheet.values) , : # Put the sheet values in `data` data = sheet.values # Indicate the columns in the sheet values cols = next(data)[1:] # Convert your data to a list data = list(data) # Read in the data at index 0 for the indices idx = [r[0] for r in data] # Slice the data at index 1 data = (islice(r, 1, None) for r in data) # Make your DataFrame df = pd.DataFrame(data, index=idx, columns=cols) Then you can start managing the data with all the features that Pandas has. But remember that you are in a virtual environment, so if the library is not already connected, you will need to install it again via pip.
To write Pandas DataFrames back to an Excel file, you can use the dataframe_to_rows () function from the utils module:
# Import `dataframe_to_rows` from openpyxl.utils.dataframe import dataframe_to_rows # Initialize a workbook wb = Workbook() # Get the worksheet in the active workbook ws = wb.active # Append the rows of the DataFrame to your worksheet for r in dataframe_to_rows(df, index=True, header=True): ws.append(r) But this is definitely not all! The openpyxl library offers you great flexibility in how you write your data to Excel files, change cell styles, or use write-only mode. This makes it one of those libraries that you really need to know if you often work with spreadsheets.
And don't forget to deactivate the virtual environment when you're done with the data!
Now let's look at some other libraries that you can use to retrieve data in a Python spreadsheet.
Ready to learn more?
Reading and formatting Excel xlrd files
This library is ideal if you want to read data and format data in files with the .xls or .xlsx extension.
# Import `xlrd` import xlrd # Open a workbook workbook = xlrd.open_workbook('example.xls') # Loads only current sheets to memory workbook = xlrd.open_workbook('example.xls', on_demand = True) If you do not want to review the entire book, you can use functions such as sheet_by_name () or sheet_by_index () to extract the sheets you want to use in the analysis.
# Load a specific sheet by name worksheet = workbook.sheet_by_name('Sheet1') # Load a specific sheet by index worksheet = workbook.sheet_by_index(0) # Retrieve the value from cell at indices (0,0) sheet.cell(0, 0).value Finally, you can get the values at specific coordinates indicated by indices.
About how xlwt and xlutils relate to xlrd further.
Writing data to an Excel file using xlrd
If you need to create spreadsheets that contain data, in addition to the XlsxWriter library, you can use the xlwt libraries. Xlwt is ideal for writing and formatting data in files with the .xls extension.
When you manually want to write to a file, it will look like this:
# Import `xlwt` import xlwt # Initialize a workbook book = xlwt.Workbook(encoding="utf-8") # Add a sheet to the workbook sheet1 = book.add_sheet("Python Sheet 1") # Write to the sheet of the workbook sheet1.write(0, 0, "This is the First Cell of the First Sheet") # Save the workbook book.save("spreadsheet.xls") If you need to write data to a file, you can resort to a for loop to minimize manual labor. This will automate the process a bit. We make a script in which the book is created, in which the sheet is added. Next, specify a list with columns and with values that will be transferred to the worksheet.
The for loop will ensure that all values fall into the file: we specify that we are going to take actions with each element in the range from 0 to 4 (5 is not included). We will fill in the values line by line. To do this, specify the row element, which will “jump” in each cycle. And then we have the next for loop, which will go through the columns of the sheet. We set the condition that for each row on the sheet we look at the column and fill in the value for each column in the row. When we have filled all the columns of the row with values, we proceed to the next line until we have filled all the rows.
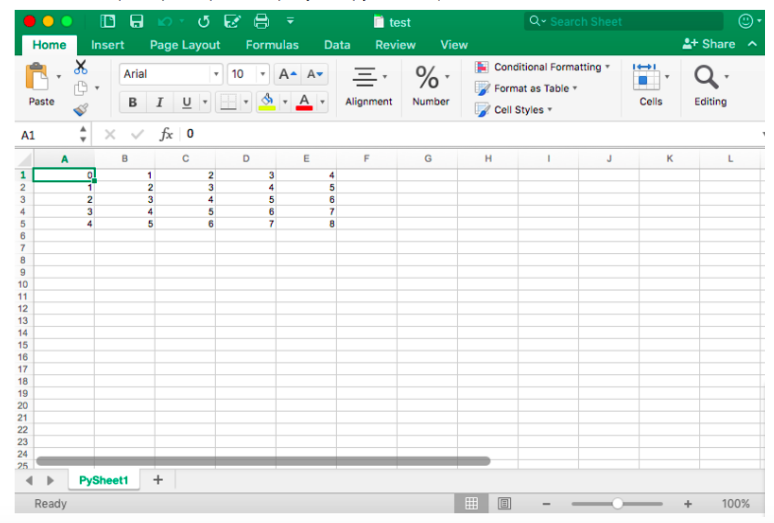
# Initialize a workbook book = xlwt.Workbook() # Add a sheet to the workbook sheet1 = book.add_sheet("Sheet1") # The data cols = ["A", "B", "C", "D", "E"] txt = [0,1,2,3,4] # Loop over the rows and columns and fill in the values for num in range(5): row = sheet1.row(num) for index, col in enumerate(cols): value = txt[index] + num row.write(index, value) # Save the result book.save("test.xls") As an example, a screenshot of the resulting file:
Now that you have seen how xlrd and xlwt interact together, it's time to look at a library that is closely related to these two: xlutils.
Xlutils utility collection
This library is basically a collection of utilities for which both xlrd and xlwt are required. Includes the ability to copy and modify / filter existing files. Generally speaking, both of these cases now fall under openpyxl.
Use pyexcel to read .xls or .xlsx files
Another library that can be used to read table data in Python is pyexcel. This is a Python Wrapper, which provides one API for reading, processing and writing data in .csv, .ods, .xls, .xlsx and .xlsm files.
To get the data in an array, you can use the get_array () function, which is contained in the pyexcel package:
# Import `pyexcel` import pyexcel # Get an array from the data my_array = pyexcel.get_array(file_name="test.xls") , get_dict (): # Import `OrderedDict` module from pyexcel._compact import OrderedDict # Get your data in an ordered dictionary of lists my_dict = pyexcel.get_dict(file_name="test.xls", name_columns_by_row=0) # Get your data in a dictionary of 2D arrays book_dict = pyexcel.get_book_dict(file_name="test.xls") However, if you want to return two-dimensional arrays to the dictionary or, in other words, get all the sheets of a book in one dictionary, you should use the get_book_dict () function.
Keep in mind that both the mentioned data structures, arrays and dictionaries of your spreadsheet allow you to create your data's DataFrames with pd.DataFrame (). This will simplify the processing of your data!
Finally, you can simply get entries with pyexcel thanks to the get_records () function. Just pass the argument to the file_name function and get back the list of dictionaries:
# Retrieve the records of the file records = pyexcel.get_records(file_name="test.xls") File Records with pyexcel
Just as you can load data into arrays using this package, you can also easily export arrays back to a spreadsheet. To do this, use the save_as () function with passing the array and the name of the target file to the argument dest_file_name:
# Get the data data = [[1, 2, 3], [4, 5, 6], [7, 8, 9]] # Save the array to a file pyexcel.save_as(array=data, dest_file_name="array_data.xls") Note: if you specify a delimiter, you can add the argument dest_delimiter and pass the character you want to use as a delimiter between “”.
However, if you have a dictionary, you will need to use the save_book_as () function. Transfer the two-dimensional dictionary in bookdict and specify the file name, and everything is OK:
# The data 2d_array_dictionary = {'Sheet 1': [ ['ID', 'AGE', 'SCORE'] [1, 22, 5], [2, 15, 6], [3, 28, 9] ], 'Sheet 2': [ ['X', 'Y', 'Z'], [1, 2, 3], [4, 5, 6] [7, 8, 9] ], 'Sheet 3': [ ['M', 'N', 'O', 'P'], [10, 11, 12, 13], [14, 15, 16, 17] [18, 19, 20, 21] ]} # Save the data to a file pyexcel.save_book_as(bookdict=2d_array_dictionary, dest_file_name="2d_array_data.xls") Remember that when you use the code that is printed in the code snippet above, the order of the data in the dictionary will not be saved!
Read and write .csv files
If you are still looking for libraries that allow you to upload and write data to CSV files other than Pandas, we recommend the csv library:
# import `csv` import csv # Read in csv file for row in csv.reader(open('data.csv'), delimiter=','): print(row) # Write csv file data = [[1, 2, 3], [4, 5, 6], [7, 8, 9]] outfile = open('data.csv', 'w') writer = csv.writer(outfile, delimiter=';', quotechar='"') writer.writerows(data) outfile.close() Note that NumPy has a genfromtxt () function that allows you to load data contained in CSV files into arrays, which can then be placed in DataFrames.
Final data check
When the data is prepared, do not forget the last step: check that the data is loaded correctly. If you put your data in the DataFrame, you can quickly and easily check whether the import was successful by running the following commands:
# Check the first entries of the DataFrame df1.head() # Check the last entries of the DataFrame df1.tail() Note: Use DataCamp Pandas Cheat Sheet when you plan to upload files as Pandas DataFrames.
If the data is in an array, you can check it using the following attributes of the array: shape, ndim, dtype, etc .:
# Inspect the shape data.shape # Inspect the number of dimensions data.ndim # Inspect the data type data.dtype What's next?
Congratulations, you now know how to read Excel files in Python :) But importing data is only the beginning of the workflow in the data area. When you have data from spreadsheets in your environment, you can focus on what really matters: data analysis.
If you want to dive deeper into the topic - meet PyXll, which allows you to write functions in Python and call them in Excel.
Source: https://habr.com/ru/post/331998/
All Articles