Developing a new service in Android 7 | Customization of the navigation bar

Imagine the following situation: we are developing a product that requires very specific properties that either do not exist or are not available in the Android inventory. For example, a card reader is required.
Yes, I know about external readers, but we are serious developers and we decided to make it internal so that the final device looked more complete. For example, like this:

Such devices are likely to provide special payment processing services for third-party developers.
')
In this article I want to describe the process of expanding the Android API on the example of creating a new service to customize the navigation bar.
Task statement
We are going to develop an API that will allow customization (customization) of the navigation line by adding new elements there. The standard navigation bar looks differently on different devices, and may even be absent on devices with hardware navigation buttons.
Let's take the Nexus 9:
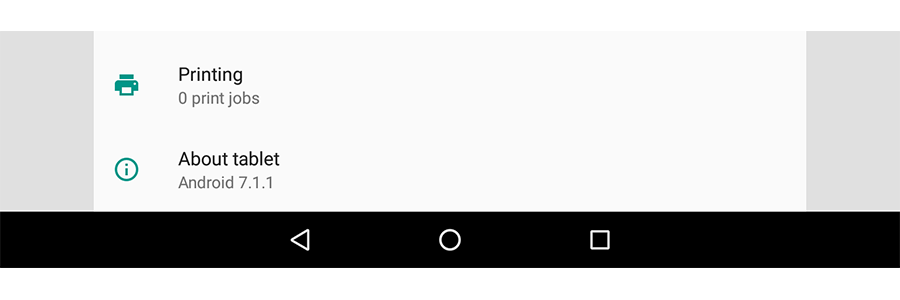
The navigation bar is a black box at the bottom with navigation buttons. It is shown to the user all the time (except when an application is running in full-screen mode), so it would be nice to allow developers to put their own elements there.
In order to make the API as flexible as possible, take the Android Remote View as the main parameter of our API. This will allow the user (ie, another developer) to use many of the standard components for customization. It will also provide a feedback mechanism from the elements to the application.
As an extension point, let's take the Android SDK directly: we will make changes to the AOSP (Android Open Source Project) and build our own Android SDK. This SDK is suitable only for devices running our modified firmware, but this restriction suits us a priori. As a result, our services will be very easy to use and they will be immediately accessible from the Android SDK.
Release
Download and set up your AOSP development environment.
All necessary information for setting up the AOSP development environment is provided here . Select the appropriate AOSP branch (this affects the Android version) compatible with the selected device. In my case, this is Nexus 9 and the android-7.1.1_r33 branch .
Develop a new service
Looking ahead, the following diagram shows all the components involved in the implementation:
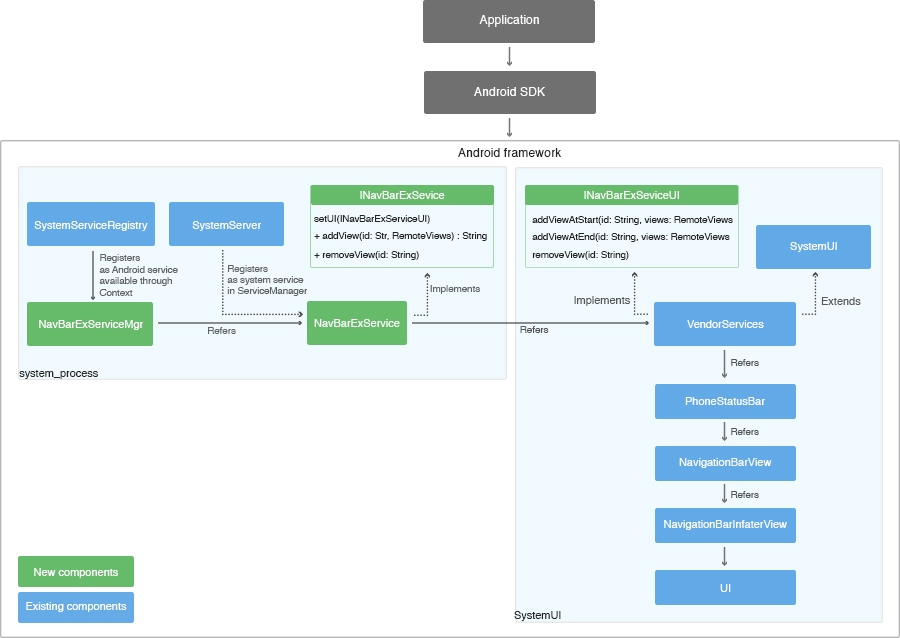
The idea is to provide advanced functions for managing the navigation bar to client applications via the Android service. The navigation bar is defined in the NavigationBarInflaterView.java and {aosp} /frameworks/base/packages/SystemUI/res/layout/navigation_bar.xml files . But we cannot access them directly from the client application, as they are in the SystemUI system application while the main Android services are located in the system_process process.
Thus, our goal is reduced to the connection of these components with system_process , where they will be available for client code.
1. Create a proxy service (manager) that will be visible from the client application. This is a standard Java class that delegates all functions to the service:
Code
package android.os; /** * /framework/base/core/java/android/os/NavBarExServiceMgr.java * It will be available in framework through import android.os.NavBarExServiceMgr; */ import android.content.Context; import android.widget.RemoteViews; public class NavBarExServiceMgr { private static final String TAG = "NavBarExServiceMgr"; private final Context context; private final INavBarExService navBarExService; public static NavBarExServiceMgr getInstance(Context context) { return (NavBarExServiceMgr) context.getSystemService(Context.NAVBAREX_SERVICE); } /** * Creates a new instance. * * @param context The current context in which to operate. * @param service The backing system service. * @hide */ public NavBarExServiceMgr(Context context, INavBarExService service) { this.context = context; if (service == null) throw new IllegalArgumentException("service is null"); this.navBarExService = service; } /** * Sets the UI component * * @param ui - ui component * @throws RemoteException * @hide */ public void setUI(INavBarExServiceUI ui) throws RemoteException { navBarExService.setUI(ui); } public String addView(int priority, RemoteViews remoteViews) { try { return navBarExService.addView(priority, remoteViews); } catch (RemoteException ignored) {} return null; } public boolean removeView(String id) { try { return navBarExService.removeView(id); } catch (RemoteException ignored) {} return false; } public boolean replaceView(String id, RemoteViews remoteViews) { try { return navBarExService.replaceView(id, remoteViews); } catch (RemoteException e) {} return false; } public boolean viewExist(String id) { try { return navBarExService.viewExist(id); } catch (RemoteException e) {} return false; } } This class must be registered in the static section of the SystemServiceRegistry class:
Code
registerService(Context.NAVBAREX_SERVICE, NavBarExServiceMgr.class, new CachedServiceFetcher() { @Override public NavBarExServiceMgr createService(ContextImpl ctx) { IBinder b = ServiceManager.getService(Context.NAVBAREX_SERVICE); INavBarExService service = INavBarExService.Stub.asInterface(b); if (service == null) { Log.wtf(TAG, "Failed to get INavBarExService service."); return null; } return new NavBarExServiceMgr(ctx, service); }}); On the client side, the service may be available as follows:
Code
NavBarExServiceMgr navBarExServiceMgr = (NavBarExServiceMgr) getSystemService(Context.NAVBAREX_SERVICE); // TODO 2. Define AIDL service interface:
Code
/*
* aidl file :
* frameworks/base/core/java/android/os/INavBarExService.aidl
* This file contains definitions of functions which are
* exposed by service.
*/

package android.os;

import android.os.INavBarExServiceUI;
import android.widget.RemoteViews;

/** */
interface INavBarExService
{
/**
* @hide
*/
void setUI(INavBarExServiceUI ui);

String addView(in int priority, in RemoteViews remoteViews);
boolean removeView(in String id);
boolean replaceView(in String id, in RemoteViews remoteViews);
boolean viewExist(in String id);
}
And implement it:
Code
public class NavBarExService extends INavBarExService.Stub … As you can see most of the methods are straightforward, only setUI looks weird. This is an internal method used by the class that implements the INavBarExServiceUI interface to register itself with the NavBarExService . All entities marked with the “@hide” comment will be cut from the final Android SDK and thus will not be visible from the client code.
A few comments regarding API semantics:
- Each element is identified by a string identifier. It is generated by the service when a new item is added. Thus, each application that adds new elements through our service must save the returned identifier in order to be able to work with the element in the future;
- Other methods accept an identifier as a parameter that identifies the element;
- Each element also has a “priority” parameter which indicates where to place the element. The higher the priority value, the more left will be the placement.
The implementation of the setUI method:
code
@Override public void setUI(INavBarExServiceUI ui) { Log.d(TAG, "setUI"); this.ui = ui; if (ui != null) { try { for (Pair entry : remoteViewsList.getList()) { ui.navBarExAddViewAtEnd(entry.first, entry.second); } } catch (Exception e) { Log.e(TAG, "Failed to configure UI", e); } } } Implementation of the addView method:
code
@Override public String addView(int priority, RemoteViews remoteViews) throws RemoteException { String id = UUID.randomUUID().toString(); int pos = remoteViewsList.add(priority, id, remoteViews); if (ui != null) { if (pos == 0) ui.navBarExAddViewAtStart(id, remoteViews); else if (pos == remoteViewsList.size() - 1) ui.navBarExAddViewAtEnd(id, remoteViews); else { // find previous element ID Pair prevElPair = remoteViewsList.getAt(pos - 1); ui.navBarExAddViewAfter(prevElPair.first, id, remoteViews); } } return id; } remoteViewsList is used to hold created items until the UI is connected (the setUI method is not called). If it is already connected (the ui field is not null) the new element is added directly to the UI.
3. SystemServer must register our service in the system:
code
try { traceBeginAndSlog("StartNavBarExService"); ServiceManager.addService(Context.NAVBAREX_SERVICE, new NavBarExService(context)); Slog.i(TAG, "NavBarExService Started"); } catch (Throwable e) { reportWtf("Failure starting NavBarExService Service", e); } Trace.traceEnd(Trace.TRACE_TAG_SYSTEM_SERVER); Adding a new service requires editing Android SEPolicy policies.
Add a new entry to the {aosp} /system/selinux/service.te file :
type navbarex_service, app_api_service, system_server_service, service_manager_type;Add a new entry to the {aosp} / system / selinux / service_contexts file:
navbarex u:object_r:navbarex_service:s0
Keep in mind that the SELinux file format for Android 7.0 is different from previous versions of Android.
4. Add service name constants to the Context class so that clients can use it instead of a string value:
Code
/** * Use with {@link #getSystemService} to retrieve a * {@link android.os.NavBarExServiceMgr} for using NavBarExService * * @see #getSystemService */ public static final String NAVBAREX_SERVICE = "navbarex"; 5. Define the INavBarExServiceUI interface:
Code
/*
* aidl file :
* frameworks/base/core/java/android/os/INavBarExServiceUI.aidl
* This file contains definitions of functions which are provided by UI.
*/

package android.os;

import android.widget.RemoteViews;

/** @hide */
oneway interface INavBarExServiceUI
{
void navBarExAddViewAtStart(in String id, in RemoteViews remoteViews);
void navBarExAddViewAtEnd(in String id, in RemoteViews remoteViews);
void navBarExAddViewBefore(in String targetId, in String id, in RemoteViews remoteViews);
void navBarExAddViewAfter(in String targetId, in String id, in RemoteViews remoteViews);
void navBarExRemoveView(in String id);
void navBarExReplaceView(in String id, in RemoteViews remoteViews);
}
Notice that it is marked with the “hide” attribute, which makes it invisible to clients. Also note the oneway keyword. It makes interprocess communication from system_process to SystemUI faster, since all calls will be non-blocking (this also requires an empty return value in the methods).
6. VendorServices is a standard SystemUI component (it is inherited from the SystemUI class), which implements the INavBarExServiceUI interface:
Code
public class VendorServices extends SystemUI { private final Handler handler = new Handler(); private NavBarExServiceMgr navBarExServiceMgr; private volatile PhoneStatusBar statusBar; private INavBarExServiceUI.Stub navBarExServiceUI = new INavBarExServiceUI.Stub() { @Override public void navBarExAddViewAtStart(final String id, final RemoteViews remoteViews) { if (!initStatusBar()) return; handler.post(new Runnable() { @Override public void run() { statusBar.navBarExAddViewAtStart(id, remoteViews); } }); } //… } @Override protected void onBootCompleted() { super.onBootCompleted(); navBarExServiceMgr = (NavBarExServiceMgr) mContext.getSystemService(Context.NAVBAREX_SERVICE); if (navBarExServiceMgr == null) { Log.e(TAG, "navBarExServiceMgr=null"); return; } try { navBarExServiceMgr.setUI(navBarExServiceUI); } catch (Exception e) { Log.e(TAG, "setUI exception: " + e); } } } The onBootCompleted method is interesting . It performs self-registration (calls the setUI method) in the NavBarExService via the NavBarExServiceMgr. Also note that the SystemUI process may be restarted (for example due to a crash), as a result of which several setUI calls will be made. Of course, only the latter should be taken into account.
7. The PhoneStatusBar class is the key element that links the NavBarExService and the NavigationBarInflaterView. It contains a link to NavigationBarView, which in turn contains a link to NavigationBarInflaterView. On the other hand, VendorServices obtains a reference to PhoneStatusBar via the SystemUI.getComponent method:
Code
private boolean initStatusBar() { if (statusBar == null) { synchronized (initLock) { if (statusBar == null) { statusBar = getComponent(PhoneStatusBar.class); if (statusBar == null) { Log.e(TAG, "statusBar = null"); return false; } Log.d(TAG, "statusBar initialized"); } } } return true; } Have you noticed the strange “if (statusBar == null)” construct? It is called the “ Double Checking Locking Pattern ” and pursues the following goal: to produce a thread-safe initialization of the object, but to avoid entering the synchronization section when the object is already initialized. The changes to PhoneStatusBar and NavigationBarView are fairly simple: they simply delegate all calls to the NavigationBarInflaterView class.
8. The NavigationBarInflaterView class is the final class that directly makes changes to the UI. Here is his method navBarExAddViewAtStart:
Code
public void navBarExAddViewAtStart(String id, RemoteViews remoteViews) { if ((mRot0 == null) || (mRot90 == null)) return; ViewGroup ends0 = (ViewGroup) mRot0.findViewById(R.id.ends_group); ViewGroup ends90 = (ViewGroup) mRot90.findViewById(R.id.ends_group); if ((ends0 == null) || (ends90 == null)) return; navBarExAddView(0, id, remoteViews, ends0); navBarExAddView(0, id, remoteViews, ends90); } private void navBarExAddView(int index, String id, RemoteViews remoteViews, ViewGroup parent) { View view = remoteViews.apply(mContext, parent); view.setTag(navBarExFormatTag(id)); TransitionManager.beginDelayedTransition(parent); parent.addView(view, index); } This code relies on the existing implementation and uses the mRot0, mRot90 and also R.id.ends_group fields as a ViewGroup for custom elements. mRot0 and mRot90 represent markup for portrait and landscape modes, so add our elements to both of them. We also used TransitionManager to play some animation.
9. One thing about the Android.mk file. It should contain links to our AIDL files. Two files in the LOCAL_SRC_FILES section:
code
LOCAL_SRC_FILES += \

core/java/android/os/INavBarExService.aidl \
core/java/android/os/INavBarExServiceUI.aidl \

...
and INavBarExService.aidl in the “aidl_files” section:
Code
aidl_files := \

frameworks/base/core/java/android/os/INavBarExService.aidl \

...
Together
Source codes are available on GitHub . There are two files in the “patches” directory: frameworks_base.patch and system_sepolicy.patch. The first patch should be applied to the “{aosp} / frameworks / base” directory, the second to the “{aosp} / system / sepolicy” directory.
The NavBarExDemo directory contains a demo application for the gradle assembly system.
To test the implementation on a real device, we need:
- Download Android stock sources and set up a development environment;
- Apply patches;
- Build custom Android SDK;
- Assemble custom firmware and flash the device;
- Launch the demo application.
To build the Android SDK, run the following commands:
Code
. build/envsetup.sh
lunch sdk_x86-eng
make sdk -j16
The resulting ZIP file is located in the {aosp} / out / host / linux-x86 / sdk / sdk_x86 directory (if running on Linux). Keep in mind that the file name will contain your Linux username. In order to change this behavior, define the environment variable “BUILD_NUMBER” and its value will be used instead of the user name. The J parameter specifies how many tasks to run simultaneously. Use the number of processor cores multiplied by 2.
Firmware can be created using the following commands (for a Nexus 9 device):
Code
. build/envsetup.sh
lunch aosp_flounder-userdebug
make otapackage -j16
Firmware can be flashed using the command:
Code
fastboot -w flashall
The device must have an unlocked bootloader.
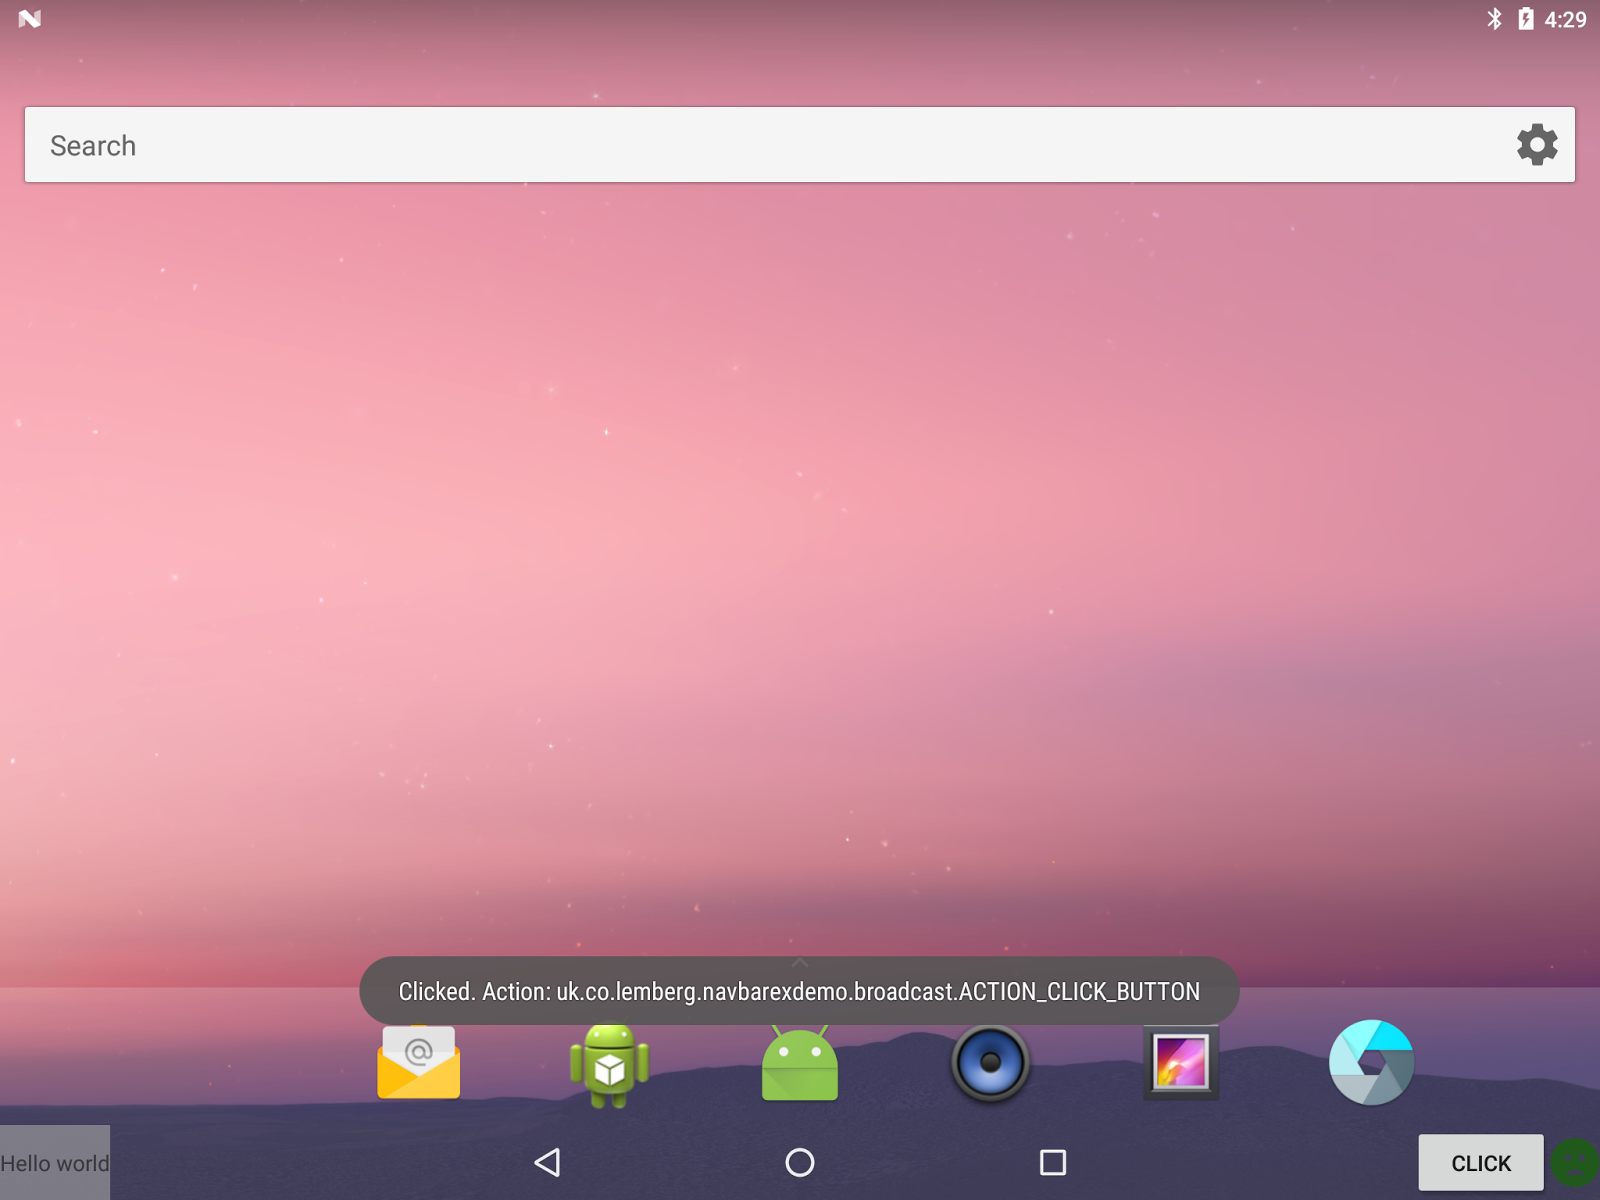
To check the results, a special demonstration application was created. It allows you to manage the elements of the navigation bar.
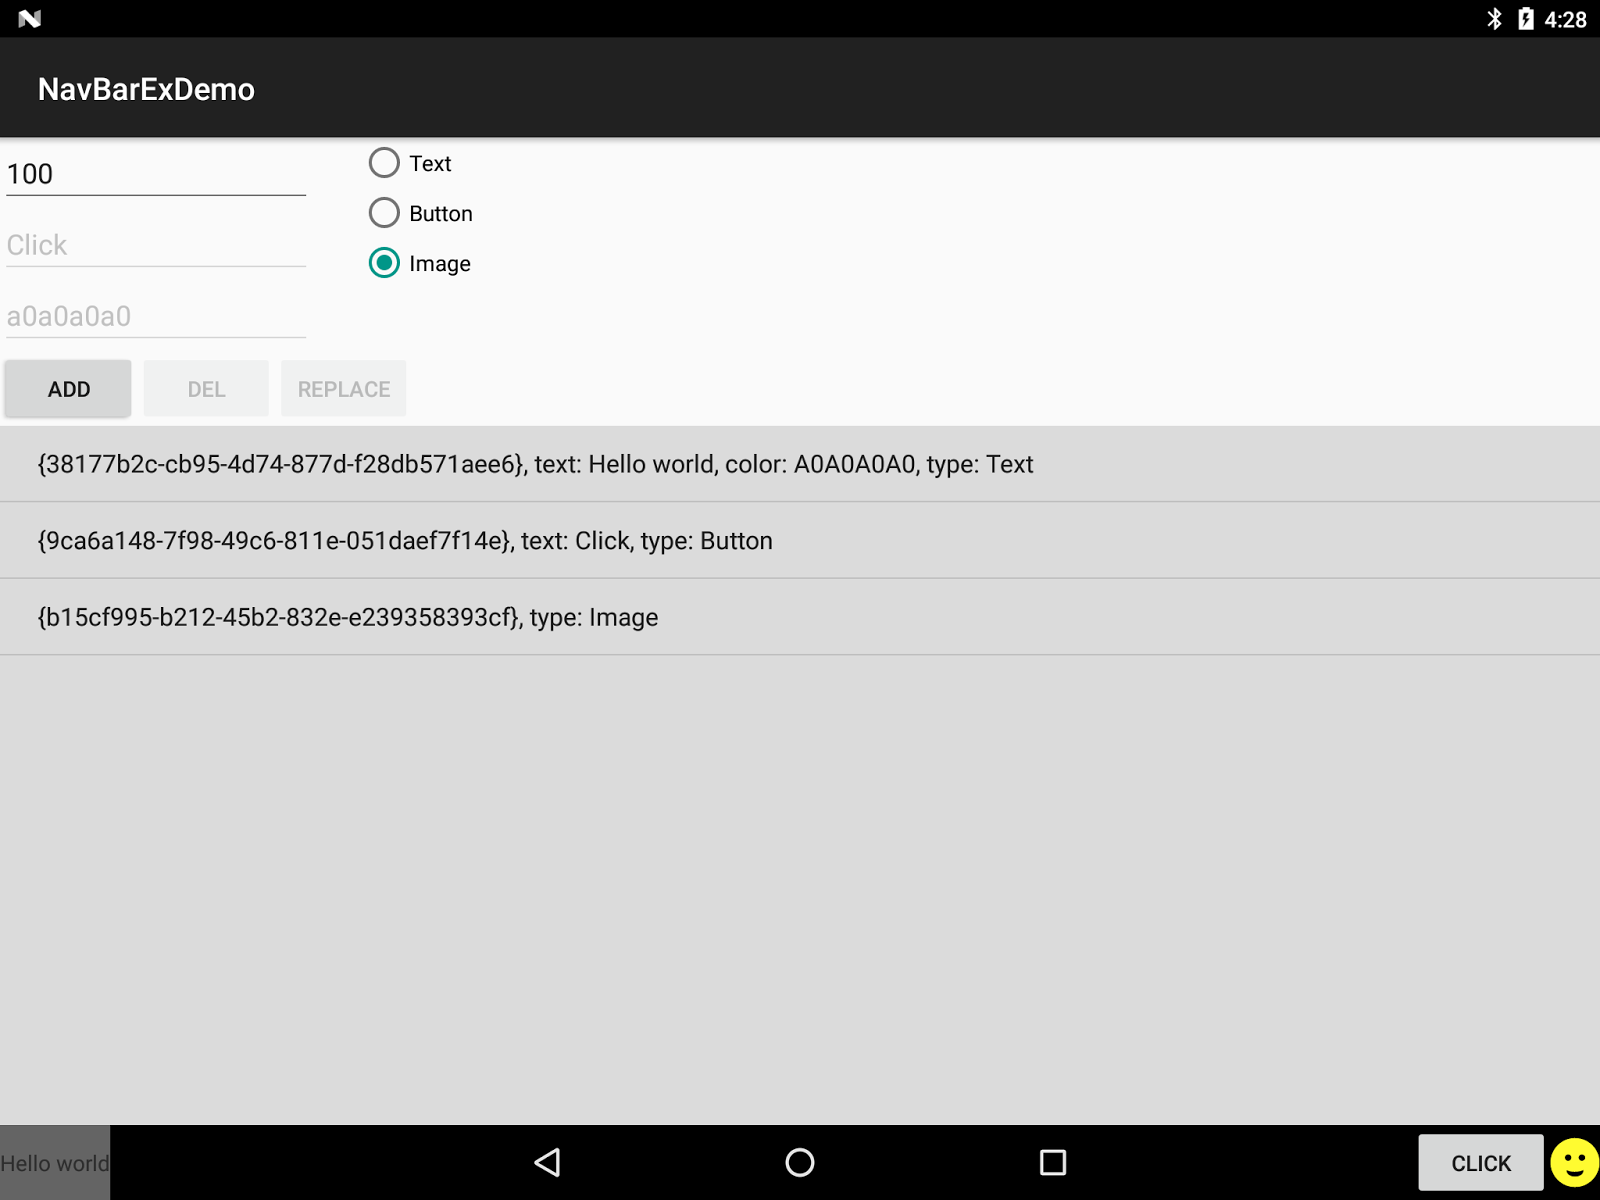
Clicking on the custom element will show a toast even if the demo application is not running (in fact, the system itself will start the process if needed).
Shortcomings
After rebooting, the device will lose all customization. So it would be good to save her somewhere. It would also be nice to add the “gravity” parameter to the API for more precise control of the location of elements.
Summary
We have expanded the Android SDK and implemented a new service designed to customize the Android navigation bar. We also created a custom firmware for the Nexus 9 tablet containing our service.
In the previous article we implemented screen stabilization for the Nexus 7. Here is the same implementation but for the Nexus 9:
PS In fact, I am also the author of the original English version of the article, which was published on blog.lemberg.co.uk , so I can answer technical questions.
Source: https://habr.com/ru/post/331900/
All Articles