Creating a React Real-Time VR Application
The React VR library allows you to write virtual reality applications for the web using JavaScript and React on top of the WebVR API . This specification is supported by the latest (in some cases, experimental) versions of Chrome, Firefox and Edge browsers. And for this you do not need VR glasses.
WebVR Experiments is a showcase site that demonstrates the capabilities of WebVR. My attention was drawn to the project The Musical Forest , created by a wonderful person from Google Creative Lab, who used A-Frame , a web framework for WebVR, developed by the Mozilla VR team.
In Musical Forest, thanks to WebSockets, users can play music together in real time by clicking on geometric shapes. But because of the possibilities and the technologies used, the application turned out to be quite complicated ( source code ). So why not create a similar real-time application on React VR with multiplayer support based on Pusher?
Here’s what React VR / Pusher version looks like:
The user can enter the channel ID in the URL. When you click on a three-dimensional figure, the sound is played and the Pusher event is published, which are received by other users in the same channel, and they hear the same sound.
To publish events, take a Node.js backend, so you need to have some experience with JavaScript and React. If you are new to React VR and the concepts used in VR, then start by reading this material .
Download links (just to try):
→ React VR project .
→ Node.js backend .
We configure the VR project
Let's start by installing (or updating) the React VR CLI tool:
npm install -g react-vr-cli Let's create a new React VR project:
react-vr init musical-exp-react-vr-pusher Go to the directory created by him and execute the command to start the development server:
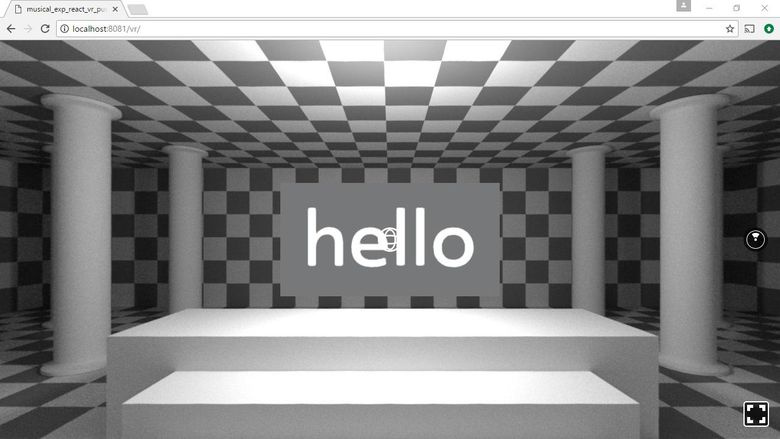
cd musical-exp-react-vr-pusher npm start In the browser, go to http: // localhost: 8081 / vr / . This should appear:
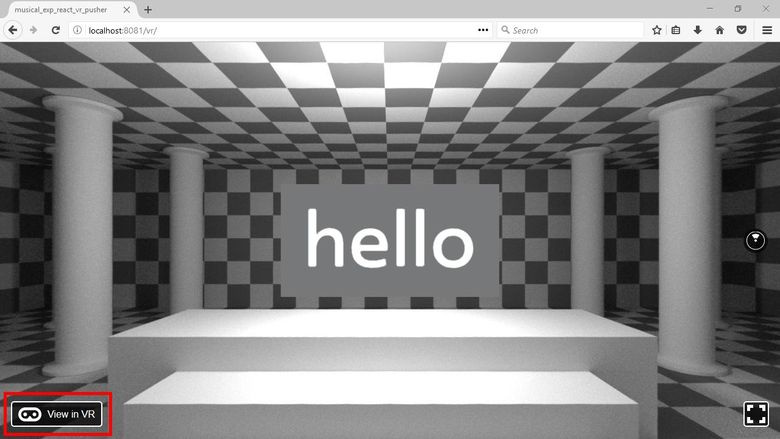
If you are using a compatible browser (like Firefox Nightly under Windows), you should also see the View in VR button, which allows you to view the application with VR glasses:
Let's move on to programming.
Create a background
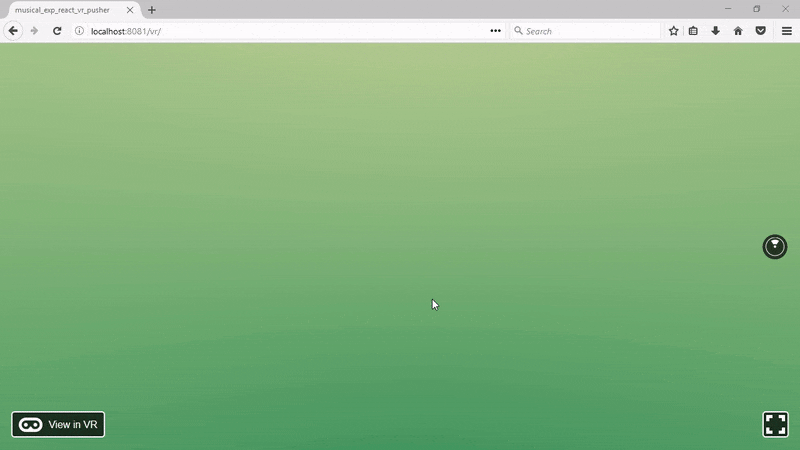
For a background, take an equidistant image ( equirectangular image ). The main feature of such images is that the width should be exactly twice the height. So open your favorite image editor and create a 4096 × 2048 image with a gradient fill. Color - to your taste.

Inside the static_assets directory in the root of the application, create a new images folder, and save the image there. Now open the file index.vr.js and replace the contents of the render method with:
render() { return ( <View> <Pano source={asset('images/background.jpg')} /> </View> ); } Reload the page (or activate the hot reboot ), and see this:
To emulate a tree, use Cylinder . In fact, we need hundreds of them to make the forest around the user. In the original Musical Forest, in the js / components / background-objects.js file, you can find an algorithm that generates trees. If we adapt the code for the React-component of our project, we get:
import React from 'react'; import { View, Cylinder, } from 'react-vr'; export default ({trees, perimeter, colors}) => { const DEG2RAD = Math.PI / 180; return ( <View> {Array.apply(null, {length: trees}).map((obj, index) => { const theta = DEG2RAD * (index / trees) * 360; const randomSeed = Math.random(); const treeDistance = randomSeed * 5 + perimeter; const treeColor = Math.floor(randomSeed * 3); const x = Math.cos(theta) * treeDistance; const z = Math.sin(theta) * treeDistance; return ( <Cylinder key={index} radiusTop={0.3} radiusBottom={0.3} dimHeight={10} segments={10} style={{ color: colors[treeColor], opacity: randomSeed, transform: [{scaleY : 2 + Math.random()}, {translate: [x, 3, z]},], }} /> ); })} </View> ); } The functional component takes three parameters:
trees- the number of trees that should happen in the forest;perimeter- a value that allows you to control the range of drawing trees from the user;colors- an array of tree color values.
Using Array.apply(null, {length: trees}) you can create an array of empty values, to which we apply the map function, to draw an array of cylinders of random colors, transparency, and positions within the View component.
You can save the code in the Forest.js file inside the component directory and use it inside index.vr.js:
... import Forest from './components/Forest'; export default class musical_exp_react_vr_pusher extends React.Component { render() { return ( <View> <Pano source={asset('images/background.jpg')} /> <Forest trees={100} perimeter={15} colors={['#016549', '#87b926', '#b1c96b']} /> </View> ); } }; ... In the browser we will see it . Great, the background is ready, create 3D objects that will create sounds.
Create 3D Forms
You need to create six 3D-forms, when touched, each will play six different sounds. Also useful is a small animation when the cursor is placed and removed from the object.
To create the forms we need VrButton , Animated.View , Box , Cylinder and Sphere . But since all the forms will be different, just encapsulate in the component, it will be the same. Save the following code to the components / SoundShape.js file:
import React from 'react'; import { VrButton, Animated, } from 'react-vr'; export default class SoundShape extends React.Component { constructor(props) { super(props); this.state = { bounceValue: new Animated.Value(0), }; } animateEnter() { Animated.spring( this.state.bounceValue, { toValue: 1, friction: 4, } ).start(); } animateExit() { Animated.timing( this.state.bounceValue, { toValue: 0, duration: 50, } ).start(); } render() { return ( <Animated.View style={{ transform: [ {rotateX: this.state.bounceValue}, ], }} > <VrButton onEnter={()=>this.animateEnter()} onExit={()=>this.animateExit()} > {this.props.children} </VrButton> </Animated.View> ); } }; When the cursor hits the button area, Animated.spring changes the value of this.state.bounceValue from 0 to 1 and shows the bouncing effect. When the cursor leaves the button area, Animated.timing changes the value of this.state.bounceValue from 1 to 0 for 50 milliseconds. For this to work, we wrap the VrButton into the Animated.View component, which will change the rotateX transformation of the View every time the state changes.
In index.vr.js, you can add SpotLight (you can select any other type of light source and change its properties) and use the SoundShape component, thereby making a cylinder:
... import { AppRegistry, asset, Pano, SpotLight, View, Cylinder, } from 'react-vr'; import Forest from './components/Forest'; import SoundShape from './components/SoundShape'; export default class musical_exp_react_vr_pusher extends React.Component { render() { return ( <View> ... <SpotLight intensity={1} style={{transform: [{translate: [1, 4, 4]}],}} /> <SoundShape> <Cylinder radiusTop={0.2} radiusBottom={0.2} dimHeight={0.3} segments={8} lit={true} style={{ color: '#96ff00', transform: [{translate: [-1.5,-0.2,-2]}, {rotateX: 30}], }} /> </SoundShape> </View> ); } }; ... Of course, you can change the properties of 3D-forms, and even replace them with 3D-models .
Now add a pyramid (a cylinder with a zero radius of op radius and four segments):
<SoundShape> <Cylinder radiusTop={0} radiusBottom={0.2} dimHeight={0.3} segments={4} lit={true} style={{ color: '#96de4e', transform: [{translate: [-1,-0.5,-2]}, {rotateX: 30}], }} /> </SoundShape> Cube:
<SoundShape> <Box dimWidth={0.2} dimDepth={0.2} dimHeight={0.2} lit={true} style={{ color: '#a0da90', transform: [{translate: [-0.5,-0.5,-2]}, {rotateX: 30}], }} /> </SoundShape> Parallelepiped:
<SoundShape> <Box dimWidth={0.4} dimDepth={0.2} dimHeight={0.2} lit={true} style={{ color: '#b7dd60', transform: [{translate: [0,-0.5,-2]}, {rotateX: 30}], }} /> </SoundShape> Sphere:
<SoundShape> <Sphere radius={0.15} widthSegments={20} heightSegments={12} lit={true} style={{ color: '#cee030', transform: [{translate: [0.5,-0.5,-2]}, {rotateX: 30}], }} /> </SoundShape> And a triangular prism:
<SoundShape> <Cylinder radiusTop={0.2} radiusBottom={0.2} dimHeight={0.3} segments={3} lit={true} style={{ color: '#e6e200', transform: [{translate: [1,-0.2,-2]}, {rotateX: 30}], }} /> </SoundShape> After import, save the file and update the browser. It should turn out like this:
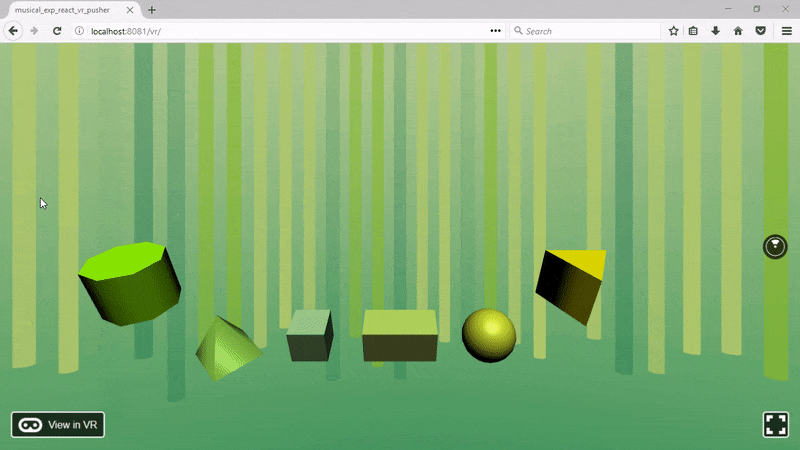
Now add the sounds!
Add sound
Among other things, React VR supports wav, mp3 and ogg files. The full list is here .
You can take samples from Freesound or another similar site. Download what you like and place in the static_assets / sounds directory. For our project, we take the sounds of six animals, a bird , another bird , another bird , a cat , a dog and a cricket (the last file had to be saved to reduce the bitrate, otherwise React VR did not lose it).
React VR provides three sound playback options:
- VrSoundEffects
- The onClickSound event of the VrButton button.
- Sound component.
However, 3D / surround sound supports only the Sound component, so the balance of the left and right channels will change when you move the listener around the stage or when you turn your head. Add it to the SoundShape component, as well as the onClick event in the VrButton :
... import { ... Sound, } from 'react-vr'; export default class SoundShape extends React.Component { ... render() { return ( <Animated.View ... > <VrButton onClick={() => this.props.onClick()} ... > ... </VrButton> <Sound playerState={this.props.playerState} source={this.props.sound} /> </Animated.View> ); } } To control the playback use MediaPlayerState . They will be passed as component properties.
Using the information from index.vr.js, we define an array:
... import { ... MediaPlayerState, } from 'react-vr'; ... export default class musical_exp_react_vr_pusher extends React.Component { constructor(props) { super(props); this.config = [ {sound: asset('sounds/bird.wav'), playerState: new MediaPlayerState({})}, {sound: asset('sounds/bird2.wav'), playerState: new MediaPlayerState({})}, {sound: asset('sounds/bird3.wav'), playerState: new MediaPlayerState({})}, {sound: asset('sounds/cat.wav'), playerState: new MediaPlayerState({})}, {sound: asset('sounds/cricket.wav'), playerState: new MediaPlayerState({})}, {sound: asset('sounds/dog.wav'), playerState: new MediaPlayerState({})}, ]; } ... } And a method to play a sound using the MediaPlayerState object when the right index is passed: ... export default class musical_exp_react_vr_pusher extends React.Component { ... onShapeClicked(index) { this.config[index].playerState.play(); } ... } It remains only to transfer all this information to the SoundShape component. Group our 3D forms into an array and use the map function to generate components:
... export default class musical_exp_react_vr_pusher extends React.Component { ... render() { const shapes = [ <Cylinder ... />, <Cylinder ... />, <Box ... />, <Box ... />, <Sphere ... />, <Cylinder ... /> ]; return ( <View> ... {shapes.map((shape, index) => { return ( <SoundShape onClick={() => this.onShapeClicked(index)} sound={this.config[index].sound} playerState={this.config[index].playerState}> {shape} </SoundShape> ); })} </View> ); } ... } Restart the browser and try to click on the objects, you will hear different sounds.
With Pusher, we’ll add real-time multi-user support to the React VR application.
Customize Pusher
Create a free account at https://pusher.com/signup . When you create an application, you will be asked to configure something:
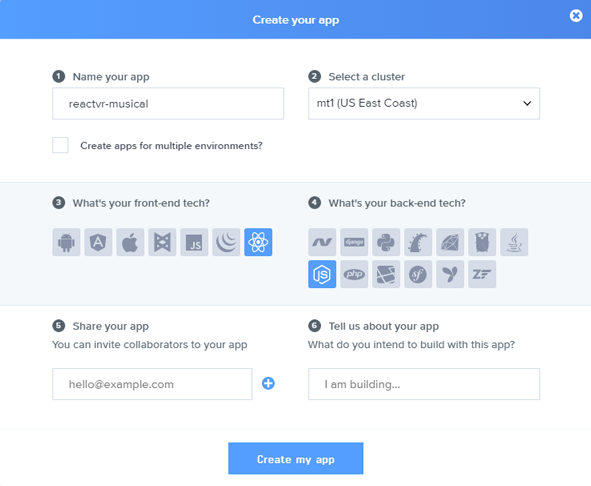
Enter a name, select React as the front end, and Node.js as the backend. Sample code to get you started:
Do not worry, you are not forced to adhere to a specific set of technologies, you can always change them. With Pusher, you can use any combination of libraries.
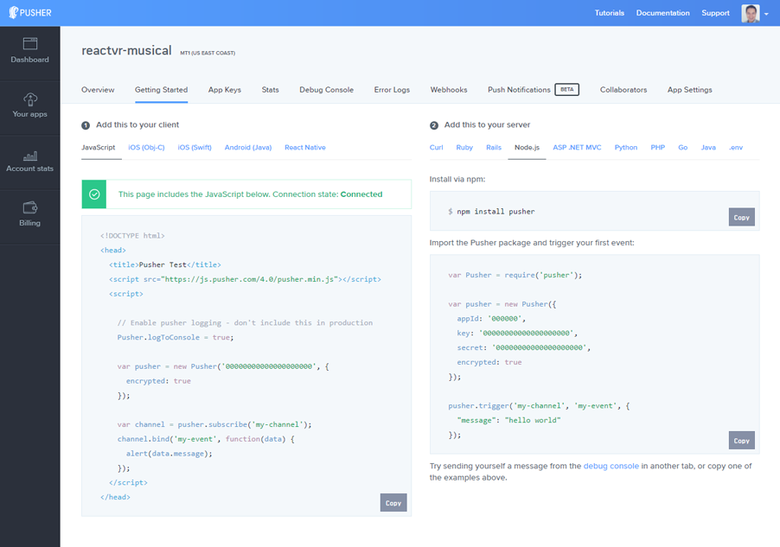
Copy the cluster ID (comes after the name of the application, in this example, mt1), application ID, key and secret information, we will need it. All this can also be found in the App Keys tab.
We publish the event
React VR works as a Web Worker (more on the React VR architecture in the video ), so we need to include the Pusher-worker script in index.vr.js:
... importScripts('https://js.pusher.com/4.1/pusher.worker.min.js'); export default class musical_exp_react_vr_pusher extends React.Component { ... } There are two conditions that must be met. First, you need to be able to pass an identifier via a URL (like http: // localhost: 8081 / vr /? Channel = 1234 ) so that users can choose which channels to go in and share with friends.
For this we need to read the URL. Fortunately, React VR comes with a native Location module , which makes the properties of the window.location object available for the React context.
Now you need to contact the server that publishes the Pusher event so that all connected clients can play it too. But we do not need the client who generated the event to receive it either, because in this case the sound will be played twice. And what's the point of waiting for an event to play a sound, if it can be done immediately, as soon as the user clicks on the object.
Each Pusher connection is assigned a unique socket ID. To prevent recipients from accepting events in Pusher, you need to transfer the client's socket_id server, which you need to exclude when the event fires (more on this here ).
Thus, by slightly adapting the getParameterByName function to read URL parameters and retaining socketId when successfully connected to Pusher, we can meet both requirements:
... import { ... NativeModules, } from 'react-vr'; ... const Location = NativeModules.Location; export default class musical_exp_react_vr_pusher extends React.Component { componentWillMount() { const pusher = new Pusher('<INSERT_PUSHER_APP_KEY>', { cluster: '<INSERT_PUSHER_APP_CLUSTER>', encrypted: true, }); this.socketId = null; pusher.connection.bind('connected', () => { this.socketId = pusher.connection.socket_id; }); this.channelName = 'channel-' + this.getChannelId(); const channel = pusher.subscribe(this.channelName); channel.bind('sound_played', (data) => { this.config[data.index].playerState.play(); }); } getChannelId() { let channel = this.getParameterByName('channel', Location.href); if(!channel) { channel = 0; } return channel; } getParameterByName(name, url) { const regex = new RegExp("[?&]" + name + "(=([^&#]*)|&|#|$)"); const results = regex.exec(url); if (!results) return null; if (!results[2]) return ''; return decodeURIComponent(results[2].replace(/\+/g, " ")); } ... } If there are no channel parameters in the URL, then ID 0 is assigned by default. This ID will be added to the Pusher channel to make it unique.
Finally, we need to call endpoint on the server side, which will publish the event, passing the client's socket ID and channel in which the events will be posted:
... export default class musical_exp_react_vr_pusher extends React.Component { ... onShapeClicked(index) { this.config[index].playerState.play(); fetch('http://<INSERT_YOUR_SERVER_URL>/pusher/trigger', { method: 'POST', headers: { 'Accept': 'application/json', 'Content-Type': 'application/json', }, body: JSON.stringify({ index: index, socketId: this.socketId, channelName: this.channelName, }) }); } ... } This is all the code for the React part. Now let's deal with the server.
Create a Node.js backend
Using the command, we generate the package.json file:
npm init -y
Add dependencies:
npm install --save body-parser express pusher And save this code to a file:
const express = require('express'); const bodyParser = require('body-parser'); const Pusher = require('pusher'); const app = express(); app.use(bodyParser.json()); app.use(bodyParser.urlencoded({ extended: false })); /* , React VR . , middleware */ app.use((req, res, next) => { res.header("Access-Control-Allow-Origin", "*") res.header("Access-Control-Allow-Headers", "Origin, X-Requested-With, Content-Type, Accept") next(); }); const pusher = new Pusher({ appId: '<INSERT_PUSHER_APP_ID>', key: '<INSERT_PUSHER_APP_KEY>', secret: '<INSERT_PUSHER_APP_SECRET>', cluster: '<INSERT_PUSHER_APP_CLUSTER>', encrypted: true, }); app.post('/pusher/trigger', function(req, res) { pusher.trigger(req.body.channelName, 'sound_played', { index: req.body.index }, req.body.socketId ); res.send('ok'); }); const port = process.env.PORT || 5000; app.listen(port, () => console.log(`Running on port ${port}`)); As you can see, we set up an Express server, a Pusher object, and a route / pusher / trigger, which simply triggers an event with a sound index for playback and a socketID to exclude the receiver of the event.
All is ready. Let's test.
We are testing
Perform a Node.js backend with the command:
node server.js
Update the server URL in index.vr.js (using your IP instead of localhost) and in two browser windows we will open an address like http: // localhost: 8081 / vr /? Channel = 1234 . When you click on a 3D form, you will hear a double-lost sound (this is much more fun to do with friends on different computers):
Conclusion
React VR is an excellent library that makes it easy to create VR projects, especially if you already know React / React Native. If you add to this Pusher, you get a powerful complex web application development of a new generation.
You can build the production release of this project for deployment on any web server: https://facebook.imtqy.com/react-vr/docs/publishing.html .
You can also change colors, shapes, sounds, add more features from the original Musical Forest .
You can download the project code from the GitHub repository.
')
Source: https://habr.com/ru/post/331816/
All Articles